Got a tip for us?

iPhone

The iPhone is a smartphone from Apple that runs the iOS mobile operating system. Between its apps, communication features, the camera, mobile internet access, and other functionalities, the iPhone has quickly become an integral part of many peoples tech lives.

On supported iPhone models, Night mode automatically brightens photos and captures more detail in low light. Your iPhone sets the exposure time automatically, but you can adjust it manually if needed.

It’ll turn on by itself in low-light situations. For even more detail, you can choose between the available exposure options, and your selection is saved for your next Night mode photo. A tripod can help you get even more detailed Night mode photos, too.

Quick tip: Use a tripod for even more detailed Night mode photos.

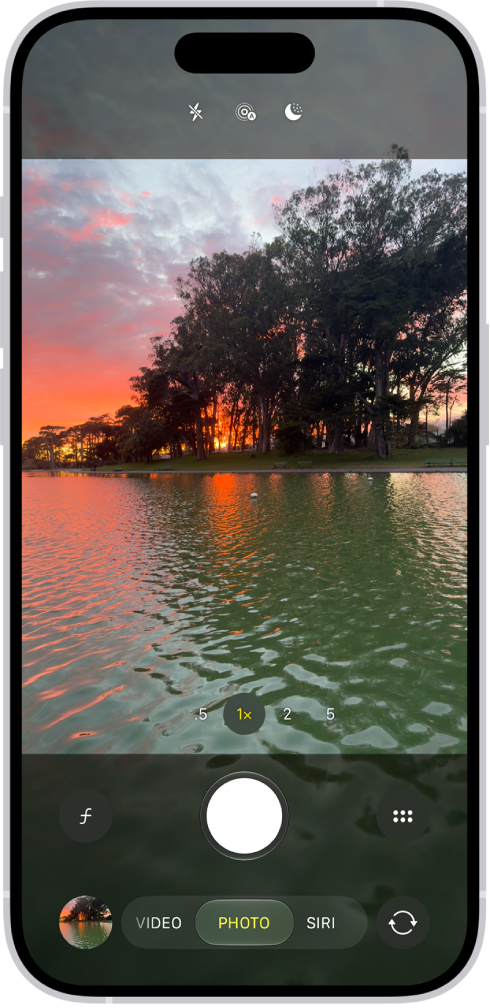
The Camera screen in Photo mode. Within the viewfinder is a night scene. Buttons for Night and Camera Controls mode appear in the top-right corner of the screen. At the bottom of the screen are, from left to right, the Photo and Video Viewer button, Video and Photo Mode, and the Camera Chooser Back-Facing button.

  1. Open Camera on your iPhone.

    In low-light situations, Night mode turns on automatically. To turn it off and on, tap the Night mode button.

  2. For even more detail, tap the Camera Controls button. Then tap Night Mode and choose between the available exposure options. Your selection is saved for your next Night mode photo.
  3. Tap the Shutter button, or click the Camera Control on (supported models) and then hold your iPhone still to take your shot.

    If crosshairs appear in the frame, your iPhone has detected movement—align them to help you reduce motion and improve the image quality.

    To cancel a Night capture in progress, tap the Stop button.

Supported models can take Night mode selfies and time-lapse videos, too.

You can also take Night mode photos with Portrait mode on supported models.

Tag: Photos

You can select any text to translate in apps such as Notes, Mail, and supported third-party apps. When you enter text, you can even replace what you wrote with a translation.

You can choose the languages you want to translate from and to, and hear the original text or its translation spoken. You can also download languages, so you can translate locally on your iPhone. Translation is available for supported languages.

Note: Translation is available for supported languages.

  1. Go to an app like Notes or Mail on your iPhone.
  2. Select the text you want to translate and tap Translate.

    If you don’t see Translate, tap the Show More Items button to see more options.

  3. Tap the Language Menu. Choose the languages you want to translate your selected text from and to.
  4. To hear the text spoken, tap More. Tap the Gray Play button on the original text or its translation.
  5. Swipe down to see options for any of the following:

    • Replace your original, editable text with the translation: Tap Replace with Translation.
    • Translate locally on your iPhone: Tap Download Languages.

Note: Not all options are available with all translation apps.

When you want the text in your sticky notes, shapes, or text boxes to have a consistent look in Freeform, for example, font, size, and color, you can copy the style from one item and paste it in another. You can also save styles.

A saved style goes further: every time you add another item like that, it uses the saved style. And when you paste a style, Freeform matches what fits the item, like fonts, line weight, or color, or the corners and shadows of linked or placed files.

  1. Open the Freeform app on your iPhone.
  2. Tap an item on a board and make any adjustments to the formatting—so it has the style you want to copy.
  3. When you have an item that’s formatted in a style you like, tap it to show its formatting tools.
  4. Tap the More button in the formatting tools, tap Style, and then tap Copy Style.
  5. Tap to select and show the formatting tools for an item whose style you want to change.
  6. Tap the More button, tap Style, and then tap Paste Style.

Fonts, line weight, or color are matched, depending on the item you paste a style into.

Pasted styles update the corners and shadows of linked or placed files.

Quick tip: When you like how an item looks, save its style, and every item like that you add to your board afterward uses it. Tap to select the text box, then tap the More button in the formatting tools. From there, tap Style and choose Save as Insert Style.

You can take a Hearing Test with your AirPods Pro 2 to provide insight into your hearing. Hearing Test results, or audiograms, depict the results of a pure-tone audiometry test, showing how loud sounds need to be for you to hear them.

The difference between the decibel level you need and a normal level indicates your level of hearing loss. If there’s no difference, your hearing is normal, and if there’s some or a lot of difference, your hearing is impaired.

Note: The Hearing Test is available for ages 18 and older. Not available in all countries or regions.

Take a Hearing Test

  1. Start the Health app on your iPhone.
  2. Tap Browse and then tap Hearing.
  3. Scroll down to Get More From Health. Tap Take Hearing Test.
  4. Tap Get Started, then follow the onscreen instructions.

Your Hearing Test results are in the Health app for you to review. To share them with your hearing healthcare professional, you can export a PDF version of your audiogram.

Tag: Health

iPhone offers useful insights into your battery life to help you identify ways to improve your experience, as well as important information about your battery’s overall health.

You can see how your battery usage today compares to previous days, view App and System Activity information, and see when your iPhone was last charged. You can also review your iPhone battery health.

Here’s how to understand your iPhone battery usage and health.

View Daily Usage information

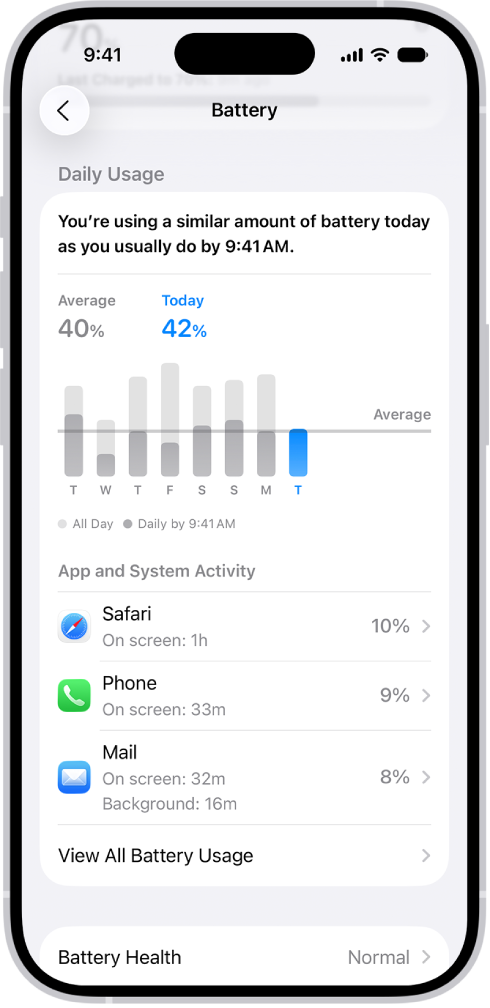
The Daily Usage section compares your battery usage today with previous days, and iPhone displays the following battery usage information:

  • Similar or lower usage: Shows when your battery use is about the same as usual or less than usual by this time of day (in blue). When usage is similar, iPhone highlights the top three apps or system activities contributing to today’s usage.
  • Higher usage: Appears when you’ve used more battery than usual by this time of day (in orange). iPhone highlights the top three apps or system activities that may explain the increase.

The Battery Usage screen in Settings on iPhone displays graphs and information about battery consumption. At the top, a bar graph shows battery usage over the last eight days. Below it, a second graph details the battery level throughout the current day, indicating periods of charging.

To view daily usage information:

  1. Open the Settings app on your iPhone.
  2. Tap Battery.

View additional Battery Usage information

For today and the previous week, you can dig into more information about app and system activity usage.

  1. Open the Settings app on your iPhone.
  2. Tap Battery, tap View All Battery Usage, and tap a day.

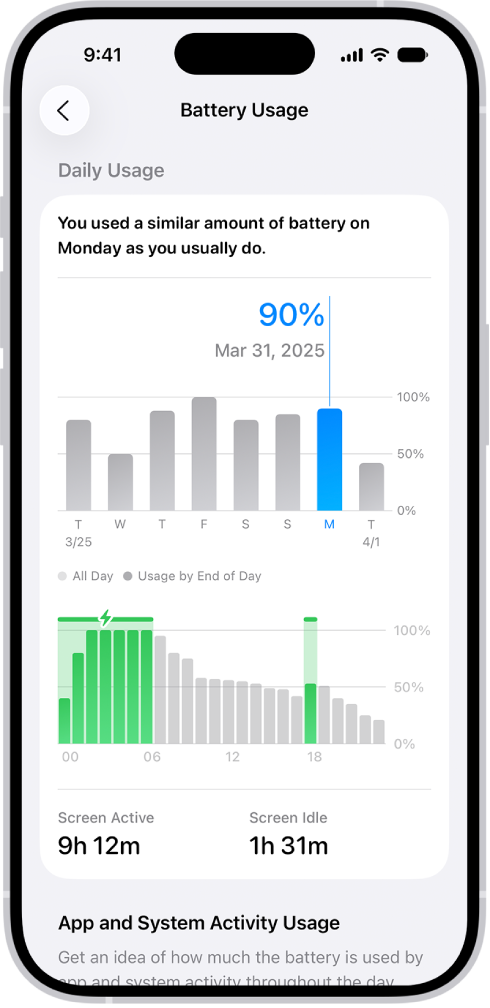
    The Battery Usage screen in Settings on iPhone. It shows two graphs: the top graph displays daily battery usage for the last week, and the bottom graph details the battery level throughout the selected day, including periods of charging. Below the graphs, it summarizes total screen active and screen idle time.

View App and System Activity information

To help you understand what’s using your battery, the App and System Activity section lists the percentage of battery each app and system task used.

You might see the following information under an app or system activity, or when you tap an app to view more details. Here’s what they mean:

  • On screen: The app or system activity was open and visible on your screen. A long duration of onscreen time can explain higher battery usage compared to previous days.
  • Background: A long duration of background time can explain higher battery usage compared to previous days. Background activities include directions, playing music, syncing photos, fetching mail, and more.
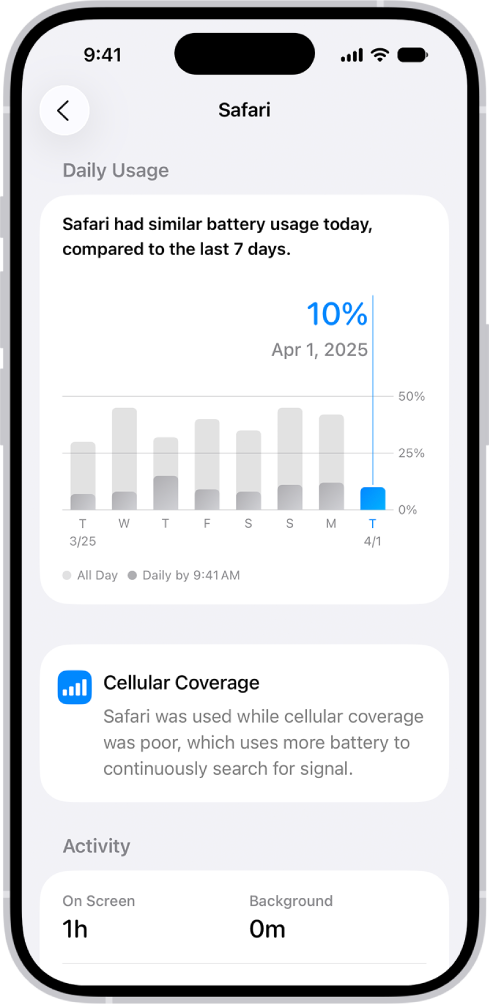
  • Cellular coverage: The app was used in a low signal environment, which used more battery.
  • Notifications: The app or system activity woke your device and used battery to check for new information. You can manage an app’s notification settings to reduce how often this happens.

The Battery Usage screen in Settings on iPhone displays the “App and System Activity Usage” list, breaking down battery consumption by app. Each app is listed with its corresponding percentage of battery usage and its on-screen or background activity time.

To view app and system activity information:

  1. Open the Settings app on your iPhone.
  2. Do any of the following:
    • View today: Tap Battery, then scroll down.
    • View additional battery information for today and previous days: Tap Battery, tap View All Battery Usage and tap a day. Then scroll down.
  3. Tap an app to view more details, including its battery usage and activity for each day.

See when your iPhone was last charged

iPhone shows when it was disconnected from the charger and when the battery was last fully charged. And while it’s charging, iPhone displays estimated times to reach 80% and 100%.

  1. Open the Settings app on your iPhone.
  2. Tap Battery.

Review your iPhone battery health

You’ll find information about your battery’s capacity on iPhone. And on iPhone 15 models or later, details like battery health, first use date, cycle count, and manufacture date show up, too.

  1. Open the Settings app on your iPhone.
  2. Tap Battery, then do one of the following:
    • On iPhone 14 or earlier: Tap Battery Health & Charging.
    • On iPhone 15 or later: Tap Battery Health.

Battery life and charge cycles vary with use and settings.

The iPhone battery should be serviced or recycled by Apple or an Apple Authorized Service Provider.

Tag: Health

In the Find My app, you can turn on separation alerts for an AirTag or other item so you don’t accidentally leave it behind. You receive an alert every time the device sharing your location separates from the item, unless you’re in a Trusted Location.

For separation alerts to work, notifications for the Find My app need to be allowed, and you can choose a suggested Trusted Location or add a new one on the map.

Important: In order to receive separation alerts, make sure you allow notifications for the Find My app.

  1. Start the Find My app on your iPhone.
  2. Tap Items and tap the name of the item you want to set an alert for. Then tap the More button.
  3. Tap When Left Behind and then turn on Notify When Left Behind.
  4. If you want to add a Trusted Location, you can choose a suggested location, or tap New Location, select a location on the map.
  5. Tap the Done button.
Tag: Find My

In the Reminders app, you can use multiple accounts—such as iCloud, enterprise-managed iCloud, Microsoft Exchange, and Yahoo—and keep all your to-do lists in one place. Your reminders stay up to date on all your devices that use the same accounts.

They appear on your iPhone, iPad, Apple Watch, and Mac when you’re signed in to the same Apple Account. Reminders from iOS 12 or earlier may need an update in iCloud before you get features like attachments and flags.

Note: Some features aren’t available with other accounts. To use all the Reminders features described in this guide, you need updated reminders in iCloud.

Keep your reminders up to date on all your devices with iCloud

  1. Open the Settings app on your iPhone.
  2. Tap your name.
  3. Tap iCloud, tap See All, and turn on Reminders.

Sign in to the same Apple Account on your iPhone, iPad, Apple Watch, and Mac, and your reminders stored in iCloud show up on each one, changes included.

Update your reminders stored in iCloud

Features such as attachments, flags, list colors and icons, and more may require an update to your reminders stored in iCloud if you’ve been using Reminders with iOS 12 or earlier.

  1. Open the Settings app on your iPhone.
  2. Tap your name.
  3. Tap iCloud, tap See All, and make sure Reminders is turned on.
  4. Open the Reminders app.
  5. On the Welcome to Reminders screen, choose one of the following options:
    • Update Now: Begin the update process.
    • Update Later: A blue Update button appears above your lists; tap it when you’re ready to update your reminders.

Note: Updated reminders don’t work with the Reminders app in earlier versions of iOS and macOS, because they aren’t backward compatible.

Add other accounts

If your to-do lists are in other accounts, such as Microsoft Exchange and Yahoo, you can manage them in the Reminders app, too.

  1. Open the Settings app on your iPhone.
  2. Tap Apps and tap Reminders.
  3. Tap Reminders Accounts and tap Add Account.
  4. Do one of the following:
    • Choose an account provider, then enter your account information.
    • If your account provider isn’t listed, tap Other, tap Add CalDAV Account, enter your account information, then turn on Reminders for that account.

Remove an account

If you remove or delete an account, the reminders in it stop appearing on your iPhone, but they remain in your internet account, such as iCloud.com or Microsoft Exchange, and on any other devices you had already set up.

  1. Open the Settings app on your iPhone.
  2. Tap Apps and tap Reminders.
  3. Tap Reminders Accounts. Then tap the account you want to remove.
  4. Do one of the following:

    • Stop using Reminders on the account: Turn off Reminders.

      You can continue to use the account for other services, such as Calendar.

    • Stop using all services on the account: Tap Sign Out (for an iCloud account) or Delete Account (for other accounts).

Your account may be managed by your organization if you don’t see Sign Out or Delete Account. Ask an administrator for removal instructions.

If you use Magic Keyboard or another physical keyboard with iPhone, you can use Full Keyboard Access to control your device with keyboard shortcuts instead of the touchscreen. Full Keyboard Access highlights the item on the screen that has focus.

You don’t need to memorize the shortcuts, either, because Full Keyboard Access can show you a list of the available commands. You can also customize the commands and the focus highlight.

Here’s how to control iPhone with an external keyboard.

Control iPhone using Full Keyboard Access

  1. Open Settings, tap Accessibility, tap Keyboards & Typing and tap Full Keyboard Access. Then turn on Full Keyboard Access.
  2. Navigate iPhone using the following default commands.
Action Shortcut
View available Full Keyboard Access commands Tab-H
Move forward Tab
Move backward Shift-Tab
Activate the selected item Space bar
Go to the Home Screen Fn-H
Open the App Switcher Fn-Up Arrow
Open Control Center Fn-C
Open Notification Center Fn-N

Customize Full Keyboard Access

Full Keyboard Access commands come with keyboard shortcuts that you can change. And to customize the appearance of Full Keyboard Access, you can adjust the color, contrast, and size of the highlight.

  1. Open Settings, tap Accessibility and tap Keyboards & Typing. Then tap Full Keyboard Access.
  2. Do any of the following:
    • View a complete list of Full Keyboard Access commands and customize them: Tap Commands.
    • Change the look of Full Keyboard Access: Tap an option below Appearance.

After you subscribe to Apple Music, you can create an Apple Music profile that features your favorite playlists and what you’re currently listening to. You can share your profile with friends you invite or with other Apple Music subscribers.

After you create a profile, you can choose the playlists you want to share. You can also follow friends. View profiles they’ve created, or request to follow them and see what they’re listening to.

Here’s how to create an Apple Music profile on iPhone.

Create a profile

  1. Open the Music app on your iPhone.
  2. Tap the My Account button.
  3. Tap Set up Profile and then follow the onscreen instructions to create a profile.

With your profile set up, you can find friends whose music profile you’d like to follow. To show friends what you’re listening to, choose who you share music with.

Note: If you’re the organizer of a Family Sharing group, you can allow children ages 13 to 18 to create Apple Music profiles (or prevent them from doing so). Children under 13 can’t create Apple Music profiles. (Age restrictions vary by region.)

Edit your profile

  1. Open the Music app on your iPhone.
  2. Tap the My Account button or your profile picture.
  3. Tap Music Profile at the top of the screen, then tap Edit to make updates.

To choose who you share music with, or which music to share with your followers, edit your profile.

Delete your profile

Deleting your profile means your playlists and music no longer appear in searches, and your followers can’t see your music or profile.

Note: You can delete your profile without affecting your Apple Music subscription, library, or playlists, but you’ll no longer see what your friends are listening to.

  1. Open the Music app on your iPhone.
  2. Tap the My Account button or your profile picture.
  3. Tap Music Profile at the top of the screen and tap Edit.
  4. Scroll to the bottom, then tap Delete Profile.

Create your profile again within 90 days, and your previous information and followers are restored.

Note: Your profile might stay visible to your followers or in searches for several minutes after you delete it.

Tag: Music

Focus is a feature that helps you concentrate on a task by minimizing distractions. When you want to concentrate on a specific activity, you can customize one of the provided Focus options, for example Work, Personal, or Sleep, or create a custom Focus.

You can use Focus to temporarily silence all notifications, or allow only specific notifications, ones that apply to your task, for example, and let other people and apps know you’re busy. Focus filters are available, too, and your Focus settings can stay up to date across all your Apple devices.

Quick tip: Open Control Center, tap Focus, and turn on Do Not Disturb to silence all notifications quickly.

There’s also the Reduce Interruptions Focus, where Apple Intelligence shows you only the most important notifications.

Note: Apple Intelligence on iOS 27 or later is available on an Apple Intelligence-enabled iPhone 15 Pro, iPhone 15 Pro Max, or iPhone 16 model or later. Apple Intelligence is not available in all languages or regions. Usage limits may apply.*

Set up a Focus

  1. Open the Settings app on your iPhone.
  2. Tap Focus. Then tap a Focus—for example, Do Not Disturb, Personal, or Work.
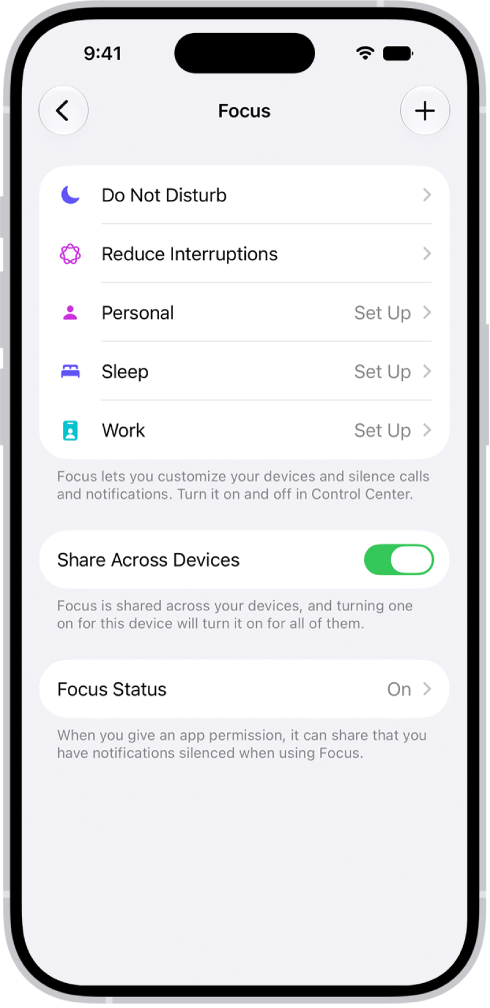
    A screen showing five provided Focus options—Do Not Disturb, No messages during calls, Sleep, Personal, and Work. The Share Across Devices option is on, which allows the same Focus settings to be used across your Apple devices.

  3. Do any of the following:

    • Choose which people to allow notifications from during your Focus: Tap People.
    • Choose which apps to allow notifications from during your Focus: Tap Apps.
    • Choose whether to show silenced notification on the Lock Screen, darken the Lock Screen when the focus is on, and more: Tap Options.
    • Choose a customized Lock Screen or Home Screen page to switch to while the Focus is on to help limit distractions: Choose the Lock Screen or Home Screen.
    • Have the Focus turn on automatically at a set time, location, or while using a certain app: Tap Add Schedule.
    • Customize how your apps and device behave when the Focus is on: Tap Add Filter.
    • Use Apple Intelligence to allow important notifications to interrupt you: Turn on Intelligent Breakthrough & Silencing. Any notifications specifically allowed or silenced will always be allowed or silenced.

Add Focus filters

When you set up a Focus, the app filters you add determine what information apps show during it. You can choose which calendar or mail account to use during the Focus, for example.

  1. Open the Settings app on your iPhone.
  2. Tap Focus. Then tap the Focus you want to add filters to.
  3. Scroll down to Focus filters and tap Add Filter.
  4. Tap an app or system filter. Then select the information from that app you want to use during the Focus.
  5. Tap Add to add the filter to the Focus.

Note: With Share Across Devices turned on, Focus filters don’t sync across devices. If you want to turn it off, go to the Settings app and tap Focus.

Create a custom Focus

Want to focus on an activity unlike any of the provided Focus options? Create a custom Focus.
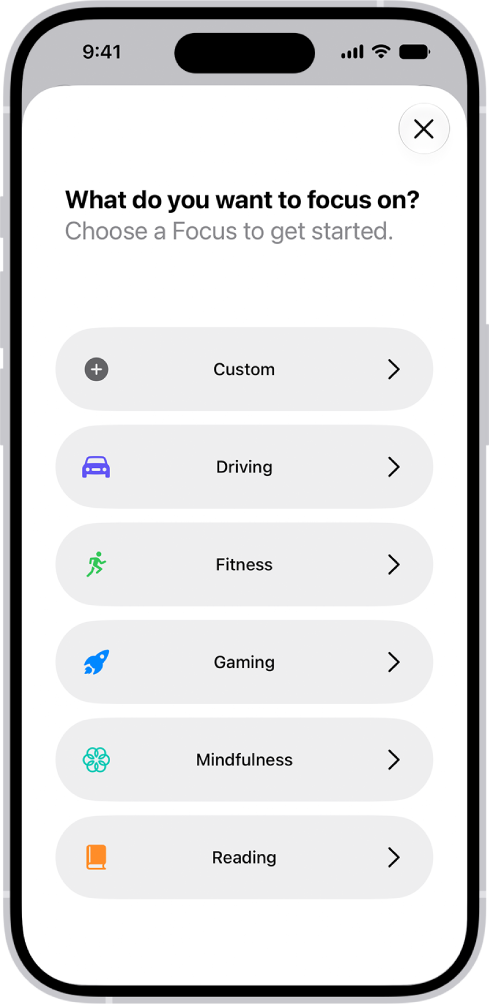
A Focus setup screen for the additional provided Focus options, including Custom, Driving, Fitness, Gaming, Mindfulness, and Reading.

  1. Go to the Settings on your iPhone.
  2. Tap Focus and tap the Add button. Tap Custom.
  3. Enter a name for your Focus, choose a color and an icon to represent your Focus, and then tap Next.
  4. Tap Customize Focus. Then set up the options for your custom Focus.

Keep your Focus settings up to date across all your Apple devices

Your Focus settings can be the same on every Apple device where you’re signed in to the same Apple Account.

  1. Open the Settings app on your iPhone.
  2. Tap Focus and then turn on Share Across Devices.

Note: If you turn on Share Across Devices and also turn on Share Focus Status, your Focus can let others know you have notifications silenced. Say you silence notifications when you Set up a Focus. Anyone who texts you then sees that your notifications are silenced. On a person’s contact card, you can change this setting for that person alone.

*Apple Intelligence is available with Siri and device language set to Chinese (Simplified), Chinese (Traditional), Danish, Dutch, English, French, German, Italian, Japanese, Korean, Norwegian, Portuguese, Spanish, Swedish, Turkish, or Vietnamese. Some features may not be available in all regions or languages. Some devices may not be available in all regions.

Siri AI is available in beta in iOS 27, iPadOS 27, macOS 27, watchOS 27, and visionOS 27 and requires an Apple Intelligence–enabled device set to a supported language. Available in English to start. Siri AI will not be initially available in the EU on iOS, iPadOS, and watchOS. Certain Apple Intelligence features that rely on server-side models are subject to daily usage limits, including but not limited to Siri AI, Intelligent Photo Editing Tools, Image Playground, and AFM 3 Cloud models in Shortcuts.

Daily limits may vary by feature, request complexity, system demand, system policies, and other factors. Expanded access to such features will be available for a fee in the future. Use of these features is subject to the Apple Intelligence Terms and Conditions.


Tag: Focus