Got a tip for us?

iPhone

The iPhone is a smartphone from Apple that runs the iOS mobile operating system. Between its apps, communication features, the camera, mobile internet access, and other functionalities, the iPhone has quickly become an integral part of many peoples tech lives.

You can wirelessly charge iPhone using a Qi-certified charger (sold separately). You can also use a Qi-certified charger to charge AirPods.

It works with the power adapter that came with your charger, or one the manufacturer recommends, and when iPhone is lined up properly on the charger, you’ll see the Battery Charging icon in the status bar.

Charge iPhone or AirPods with a Qi-certified charger

  1. Connect the charger to power. Use the power adapter that came with your charger or a power adapter recommended by the manufacturer.
  2. Do one of the following:
    • iPhone: Place iPhone face up on the center of the charger. When iPhone is aligned properly with the charger, the Battery Charging icon appears in the status bar.
    • AirPods 2 (with Wireless Charging Case), AirPods 3, AirPods 4 (with Active Noise Cancellation), and AirPods Pro: Place your AirPods in the charging case, close the lid. Place the case with the status light facing up on the center of the charger. When the case is aligned properly with the charger, the status light turns on for several seconds. Turns off while continuing to charge.
Tag: Battery

In the Notes app, you can send a copy of a note to a friend. You can also share a link to invite people to collaborate in real time on a note or on a folder of notes in iCloud, and everyone will see the latest changes.

You can view activity in a note or a folder, and change sharing settings whenever you need to.

Here’s how to share notes and collaborate on iPhone.

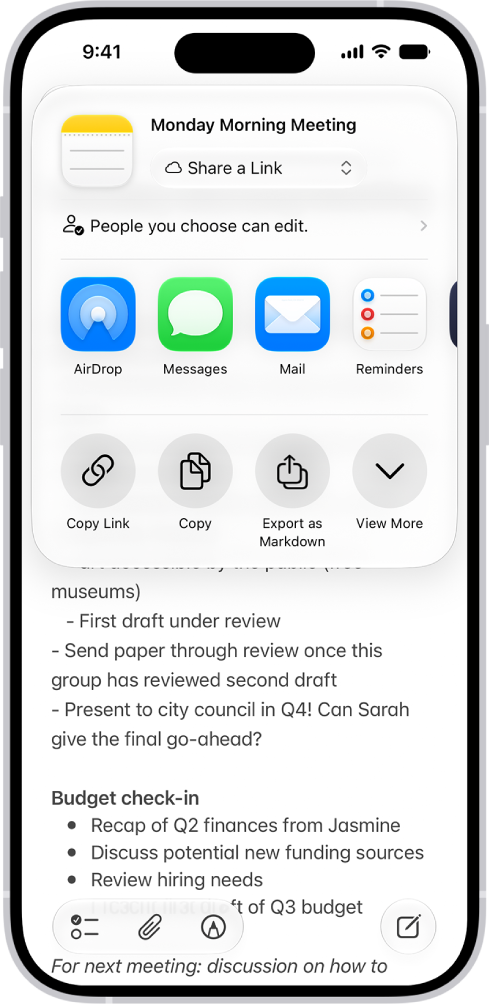
A note with an overlay showing sharing options.

Share a copy of a note

  1. Start the Notes app on your iPhone.
  2. Open the note you want to share.
  3. Tap the Share button, tap the menu under the note title, and then tap Send a Copy.
  4. Choose how to send your note.

Collaborate on a note or folder of notes using iCloud

To collaborate with others, you can share a link to a note or a folder of notes in iCloud. You can set who can access what you share and set editing permissions. All participants see changes in real time. The participants must be signed in to their Apple Account and have Notes turned on in iCloud settings. Note: You can’t collaborate on a locked note or on a folder with locked notes.

  1. Start the Notes app on your iPhone.
  2. Do one of the following:

    • Collaborate on a note: Open the note you want to share, tap the Share button, tap the menu under the note title, and then tap Share a Link.
    • Collaborate on a folder: Open the folder you want to share. Then tap the Folder Actions button.
  3. To change the access and permissions, tap People you choose can edit and then set any of the following:

    • Who can access: Choose People you choose or Anyone with the link. With People you choose, you can turn on Access Requests. Note: Requesting access to a note sends an email to the address associated with the owner’s Apple Account.
    • Permissions: Choose Edit or View and Download Only.

    Tip: If you send the invitation in Messages, you get activity updates in the Messages conversation when someone makes changes in the shared note. Tap the updates to go to the shared note.

View activity in a note

Notes that have changed since you last looked at them get an orange dot to the left of their title in the notes list.

  1. Start the Notes app on your iPhone.
  2. Open the note and then swipe right on the note or swipe up on the Activity card to see who made changes and when.
  3. To adjust how the activity is shown, tap the Collaborate button. Choose any of the following:

    • Show Updates: Shows changes made since you last opened the note.
    • Show All Activity: Shows all activity in the note.
    • Show Highlights: Shows names, dates, and changes made by each participant.

    Tip: To mention a participant and notify them of important updates, type an @ sign followed by their name.

View activity in a folder

  1. Start the Notes app on your iPhone.
  2. Touch and hold the folder. Then tap Show Folder Activity.

Change sharing settings

  1. Start the Notes app on your iPhone.
  2. The owner of a shared note or folder can change the sharing settings by doing one of the following:
    • Manage a shared note: Tap the Collaborate button, then tap Manage Shared Note.
    • Manage a shared folder: Tap the Folder Actions button. Then tap Manage Shared Folder.
  3. Do any of the following:
    • Remove participants or cancel invitations: Tap the participant you want to remove, then tap Remove Participant or Cancel Invitation.
    • Change access and permission settings: To change the settings for one person, tap their name. To change the settings for all participants, tap Sharing Options. Making a participant a Co-Owner allows them to manage participants and permissions for everyone except the owner.
    • Stop sharing: When you choose this option, the shared note or folder is deleted from the devices of the other participants.
Tags: iCloud, Notes

You can share the internet connection from your iPhone with other devices using a feature called Instant Hotspot. It’s useful when your other device doesn’t have internet access from a Wi-Fi network, and it uses the Personal Hotspot on your iPhone.

Other devices can connect to your Personal Hotspot through Wi-Fi, Bluetooth®, or a cable. It shares your iPhone’s cellular connection, and it’s faster to connect your Apple devices if they’re signed in to the same Apple Account.

Other devices can connect to your Personal Hotspot in several ways:

  • Connect your other device to your iPhone through Wi-Fi settings.
  • Pair your two devices with Bluetooth®.
  • Connect your other device to your iPhone with a cable.

Another iPhone, an iPad, a Mac, a Windows device, and more can use the Personal Hotspot on your iPhone.

Note: Personal Hotspot isn’t available with all carriers. Additional fees may apply. The number of devices that can join your Personal Hotspot at one time depends on your carrier and iPhone model. Contact your carrier for more information.

Before you begin

For Instant Hotspot to work, make sure all of these are true:

  • Both devices have Wi-Fi and Bluetooth turned on.
  • The devices are within 30 feet (10 meters) of each other.
  • Both devices meet minimum system requirements for Instant Hotspot.

If you’re using a VPN, its configuration shouldn’t prevent local networking, since that may interfere with some Continuity features.

Sharing your Personal Hotspot with your Apple devices? They connect faster if you’re signed in to the same Apple Account on both.

Note: Personal Hotspot only works by sharing the cellular internet connection on your iPhone, not a Wi-Fi network your iPhone is connected to.

Set up Personal Hotspot on your iPhone

  1. On your iPhone, open the Settings app.
  2. Tap Cellular and then tap Set Up Personal Hotspot.
  3. Follow the onscreen instructions.

Quick tip: Your Personal Hotspot uses your device’s name, so to rename it, you need to change the device name. Go to Settings > General > About, then tap Name.

When you set up your Personal Hotspot, you set up a password to connect to it. To change the password later, go to Settings > Cellular > Personal Hotspot, then tap Wi-Fi password and enter a new password.

With two SIMs set up on your iPhone, Personal Hotspot uses the line you choose for cellular data.

Note: If Cellular Data is turned on in Settings > Cellular and Set Up Personal Hotspot still isn’t an option, ask your carrier about adding Personal Hotspot to your plan.

Turn Personal Hotspot on and off on your iPhone

  1. On your iPhone, open the Settings app.
  2. Tap Personal Hotspot.
  3. Follow the onscreen instructions.

You decide who is allowed to use your Personal Hotspot and can set a password. And if you’re in a Family Sharing group, you can choose whether to share your Personal Hotspot automatically with specific family members.

Connect to a Personal Hotspot with Wi-Fi

Another device can join the Personal Hotspot on your iPhone through Wi-Fi settings, whether it’s a Mac, a Windows device, another iPhone, an iPad, or one of many other devices that can join a Wi-Fi network.

  1. On the device that you want to connect to the Personal Hotspot on your iPhone, do any of the following:
    • On an iPhone: Swipe down from the top-right edge to open Control Center. Tap the Wi-Fi Status menu to turn Wi-Fi on. Then choose your iPhone.
    • On an iPad: Swipe down from the top-right edge to open Control Center. Tap the Wi-Fi Status menu to turn Wi-Fi on. Choose your iPhone.
    • On a Mac: Click the Wi-Fi Status menu in the menu bar and then choose your iPhone.
    • On a Windows device or other device: Follow the manufacturer’s instructions to connect to a Personal Hotspot.
  2. Enter the password you set up for your Personal Hotspot to connect. If you’re connecting another Apple device and you’re signed in to the same Apple Account on both devices, you don’t need to enter a password.

Note: A Mac connected to your Personal Hotspot shows the Personal Hotspot icon in the Mac’s status bar.

To save battery life, your devices automatically disconnect when you’re not using the hotspot.

Connect to a Personal Hotspot with Bluetooth

Instead of Wi-Fi, a Mac or Windows device can connect to the Personal Hotspot on your iPhone using Bluetooth. Both devices need Bluetooth turned on.

  1. On your Mac, open the System Settings app.

    Note: If your Mac has macOS 12.5 or earlier, choose Apple menu > System Preferences.

  2. Click Bluetooth in the sidebar. (You may need to scroll down.)
  3. On your iPhone, open the Settings app and then tap Bluetooth.

    Keep Bluetooth Settings open to make sure that your device is discoverable.

  4. On your Mac, select your iPhone when it appears. (It may take a moment.)

Once it’s connected by Bluetooth, your Mac can use your iPhone’s cellular connection.

To connect your Windows device to your iPhone over Bluetooth, set up a Bluetooth network connection by following the manufacturer’s directions.

Connect to a Personal Hotspot with a USB cable

A Mac or Windows device can also connect to your iPhone’s Personal Hotspot with the USB cable that came with your iPhone. Another cable that fits the ports on your iPhone and the other device works, too.

If you see an alert on your iPhone that says Trust This Computer? tap Trust. You may be asked to enter your device passcode to proceed. If you see an alert on your Mac that says “Allow accessory to connect?” click Allow.

Note: To connect a Windows device to your Personal Hotspot with a USB cable, you need Apple Devices or iTunes installed.

Once it’s connected by a cable, your Mac or Windows device can use your iPhone’s cellular connection.

If your Personal Hotspot isn’t working

  • Make sure that your devices have Wi-Fi and Bluetooth turned on.
  • Your devices must be within 30 feet (10 meters) of one another.
  • Maximize compatibility in Settings > Personal Hotspot, then enable Maximize Compatibility. Maximize Compatibility may reduce performance for devices connected to your Personal Hotspot when turned on.

When you share a Personal Hotspot from your iPhone, it uses cellular data for the internet connection. To monitor your cellular data network usage, go to Settings > Cellular.

With Family Sharing, any member of your family can use your Personal Hotspot.

With your physical and virtual card numbers saved in Apple Wallet, you can use AutoFill to automatically fill in payment information in apps and online where Apple Pay isn’t available. You can add, edit, and remove AutoFill cards to manage your saved payment methods.

Your AutoFill cards are saved in iCloud Keychain so you can access them on your other devices where you’re signed in to the same Apple Account. Even a credit or debit card that doesn’t support Apple Pay can be added to Apple Wallet this way.

Save a physical card number in Apple Wallet

You can add a credit or debit card number to Apple Wallet even if the card doesn’t support Apple Pay.

  1. Start the Wallet app on your iPhone.
  2. Tap the More button, then tap AutoFill.
  3. Authenticate with Face ID, Touch ID, or your passcode. Tap Add Card.
  4. Position your card in the frame to scan the information, or enter the card details manually.

Update or remove AutoFill cards

You can manage your AutoFill cards, including editing or deleting the payment information.

  1. Start the Wallet app on your iPhone.
  2. Tap the More button, then tap AutoFill.
  3. Authenticate with Face ID, Touch ID, or your passcode. Tap a card to see the details.
  4. Do any of the following:
    • Update the card information: Tap Edit.
    • Delete the card information: Tap Remove From AutoFill.

Note: Removing a card from AutoFill doesn’t remove it from Apple Pay.

See a virtual card number

A virtual card number, available for supported cards, hides your real card number and prevents fraud when you’re shopping in apps or on websites that don’t offer Apple Pay.

  1. Start the Wallet app on your iPhone.
  2. Tap a supported payment card.
  3. Tap the Card Number button. Authenticate with Face ID, Touch ID, or your passcode.
  4. Tap the virtual card number to copy it.

Fill in your payment information during checkout

Where Apple Pay isn’t available, AutoFill can enter the security code, expiration date, and card number of a credit or debit card saved in Apple Wallet. And to scan the information on a new card, you can use the iPhone camera.

  1. During checkout, tap a payment information field.
  2. Do one of the following:
    • Choose a card saved in Apple Wallet: Tap a payment card above the onscreen keyboard.
    • Use a new card: Tap Scan Card. Position your card in the frame.
Tag: Wallet

On supported models, MagSafe chargers and battery packs snap to the back of iPhone or its MagSafe case or sleeve. The magnets ensure proper alignment for fast wireless charging, and you can hold and use iPhone while it’s charging.

And they’re not just for those models. Without the magnetic alignment, MagSafe chargers can also charge other iPhone models and AirPods. Just know that AirPods and MagSafe chargers, battery packs, cases, and sleeves are sold separately. With MagSafe Duo Charger, you can even charge iPhone or AirPods at the same time you charge your Apple Watch.

Charge iPhone or AirPods with MagSafe Charger

  1. Connect MagSafe Charger to power using a compatible power adapter (sold separately).

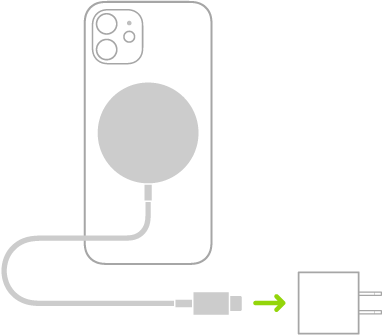
    An illustration showing one end of MagSafe Charger attached to the back of iPhone and the other end connecting to a power adapter.

  2. Do one of the following:

    • iPhone: (supported models) Place MagSafe Charger on the back of iPhone or its MagSafe case or sleeve. The charging symbol appears when iPhone starts charging.

      Note: If iPhone Leather Wallet is attached, remove it before placing MagSafe Charger on the back of iPhone.

    • Other iPhone models: Place iPhone face up on the center of MagSafe Charger. When iPhone is aligned properly with the charger, the Battery Charging icon appears in the status bar.
    • AirPods 2, AirPods 3 (MagSafe), AirPods 4 (with Active Noise Cancellation), AirPods Pro: Place your AirPods in the charging case, close the lid and then place the case with the status light facing up on the center of MagSafe Charger. When the case is aligned properly with the charger, the status light turns on for several seconds and then turns off while continuing to charge.

Charge iPhone or AirPods and Apple Watch with MagSafe Duo Charger

With MagSafe Duo Charger, you can charge iPhone 12, iPhone 13, and iPhone 14 models or AirPods at the same time you charge your Apple Watch. (MagSafe Duo Charger, Apple Watch, and AirPods are sold separately.)

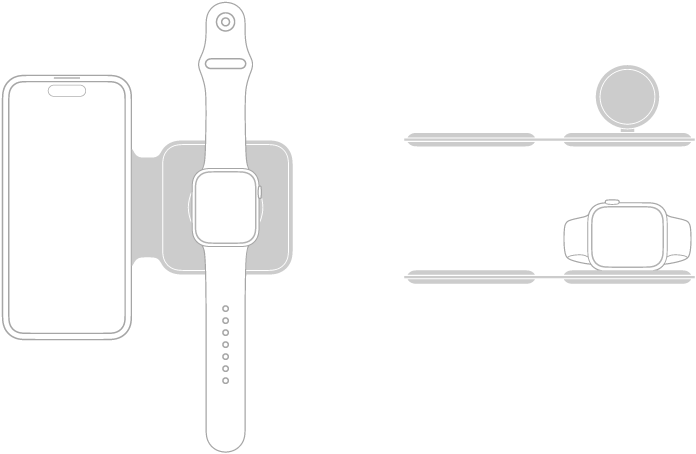
An illustration on the left shows iPhone and Apple Watch placed flat on the charging surfaces of MagSafe Duo Charger. An illustration at the top right shows the Apple Watch charging surface is raised. An illustration below it shows Apple Watch placed on the raised charging surface.

  1. Connect MagSafe Duo Charger to power using the Apple 20W USB-C power adapter or another compatible power adapter (sold separately).

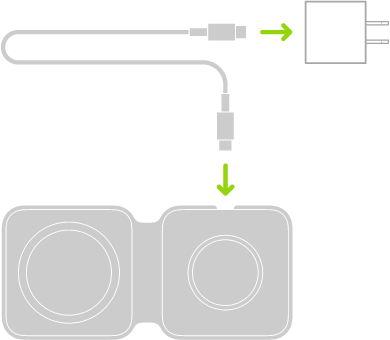
    An illustration showing one end of a cable connecting to a power adapter and the other end connecting to MagSafe Duo Charger.

  2. To charge iPhone or AirPods, do one of the following:

    • iPhone: Place iPhone face up on the center of the iPhone charging surface. The battery charging indicator appears when you properly align iPhone with the charging surface. Unless your iPhone is in Silent mode, you hear a chime when charging begins.

      Note: If an iPhone wallet is attached, remove it before placing iPhone on MagSafe Duo Charger.

    • AirPods 2 (with Wireless Charging Case), AirPods 3, AirPods 4 (with Active Noise Cancellation), and AirPods Pro: Place your AirPods in the charging case, close the lid. Place the case with the status light facing up on the center of the iPhone charging surface. When the case is aligned properly with the charger, the status light turns on for several seconds. Turns off while continuing to charge.
  3. To charge Apple Watch, do one of the following:

    • With the Apple Watch charging surface lying flat and the Apple Watch band open, place Apple Watch face up on the charging surface.
    • With the Apple Watch charging surface raised, place Apple Watch on its side with its back against the charging surface. Apple Watch automatically goes into Nightstand mode, so you can also use it as an alarm clock.

    The concave charging surface magnetically snaps to the back of your Apple Watch and aligns it properly. When charging begins, a charging symbol appears on the watch face.

Charge iPhone with a MagSafe Battery

To extend battery life, the MagSafe Battery Pack attaches magnetically to iPhone models that support MagSafe.

Only iPhone Air works with the iPhone Air MagSafe Battery.

Note: Remove any attached iPhone wallet before placing a MagSafe Battery.

  • Charge your iPhone on the go: Place the MagSafe Battery on the back of iPhone or its MagSafe case. The charging symbol appears when iPhone starts charging.
  • See the battery status of MagSafe Battery and iPhone: Check the Batteries widget in Today View or on the Home Screen.
  • Charge MagSafe Battery and iPhone: With MagSafe Battery on iPhone, connect the MagSafe Battery to power using the USB-C to Lightning Cable or a USB-C Cable and Apple 20W USB-C power adapter or another compatible power adapter (sold separately). The status indicator on the MagSafe Battery is amber while charging, then turns green when charging is complete.

With the MagSafe Battery Pack (Lightning port) only, you can also charge both devices at the same time by connecting your iPhone to power instead of the MagSafe Battery.

Note: Charging is limited to 90 percent by default, which optimizes the lifespan of MagSafe Battery Pack. If you want to remove that limit, open Control Center, tap Low Power Mode, and then tap Charge past 90%.

The MagSafe Battery can also charge without iPhone.

Tag: Battery

You can choose which options appear in an app’s Share menu, and change the order in which they appear. You can show or hide an option, add an option to Favorites or remove it, and reorder your Favorites. These changes apply only to the app you’re customizing, though.

Note: These changes only apply to the app you’re customizing, so repeat the steps in each app whose Share menu you want to set up.

  1. Open a document in the app and tap the Share button.
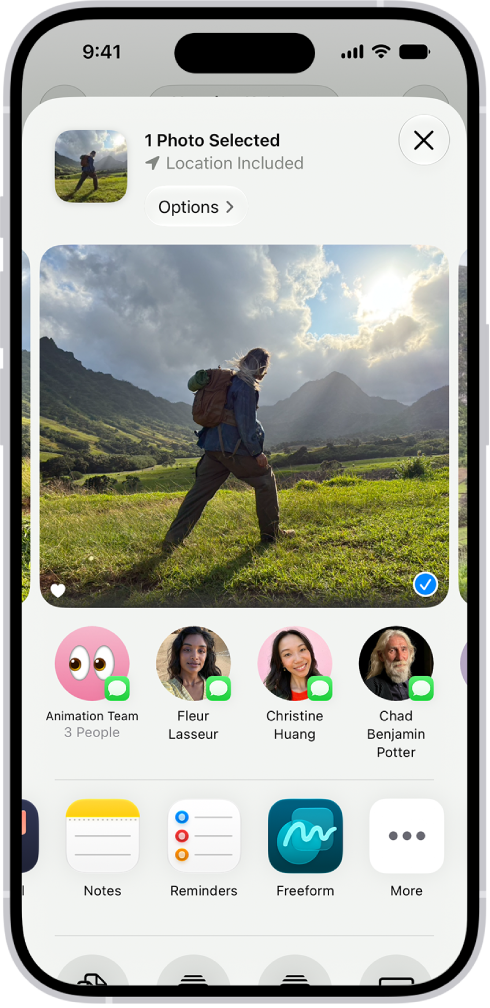
  2. Swipe left over the row of buttons and then tap More.

    The screen for sharing a photo, with the sharing options immediately below the open photo, including the More button for editing the sharing options.

  3. Tap Edit and then do any of the following:

    • Show or hide an option: Tap the control next to the option to turn it on or off.
    • Add an option to Favorites: Tap the Add button.
    • Remove an option from Favorites: Tap the Remove button.
    • Reorder Favorites: Drag the Reorder button next to any option.
  4. Tap the Done button.
Tag: iPhone

After you take a photo or video, use the tools in the Photos app to edit it on your iPhone. You can adjust the light and color, add a filter, and more, and when you use iCloud Photos, any edits you make are saved across all your devices.

Enhance can automatically improve light and color, and if you took a photo with iPhone 16 or later, you can change its Photographic Style.

Edit the light or color of a photo or video

To make your photos and videos look their best, adjust light and color settings.

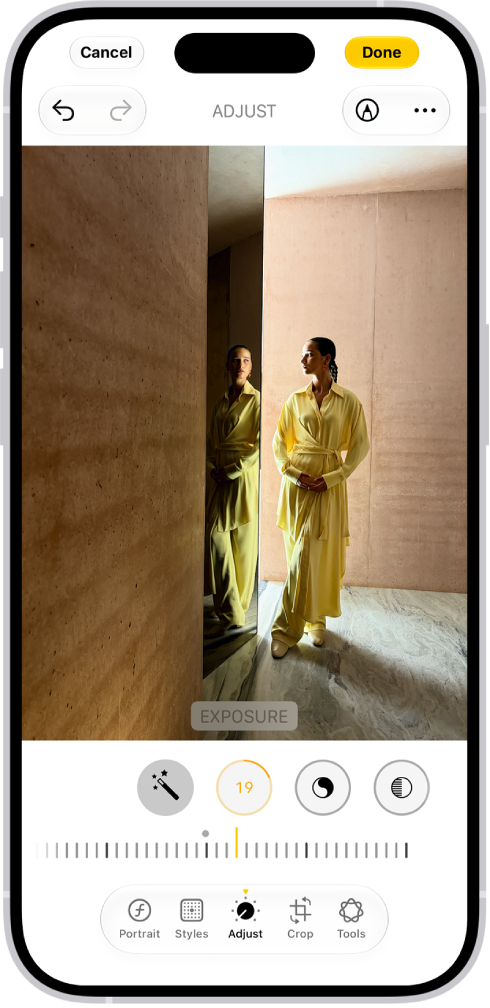
On iPhone, a phot is being edited in the Photos app. The Adjust button is selected, and a slider is available below the Exposure setting to adjust its level. The Cancel button is in the top-left corner of the screen and the Done button is in the top-right corner.

  1. Start the Photos app on your iPhone.
  2. Tap a photo or video to open it, then tap the Edit button.
  3. Tap Adjust.
  4. Swipe left under the photo to view the settings you can adjust—for example, Exposure, Brilliance, or Highlights.
  5. Tap a setting and drag the slider to make precise adjustments.

    The outline around each button indicates the level of change for that setting. Tap the button to compare the edited version to the original.

  6. Tap Done to save your edits, or if you don’t like your changes, tap Cancel, and then tap Discard Changes.

Quick tip: To automatically enhance the light and color, tap the Enhance button.

Edit the Photographic Style of a photo

On models that support Photographic Styles, you can apply a new style to photos in your library or edit the Photographic Style.

Note: Editing Photographic Styles in the Photos app only works if Camera captures photos with High Efficiency image capture. To turn on High Efficiency first, go to Settings app , tap Camera, tap Formats, and then tap High Efficiency.

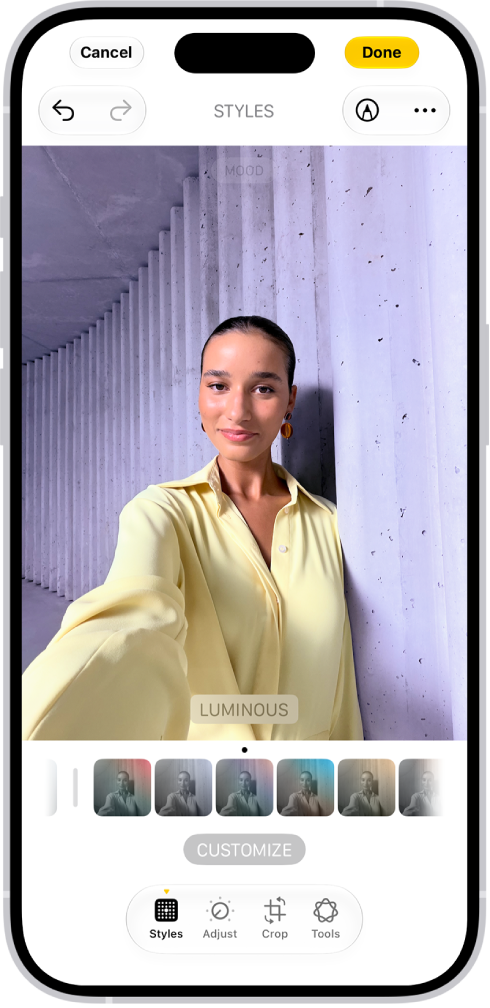
On iPhone, a photo is being edited in the Photos app. The Styles button is selected, and Luminous is selected.

  1. Start the Photos app on your iPhone.
  2. Open a photo taken with a Photographic Style and tap the Edit button.
  3. Tap Styles and then do any of the following:

    • Choose a new style: Swipe left or right on the style choices below the image.
    • Adjust the tone, color, and intensity: Tap Customize. Then drag your finger on the Styles Chooser to adjust the tone and color. On iPhone 18 Pro models, tap Palette first. Drag your finger left or right on the slider below to adjust the intensity level. When you’re done making adjustments, tap the image.
    • Change the texture: Tap Texture and choose a texture such as Soft Skin, Glow, or Film. Drag the slider to adjust the intensity, or choose Standard to apply no texture. Tap Grain to add film grain to any texture. (Available on models that support Photographic Styles 2 and Photographic Styles 3 and captured on iPhone 18 Pro or iPhone 18 Pro Max).

    Note: As you make adjustments, the values for tone, color, and intensity are shown at the top of the screen. Tap the Reset button to reset these values.

  4. Tap the Done button.

Apply filter effects to a photo or video

To change the tint of a photo or video, apply filter effects.

Note: On iPhone 16 models or later, Photographic Styles take the place of filters for giving your photos a customized look. If you haven’t turned on Photographic Styles, though, filter effects are still available on these models.

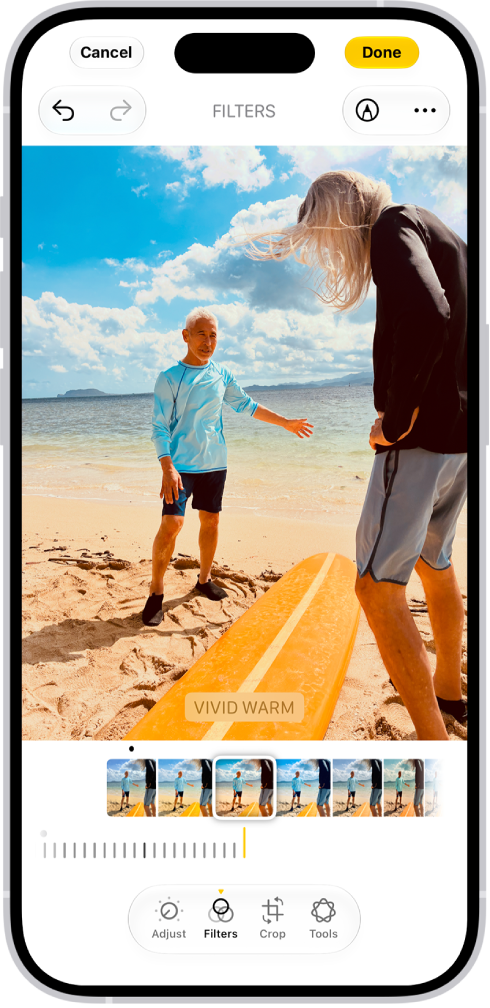
On iPhone, a photo is being edited in the Photos app. The Filters button is selected, and the Vivid Warm filter is selected. A slider is available below the filter options to adjust the intensity of the filter. The Cancel button is in thetop-left corner of the screen and the Done button is in the top-right corner.

  1. Start the Photos app on your iPhone.
  2. Open a photo or video, then tap the Edit button.
  3. Tap the Filters button to apply filter effects such as Vivid or Dramatic.

    To remove a filter that was applied when you took the photo, tap Original.

  4. Tap a filter. Then drag the slider to adjust the effect.

    To compare the edited photo to the original, tap the photo.

  5. Tap Done to save your edits, or if you don’t like your changes, tap Cancel, and then tap Discard Changes.

Copy and paste edits to multiple photos

Once you’ve edited one photo or video, you can copy those edits and paste them onto another photo, or onto a batch of photos all at the same time.

  1. Start the Photos app on your iPhone.
  2. Open the photo or video that contains the edits you want to copy.
  3. Tap the More button, then tap Copy Edits.
  4. Review and turn off any edits you don’t want to copy. Tap Copy.
  5. Tap the Back button to return to your library.
  6. Tap Select and tap the thumbnails of the photos you want to paste the edits onto, or open a single photo or video.
  7. Tap the More button and then tap Paste Edits.

Note: To make the edited photos look even more similar, Photos automatically adjusts their white balance and exposure for a better match.

Add stickers, text, and more

  1. Start the Photos app on your iPhone.
  2. Tap a photo to open it.
  3. Tap the Edit button, then tap the Markup button.
  4. Tap the Add Annotations button to add stickers, captions, text, shapes, or even your signature.
  5. Tap the Done button to save your edits.

Set the background color of Edit mode

The background of Edit mode matches your iPhone’s light or dark appearance by default. You can change its color, though. If you prefer to edit photos against a dark background, for example, set it to always appear dark.

  1. Start the Photos app on your iPhone.
  2. Tap a photo or video to open it, then tap the Edit button.
  3. Tap the More button, tap Appearance, and then do one of the following:
    • Match Edit mode to the light or dark appearance of your iPhone: Tap System.
    • Make Edit mode always appear dark: Tap Dark.
    • Make Edit mode always appear light: Tap Light.

Use Apple Intelligence editing tools

Apple Intelligence gives you the Clean Up, Extend, and Reframe tools to edit your photos.

Note: Apple Intelligence on iOS 27 or later is available on an Apple Intelligence-enabled iPhone 15 Pro, iPhone 15 Pro Max, or iPhone 16 model or later. Apple Intelligence is not available in all languages or regions. Usage limits may apply.*

*Apple Intelligence is available with Siri and device language set to Chinese (Simplified), Chinese (Traditional), Danish, Dutch, English, French, German, Italian, Japanese, Korean, Norwegian, Portuguese, Spanish, Swedish, Turkish, or Vietnamese. Some features may not be available in all regions or languages. Some devices may not be available in all regions. Siri AI is available in beta in iOS 27, iPadOS 27, macOS 27, watchOS 27, and visionOS 27 and requires an Apple Intelligence–enabled device set to a supported language. Available in English to start. Siri AI will not be initially available in the EU on iOS, iPadOS, and watchOS. Certain Apple Intelligence features that rely on server-side models are subject to daily usage limits, including but not limited to Siri AI, Intelligent Photo Editing Tools, Image Playground, and AFM 3 Cloud models in Shortcuts. Daily limits may vary by feature, request complexity, system demand, system policies, and other factors. Expanded access to such features will be available for a fee in the future. Use of these features is subject to the Apple Intelligence Terms and Conditions.

You can turn off your scheduled alarms and turn off or delete your sleep schedules.

You can turn off only your next scheduled alarm, and after your next wake up time, your normal alarm comes back. Or you can turn off all sleep schedules and alarms, permanently turn off the alarm for a sleep schedule, or delete a sleep schedule and its alarm.

Here’s how to turn off alarms and delete sleep schedules in Health on iPhone.

Turn off only your next scheduled alarm

  1. Open the Health app on your iPhone.
  2. Tap Browse and tap Sleep. Tap Sleep again.
  3. Scroll down to Your Schedule and tap Edit (below Next).
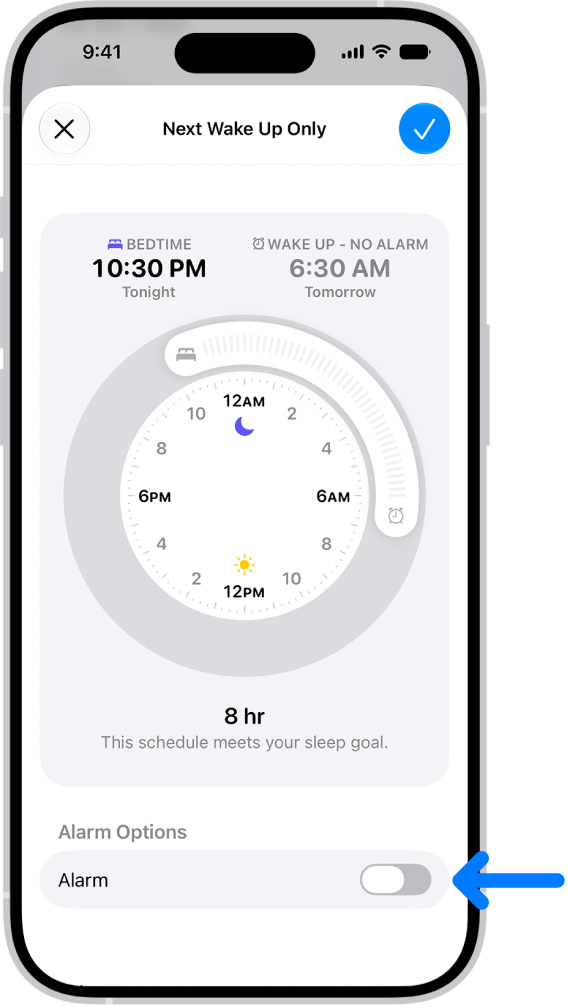
  4. Turn off Alarm.

    The Next Wake Up Only screen in Health with Alarm turned off at the bottom.

  5. When you’re finished, tap the Done button.

After your next wake up time, your normal alarm resumes.

Note: The Clock app is another place to change your next sleep schedule alarm.

Turn off all sleep schedules and alarms

You can turn all your sleep schedules off at once after you’ve created one or more. When all sleep schedules are off, scheduled alarms are turned off, too.

  1. Open the Health app on your iPhone.
  2. Tap Browse and tap Sleep. Tap Sleep again.
  3. Scroll down to Your Schedule.
  4. Tap Full Schedule & Options. Then turn off Sleep Schedule (at the top of the screen).

You can turn them all on again later.

Permanently turn off the alarm for a sleep schedule

With multiple sleep schedules, you can turn off the alarm for each one separately. So if you have sleep schedules for weekdays and weekends, for example, you could turn off the weekend schedule’s alarm.

  1. Open the Health app on your iPhone.
  2. Tap Browse and tap Sleep. Tap Sleep again.
  3. Scroll down to Your Schedule, then tap Full Schedule & Options.
  4. Tap Edit for the sleep schedule you want to change.
  5. Turn off Alarm.

You can turn it back on again later.

  1. Tap the Done button.

The rest of your sleep schedule remains in effect.

Delete a sleep schedule and its alarm

  1. Open the Health app on your iPhone.
  2. Tap Browse and tap Sleep. Tap Sleep again.
  3. Scroll down to Your Schedule, then tap Full Schedule & Options.
  4. Tap Edit for the schedule you want to remove.
  5. Tap Delete Schedule (at the bottom of the screen).
Tag: Health

You can copy, highlight, underline, or strike through text in a PDF file. You can also annotate a PDF or image with stickers, signatures, shapes, or text.

You can pick a highlight color, and images can also get an image description or a loupe. Text you copy can be pasted into another document or app, and any change can be undone.

Here’s how to annotate a PDF or image in Preview on iPhone.

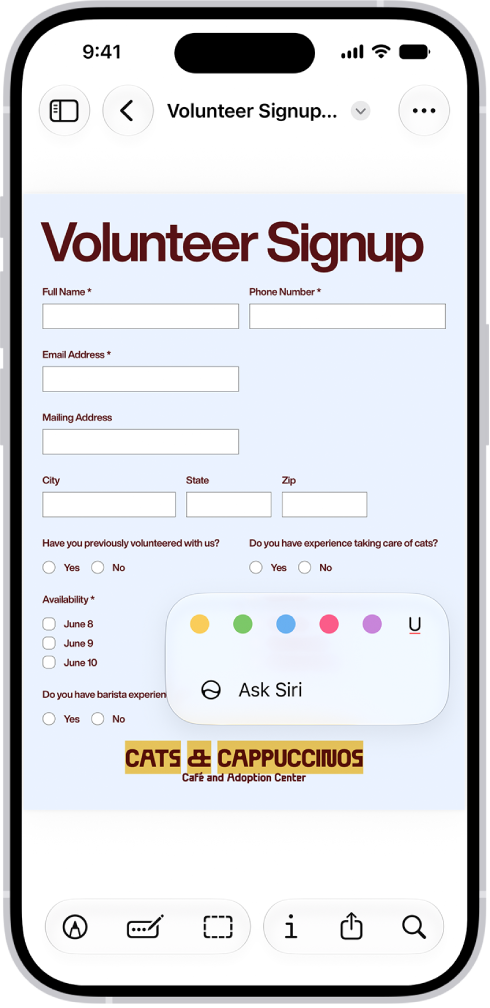
A fillable PDF form with options to highlight and underline text.

Select and copy text

  1. Start the Preview app on your iPhone.
  2. Open a PDF.
  3. To select text, touch and hold the first word and then move the grab points.
  4. To copy the selection, tap Copy.

The text is then ready to paste into another document or app.

Highlight, underline, or strike through text

  1. Start the Preview app on your iPhone.
  2. Open a PDF.
  3. Select and copy text, then tap Highlight.
  4. Choose a highlight color, or tap the underline or strike through button.

Add an annotation

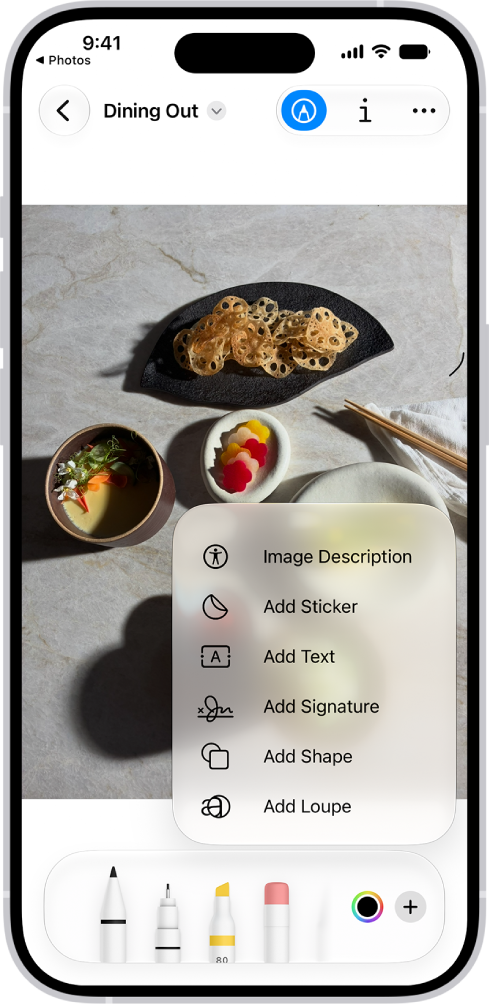
An image open in the Preview app. A menu shows options that can be added to it, such as stickers and text. The Markup, Info, and More buttons appear at the top of the screen, and annotation tools appear at the bottom of the screen.

  1. Start the Preview app on your iPhone.
  2. Open a PDF.
  3. Tap the Markup button and tap the Add button. Then choose an option, such as a sticker, signature, shape, or text. For images, you can also add an image description or a loupe.

To undo a change, tap the More button, then tap Undo.

Tag: Preview

On iPhone, you can search for apps and contacts, content in apps like Mail and Messages, and even text in your photos using Live Text. You can check stock and currency information, and find and open webpages, apps, and images in your photo library, across your system, and on the web.

Search for an app, and shortcuts for your most likely next action appear within the Top Hit. Search for Photos, for example, and a shortcut to the Favorites album appears.

And with Siri AI (Beta)* on supported iPhone models, Spotlight becomes where you start a conversation with Siri, whether you want personal context, broad world knowledge, or actions across your apps.

Note: Siri AI is available in beta on iOS 27 or later on an Apple Intelligence-enabled iPhone 15 Pro, iPhone 15 Pro Max, or iPhone 16 model or later with Siri and device language set to a supported language. Available in English to start. Siri AI will not initially be available in the EU on iOS. Usage limits may apply.

Search with iPhone

  1. Tap the Search button on the Home Screen (on models with Face ID) or swipe down on the Home Screen or the Lock Screen.
  2. Enter what you’re looking for in the search field. Then do any of the following:
    • Initiate your search: Tap the Search button.
    • Open a suggested app or website: Tap the app or website.
    • Take quick action: Start a timer, turn on a Focus, find the name of a song with Shazam, run any shortcut, and more. Search for an app’s name to see shortcuts available for the app, or create your own using the Shortcuts app.
    • Check a suggested website: Tap it.
    • Get more information about a search suggestion: Tap it. Tap one of the results to open it.
    • Start a new search: Tap the Clear Text button in the search field.

Note: Content from third-party apps only appears in search results if the app supports Spotlight indexing, so if something you’re looking for is missing, the app may not support Spotlight search.

Choose which apps to include in Search

  1. Start the Settings app on your iPhone.
  2. Tap Search and scroll down. Tap an app.
  3. Turn Show App in Search on or off.

Turn off Location-Based Suggestions

With Location Services on, Spotlight may use your location to refine suggestions. Turning off Location-Based Suggestions stops that.

  1. Start the Settings app on your iPhone.
  2. Tap Privacy & Security and then tap Location Services.
  3. Tap System Services, then turn off Suggestions & Search.

Search in apps

Many apps include a search field or search button for finding something within the app. In the Maps app, for example, you can search for a specific location.

  1. In an app, tap the search field or the Search button.

    If you don’t see a search field or button, swipe down from the top.

  2. Type your search and then tap Search.

Add a dictionary

You can add dictionaries on iPhone to use in searches.

  1. Start the Settings app on your iPhone.
  2. Tap General, then tap Dictionary.
  3. Select a dictionary.

*Apple Intelligence is available with Siri and device language set to Chinese (Simplified), Chinese (Traditional), Danish, Dutch, English, French, German, Italian, Japanese, Korean, Norwegian, Portuguese, Spanish, Swedish, Turkish, or Vietnamese. Some features may not be available in all regions or languages. Some devices may not be available in all regions. Siri AI is available in beta in iOS 27, iPadOS 27, macOS 27, watchOS 27, and visionOS 27 and requires an Apple Intelligence–enabled device set to a supported language. Available in English to start. Siri AI will not be initially available in the EU on iOS, iPadOS, and watchOS. Certain Apple Intelligence features that rely on server-side models are subject to daily usage limits, including but not limited to Siri AI, Intelligent Photo Editing Tools, Image Playground, and AFM 3 Cloud models in Shortcuts. Daily limits may vary by feature, request complexity, system demand, system policies, and other factors. Expanded access to such features will be available for a fee in the future. Use of these features is subject to the Apple Intelligence Terms and Conditions.

Tag: iPhone