Got a tip for us?

iPhone

The iPhone is a smartphone from Apple that runs the iOS mobile operating system. Between its apps, communication features, the camera, mobile internet access, and other functionalities, the iPhone has quickly become an integral part of many peoples tech lives.

Choose when and how notifications appear, which apps can send them, and what sounds they make. You can also set up location-based alerts, allow government alerts, and more.

Many notification settings apply to all app notifications, while others can be customized for individual apps. For a single app, you can turn notifications off entirely, choose whether they appear on the Lock Screen, in Notification Center, or as banners, and show a badge on its icon.

Here’s how to change notification settings on iPhone.

Customize notifications for an app

  1. Start the Settings app on your iPhone.
  2. Tap Notifications, then tap an app below Notification Style.
  3. Do any of the following:
    • Turn off notifications for the app: Turn off Allow Notifications.
    • Allow time-sensitive notifications: If the app supports it, turn on Time Sensitive Notifications.
    • Choose where notifications appear: Under Alerts, choose whether notifications appear on the Lock Screen, in Notification Center, or as banners.
    • Choose a notification sound: If the app supports it, tap Sounds and then select a sound.
    • Show a badge on the app icon: Turn on Badges.
    • Customize Lock Screen appearance: Under Lock Screen Appearance, set how previews appear and how notifications are grouped.
    • Prioritize notifications from the app: If you use Priority Notifications, turn Prioritize Notifications on or off under Lock Screen Appearance.
    • Choose when notifications are delivered: If you use Scheduled Summary, under Notification Delivery choose Immediate Delivery or Scheduled Summary.
    • Customize notification types: If the app supports it, tap Customize Notifications to choose which types of notifications to receive from the app.
    • Change notification settings in the app: For some apps, tap App Name Notification Settings at the bottom of the screen to open the app’s own notification settings.

Change the appearance of notifications

  1. Start the Settings app on your iPhone.
  2. Tap Notifications and choose how you want notifications displayed on the Lock Screen:
    • View just the number of notifications: Tap Count.
    • View the notifications grouped into stacks by app: Tap Stack.
    • View the notifications in a list: Tap List.

Pinching the notifications on the Lock Screen changes their layout when they arrive.

Change the frequency of notifications

Schedule a notification summary with notifications for several apps at once to minimize interruptions throughout the day.

  1. Start the Settings app on your iPhone.
  2. Tap Notifications, then tap Scheduled Summary.
  3. Turn on Scheduled Summary and then tap Continue (if it appears).
  4. Schedule times for the notification summary.
  5. Tap A to Z, turn on the apps to include in your notification summary, and then tap the Back button.
  6. To choose when you want notification previews to appear, tap Show Previews, select an option, and then tap the Back button.

Things like text from Messages and Mail, or invitation details from Calendar, can appear in previews. For individual apps, you can override this setting.

To prevent interruptions, Focus delays the delivery of notifications on iPhone when you use it. You can pick a time to receive a summary of the ones you missed.

Prevent notification previews from appearing on the Lock Screen

You can choose when notification previews appear on your Lock Screen, for a single app or for all apps.

Note: Not all apps support notification previews.

  1. Start the Settings app on your iPhone.
  2. Tap Notifications.

    To turn off notification previews for a specific app, tap the app below Notification Style.

  3. Tap Show Previews (if it appears). Then select one of the following:

    • Always
    • When Unlocked
    • Never

Show or hide notifications during screen sharing

Notifications are allowed by default when you share your screen using SharePlay or Screen Mirroring. You can turn them off if you don’t want them showing up during a session.

  1. Start the Settings app on your iPhone.
  2. Tap Notifications, then tap Screen Sharing.
  3. Turn Allow Notifications on or off.

Use Apple Intelligence to summarize notifications and prioritize time-sensitive ones

Apple Intelligence can summarize long or stacked notifications so they’re easier to understand at a glance. It can also prioritize time-sensitive notifications, helping you catch up on what you may have missed.

Note: Apple Intelligence on iOS 27 or later is available on an Apple Intelligence-enabled iPhone 15 Pro, iPhone 15 Pro Max, or iPhone 16 model or later. Apple Intelligence is not available in all languages or regions. Usage limits may apply.*

Turn off location-based alerts

Based on where you are, some apps use your location to send you relevant alerts. The Weather app, for example, might send you alerts based on your location.

Don’t want to see these types of alerts? Turn them off.

  1. Start the Settings app on your iPhone.
  2. Tap Privacy & Security and tap Location Services. Turn on Location Services.
  3. Tap an app (if any appear in the list) and choose whether you want to share your location while using that app.

Turn government alerts on or off

In some countries or regions, you can turn on alerts in the Government Alerts list. For example, on iPhone in the United States, you can receive National Alerts, and you can turn AMBER, Public Safety, and Emergency Alerts (which include both Severe and Extreme Imminent Threat Alerts) on or off (they’re on by default). On iPhone in Japan, you can receive Emergency Earthquake Alerts from the Japan Meteorological Agency.

  1. Start the Settings app on your iPhone.
  2. Tap Notifications, scroll down to the Government Alerts section, and turn on the alerts you want to receive.
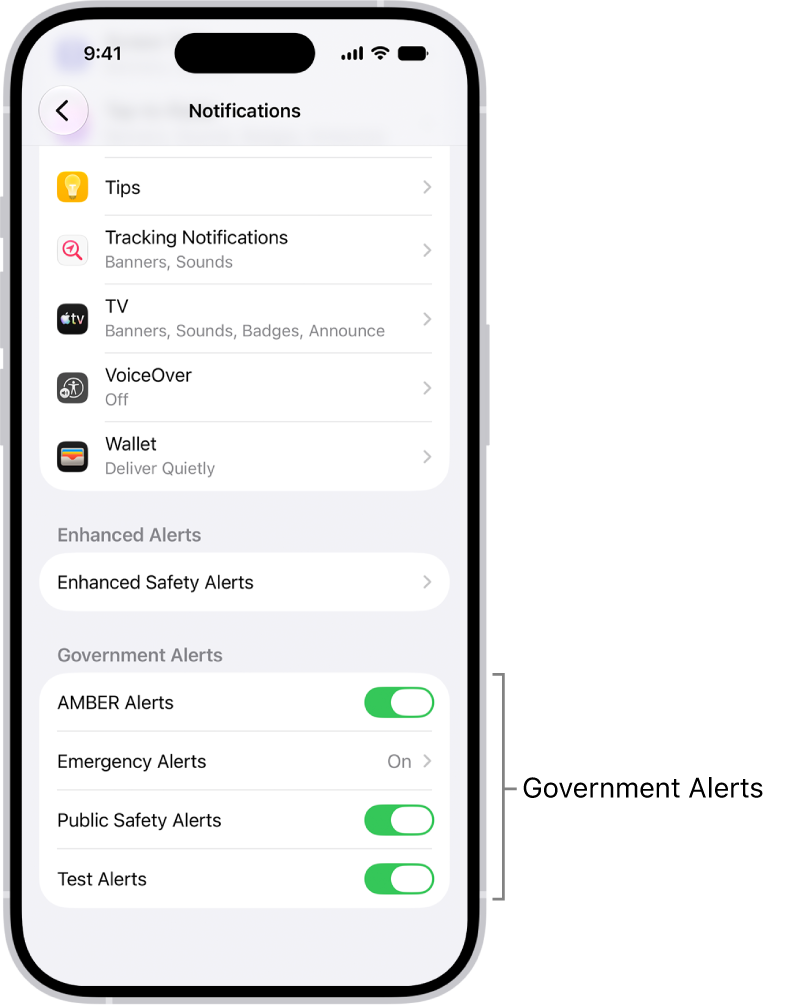
    The Notifications screen, showing the Government Alerts you can turn on to receive government alerts.

  3. Tap Emergency Alerts if you want to turn on Emergency Alerts and Local Awareness.

Note: In some regions, Local Awareness may improve the timeliness, accuracy, and reliability of certain Emergency Alerts. For example, Earthquake Alerts received on iPhone in California, Oregon, and Washington (including bordering regions) may be more timely or delivered with increased accuracy when Local Awareness is turned on.
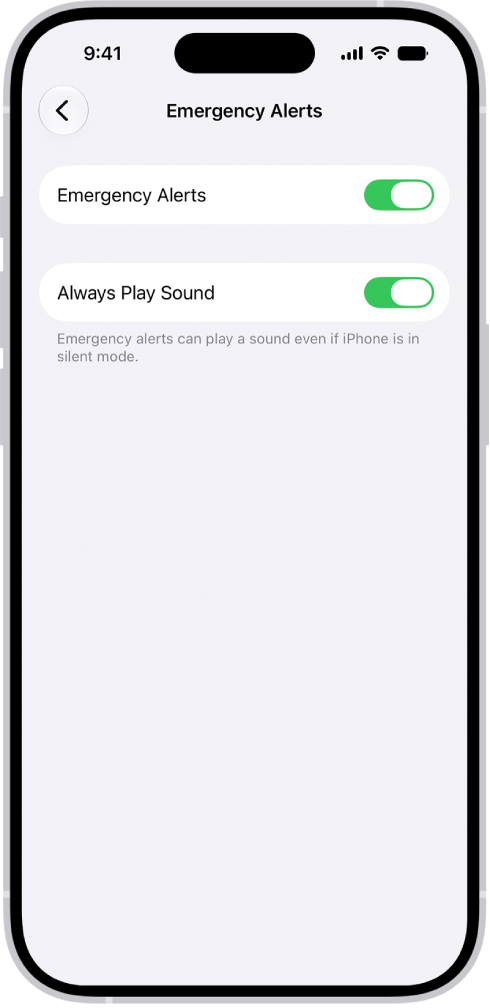
The Emergency Alerts screen, with Emergency Alerts, Local Awareness, and Always Play Sound turned on.

Turn on Always Play Sound to have Emergency Alerts play a sound even if iPhone is in Silent mode.

Government alerts vary by carrier and iPhone model, and may not work under all conditions.

*Apple Intelligence is available with Siri and device language set to Chinese (Simplified), Chinese (Traditional), Danish, Dutch, English, French, German, Italian, Japanese, Korean, Norwegian, Portuguese, Spanish, Swedish, Turkish, or Vietnamese. Some features may not be available in all regions or languages. Some devices may not be available in all regions. Siri AI is available in beta in iOS 27, iPadOS 27, macOS 27, watchOS 27, and visionOS 27 and requires an Apple Intelligence–enabled device set to a supported language. Available in English to start. Siri AI will not be initially available in the EU on iOS, iPadOS, and watchOS. Certain Apple Intelligence features that rely on server-side models are subject to daily usage limits, including but not limited to Siri AI, Intelligent Photo Editing Tools, Image Playground, and AFM 3 Cloud models in Shortcuts. Daily limits may vary by feature, request complexity, system demand, system policies, and other factors. Expanded access to such features will be available for a fee in the future. Use of these features is subject to the Apple Intelligence Terms and Conditions.
If you have difficulties with hand tremors, dexterity, or fine motor control, you can adjust how the iPhone touchscreen responds to tap, swipe, and touch-and-hold gestures. You can have iPhone recognize faster or slower touches and ignore multiple touches.

You can also prevent iPhone from waking when you touch the screen, or turn off Shake to Undo if you unintentionally shake iPhone. Many of these settings come from Touch Accommodations, which gives you a personalized list of options like Hold Duration or Tap Assistance after a short setup.

Here’s how to adjust how iPhone responds to your touch.

Set up and adjust Touch Accommodations

  1. Start the Settings app on your iPhone.
  2. Tap Accessibility and tap Touch. Then tap Touch Accommodations.
  3. Tap Set Up Touch Accommodations and then follow the onscreen instructions.

    After you complete setup, you’ll see a personalized list of Touch Accommodations—like Hold Duration or Tap Assistance—that you can turn on.

  4. You can adjust any of your Touch Accommodations after setup. Tap Settings and then change any of the following:

    • Respond to longer or shorter touches: Turn on Hold Duration. Then tap the Decrement button or the Increment button to adjust the duration.

      Note: When you turn on Hold Duration, taps and swipes within the duration are ignored. You can turn on Swipe Gestures to make swiping easier when Hold Duration is on.

    • Make swiping easier while Hold Duration is on: Turn on Hold Duration, then tap Swipe Gestures. Turn on Swipe Gestures, then choose the required movement before a swipe gesture begins.
    • Treat multiple touches as a single touch: Turn on Ignore Repeat. Then tap the Decrement button or the Increment button to adjust the amount of time allowed between multiple touches.
    • Respond to the first or last place you touch: Under Tap Assistance, choose either Use Initial Touch Location or Use Final Touch Location.

      If you choose Use Initial Touch Location, iPhone uses the location of your first tap—when you tap an app on the Home Screen, for example.

      If you choose Use Final Touch Location, iPhone registers the tap where you lift your finger. iPhone responds to a tap when you lift your finger within a certain period of time. Tap the Decrement button or the Increment button under Tap Assistance Gesture Delay to adjust the timing. Your iPhone can respond to other gestures, such as a drag gesture, if you wait longer than the gesture delay.

      Note: When you turn on Tap Assistance, taps and swipes within the duration are ignored. You can turn on Swipe Gestures to make swiping easier when Hold Duration is on.

    • Make swiping easier while Tap Assistance is on: Choose either Use Initial Touch Location or Use Final Touch Location. Then tap Swipe Gestures. Turn on Swipe Gestures. Then choose the required movement needed before a swipe gesture begins.

At any time, you can recalibrate or reset Touch Accommodations.

Adjust settings for touch-and-hold gestures

You can use the touch-and-hold gesture to see additional options or actions you can perform, or to get a preview of content. If you have trouble performing this gesture, do the following:

  1. Start the Settings app on your iPhone.
  2. Tap Accessibility and tap Touch. Then tap Haptic Touch.
  3. Choose the touch duration—Fast or Slow.
  4. Test your new settings on the image at the bottom of the screen.

Recalibrate or reset Touch Accommodations

  1. Start the Settings app on your iPhone.
  2. Tap Accessibility and tap Touch. Then tap Touch Accommodations.
  3. Do either of the following:
    • Recalibrate your Touch Accommodations: Tap Recalibrate Touch Accommodations.
    • Reset your Touch Accommodations: Tap Reset Touch Accommodations.

Turn off Tap to Wake

If you have a supported iPhone model, you can stop touches on the screen from waking iPhone.

  1. Start the Settings app on your iPhone.
  2. Tap Accessibility, tap Touch, and then turn off Tap to Wake.

Turn off Shake to Undo

Turning off Shake to Undo helps if you tend to unintentionally shake iPhone.

  1. Start the Settings app on your iPhone.
  2. Tap Accessibility and tap Touch. Then turn off Shake to Undo.

Quick tip: To undo text edits, swipe left with three fingers.

If you’re blind or have low vision, you can use the Magnifier app to aim your iPhone camera at nearby text and have it spoken out loud. You can even point your finger at the specific text you want spoken.

It all happens in Detection Mode, which you can add to the Magnifier app on your iPhone if you don’t see its button. Text Detection and Point & Speak aren’t available in all languages, though.

Important: Detection Mode should not be relied on in high-risk or emergency situations, in circumstances where you may be harmed or injured, or for navigation.

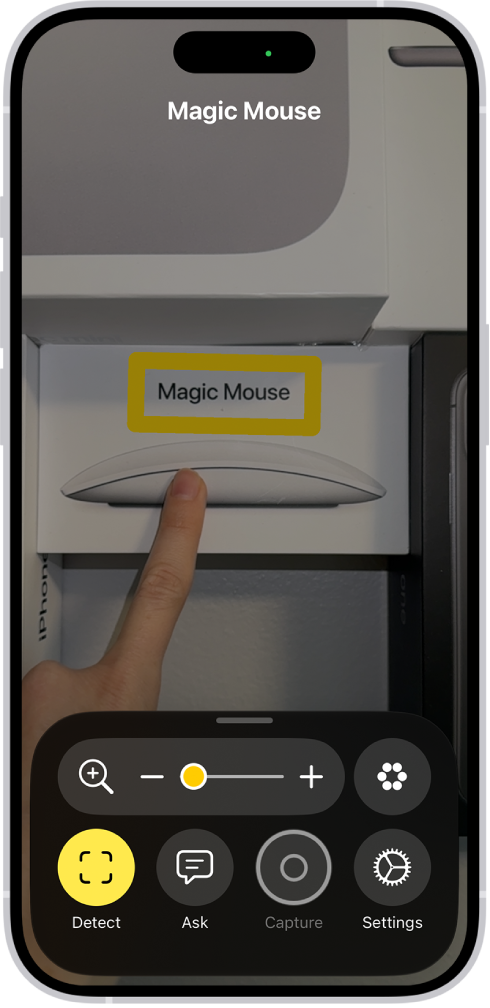
The Magnifier app detecting a finger pointing at text on a wall.

Detect text in the camera frame and have it read out loud

The Magnifier app can detect text in the field of view of your iPhone camera, then have it read out loud.

  1. Start the Magnifier app on your iPhone.
  2. Tap the Detection Mode button to start Detection Mode.

    If you don’t see the Detection Mode button, you can add it.

  3. Touch and hold the Detection Mode button and then make sure Text is selected.
  4. Position iPhone so the rear camera can detect text around you.

    If you don’t hear speech feedback, make sure Silent mode isn’t on.

  5. To temporarily pause detection, double-tap the screen with two fingers.

    Double-tap again with two fingers to resume detection.

  6. To stop Detection Mode, tap the Detection Mode button.

Point your finger at text to have it spoken

When you point your finger at text near you, the Magnifier app can have your iPhone speak it out loud.

It’s especially useful for interacting with objects that have text labels, like dials, buttons, or keypads on ATMs or household appliances, or a digital screen at a grocery store self-checkout.

  1. Start the Magnifier app on your iPhone.
  2. Tap the Detection Mode button to start Detection Mode.

    If you don’t see the Detection Mode button, you can add it.

  3. Touch and hold the Detection Mode button. Make sure Point & Speak is selected.
  4. Position iPhone so the rear camera can detect the text and then point your finger to identify which text to read.

    If you don’t hear sound or speech feedback, make sure Silent mode isn’t on.

  5. To temporarily pause detection, double-tap the screen with two fingers.

    Double-tap again with two fingers to resume detection.

  6. To stop Detection Mode, tap the Detection Mode button.

Customize settings for Text Detection or Point & Speak

  1. Start the Magnifier app on your iPhone.
  2. Tap the Settings button and then tap Detect.

    To detect text in other languages, turn on Detect Languages.

  3. Tap Text or Point & Speak and then customize any of the following: Detection Feedback: Turn on any combination of Labels and Speech.

    For Point & Speak, you can also turn on Sound and Haptic feedback.

    Location: For Point & Speak, tap Under (to read text under your fingertip) or Above (to read text directly above your finger).

    Automatic Flashlight: When your environment is too dark to detect text, have Magnifier turn the flashlight on for 10 seconds.

    Border and Color: For Point & Speak, outline the text you’re pointing to in a color of your choice.

  4. To return to the live Magnifier lens, tap the Back button, tap it again, and then tap the Done button.

    Text Detection and Point & Speak work with VoiceOver.

You can turn cellular data on or off, manage roaming and network options, and control which apps and services use cellular data.

With cellular data off, email, web browsing, notifications, and other data services use Wi-Fi only. If you’re traveling internationally, you can adjust roaming and network settings. You can also see how much data each app has used, and turn off cellular data for individual apps.

Here’s how to view or change cellular data settings on iPhone.

Note: For help with cellular network services, voicemail, and billing, contact your wireless service provider.

Turn cellular data on or off

With cellular data turned off, every data service, including email, web browsing, and notifications, sticks to Wi-Fi. Leave cellular data on, and carrier charges may apply. Features and services that transfer data, like Siri and Messages, could add charges to your data plan, for example.

  1. Open the Settings app on your iPhone.
  2. Tap Cellular and turn Cellular Data on or off.

Manage roaming and network options

You can adjust roaming and network settings when you’re traveling internationally or want more control over how iPhone uses your carrier’s network.

  1. Open the Settings app on your iPhone.
  2. Tap Cellular and tap Cellular Data Options.
  3. Do any of the following:
    • Avoid roaming charges: Turn off Data Roaming. When you’re in a region not covered by your carrier’s network, Data Roaming permits internet access over a cellular data network. When you’re traveling, turn off Data Roaming to avoid roaming charges. To stay connected while traveling, contact your carrier about international plans, or add a travel eSIM.
    • Reduce cellular usage: Tap Data Mode, then choose Low Data Mode. This mode pauses automatic updates and background tasks when iPhone isn’t connected to Wi-Fi.

Depending on your iPhone model, carrier, and region, the following options may be available:

  • Turn Voice Roaming on or off: (CDMA) Turn Voice Roaming off to avoid charges from using other carrier’s networks. When your carrier’s network isn’t available, iPhone won’t have cellular (data or voice) service.
  • Enable or disable 4G/LTE: Using 4G or LTE loads internet data faster in some cases but may decrease battery performance. There may be options for turning off 4G/LTE or for selecting Voice & Data (VoLTE) or Data Only.

With a 5G data plan on iPhone 12 models and later, you can do the following:

  • Enable Smart Data mode to optimize battery life: Tap Voice & Data, then choose 5G Auto. In this mode, your iPhone automatically switches to LTE when 5G speeds don’t provide noticeably better performance.
  • Use higher-quality video and FaceTime HD on 5G networks: Tap Data Mode, then choose Allow More Data on 5G.
  • Turn off 5G: Tap Voice & Data, then choose LTE.

View and manage cellular data usage

For each app, you can see how much data it has used, and turn off cellular data for individual apps if you’d like.

  1. Open the Settings app on your iPhone.
  2. Tap Cellular, then do any of the following.
    • Turn cellular data on or off for an app or service: Scroll down to the list of apps and services and turn an app or service on or off. When cellular data is off for an app, iPhone uses only Wi-Fi for that service.
    • See how much data each app is using: Scroll down to your list of apps and tap Show All. The amount of cellular data used appears below each app. If you’re using Dual SIM, you can see how much data you’ve used with your selected cellular data number.
    • See data used by system services: Scroll down to System Services (above the list of apps). Cellular data can’t be turned on or off for individual system services.
    • Reset usage statistics: Scroll to the bottom, then tap Reset Statistics.

Note: Your carrier can give you the most accurate cellular data usage from a current period.

You can remotely control your other Apple devices with your iPhone, as long as each nearby device is signed in to the same Apple Account and on the same Wi-Fi network. Button names correspond to the controls on your device, and there’s a More button with options like media play controls.

  1. Open Settings, tap Accessibility and tap Control Nearby Devices. Tap Control Nearby Devices.

    The device you want to control must be signed in to the same Apple Account and connected to the same Wi-Fi network as your iPhone.

  2. Choose the device you want to control and then tap a button.

    Button names correspond to the controls on your device. Tap the More button to see your options, including media play controls.

Quick tip: Add this feature to Accessibility Shortcut to turn on Control Nearby Devices quickly.

To stop controlling the other device, tap the Close button.

You can save a map of an area and use it when your iPhone is offline. Even when you can’t access Wi-Fi or cellular service, you can view information like hours and ratings on place cards, get turn-by-turn directions for driving, walking, cycling, or riding transit, and see your estimated time of arrival.

Automatic Updates is on by default, so your downloaded maps are kept up to date. And you can remove downloaded maps to free up storage space.

Note: Offline maps aren’t available in all countries or regions.

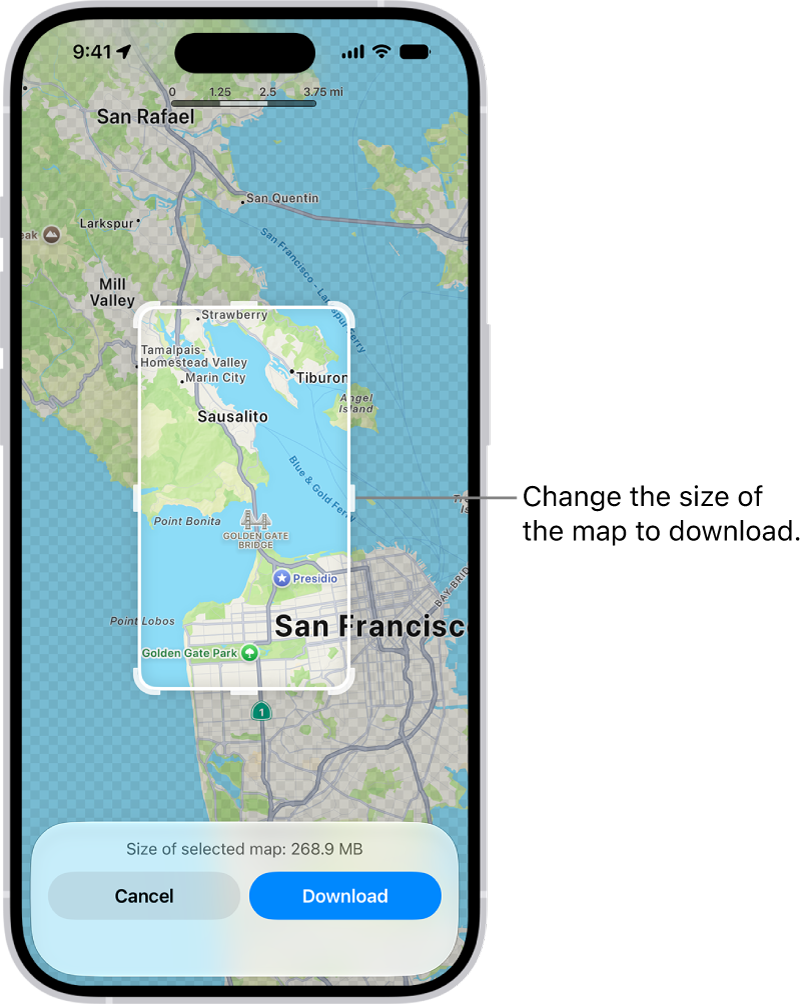
A map of a national park. The park is framed by a rectangle with handles, which can be moved to change the size of the map to download. The selected map’s download size is indicated near the bottom of the map. The Cancel and Download buttons are at the bottom of the screen.

Download maps

  1. Open the Maps app on your iPhone.

    Do one of the following: Touch and hold the map until a pin marker appears, then tap Download.

  2. Tap your picture or initials next to the search field, tap Offline Maps, tap Add Offline Map, and then enter a location in the search field or tap Current Location.

Adjust the selected area, then tap Download.

  1. To reduce the size of the map you download, select a smaller area.

If you don’t change your settings, downloaded maps update automatically.

Quick tip: When you sync your iPhone with Apple Watch, your downloaded maps go wherever you go, even when your iPhone isn’t nearby.

Open or edit a map you downloaded

When you download maps to use offline, they appear in your list of offline maps.

  1. Open the Maps app on your iPhone.
  2. Tap your picture or initials next to the search field. Then tap Offline Maps.
  3. Select a map and then do any of the following: Rename a map: Tap Rename, enter a new name, then tap Save.
    • Change the area covered by a map: Tap Resize on the image of the map, adjust the selected area and tap Download.
    • Delete a map: Tap Delete Map.

Control map data downloads

Depending on your data storage needs and preferences, you can change settings like when to download or update a map.

  1. Open the Maps app on your iPhone.
  2. Tap your picture or initials next to the search field. Then tap Offline Maps.

    Do any of the following: Download over cellular: Tap Wi-Fi Only, then tap to select Wi-Fi + Cellular.

    • Automatically update all maps: Turn on Automatic Updates.
    • Automatically delete unused maps: Turn on Optimize Storage.
    • Use online maps: Turn off Only Use Offline Maps.

Remove downloaded maps

To free up storage space on your iPhone, you can remove downloaded maps.

  1. Open the Maps app on your iPhone.
  2. Tap your picture or initials next to the search field. Then tap Offline Maps.

    Do one of the following: Manually remove a map: Swipe left on the map, then tap Delete.

    • Automatically delete unused maps: Turn on Optimize Storage.
Tag: Maps

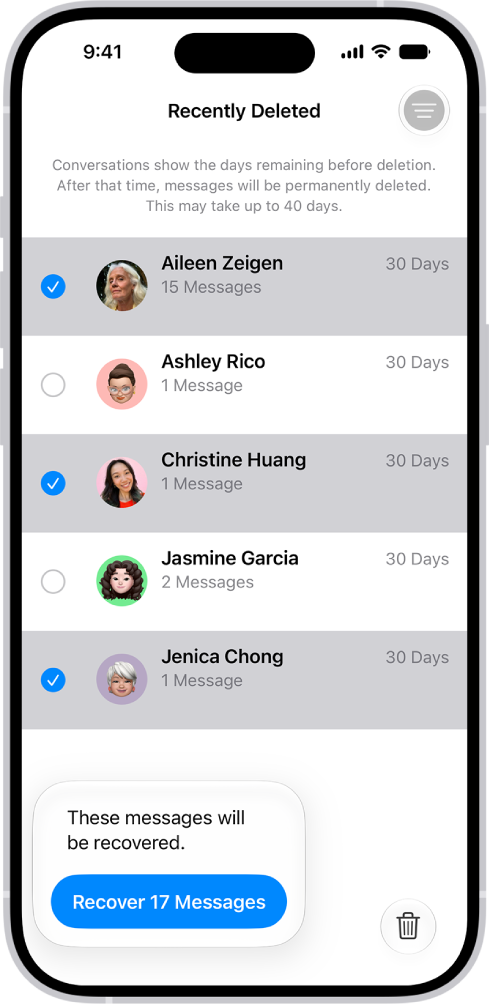
You can recover text messages you deleted on your iPhone for up to 30 days. They’re in Recently Deleted, in the conversation list. And if you use Messages in iCloud, a message you recover on your iPhone comes back on all your devices that use Messages in iCloud.

Recovering all messages deleted within two conversations.

  1. Start the Messages app on your iPhone.
  2. In the conversation list, tap the Filter button and tap Recently Deleted.
  3. Select the conversations whose messages you want to restore and tap Recover.
  4. Tap Recover Messages.

With Messages in iCloud, a message or conversation you recover on your iPhone comes back on all your devices where Messages in iCloud is on.

Note: Deleting and recovering messages affects only your iPhone and other Apple devices that use the same Apple Account. Messages, attachments, and conversations on anyone else’s device can’t be recovered.

Future messages from a blocked contact aren’t automatically deleted if you block them in a conversation with non-iMessage participants, then delete the conversation and recover it.

If you remove a message from a conversation using Undo Send, it’s permanently deleted. And audio messages that expire before being saved aren’t recoverable.

iPhone can provide subtitles, closed captions, and transcriptions so you can follow along more easily with audio and video. On supported models, you can also get automatic subtitles, including in another language.

In a supported app, subtitles and closed captions can be turned on when they’re available, and you can customize how they look. You can also choose accessible captions, like subtitles for the deaf and hard of hearing (SDH). Subtitles transcribed from spoken audio are labeled in the list of subtitles, too.

Note: Generated subtitles and viewing subtitles in multiple languages is supported on iOS 27 or later and is available on iPhone 15 Pro, iPhone 15 Pro Max, and iPhone 16 models or later. Generated subtitles are available in English (U.S. and Canada) when the content doesn’t include them.

Turn on subtitles and captions in supported apps

If subtitles and closed captions are available, you can turn them on when you play video content in a supported app. iPhone usually shows standard subtitles and captions, though you can also choose special accessible captions if they’re available, such as subtitles for the deaf and hard of hearing (SDH).

Note: In supported apps, subtitles may appear automatically. The list of subtitles labels the ones transcribed from spoken audio “Transcribed” and the ones translated into another language “Translated”.

  1. While playing video content, tap the More Controls button. Tap Subtitles.
  2. Choose from the list of available subtitles and captions.

Customize the subtitles and captions in supported video apps

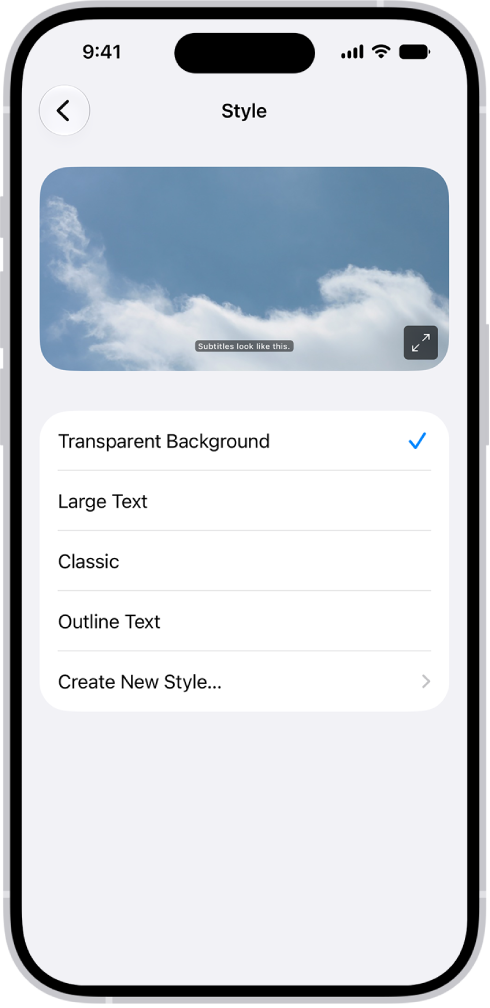
An iPhone showing an example of subtitles with a custom style.

  1. Open Settings, tap Accessibility, and then tap Subtitles & Captioning.
  2. If you prefer closed captioning or subtitles for the deaf and hard of hearing when available, turn on Closed Captions + SDH.
  3. Tap Style and choose an existing caption style or create a new style based on the following:
    • Font, size, and color
    • Background color and opacity
    • Text opacity, edge style, and highlight

Manage when subtitles automatically appear

In a supported app, subtitles may appear automatically if the video is in another language, if your iPhone is muted, or if you skip back a few seconds. Generated subtitles from videos in Photos and Messages can show up automatically, too.

  1. Start the Settings app on your iPhone.
  2. Tap Accessibility, tap Subtitles & Captioning, and tap Automatic Subtitles.
  3. Do any of the following:
    • Automatically show subtitles in your preferred language: Turn on When Languages Don’t Match.
    • Automatically turn on subtitles when volume is muted: Turn on Show When Muted.
    • Temporarily turn on subtitles when you skip back in a video: Turn on Show on Skip Back.

View generated subtitles in another language

Using on-device translation, your iPhone can generate subtitles in another language in supported apps. For that to work, the video needs English subtitles, and you need to have added more than one preferred language in Settings. Then you can view the subtitles translated into one of your other languages.

  1. While playing video content, tap the Captions button.
  2. Tap Languages, then choose the language you’d like to view subtitles in.

The Health app offers secure access to information about your vaccinations, allergies, conditions, medications, and more (not available in all countries or regions).

You can use a QR code or a link from a healthcare provider or authority to download a test result record, and you can set up automatic downloads for a range of health records from supporting healthcare organizations. Those organizations can securely send records of your allergies, medical conditions, medications, labs, vaccinations, and more straight to Health.

Note: When iPhone is locked with Face ID, Touch ID, or a passcode, all of the health data in the Health app—other than what you add to your Medical ID—is encrypted.

Set up automatic health record downloads from your healthcare provider

Supporting healthcare organizations can download your records to Health securely and automatically, including your vaccinations, labs, medications, allergies, medical conditions, and more.

  1. Start the Health app on your iPhone.
  2. Tap Summary, then tap your picture or initials.
  3. Tap Health Records and then do one of the following:
    • Set up your first download: Tap Get Started.
    • Set up downloads for additional accounts: Tap Add Account.

A list of nearby organizations appears. If your organization doesn’t appear in the list, enter the name of a clinic, hospital, or other place where you obtain health records. Or enter the name of a city, state, or province to find organizations near there.

  1. Tap the name of your organization.
  2. Tap Connect Account (below Available to Connect) to go to the sign-in screen for your patient portal.
  3. Enter the user name and password you use for the patient web portal of that organization and then follow the onscreen instructions.

When you set up downloads from an organization, new records arrive in Health automatically as they become available.

Note: Your healthcare organization might not appear in this feature. Organizations are added frequently.

Tag: Health

You can change the sounds iPhone plays when you get a call, message, and alert. Haptic feedback is the vibration you feel on your iPhone when you perform some actions, such as when you touch and hold any icon on the Home Screen.

Each alert sound has a paired vibration pattern, and you can change it or record your own. You can even give certain people their own ringtone and text tone.

Change ringtone settings

  1. Open the Settings app on your iPhone.
  2. Tap Sounds & Haptics and then do any of the following below Ringtone:
    • Change your ringtone: Tap Ringtone and tap a ringtone to preview it and select it.
    • Adjust ringer volume: Drag the volume slider.
    • Change the haptic pattern: Tap Haptics and then choose a pattern or tap Create New Vibration to record your own.
    • Control ringer volume with buttons: Turn Change with Buttons on or off.

You can also change the sounds iPhone plays for certain people. Go to the Contacts app, tap a person’s name, tap Edit, then choose a ringtone and text tone.

Change the sound for alerts and other actions

AirDrop, calendar alerts, reminder alerts, new mail, sent mail, new voicemail, and text messages can each have a different sound.

  1. Open the Settings app on your iPhone.
  2. Tap Sounds & Haptics.
  3. Tap a sound category, such as Text Tone or Calendar Alerts. Tap a sound to select it.

Change the vibration pattern for a sound

Every alert sound has a paired vibration pattern, and for any sound, you can change the vibration or create a custom pattern.

  1. Open the Settings app on your iPhone.
  2. Tap Sounds & Haptics.
  3. Tap a sound category, such as Text Tone or Calendar Alerts.
  4. Tap Haptics and then choose a pattern or tap Create New Vibration to record your own.

Set separate volumes for alarms and alerts

Alarms, timers, alerts, and system sounds all match your ringtone volume by default. If you’d rather, you can set two separate volumes, one for alerts and system sounds and one for alarms and timers.

  1. Open the Settings app on your iPhone.
  2. Tap Sounds & Haptics. Then turn off Match Ringtone Volume under Alarms and Timers or Alerts and System Sounds.
  3. Drag the slider to set the volume.

Change other sound settings

  1. Open the Settings app on your iPhone.
  2. Tap Sounds & Haptics and then do any of the following:
    • Play a click or vibration when you type on the keyboard: Tap Keyboard Feedback to choose Sound, Haptic, or both.
    • Play a sound when you lock iPhone: Turn Lock Sound on or off.
    • Play haptics for system controls and interactions: Turn System Haptics on or off.