Got a tip for us?

iPhone

The iPhone is a smartphone from Apple that runs the iOS mobile operating system. Between its apps, communication features, the camera, mobile internet access, and other functionalities, the iPhone has quickly become an integral part of many peoples tech lives.

Use Camera to take Live Photos with your iPhone. A Live Photo captures what happens just before and after you take a photo, including the audio. You take a Live Photo just like you do a normal photo.

In Photo mode, Live Photo is on by default, and you can turn Live Photos off and on whenever you like. And you can play one back to see the moment move.

Here’s how to take Live Photos with your iPhone camera.

Take a Live Photo

  1. Open Camera on your iPhone.
  2. Make sure Camera is set to Photo mode.

    Note: Live Photo is on by default.

  3. Tap the Shutter button or click the Camera Control to take a Live Photo.
  4. To play the Live Photo, tap the photo thumbnail at the bottom of the screen. Touch and hold the screen.

Your Live Photos save automatically to your photo library in the Photos app.

Turn Live Photos off and on

  1. Open Camera on your iPhone.
  2. Make sure Camera is set to Photo mode.
  3. Tap the Camera Controls button or swipe up from Photo mode at the bottom of the screen.
  4. Tap Live. Tap one of the three options: Auto, On, or Off.
  5. Tap the screen to close.

Quick tip: Keep the Live Photo button on the camera screen at all times: Go to Settings > Camera > Indicators, then turn on Live Photo.

Note: With ProRAW or HEIF Max turned on, Live Photos aren’t available.

Tag: Photos

In the FaceTime app, on a device that meets the minimum system requirements, you can share your screen to bring apps, webpages, and more into the conversation.

You can also ask someone to share their screen with you.

Here’s how to share your screen in a FaceTime call on iPhone.

Note: FaceTime, FaceTime audio, Group FaceTime, some FaceTime features, and other Apple features or services may not be available in all countries or regions.

Share your screen

  1. During a call in the FaceTime app on your iPhone, tap the screen to show the FaceTime controls (if they aren’t visible). Tap the More button.
  2. Tap Screen Sharing, then tap Share My Screen.

Screen sharing begins after a countdown from 3 to 1 at the bottom of the screen.

Quick tip: On a one-to-one FaceTime call, the other participant can tap, draw, or write on your screen from an iPhone or iPad to call your attention to a specific area, and whatever they add disappears after a few seconds. For more help, allow the other participant to control your screen.

To stop sharing your screen, tap the More button, then tap Stop next to Screen Sharing. Ending a FaceTime call also ends screen sharing.

Ask someone to share their screen

  1. During a call in the FaceTime app on your iPhone, tap the screen to show the FaceTime controls (if they aren’t visible). Tap the More button.
  2. Tap Screen Sharing and then tap Ask to Share Screen.

Some elements on the screen let you customize how they move. Turn Reduce Motion off, and you get more motion, like the fluid morphing effects of Liquid Glass. You can also set Vehicle Motion Cues to turn on automatically when you’re moving in a vehicle, and customize how the cues look. Here are the elements you can customize:

  • Motion effects for wallpaper, apps, and alerts
  • Screen transitions
  • Siri animations
  • Typing autocompletion
  • Animated full-screen and bubble effects in the Messages app
  • Animated images on the web and in apps

Customize onscreen motion

  1. Start the Settings app on your iPhone.
  2. Tap Accessibility, then tap Motion.
  3. Do any of the following:
    • Reduce Motion: Turn on. (When off, you’ll see more motion, like the fluid morphing effects of Liquid Glass.)
    • Vehicle Motion Cues: Turn on, off, or set to automatically turn on when you’re moving in a vehicle. You can also customize the appearance of the cues including the pattern, color, and visibility. (When on, dots appear and move on the screen to reduce or stop onscreen motion.)
    • Auto-Play Animated Images: Turn off. (When on, rapid animated images and moving elements such as GIFs in Messages and Safari play automatically.)
    • Auto-Play Video Previews: Turn off. (When on, it allows apps such as the App Store to automatically play video previews.)
    • Auto-Play Message Effects: Turn off. (When on, the Messages app automatically plays full-screen effects. If you turn this setting off, you can still manually play effects by tapping Replay below the message bubble.)
    • Prefer Non-Blinking Cursor: Turn on. (Stop the blinking of the vertical bar that appears at the insertion point where you’re typing. If you use a braille display with iPhone, the cursor indicator on the display also stops blinking.)
    • Limit Frame Rate: Turn on. (On models with ProMotion display technology, this limits the maximum frame rate of the display to 60 frames per second.)

Reduce flashing and strobing lights in videos

  1. Start the Settings app on your iPhone.
  2. Tap Accessibility, then tap Display & Text Size.
  3. Turn on Dim Flashing Lights.

Reduce bright effects of onscreen elements

Highlighting and flashing effects may appear when you interact with certain onscreen elements, like the keyboard, but you can reduce them.

  1. Start the Settings app on your iPhone.
  2. Tap Accessibility, then tap Display & Text Size.
  3. Turn on Reduce Bright Effects.

Smooth display dimming

To control brightness, your iPhone uses a technique called pulse width modulation (PWM), which can make the display appear to flicker for some people when it’s dim. On supported models, turning on Display Pulse Smoothing creates a smoother dimming experience at low brightness levels.

Note: Under certain conditions, turning off PWM may affect display performance at low brightness.

  1. Start the Settings app on your iPhone.
  2. Tap Accessibility, then tap Display & Text Size.
  3. Turn on Display Pulse Smoothing (PWM).

Important: Your iPhone uses an on-device algorithm to detect flashing or strobing lights included in supported media and automatically dims them on your iPhone in real time. Motion settings should not be relied upon in high-risk situations, or for the treatment of any medical condition.

When you subscribe to iCloud+, you can use Hide My Email to keep your personal email address private. It generates unique, random email addresses that forward to your personal email account, so you don’t have to share your real address when you fill out forms, sign up for newsletters, or send email.

You can create a new address, deactivate one so it stops forwarding emails to you, choose which personal email address it forwards to, and copy a forwarding address to use elsewhere. You can also generate addresses in Safari and Mail wherever an email address is required.

You can create and manage Hide My Email addresses in Settings . Go to Settings > [your name] > iCloud > Hide My Email, then do any of the following:

  • Create a Hide My Email address: Tap Create New Address, then follow the onscreen instructions.
  • Deactivate a Hide My Email address: Tap an address (below Create New Address), then tap Deactivate Email Address. After you deactivate the address, it no longer forwards emails to you.
  • Change which personal email address you forward to: Tap Forward To, then choose an email address. Options consist of addresses that are available with your Apple Account.
  • Copy a forwarding address to use elsewhere: Tap an address (below Create New Address), touch and hold the Hide My Email section, then tap Copy. To immediately use that address elsewhere, touch and hold in a text field, then tap Paste.

You can also generate Hide My Email addresses in Safari and Mail wherever email addresses are required. In supporting apps, you can also generate a Hide My Email address when an email address is required by tapping the email address field, then tapping Hide My Email above the keyboard.

Tag: Mail

With Apple Intelligence, you can use Writing Tools to write text and rewrite selected text to find the right wording and tone. You can also proofread and summarize documents. Writing Tools are available in most places you write, including third-party apps and websites.

You can describe a change you want to make, or rewrite text in a Friendly, Professional, or Concise tone. Writing Tools can also summarize the key points of your text, and you can even compose text with ChatGPT.

Note: Siri AI is available in beta on iOS 27 or later on an Apple Intelligence-enabled iPhone 15 Pro, iPhone 15 Pro Max, or iPhone 16 model or later with Siri and device language set to a supported language. Available in English to start. Siri AI will not initially be available in the EU on iOS. Usage limits may apply.
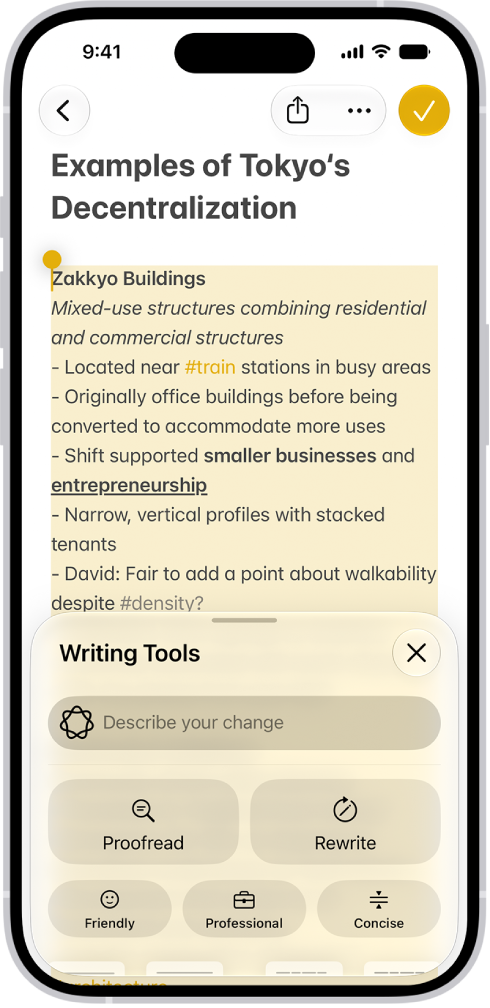
An iPhone showing a story being written in the Notes app. At the bottom of the screen is the Compose with Writing Tools dialog that includes options to refine with ChatGPT, rewrite, choose ChatGPT suggestions, and more.

Note: Apple Intelligence on iOS 27 or later is available on an Apple Intelligence-enabled iPhone 15 Pro, iPhone 15 Pro Max, or iPhone 16 model or later. Apple Intelligence is not available in all languages or regions. Usage limits may apply.*

Proofread, rewrite, summarize, and organize text with Writing Tools

  1. While writing, select the text you want to refine. Then tap the Writing Tools button.
  2. Choose an option to refine or summarize your text. Here are some of the things you can do:
    • Tap “Describe a change” to describe the kind of change you want to make.
    • Tap Rewrite. To choose a particular tone, tap Friendly, Professional, or Concise.
    • Tap Proofread.
    • Tap Summarize or Key Points to only summarize the most important points of your text.
  3. When you’re finished, tap the Done button.

Compose text with ChatGPT in Writing Tools

  1. While typing, tap the text field and tap the Writing Tools button.
  2. Swipe up, then tap Compose.
  3. Describe what you want ChatGPT** to write—for example, “A bedtime story about a girl who visits a magical world where she befriends a caterpillar on its journey to becoming a butterfly”— choose Include All Text or Selected Text. Tap the Send button.
  4. If you’re asked for more details, tap a field and enter a response. Then tap the Send button—or tap Ignore to continue without adding details.

After you view the text, you can rewrite text, incorporate ChatGPT’s suggestions, and revert to the original version of your text.

*Apple Intelligence is available with Siri and device language set to Chinese (Simplified), Chinese (Traditional), Danish, Dutch, English, French, German, Italian, Japanese, Korean, Norwegian, Portuguese, Spanish, Swedish, Turkish, or Vietnamese. Some features may not be available in all regions or languages. Some devices may not be available in all regions. Siri AI is available in beta in iOS 27, iPadOS 27, macOS 27, watchOS 27, and visionOS 27 and requires an Apple Intelligence–enabled device set to a supported language. Available in English to start. Siri AI will not be initially available in the EU on iOS, iPadOS, and watchOS. Certain Apple Intelligence features that rely on server-side models are subject to daily usage limits, including but not limited to Siri AI, Intelligent Photo Editing Tools, Image Playground, and AFM 3 Cloud models in Shortcuts. Daily limits may vary by feature, request complexity, system demand, system policies, and other factors. Expanded access to such features will be available for a fee in the future. Use of these features is subject to the Apple Intelligence Terms and Conditions.

**ChatGPT uses generative models and outputs may vary. Check important information for accuracy. When using the ChatGPT extension, you choose what content to send to ChatGPT. Your request and attachments, as well as limited data associated with the request, such as current time zone, country, device type, language, and feature being used when making the request, are sent to ChatGPT to answer your request and enable ChatGPT to provide you accurate and relevant results.


You can save a frame from a video as a photo. In the Photos app, you pause a video on the frame you want, and Save Video Frame as Photo adds it to your library. If your library is sorted by Captured, the new photo appears next to the original video.

  1. Open the Photos app on your iPhone.
  2. Open a video, then play it.
  3. Pause the video on the frame you want to save.
  4. Tap the More button and tap Save Video Frame as Photo.

You’ll find the new photo in your photo library, at the bottom if your library is sorted by Added. When sorted by Captured, the photo appears next to the original video.

Tag: Photos

Apple Watch Mirroring allows you to see and control your Apple Watch screen from your paired iPhone. You can use touch or assistive features like Voice Control, Switch Control, and more on your iPhone to interact with Apple Watch.

There’s one requirement, though: Apple Watch Mirroring is available on Apple Watch Series 6 and later. And once you set up Accessibility Shortcut, you can turn it on right from your iPhone.

To turn on Apple Watch Mirroring, use either of the following:

  • Go to Settings > Accessibility > Apple Watch Mirroring.
  • You can triple-click a button if you set up Accessibility Shortcut.

To turn off Apple Watch Mirroring, tap the Close button.

In supported apps, such as Notes and Photos, you can use the Markup tools to add text, shapes, stickers, and image descriptions to your images and documents.

You can move or resize a shape, and adjust its border color, border width, fill color, and opacity. You can even draw geometrically perfect shapes, like lines and arcs, and VoiceOver reads the custom image descriptions you add.

Here’s how to add text, shapes, stickers, and more with Markup on iPhone.

Note: Tap the Markup button or Markup if the Markup toolbar doesn’t appear in a supported app. And if the toolbar is minimized, tap the minimized version.

Add text

  1. In the Markup toolbar, tap the Add button. Tap Add Text.
  2. Tap the text box. Then use the keyboard to enter text.
  3. To adjust the text’s font, size, justification, style, or color, tap the tools.
  4. To cut, copy, duplicate, or delete the text box, tap the More button.
  5. When you’re done, tap outside the text box.
  6. To close the Markup toolbar, tap the Markup button or Done.

Add a shape

  1. In the Markup toolbar, tap the Add button. Tap Add Shape.
  2. Tap the shape you want to add. Then do any of the following:
    • Move the shape: Drag it.
    • Resize the shape: Drag any dot along the shape’s outline.
    • Adjust the shape’s direction or dimension: Drag any green dot along the shape’s outline.
    • Adjust the shape’s border color, border width, fill color, and opacity: Tap an option in the Markup toolbar.
    • Cut, copy, duplicate, share, or delete: Tap the More button next to the shape. Then tap an option.
  3. When you’re done adjusting the shape, tap the screen.
  4. To close the Markup toolbar, tap the Markup button or Done.

Quick tip: To adjust shapes up close, pinch the screen open and zoom in on the document. Drag two fingers to pan while you’re zoomed in, and pinch closed when you want to zoom back out.

Draw a shape

If you need geometrically perfect shapes for diagrams and sketches, Markup can draw lines, arcs, and more.

  1. In the Markup toolbar, tap a drawing tool.
  2. Draw a shape in one stroke with your finger. Pause.

A perfect version of the shape snaps into place, replacing the drawing. (If you prefer to keep the freehand shape, tap the Undo button.)

You can draw squares, circles, rectangles, triangles, and pentagons, plus straight lines, arrows, arcs, and continuous lines with 90-degree turns. Chat bubbles, hearts, stars, and clouds are available, too.

Add a sticker with Markup

To add stickers from your sticker collection to documents and images, use Markup.

  1. In the Markup toolbar, tap the Add button and tap Add Sticker.
  2. Touch a sticker and then drag it onto your document or photo.
  3. Tap to select the sticker and then do any of the following:
    • Adjust its angle: Use two fingers to rotate it.
    • Adjust its size: Drag a blue dot on the bounding box of the sticker.

Sticker packs are available to download from the App Store. You can also make stickers in any supported app, or create Live Stickers by lifting subjects from your photos or in the Messages app.

Add custom image descriptions

Markup can add descriptions to images in supported apps, such as Photos, and VoiceOver reads those custom descriptions when you use the Image Explorer.

  1. In the Markup toolbar, tap the Add button, then tap Image Description.
  2. Enter your description, then tap the Done button.
Tag: Markup

You can access iCloud Drive and store files, create folders, and share documents with friends and family. You can access your content from all your devices where you’re signed in to the same Apple Account, including on a Mac, where iCloud Drive is located in the Finder.

iCloud Drive is built into the Files app on devices with iOS 11, iPadOS 13, or later. You can also use it on Mac computers (OS X 10.10 or later), Windows devices (iCloud for Windows 7 or later), or online at iCloud.com. Just know that storage limits depend on your iCloud storage plan.

Turn on iCloud Drive

  1. Open Settings, tap [your name], and then tap iCloud.
  2. Tap Drive and then turn on Sync this iPhone.

Browse iCloud Drive

  1. Start the Files app on your iPhone.
  2. Tap Browse.
  3. Tap iCloud Drive below Locations.
  4. If you don’t see Locations, tap Browse again. If you don’t see iCloud Drive below Locations, tap Locations.
  5. To open a folder, tap it.

Choose which apps use iCloud Drive

It’s up to you which apps can store and edit content on iCloud Drive.

  1. Open Settings, tap [your name], and then tap iCloud.
  2. Tap See All next to Saved to iCloud.
  3. Turn on each app you want saved to iCloud, and turn off each one you don’t want saved.
Tag: iCloud

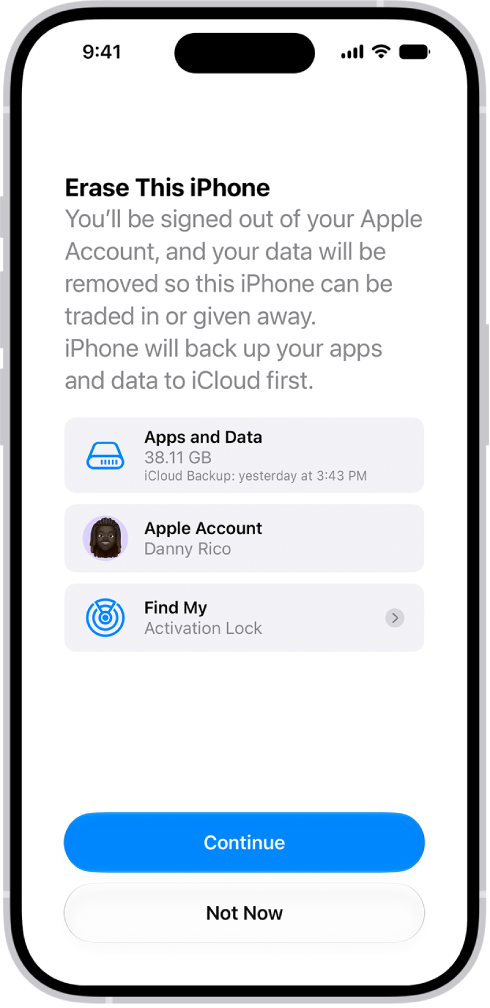
You can securely erase your personal information, content, and settings (such as privacy and network settings) from your iPhone. When you erase your iPhone, it’s restored to factory settings.

Back up your iPhone first, so you can restore your data later on a different device. And if you have an eSIM, you get to choose whether to erase it or keep it, since erasing it means contacting your carrier to reactivate your cellular plan.

Here’s how to erase iPhone.

The Erase This iPhone screen.

Before you begin

To be able to restore your data later on a different device, back up your iPhone.

Erase iPhone using Settings

  1. Start the Settings app on your iPhone.
  2. Tap General, then tap Transfer or Reset iPhone.
  3. Tap Erase All Content and Settings.
  4. If asked, enter your iPhone passcode or Apple Account password.
  5. Tap Continue to confirm.

With an eSIM, you can choose to erase it or keep it, but if you erase it, you’ll need to contact your carrier to reactivate your cellular plan.

Erase iPhone using your Mac or Windows device

  1. Connect your iPhone to your computer with a USB or USB-C cable.
  2. On your Mac, click the Finder icon to open a Finder window, or open the Apple Devices app on your Windows device.

    If your Mac is using macOS 10.14 or earlier, or your Windows device doesn’t have the Apple Devices app, open iTunes instead.

  3. Click the iPhone icon in the Finder sidebar (below Locations) and then click General at the top of the window.
  4. Click Restore iPhone and click Restore to confirm.

    Note: If you’re signed in to Find My, you need to sign out before you can click Restore.

Tag: iPhone