Got a tip for us?

iPhone

The iPhone is a smartphone from Apple that runs the iOS mobile operating system. Between its apps, communication features, the camera, mobile internet access, and other functionalities, the iPhone has quickly become an integral part of many peoples tech lives.

You can use the Contacts app to create, find, share, and delete contacts.

Siri can even suggest new contacts based on what you do in Mail and Calendar. You can also search your contacts using Spotlight, and quickly reach a contact with a call, message, or email. And you can change the default phone number or email address for a contact.

Here’s how to add and use contact information on iPhone.

Siri: Siri can update information about a contact. Say something like, “Sarah Milos is my sister.”

Create a contact

  1. Open the Contacts app on your iPhone.
  2. Tap the Add button.
  3. Enter details for the contact such as name and phone number and tap the Done button.

Siri suggests new contacts based on your activity in other apps, such as Mail and Calendar. Siri also suggests adding contact information in other apps based on how you use Contacts. To turn off either feature, go to the Settings app , tap Apps, then tap Contacts. Tap Siri (or Apple Intelligence & Siri), then turn off Show Contact Suggestions or Learn from this App.

Find a contact

  1. Open the Contacts app on your iPhone.
  2. Tap the search field at the bottom of the contacts list and enter a name, address, phone number, or other contact information.

Search can also find your contacts.

Share a contact

  1. Open the Contacts app on your iPhone.
  2. Tap a contact and tap Share Contact. Then choose the fields you want to share.
  3. Tap the Done button then choose a sharing option, such as Messages or Mail.

Quickly reach a contact

  1. Open the Contacts app on your iPhone.
  2. Tap a contact.
  3. Tap a button below the contact’s name to do any of the following: start a message, make a phone call or a FaceTime call; or compose an email.

To change the default phone number or email address for a contact method, touch and hold the button for that method below the contact’s name, then tap a selection in the list.

Delete a contact

  1. Open the Contacts app on your iPhone.
  2. Go to the contact’s card and tap Edit.
  3. Scroll down, tap Delete Contact, and then tap Delete Contact again to confirm your edit.

All apps are required to ask your permission before tracking you or your iPhone across websites or apps owned by other companies for advertising or to share your information with data brokers. After you grant or deny permission to an app, you can change permission later.

You can also stop all apps from requesting permission, so they can’t even ask. The list in Tracking settings shows every app that has requested permission to track you.

Review or change an app’s permission to track you

  1. Open Settings, tap Privacy & Security, and then tap Tracking.

    The list shows the apps that requested permission to track you. You can turn permission on or off for any app on the list.

  2. To stop all apps from asking permission to track you, turn off Allow Apps to Request to Track (at the top of the screen).

For more information about app tracking, tap “Learn more” near the top of the screen.

Use CarPlay to play the podcasts that are on your iPhone. You can use your vehicle’s built-in controls to open Podcasts and select a podcast to play. And to control playback, you can use the controls on your vehicle’s steering wheel and the buttons on the Now Playing screen.

Note: If you’re viewing CarPlay Dashboard, tap the Home button. All of your CarPlay apps appear on its pages, including Podcasts.

The buttons on the Now Playing screen, CarPlay Dashboard, and the controls on your vehicle’s steering wheel can all control podcast playback, too.

Button Description
Play
Pause
Jump back 15 seconds
Jump forward 30 seconds
Choose a faster or slower playback speed
Tag: carplay

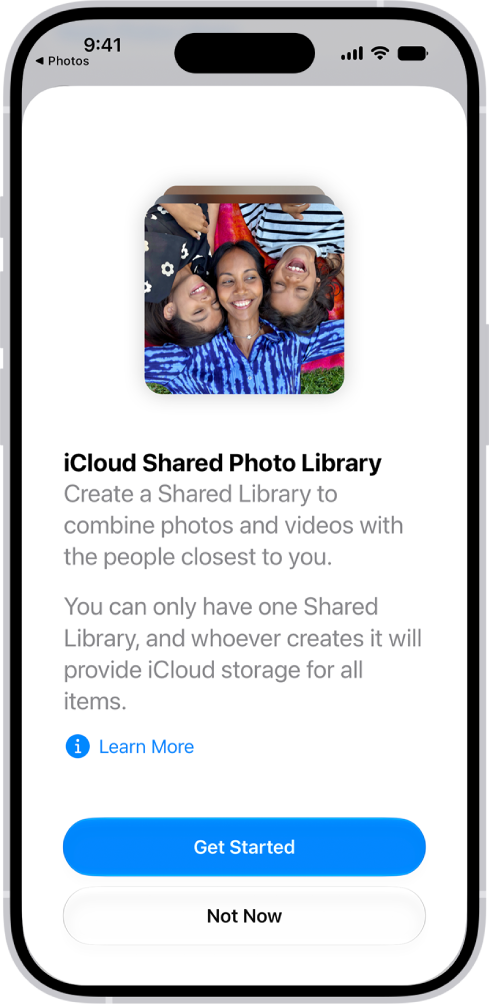
With the iCloud Shared Photo Library feature, you can set up or join a shared library to share photos and videos with up to five friends or family members. You and those close to you can collaborate on the photo collection and enjoy more complete memories, all in one place. You can belong to one shared library at a time.

When you join a shared library, the photos and videos that you contribute move from your personal library to the shared library, and all members can view, edit, and delete them. Shared library photos and videos appear in the Photos app alongside your personal content, and a filter lets you quickly switch between your personal and shared libraries.

Note: The minimum system requirements for iCloud Shared Photo Library are iOS 16.1, iPadOS 16.1, macOS 13, or later. On devices with earlier versions of the software, photos and videos added to a shared library aren’t available.

An iPhone showing the Get Started Screen for creating an iCloud Shared Photo Library.

Before you begin

Make sure iCloud Photos is turned on before you set up or join an iCloud Shared Photo Library.

  1. Start the Settings app on your iPhone.
  2. Tap your name, then tap iCloud.
  3. Tap Photos and then make sure Sync this iPhone is on.

Note: To set up a shared library, you don’t need Family Sharing turned on.

Set up an iCloud Shared Photo Library

Whoever sets up a shared library is its organizer.

  1. Start the Photos app on your iPhone.
  2. Tap Collections.
  3. Tap your account in the top-right corner.
  4. Tap Shared Library and then follow the onscreen instructions to add participants and move photos and videos into the shared library.

Note: Your personal library doesn’t show the photos and videos you add to the shared library.

Before you invite participants using Messages or a web link, you can preview and change the photos and videos you add to the shared library.

Join an iCloud Shared Photo Library

To join an iCloud Shared Photo Library, tap the invitation sent from the organizer, tap Get Started, then follow the onscreen instructions. During setup, you can add photos and videos to the shared library the same way as the organizer.

Once you’ve joined a shared library, you can add photos and videos to it in several ways and access the same content as the organizer and other participants.

Add participants to an iCloud Shared Photo Library

The organizer, the person who sets up an iCloud Shared Photo Library, can add new participants.

  1. Start the Photos app on your iPhone.
  2. Tap Collections.
  3. Tap your account in the top-right corner.
  4. Tap Manage, then tap Add Participants.

Note: Up to six participants, organizer included, can share a library, and you can only belong to one shared library at a time.

Delete or leave an iCloud Shared Photo Library

Organizers of an iCloud Shared Photo Library can delete it, while anyone who isn’t the organizer can leave the shared library.

  1. Start the Photos app on your iPhone.
  2. Tap Collections.
  3. Tap your account in the top-right corner.
  4. Tap Manage, then tap one of the following:
    • Delete Shared Library: When a shared library is deleted, participants who have been members of the shared library for more than 7 days can copy everything from the shared library into their own libraries. Participants who have been members for less than 7 days can copy only the content they contributed.
    • Leave Shared Library: When you leave a shared library, you can copy everything from the shared library into your own library, or just the content you contributed.

Everything added to a shared library counts toward the library organizer’s iCloud storage space.

Tags: iCloud, Photos

Widgets show you current information from your favorite apps at a glance. On iPhone, you can add a Mail widget and choose which mailbox it shows on your Home Screen, from recent unread emails to new emails from your VIPs or any other mailbox.

Add a Mail widget to your Home Screen

  1. Go to the Home Screen and then find the Home Screen page where you want to add the widget.
  2. Touch and hold the background until the apps begin to jiggle, tap the Edit button, and then tap Add Widget.
  3. Scroll or search to find Mail, tap it, and then swipe through the size and style options.
  4. When you see the size you want, tap Add Widget.
  5. While the apps are still jiggling, move the widget where you want it. Then tap the Done button.

Choose which mailbox the Mail widget shows

You can tap the mailbox shown in the widget, then choose a different mailbox so the messages in that mailbox are displayed in the widget. You can also change it from the widget’s options:

  1. Touch and hold the widget.
  2. Tap Edit Widget and then choose options.
  3. Tap Done.

You can save the last camera mode, filter, lighting, depth, and Live Photo settings you used, so they’re not reset the next time Camera opens. Preserve Settings lets you choose which settings to keep, like the last camera mode you used, such as Portrait or Pano.

  1. Open Settings, tap Camera, and then tap Preserve Settings.
  2. Turn on any of the following:
    • Camera Mode: Save the last camera mode you used, such as Portrait or Pano.
    • Photographic Style: Save the last used Photographic Style (on supported models).
    • Creative Controls: Save the last settings you used for a light setting.
    • Depth Control: Save the last depth control setting you used in Photo, Portrait, and Cinematic modes.
    • Macro Control: Preserve the Auto Macro setting rather than automatically using the Ultra Wide camera to capture macro photos and videos (on supported models).
    • Exposure Adjustment: Save the exposure control setting (on iPhone 11 and later).
    • Lens Aperture: Save the last aperture setting you used (on iPhone 18 Pro models).
    • Night Mode: Save the Night mode setting rather than reset to Auto (on supported models).
    • Portrait Zoom: Save the Portrait mode zoom rather than reset to the default lens (this setting is on by default on supported models).
    • Action Mode: Keep the Action Mode setting turned on rather than reset to off (on supported models).
    • ProRAW & Resolution Control: Save the Apple ProRAW setting (on supported models).
    • Apple ProRes: Save the Apple ProRes setting (on supported models).
    • Live Photo: Save the Live Photo setting. This setting is on by default.
Tag: camera

Before apps use the camera or microphone on your iPhone, they’re required to request your permission and explain why they’re asking. For example, a social networking app may ask to use your camera so that you can take and upload pictures to that app.

Apps are similarly required to request your permission to use various other hardware features, including Bluetooth® connectivity, motion and fitness sensors, and devices on your local network. You can review which apps have requested access to these hardware features, and you can change their access at your discretion.

Here’s how to control access to hardware features on iPhone.

Review or change access to the camera, microphone, and other hardware features

  1. Open Settings and then tap Privacy & Security.
  2. Tap a hardware feature, such as Camera, Bluetooth, Local Network, or Microphone.

    The list shows the apps that requested access. You can turn access on or off for any app on the list.

Note: Whenever an app uses the camera (including when the camera and microphone are used together), a green indicator appears. An orange indicator appears whenever an app uses the microphone without the camera. Also, a message appears at the top of Control Center to inform you when an app has recently used either.

In FaceTime, you can create a link to a FaceTime call and send the link to a friend or a group (using Mail or Messages). They can use the link to join or start a call, and you can even put a FaceTime link in a Calendar event to schedule a video meeting.

You can even invite people who don’t have an Apple device, as long as they’re using the latest version of Chrome or Edge, and they don’t need to log in.

  1. Open the FaceTime app on your iPhone.
  2. Tap New Call and then tap the Create Link button.
  3. Choose an option for sending the link (for example, Messages or Mail).

To schedule a remote video meeting in Calendar, insert a FaceTime link as the location of the meeting.

Note: People without an Apple device can join you in a FaceTime call, too, as long as their browser supports WebRTC, like the latest version of Google Chrome or Microsoft Edge. They don’t need to log in, and they can join one-to-one and Group FaceTime calls right from their browser. To send video, the browser needs H.264 video encoding support.

A Medical ID provides information about you that may be important in an emergency, like allergies, medical conditions, and your emergency contacts. Your iPhone and Apple Watch can automatically share your Medical ID during an emergency call (U.S. and Canada only) and in person to first responders.

You set it up in the Health app, and you choose whether emergency services and first responders can access it.

Here’s how to set up and view your Medical ID.

Create your Medical ID

Set up a Medical ID in the Health app.

  1. Start the Health app on your iPhone.
  2. Tap your picture, then tap Medical ID.
  3. Tap Get Started or Edit, then enter your information.
  4. Below Emergency Contacts, tap Add Emergency Contact, then add your contacts. After an emergency call ends, your iPhone alerts your emergency contacts with a text message, unless you choose to cancel. Your iPhone sends your current location (if available) and—for a period of time after you enter SOS mode—your emergency contacts receive updates when your location changes.
  5. Tap Done.

Quick tip: To view your Medical ID from the Home Screen, touch and hold the Health app icon, then choose Medical ID.

Allow emergency services and first responders to access your Medical ID

The information in your Medical ID can be shared automatically during an emergency call (U.S. and Canada only), and also appears on the Lock Screen of your iPhone and Apple Watch.

  1. Start the Health app on your iPhone.
  2. Tap your picture, then tap Medical ID.
  3. Tap Edit, scroll to the bottom, and turn on Show When Locked and Emergency Call.

Note: A first responder views your Medical ID from the Lock Screen by swiping up or pressing the Home button (depending on your iPhone model), tapping Emergency on the passcode screen, then tapping Medical ID.

Tag: Health

With Voice Control on your iPhone, you can speak commands to interact with what’s on the screen, perform gestures and button presses, dictate and edit text, and more. And with Apple Intelligence, you can describe onscreen elements in your own words instead of using exact labels—refer to an item by its name, what it does, its color, or where it appears on the screen.

You can pause or resume Voice Control, see what commands you can use, label onscreen items, and show a numbered grid on the screen.

Note: When Voice Control is on, you use Voice Control to dictate text; standard iOS Dictation isn’t available. Voice Control isn’t available in all languages.

Note: Apple Intelligence on iOS 27 or later is available on an Apple Intelligence-enabled iPhone 15 Pro, iPhone 15 Pro Max, or iPhone 16 model or later. Apple Intelligence is not available in all languages or regions. Usage limits may apply.* To use Apple Intelligence with Voice Control, you must have your system language and Voice Control language set to English.

Set up Voice Control

Before you turn on Voice Control for the first time, iPhone needs to be connected to the internet over a Wi-Fi network. Once iPhone finishes a one-time file download from Apple, Voice Control works without an internet connection.

  1. Start the Settings app on your iPhone.
  2. Tap Accessibility, tap Voice Control, tap Set Up Voice Control, and follow the onscreen instructions.

    When the download is complete, the Voice Control icon appears in the status bar to indicate that Voice Control is turned on.

  3. Set options such as the following:

    • Language: Set the language and download languages for offline use.
    • Commands: View the available commands and create new commands.
    • Vocabulary: Teach Voice Control to recognize new words and phrases. You can enter a word or phrase and teach Voice Control how you pronounce it, or import a vocabulary list.

      Note: Not all Voice Control languages support a custom vocabulary.

    • Show Confirmation: When Voice Control recognizes a command, a visual confirmation appears at the top of the screen.
    • Play Sound: When Voice Control recognizes a command, a sound plays.
    • Show Hints: See command suggestions and hints.
    • Flexible Item Names: With Apple Intelligence, you can refer to onscreen items in your own words instead of using their exact labels. This is turned on by default and can be turned off to use exact labels.
    • Continuous Overlay: Display numbers, names, or a grid over screen elements.
    • Attention Aware: On an iPhone with Face ID, Voice Control wakes up when you look at your iPhone and goes to sleep when you look away.
    • Prefer Bluetooth Headset: Use AirPods or Bluetooth® headsets when connected instead of the iPhone microphone.

    Note: Using Voice Control with AirPods and third-party headsets impacts audio quality and audio features like Siri announcements and Share Audio with AirPods.

Turn Voice Control on or off

With Voice Control set up, any of the following turns it on or off quickly:

  • Use Control Center if you’ve added Voice Control there.
  • Use Accessibility Shortcut if you’ve set it up to turn on Voice Control.

Siri: Ask Siri something like, “Turn on Voice Control.”

Start using commands

You just say a command to use Voice Control on your iPhone. And Apple Intelligence lets you describe the item you want to act on rather than use its exact label.

Voice Control: Say, for example, “Open Control Center,” “Go home,” “Tap item name,” or “Turn up volume.” Or with Apple Intelligence, say “Tap the button that sends the message” or “Tap the button at the bottom right.”

Quick tip: The interactive Voice Control Tutorial helps you get familiar with Voice Control and practice essential commands. To open it, go to Settings > Accessibility > Voice Control and tap Open Voice Control Tutorial.

Pause or resume Voice Control

Pausing Voice Control keeps the words you say from being interpreted as commands or dictation. Resume it when you’re ready for Voice Control to listen for commands and dictation again.

Voice Control: Say “Stop listening” or “Start listening.”

See what commands you can use

The list shows the available commands, which change based on the app you’re working in and what you’re doing. While writing a document, for example, you’ll see text formatting commands. Apple Intelligence also means you can describe an item in your own words rather than use its exact label.

Note: Voice Control: Say “Show commands.”

To browse the full list of supported commands and see examples of how to use them, go to Settings > Accessibility > Voice Control > Commands.

Label onscreen items

Not sure what to call something? Show a name or number next to each item on the screen, then use that name or number to interact with the item. With Apple Intelligence, you’re also free to describe an item in your own words, without its name or number.

Voice Control: Say “Show names,” “Show numbers,” or “Show text numbers.” Or with Apple Intelligence, say “Tap the blue button at the bottom.”

To interact with an item, say its name or number, or say a command—such as “Long press”—followed by the item’s name or number. The item names or numbers disappear after you say the command.

Show a numbered grid on the screen

Superimposing a grid makes it easier to interact with a precise area of the screen.

Voice Control: Say “Show grid.”

  • Interact with a location on the grid: If a number is at the location you want to interact with, say any command—such as “Tap”—followed by the grid number. The grid disappears after you say the command.
  • Drill down on an area of the grid: If you need to further refine the location, say a grid number to show a more detailed grid in that area.

Say “Hide names,” “Hide numbers,” or “Hide grid” to turn the overlay off.

Enter text

In a text input area, you can dictate character by character (with Spelling mode) or word by word (with Dictation mode). And so you don’t mistakenly enter a Voice Control command as text, you can have Voice Control respond only to commands (with Command mode).

When you’re in a text input area and label onscreen items with numbers, numbers are shown next to each line of text. Select a line or another section of the text to display a number for each word in the selection; select a single word to show a number for each character in the word. To interact with a text item (such as a line or a word), say a command followed by the item’s name or number. For example, you can say “Delete [item number]” or “Uppercase [item number].”

Command Description
Voice Control: Say “Dictation mode.” Dictate word by word. Any words you say that aren’t Voice Control commands are entered as text. Dictation mode is on by default. In some Voice Control languages, if several words phonetically match what you say, they appear onscreen. Tap to choose the one you want.
Voice Control: Say “Spelling mode.” Dictate character by character. Spelling mode is helpful when you need to enter a password, a web address, or another sequence of characters that wouldn’t be recognized as a word in Dictation mode. When Spelling mode is on, the Spelling Mode icon appears in the text input area. To increase accuracy when entering letters, you can use the letter’s phonetic alphabet code word (for example, say “Alfa Bravo Charlie” to enter “abc”). Note: Spelling mode isn’t available in all Voice Control languages.
Voice Control: Say “Command mode.” Voice Control responds only to commands. Words and characters that aren’t commands are ignored and aren’t entered as text. Command mode is helpful when you need to say a series of commands and don’t want them inadvertently entered in a text input area. When Command mode is on, the Command Mode icon appears in the text input area to indicate you can’t dictate to enter text.

Apple Intelligence is available with Siri and device language set to Chinese (Simplified), Chinese (Traditional), Danish, Dutch, English, French, German, Italian, Japanese, Korean, Norwegian, Portuguese, Spanish, Swedish, Turkish, or Vietnamese. Some features may not be available in all regions or languages, Apple says. Some devices may not be available in all regions.

Siri AI is available in beta in iOS 27, iPadOS 27, macOS 27, watchOS 27, and visionOS 27 and requires an Apple Intelligence–enabled device set to a supported language. Available in English to start. Siri AI will not be initially available in the EU on iOS, iPadOS, and watchOS. Certain Apple Intelligence features that rely on server-side models are subject to daily usage limits, including but not limited to Siri AI, Intelligent Photo Editing Tools, Image Playground, and AFM 3 Cloud models in Shortcuts.

Daily limits may vary by feature, request complexity, system demand, system policies, and other factors. Expanded access to such features will be available for a fee in the future. Use of these features is subject to the Apple Intelligence Terms and Conditions.