Got a tip for us?

iPhone

The iPhone is a smartphone from Apple that runs the iOS mobile operating system. Between its apps, communication features, the camera, mobile internet access, and other functionalities, the iPhone has quickly become an integral part of many peoples tech lives.

Apple tends to release operating system changes as a two-beat sequence, like our heart going LUB-dub: The LUB beat is a major flex, like the introduction of Liquid Glass across all their operating systems in 2025. This year is a “dub,” a building-or-rebuilding year, in which Apple largely tweaks the previous cycle and offers incremental improvements, though some may feel quite large. If you have just upgraded, ten of them are worth trying first.

The 2026 set of releases, numbered 27—like car models are numbered in fall for the following year—is a “dub.” We see the rollout of the long-promised Siri upgrade, called Siri AI. Along with its improved performance, Siri AI and Apple Intelligence both extend much more deeply into apps and system functions across nearly all platforms. That’s the flagship feature.

This includes significant improvements to on-device searching. When you use Spotlight in iOS 27 or iPadOS 27 on devices with Apple Intelligence support, the Spotlight field has changed from Search to Search or Ask. You can perform searches or ask Siri questions via the same entry field, which expands Spotlight’s reach and Siri’s scope.

Starting in iOS 27 and iPadOS 27 (as well as macOS 27 Golden Gate), Apple has leaned very heavily into so-called artificial intelligence to enhance the overall operating system experience and many apps. They rebranded Siri as Siri AI on devices with the minimum required hardware. (Check whether your device qualifies.)

Apple also offered four additional areas of focus:

  • Interface tweaks: Apple devoted significant time during their Worldwide Developer Conference presentation in June 2026 to stepping way back from interface overreaches with the Liquid Glass interface. Apple made a number of worthwhile improvements in macOS 27, but far fewer in iOS 27 and iPadOS 27. The key change is a Liquid Glass slider—also in macOS—that lets you choose a degree of translucency. In iOS 26.1/iPadOS 26.1, Apple added a binary choice of Clear (original flavor) and Tinted (somewhat less translucent). In iOS 27/iPadOS 27, that choice is now a slider.

The company also provided minor improvements to iPadOS 27, following the significant overhaul and improvements introduced in iPadOS 26, which were generally well received. See what’s new for iPad.

  • Child safety and Screen Time: Nobody loves Screen Time, because it works erratically and doesn’t always map to what parents want to limit. Apple has regrouped and reworked Screen Time to better allot time. Let’s see if it works better, too! Child safety enhancements include intervening for gore and violence, and better oversight of new connections in FaceTime, Messages, and Phone.
  • Accessibility: A cornucopia of individual improvements in Accessibility adds up. Among them: on-device subtitles for any video across all platforms, developer access to FaceTime that will let sign language interpreters join a call, and greater use of Apple Intelligence to describe things in images and in Magnifier.
  • Communications: While Apple didn’t perform the same kind of huge overhaul to FaceTime, Messages, and Phone in iOS 27 and iPadOS 27 as they did in the previous releases, I’ve provided a one-stop shop for changes affecting those apps, as well as cellular and Wi-Fi.

Apple also discussed in the lead-up to the release of the new operating system how much faster everything would be, but a list of those promises doesn’t help you get more familiar with iOS 27 and iPadOS 27! Because this book doesn’t benchmark these sorts of changes, I can only say: you should be pleased.

I don’t want to say everything else is miscellaneous, as there are hundreds—maybe thousands—of other changes. (You can find extensive rundowns.) Instead, let me say that Apple’s extensive work means many apps and system features have been modified, matured, or enhanced, as you will see in the rest of the book.

How Apple numbers its operating systems

Apple began their current numbering system in 2025, with the releases of iOS, iPadOS, macOS, tvOS, and watchOS all with a base number of 26 for 2026. This continued in 2026 with the release of all operating systems numbered 27.

Before this, Apple incremented their operating systems differently depending on whether they were initial or subsequent releases. A change described as coming from an older version will therefore show an 8- or 9-number leap—say, from iOS 18 to 26 or 27—even though “26” is the very next version after “18.”

Apple Intelligence reaches into a dozen apps. Where to find it in each one is set out separately. For the upgrade itself, start with which iPhones and iPads can install iOS 27, then how to install it.

The reason for the above change appears to stem from some extraordinary articles in the Wall Street Journal. In February 2023, the Journal published a story with an alarming headline: “A Basic iPhone Feature Helps Criminals Steal Your Entire Digital Life” by Joanna Stern and Nicole Nguyen. The article noted that individuals were reporting and police departments confirming that an increasing number of thieves were stealing people’s iPhones and coercing or extracting the corresponding passcodes through in-person methods. With the iPhone and its passcode, the thief could unlock an Apple Account using a loophole.

If you don’t enable Stolen Device Protection, you remain susceptible to this real-world exploit, and should read on.

How physical passcode theft happens

The Journal article details multiple kinds of attacks, the most prevalent of which is shoulder-surfing criminal teams, which involve one thief interacting with you and another surreptitiously watching you or recording you.

For instance, one ne’er-do-well might offer to take a couple’s photo. They take the picture, but then sneakily press and hold the volume up/standby button on the phone and tap Cancel (see how to set a stronger iPhone passcode) This requires a passcode to unlock, which someone might naturally enter. However, Stern explained on a podcast that tests with 4K iPhone video indicate someone could easily record your passcode entry from nearly across a room. Then it’s just a snatch-and-grab operation.

Even more disturbingly, the reporters interviewed a number of people who said they were physically assaulted and coerced into revealing their passcode and giving up their phones, or waking up believing they were drugged with their phone missing and later account issues. (The prevalence of druggings at bars has become something awful.)

The reporters explained a criminal can reset an Apple Account password with nothing more than an iPhone passcode and possession of the iPhone. At that point, if someone uses iCloud email with their financial and other accounts, the thief can send password resets and receive second factor SMS and device-based tokens to validate changes and logins. One victim, an economist, lost access to her Apple Account and everything attached to it, and told the reporters that about $10,000 vanished from her bank account within a day.

While Face ID and Touch ID can’t be used to extract your passcode and then reset your Apple Account, they can be used against you if you’re drugged, threatened, or in custody of a government that compels their use. See how to set a stronger iPhone passcode for how to disable Face ID or Touch ID quickly.

We don’t know the scale of these attacks, as there’s no comprehensive accounting and Apple hasn’t made a statement. Does it happen to hundreds of people a year in the United States—the article’s geographical focus—or tens of thousands? Because of that two-thief passcode approach, I’d put my money on hundreds to thousands where the passcode is obtained when an iPhone is stolen.

The Journal raised important questions about how tightly Apple has linked a passcode to the ability to log in to an Apple Account. That led Apple to create Stolen Device Protection.

None of this is the fault of crime victims entering their passcode in public or…being drugged or mugged. Rather, the person who stole from you—I mean, it shouldn’t even have to be said that it’s that person who did wrong.

Before venturing forth into the world:

  • Set a longer or more complicated passcode. This makes it harder for a thief to see or capture what you’re entering.
  • Enable Face ID or Touch ID. This prevents unsophisticated shoulder-surfer snoops. Coupled with the Stolen Device Protection option, it dramatically reduces your exposure to Apple Account and other data hijacking.
  • If you need to enter your passcode in public, make sure there’s no direct line of sight other than your own. Holding your hand over your phone or peering through your fingers is unfortunately not a ridiculous strategy. (I never enter my ATM PIN without holding my hand over the keypad.)

ATMs are also a prime spot for “skimmers” to be attached where thieves have a camera and sensor to grab your card number and PIN. Never use an ATM if anything around the keypad looks suspect, such as a raised external surface around any part.

  • Make sure Find My is turned on. This will help you later if you need to erase your device remotely.
  • Remove from your Photos library any images that show your passport, driver’s license, or Social Security number, or any other cards or information that contain numbers useful for information theft. (“Surely the writer of this book hasn’t left his…oh, no.” Deletes many images.)

This might deter most instances. But for best results, if you consider yourself possibly at risk, read on to enable Stolen Device Protection.

What to do after a theft

Stolen Device Protection doesn’t prevent robberies. If your device is brazenly or violently stolen, here’s what else you can do:

  • Access Find My: If you have access to Find My from one of your other devices right away, use a native app. Otherwise, you can use the Find My app on someone else’s device or log in to iCloud.com and use Find My there. (You have to have your iCloud password memorized or available through some backup method or other device, of course.)

Next, consider doing one or all of the following:

— Put the device in Lost Mode: If you have Stolen Device Protection enabled, putting your iPhone in Lost Mode could make it more recoverable as the thieves won’t be able to do anything useful with it. If the thieves haven’t powered down the iPhone or put it into Airplane Mode, it might immediately enter Lost Mode, or enter it the next time it has even the briefest internet connection. Because Find My is on, and the thieves can’t disable it, your iPhone retains Activation Lock, making it difficult or impossible to resell or reuse the phone.

— Erase the device remotely if it’s online: You can opt instead to try to erase your phone. If it’s online at any point, erasure is immediate, and Activation Lock remains on. In fact, it’s still trackable even after being erased with iOS 15 or later.

— Remove the device from your account if it’s offline: I recommend that if you don’t have Stolen Device Protection enabled and your iPhone is showing as offline, consider whether to remove the iPhone from your Apple Account on another device or via iCloud.com. This prevents Find My tracking, but it also halts iCloud syncing, so there’s a tradeoff.

  • Change your Apple Account password immediately: You may, ironically, need another trusted device connected to your account to do so.
  • Change important financial and email account passwords: If you don’t have Stolen Device Protection enabled, you should change critical passwords elsewhere; with it on, you might consider doing so anyway. After erasing or disconnecting your device, you can create new passwords they won’t have access to. (If you can’t erase or disconnect your device, turn off Passwords syncing in iCloud on your remaining devices.)
  • Call your phone company: If you haven’t enabled Stolen Device Protection, you can block your device from receiving SMS messages by calling your carrier. Have them remove the phone number from the SIM and disable the line temporarily at least. (If you wisely set a PIN for your cellular account, you’ll need that PIN to get the account locked, too.)

This experience can be scary. Theft and assault always is. If you can summon the strength to act quickly, you can minimize harm.

Automatic restart after three days

In late 2024, law-enforcement departments began to exchange stories of iPhones that had been unlocked and were kept carefully in that state in locked, shielded storage areas had spontaneously rebooted. While Apple didn’t make an announcement, iOS 18.1 apparently included a “reboot after inactivity” timer, according to reporting by 404 Media.

iPhones have two general states: Before First Unlock (BFU), which happens after a restart, and After First Unlock (AFU). An iPhone is easier to rummage through for investigative or illicit purposes in the AFU state, when its internal storage has been unlocked and other kinds of access remain available, even if some data remains protected by a passcode or biometrics.

Apple now apparently starts a three-day timer (as of 2026) when an iPhone is in the AFU state. If it’s inactive for that period of time, it restarts, putting it back into the harder-to-crack BFU state. Security researcher Matthew Green told 404 Media it wasn’t about blocking police access—but criminal use. He told them, “This feature means that if your phone gets stolen, the thieves can’t nurse it along for months until they develop the tech to crack it.”

Tags: iOS, Security

You can turn on and set up your new iPhone 18 Pro or iPhone 18 Pro Max with an internet connection. You can also set up iPhone 18 Pro by connecting it to your computer. If you have another iPhone, an iPad, or an Android device, you can transfer your data to your new iPhone 18 Pro.

Prepare for setup

To make setup as smooth as possible, have the following items available:

  • An internet connection through a Wi-Fi network (you may need the name and password of the network) or cellular data service through a carrier (not required for iPhone 18 Pro models)
  • Your Apple Account and password; if you don’t have an Apple Account, you can create one during setup
  • Your credit or debit card account information, if you want to add a card to Apple Pay during setup
  • Your previous iPhone or a backup of your device, if you’re transferring your data to your new iPhone 18 Pro

Tip: If you don’t have sufficient storage space to back up your device, iCloud will provide enough storage to complete a temporary backup, free of charge, for up to three weeks from the purchase of your iPhone. On your previous device, go to the Settings app 541ed016-e1c2-4e06-813b-7a5236b16a3a, tap General, then tapTransfer or Reset [device]. Tap Get Started, then follow the onscreen instructions.

  • Your Android device, if you’re transferring your Android content

Turn on and set up your iPhone 18 Pro

  1. Press and hold the side button until the Apple logo appears.

A green arrow pointing to the button on the right side of iPhone 18 Pro.

If iPhone 18 Pro doesn’t turn on, you might need to charge the battery.

Tip: If you’re blind or have low vision, you can triple-click the side button to turn on VoiceOver, the screen reader. You can also double-tap the screen with three fingers to turn on Zoom.

  1. Do one of the following:

    • Set up with another device: If you have another iPhone or iPad with iOS 11, iPadOS 13, or later, you can use it to automatically set up your new iPhone 18 Pro. Bring the two devices close together, then follow the onscreen instructions to securely copy many of your settings, preferences, and iCloud Keychain. You can then restore the rest of your data and content to your new device from your iCloud backup.

Or, if your other device has iOS 12.4, iPadOS 13, or later, you can transfer all your data wirelessly from your previous device to your new iPhone 18 Pro. Keep your iPhone 18 Pro near the other device and plugged into power until the migration process is complete.

- _Set Up Manually:_ If you don't have another device, tap Set Up Without Another Device, then follow the onscreen setup instructions.

Move from an Android device to iPhone

If you have an Android device, you can transfer your data with the Move to iOS app when you first set up your new iPhone 18 Pro.

Note: If you already completed setup and want to use Move to iOS, you must erase your iPhone and start over, or move your data manually.

  1. On your device with Android version 4.0 or later, download the Move to iOS app.
  2. On your iPhone 18 Pro, do the following:

    • Follow the setup assistant.
    • On the Transfer Your Apps & Data screen, tap From Android.
  3. On the Android device, do the following:

    • Turn on Wi-Fi.
    • Open the Move to iOS app.
    • Follow the onscreen instructions.

See also: How to Use iPhone 18 Pro and iPhone 18 Pro Max: A Beginner’s Guide

Learn how to use iPhone 18 Pro or iPhone 18 Pro Max with high quality screenshots! Our comprehensive guide is a useful resource for users who want to get the most out of their brand-new iPhone 18 Pro or iPhone 18 Pro Max! Images are perfect for visual learners, so this guide uses high quality screenshots to show you how to get started with the iPhone 18 Pro and iPhone 18 Pro Max. We walk you step-by-step through how to use basic features such as locking and unlocking your iPhone, all the way to advanced features such as using Siri AI. Whether you are new to the iPhone or have just upgraded to the 18 Pro or 18 Pro Max, this guide helps you unlock your phone’s full functionality and maximize your use and enjoyment of it.
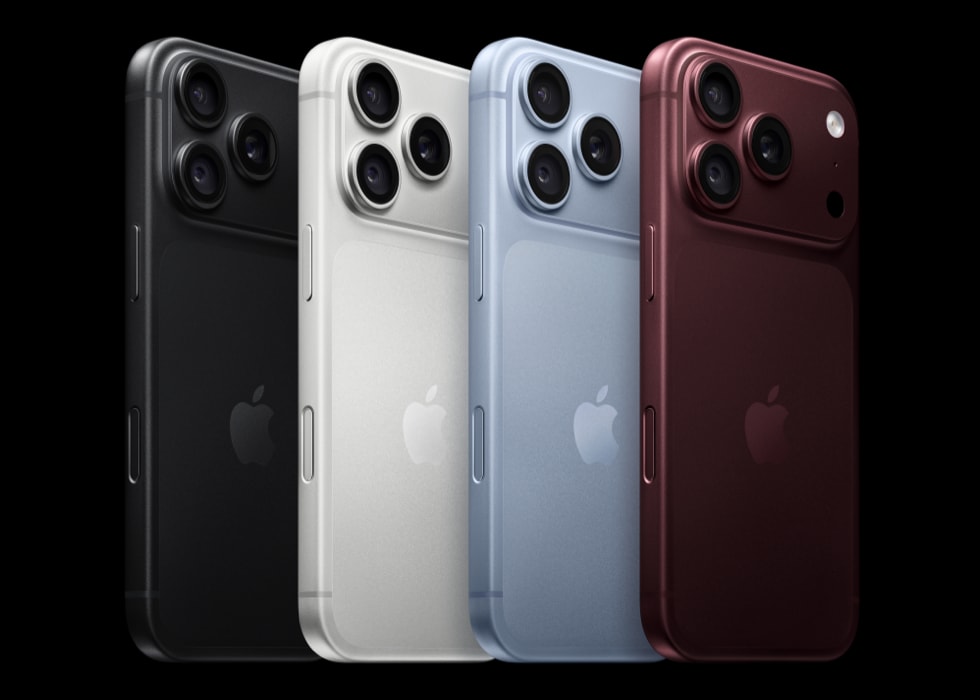
iPhone 18 Pro is displayed in black, silver, glacier, and burgundy.

Turn iPhone 18 Pro on or off

There are multiple ways to turn your iPhone 18 Pro on and off–you can use the buttons on the side of your iPhone, or you can use the controls in Settings and Control Center.

Turn on iPhone 18 Pro

Press and hold the side button until the Apple logo appears.
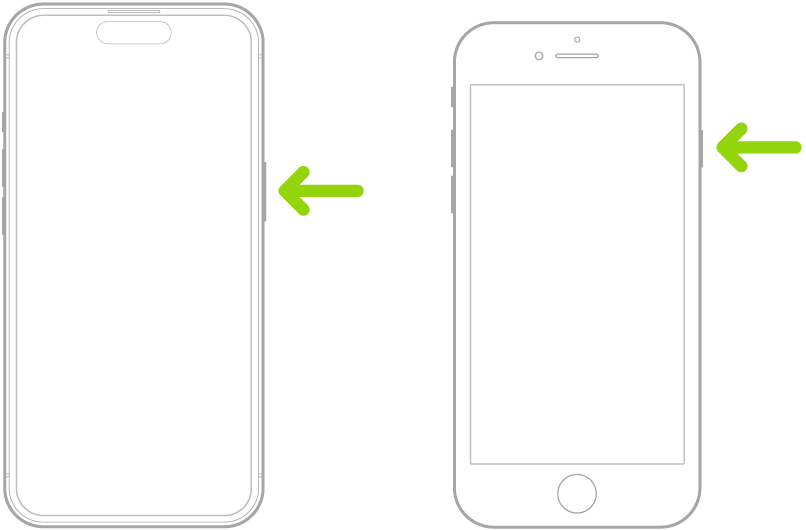
A green arrow pointing to the button on the right side of iPhone.

Turn off iPhone 18 Pro

Simultaneously press and hold the side button and either volume button until the sliders appear, then drag the Power Off slider.

Turn off iPhone 18 Pro in Control Center

  1. Open Control Center by swiping down from the top right of the screen.
  2. Touch and hold the Power button in the top-right corner of your screen.
  3. Drag the slider to turn off iPhone.

Turn off iPhone 18 Pro in Settings

  1. Go to the Settings app on your iPhone.
  2. Tap General, scroll down, then tap Shut Down.
  3. Drag the slider to turn off iPhone.

Wake, unlock, and lock iPhone 18 Pro

iPhone turns off the display to save power, locks for security, and goes to sleep when you’re not using it. You can quickly wake and unlock iPhone 18 Pro when you want to use it again.

Wake iPhone 18 Pro

To wake iPhone 18 Pro, do one of the following:
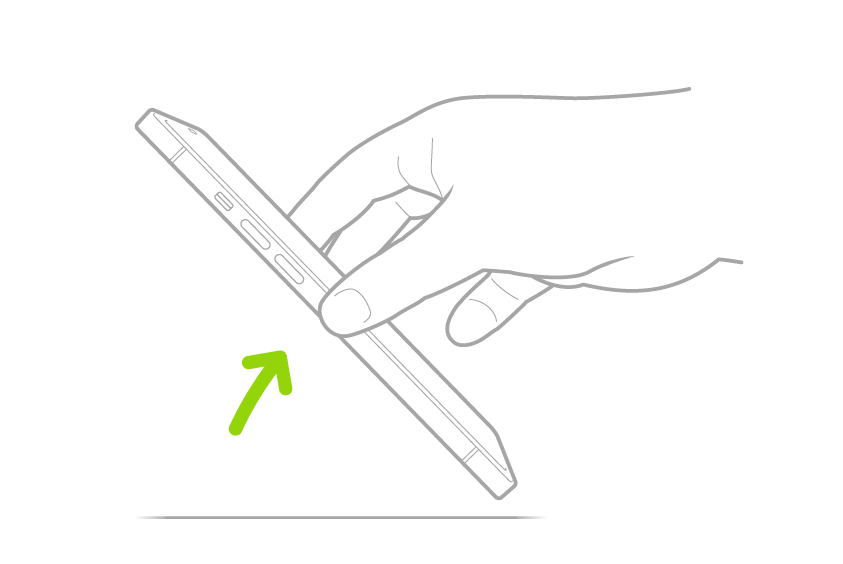
  • Press the side button.

A green arrow pointing to the button on the right side of iPhone.

  • Raise iPhone.

A hand lifting iPhone from a flat surface.

Note: To turn off Raise to Wake, go to the Settings app , then tap Display & Brightness.
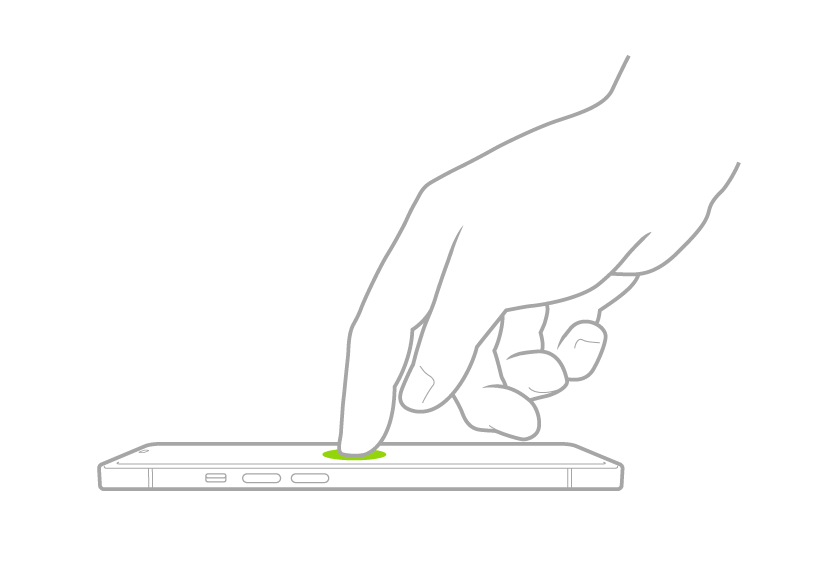
  • Tap the screen.

A finger tapping the screen to wake iPhone.

Unlock iPhone 18 Pro with Face ID

If you didn’t set up Face ID when you first set up your iPhone 18 Pro, go to Settings > Face ID & Passcode > Set up Face ID, then follow the onscreen instructions. Then follow these steps:

  1. Tap the screen or raise iPhone to wake it, then glance at your iPhone.

The lock icon animates from closed to open to indicate that iPhone is unlocked.

  1. Swipe up from the bottom of the screen.

Note: To lock iPhone again, press the side button. iPhone locks automatically if you don’t touch the screen for a minute or so. However, if Attention Aware Features is turned on, iPhone won’t dim or lock as long as it detects attention. To turn it on or off, go to the Settings app , then tap Face ID & Passcode.

Unlock iPhone 18 Pro with a passcode

If you didn’t create a passcode when you set up iPhone 18 Pro, go to Settings > Face ID & Passcode, tap Turn Passcode On, then follow the onscreen instructions. Then follow these steps:

  1. Swipe up from the bottom of the Lock Screen.
  2. Enter your passcode.

Lock iPhone 18 Pro

You can lock iPhone 18 Pro using the following methods:

  • Manually: Press the side button.
  • Automatically: iPhone locks on its own if you don’t interact with it for a certain amount of time.

When iPhone locks, the display turns off unless you’ve turned on the Always On Display.

Learn gestures for iPhone 18 Pro

Here’s a handy reference to the gestures you use for interacting with an iPhone 18 Pro or iPhone 18 Pro Max:

Gesture Description
Go to the Home Screen Swipe up from the bottom edge of the screen to return to the Home Screen at any time.
Quickly access controls Swipe down from the top-right corner to open Control Center; touch and hold a control to reveal more options. To add or remove controls, go to the Settings app, then tap Control Center.
Open the App Switcher Swipe up from the bottom edge, pause in the center of the screen, then lift your finger. To browse the open apps, swipe right, then tap the app you want to use.
Switch between open apps Swipe up from the bottom edge, then swipe right or left.
Use Siri Just say “Siri” or “Hey Siri.” Or press and hold the side button while you ask a question or make a request.
Use Apple Pay Double-click the side button to display your default card for Apple Pay, then glance at iPhone to authenticate with Face ID.
Use Accessibility Shortcut Triple-click the side button.
Take a screenshot Simultaneously press and quickly release the side button and volume up button.
Use Emergency SOS (all countries or regions except India) Simultaneously press and hold the side button and either volume button until the sliders appear and the countdown on Emergency SOS ends, then release the buttons.
Use Emergency SOS (in India) Quickly press the side button 3 times until the sliders appear and the countdown on Emergency SOS ends.

If you’ve turned on Accessibility Shortcut, simultaneously press and hold the side button and either volume button until the sliders appear and the countdown on Emergency SOS ends, then release the buttons.

Turn off Simultaneously press and hold the side button and either volume button until the sliders appear, then drag the top slider to power off. Or go to the Settings app, tap General, then tap Shut Down.
Force restart Press and release the volume up button, press and release the volume down button, then press and hold the side button until the Apple logo appears.

Use the Action button, side button, and other controls on your iPhone 18 Pro

Learn about the buttons and other controls on your iPhone 18 Pro and iPhone 18 Pro Max:

  • Side button: Use the side button to turn off your iPhone.
  • Volume buttons: Use the volume up/down buttons to adjust the volume when listening to music, watching videos, or playing games. When you’re not using other apps, the buttons will adjust the ringer volume.
  • Action button: You can choose what you want this button to do, including opening the Camera app or turning on the flashlight. By default, the Action button turns Silent mode on or off.
  • Camera Control: Use the Camera Control to quickly open your iPhone 18 Pro camera, capture photos or videos, and access camera settings.

Use the Lock Screen

The Lock Screen appears when you turn on or wake iPhone 18 Pro. From the Lock Screen, you can see notifications, open Camera and Control Center, get information from your favorite apps at a glance, control media playback, and more.

You can quickly access useful features and information from the Lock Screen, even while iPhone 18 Pro is locked.

Go to the Lock Screen, then do any of the following:

  • Open Camera: Swipe left. You can touch and hold the Camera button, then lift your finger.
  • Open Control Center: Swipe down from the top-right corner of your iPhone 18 Pro.
  • See earlier notifications: Swipe up from the center.
  • View more widgets: Swipe right. You can interact with widgets on the Lock Screen and the Home Screen to perform tasks–for example, tap an item in the Reminders widget to check it off, or tap the Play button in the Podcasts widget to play an episode.
  • Control media playback: Use the playback controls (Now Playing) on the Lock Screen to play, pause, rewind, or fast-forward media playing on your iPhone.

Use the Dynamic Island on iPhone 18 Pro

On iPhone 18 Pro and iPhone 18 Pro Max, you can check alerts and Live Activities–such as a Voice Memo recording in progress, an AirDrop connection, and directions from Maps–in the Dynamic Island on the Home Screen or in an active app whenever your iPhone is unlocked. On iPhone 18 Pro models, the Dynamic Island can show up to three Live Activities at the same time.
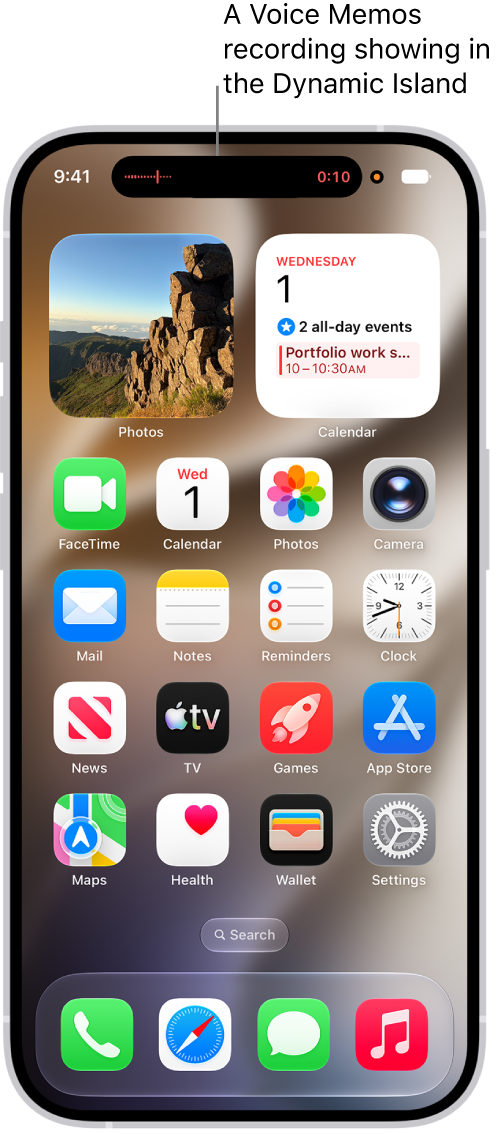
An iPhone Home Screen, showing a live Voice Memo recording in the Dynamic Island at the top of the screen.

You can do any of the following in the iPhone 18 Pro Dynamic Island:

  • Expand the activity to see more detail: Touch and hold the activity.
  • Collapse the activity to make the Dynamic Island smaller: Swipe the expanded activity up.
  • Switch between two activities: Tap the activity you want to view.
  • Move between activities: On iPhone 18 Pro models, the Dynamic Island can show up to three Live Activities at the same time. Swipe across it to move between them.

Personalize your iPhone 18 Pro

Customize the look of app icons on Home Screen
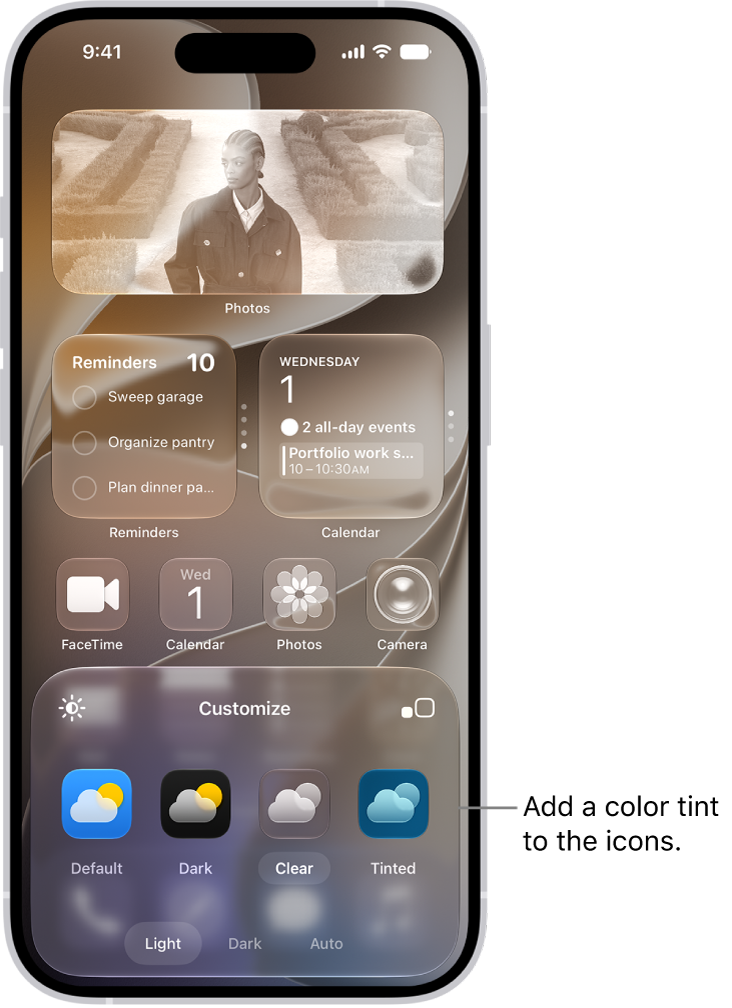
A customized Home Screen clear icons tinted blue and arranged to frame the photo, and controls at the bottom of the screen for customizing icons. Options include Automatic, Dark, Light, and Tinted buttons, options for choosing color and saturation, and Small and Large buttons for setting the icons' size.

You can change how app icons look on your iPhone 18 Pro Home Screen–adjust their size, apply a color tint, or switch between light and dark appearances.

  1. Go to the Home Screen.
  2. Touch and hold the Home Screen background until the icons begin to jiggle.
  3. Tap the Edit button, then choose Customize.
  4. Do any of the following:

    • Make the icons larger: Tap the Large App Icon button. In large size, the names of the apps disappear.
    • Choose a dark appearance: Tap Dark. To show icons and widgets with a dark appearance at night and a light appearance during the day, tap Auto.
    • Give the icons a clear look: Tap Clear to make the icons translucent, then choose Light, Dark, or Auto.
    • Add a color tint: Tap Tinted. Use the sliders to choose the color and saturation (or use the eyedropper to select a color in your wallpaper). Then choose Light, Dark, or Auto.

Change the wallpaper on iPhone 18 Pro

On iPhone 18 Pro, you can change the wallpaper on the Lock Screen and the Home Screen. You can set your wallpaper in Settings or through the wallpaper gallery from your Lock Screen.
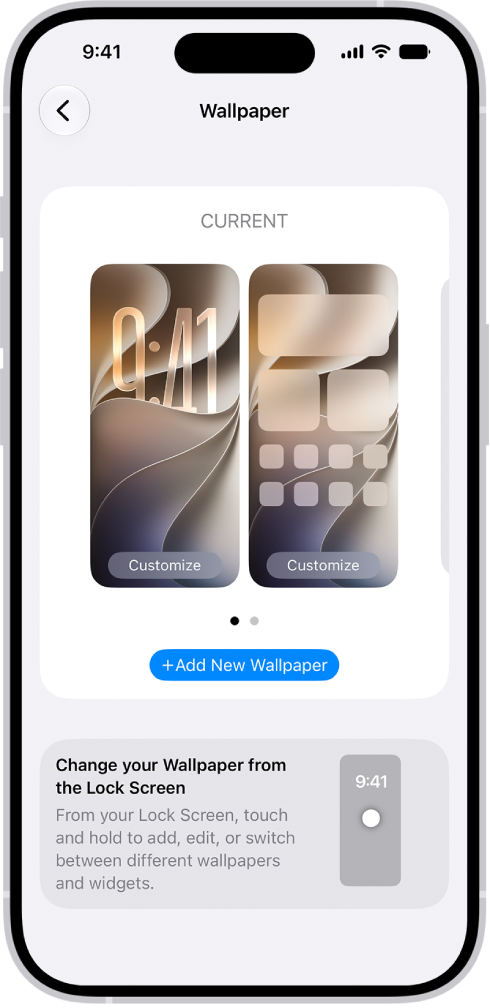
The Wallpaper Settings screen, with buttons for customizing the current wallpaper on the Home Screen and Lock Screen, and the Add New Wallpaper button for changing the wallpaper.

  1. Go to the Settings app on your iPhone.
  2. Tap Wallpaper, tap Add New Wallpaper, then do any of the following:

    • Tap a button at the top of the wallpaper gallery–for example, Photos, Emoji, or Color–to design your wallpaper.
    • Choose a wallpaper option from one of the featured sets (for example, Nature).

Note: If you don’t see wallpaper options you want to use (for example, Weather or Astronomy), scroll down to see more options, then tap Get below the one you like.

  1. Tap Add, then do one of the following:

    • Choose to use the wallpaper on both the Lock Screen and Home Screen: Tap Set as Wallpaper Pair.
    • Make changes to the Home Screen: Tap Customize Home Screen. Tap a color to change the wallpaper color, tap the Select a Photo button to use a custom photo, or select Blur to blur the wallpaper so the apps stand out.

Add a widget to your iPhone 18 Pro Home Screen
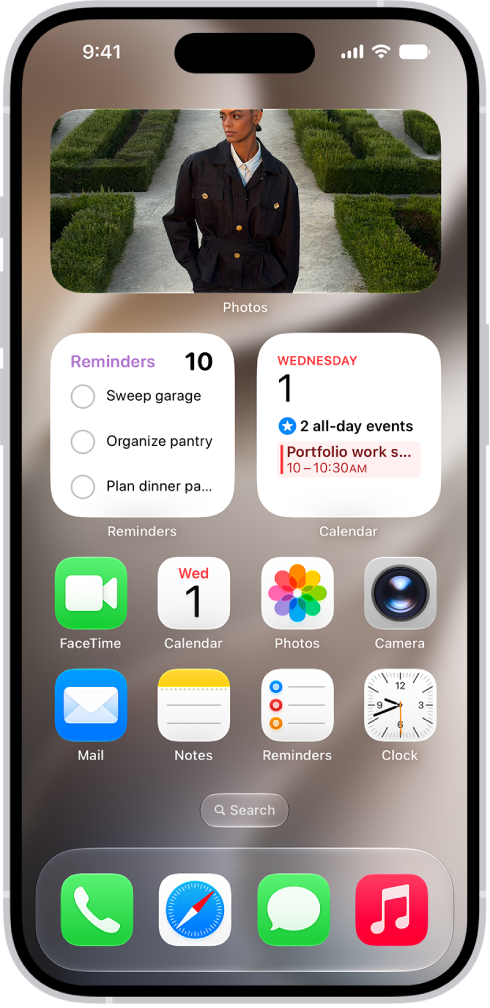
Weather, Reminders, and Home widgets on the iPhone 18 Pro Home Screen. The Reminders and Home widgets display interactive features.

Widgets give you an easy way to view current information from an app at a glance–today’s headlines, weather, reminders, battery levels, and more. You can add widgets to your iPhone 18 Pro Home Screen or Lock Screen to keep this information at your fingertips.

  1. Go to the Home Screen, then find the Home Screen page where you want to add the widget.
  2. Touch and hold the background until the apps begin to jiggle, tap the Edit button, then tap Add Widget.
  3. Scroll or search to find the widget you want, tap it, then swipe through the size and style options.
  4. When you see the size you want, tap Add Widget.
  5. While the apps are still jiggling, move the widget where you want it, then tap the Done button.

Change iPhone 18 Pro sounds and vibrations

You can change the sounds iPhone plays when you get a call, message, and alert.

Haptic feedback is the vibration you feel on your iPhone when you perform some actions, such as when you touch and hold any icon on the Home Screen.

To change ringtone and vibration settings on iPhone 18 Pro:

  1. Go to the Settings app on your iPhone 18 Pro.
  2. Tap Sounds & Haptics, then do any of the following below Ringtone:

    • Change your ringtone: Tap Ringtone, then tap a ringtone to preview it and select it.
    • Adjust ringer volume: Drag the volume slider.
    • Change the haptic pattern: Tap Haptics, then choose a pattern or tap Create New Vibration to record your own.
    • Control ringer volume with buttons: Turn Change with Buttons on or off.

You can also change the sounds iPhone plays for certain people. Go to the Contacts app , tap a person’s name, tap Edit, then choose a ringtone and text tone.

Adjust the screen brightness and color on iPhone 18 Pro
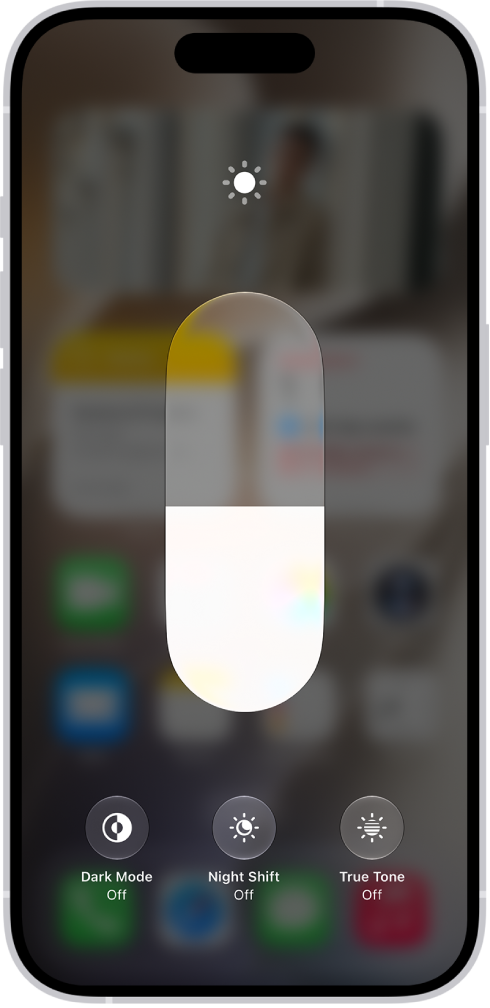
The iPhone Home Screen with Dark Mode on.

On iPhone, you can make your screen dimmer or brighter (dimming the screen extends battery life). You can also adjust the screen brightness and color manually or automatically with Dark Mode.

To make your iPhone 18 Pro screen dimmer or brighter, do one of the following:

  • Open Control Center by swiping down from the top right of your screen, then drag the Brightness button up or down.
  • Go to the Settings app , tap Display & Brightness, then drag the slider.

Dark Mode gives the entire iPhone 18 Pro experience a dark color scheme that’s perfect for low-light environments. With Dark Mode on, you can use your iPhone 18 Pro while, for example, reading in bed, without disturbing the person next to you.

Do any of the following:

  • Open Control Center by swiping down from the top right of the screen, touch and hold the Brightness button, then tap the Appearance button to turn Dark Mode on or off.
  • Go to the Settings app , tap Display & Brightness, then select Dark to turn on Dark Mode, or select Light to turn it off.

Use your Apps

Open apps on iPhone 18 Pro

You can quickly open apps from one of your Home Screen pages (like the one shown below) or your App Library.
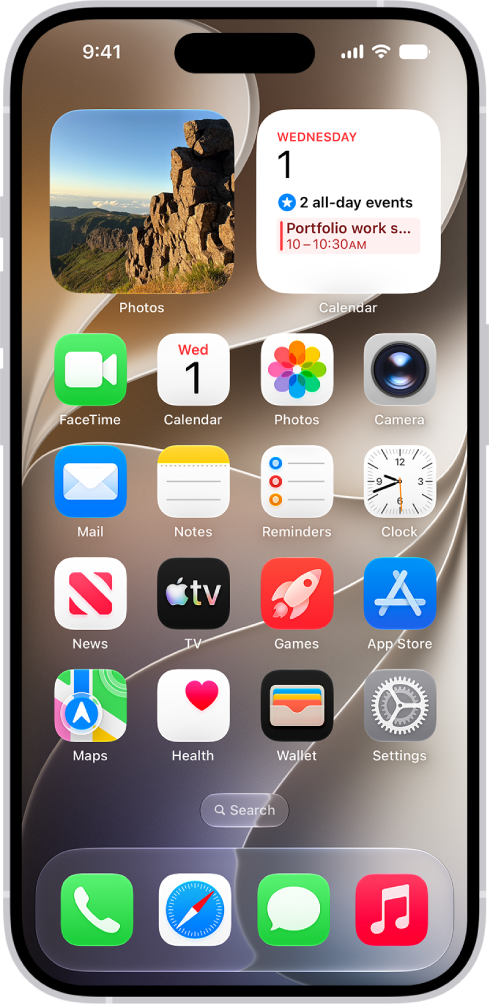
A screenshot showing an example of the default Home Screen.

  1. To go to the Home Screen, swipe up from the bottom edge of the screen.
  2. Swipe left to browse apps on other Home Screen pages.
  3. Swipe left past all your Home Screen pages to see App Library, where your apps are organized by category.
  4. To open an app, tap its icon.
  5. To return to App Library, swipe up from the bottom edge of the screen.

Quit and reopen an app on iPhone 18 Pro

If an app isn’t responding, you can quit it and then reopen it to try and resolve the issue.

Note: iPhone automatically manages how apps run in the background, so quitting apps you’re not using doesn’t prolong battery life.

  1. To quit the app on iPhone 18 Pro, open the App Switcher by swiping up from the bottom of the screen, pausing in the center of the screen, then lifting your finger. Swipe right to find the app, then swipe up on the app.
  2. To reopen the app, go to the Home Screen or App Library, then tap the app.

Switch between open apps

You can quickly switch from one open app to another on your iPhone 18 Pro. When you switch back, you can pick up right where you left off.

  1. To see all your open apps, swipe up from the bottom of the screen, pause in the center of the screen, then lift your finger.
  2. To browse the open apps, swipe right, then tap the app you want to use.

To quickly switch between open apps on an iPhone 18 Pro, swipe right along the bottom edge of the screen.

Use Phone, Messages and FaceTime

Make a call on iPhone 18 Pro

Making a phone call on iPhone 18 Pro is easy.
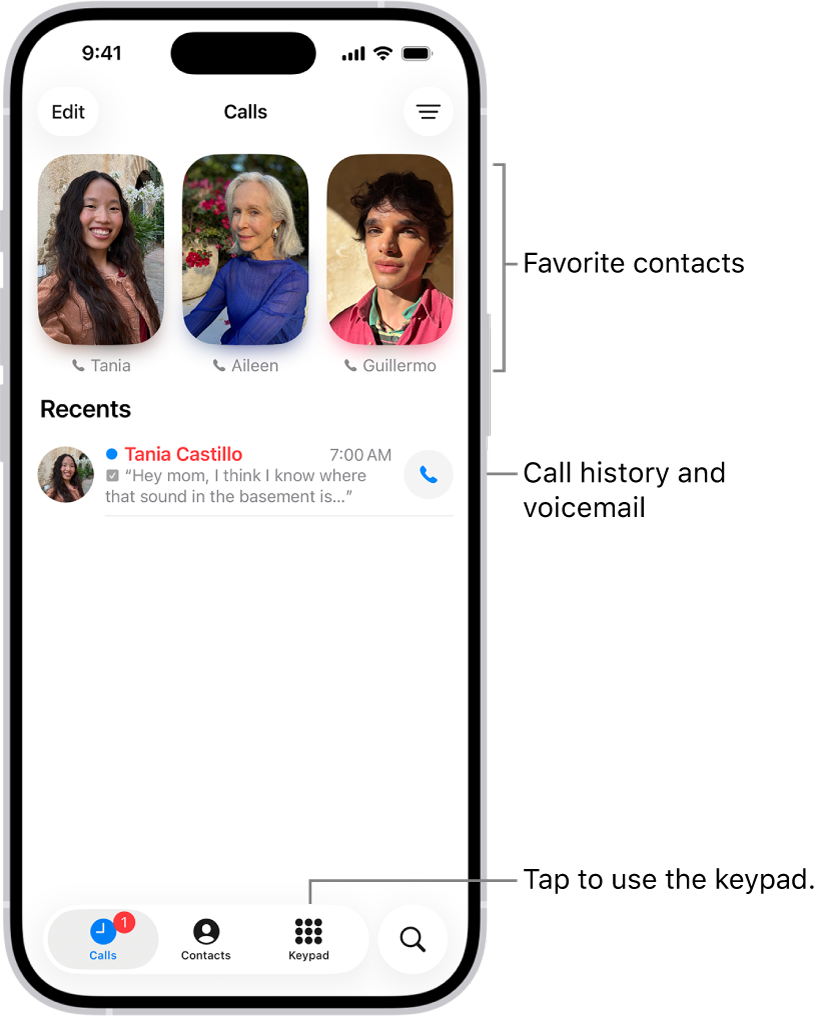
The Calls tab in the Phone app in Unified layout. Favorite contacts appear at the top. Below the Favorites is a list of recent calls and voicemail. Buttons to view the Calls, Contacts, and Keypad tabs appear at the bottom. The Search button is in the bottom-right corner.

Siri: Ask Siri to call or dial a number. Speak each digit separately–for example, “four one five, five five five….” For the 800 area code in the U.S., you can say “eight hundred.”

Or without using Siri:

  1. Go to the Phone app on your iPhone.
  2. Tap Keypad , then do any of the following:

    • Use a different line: On models with Dual SIM, tap the line at the top, then choose a line.
    • Enter the number using the keypad: If you make a mistake, tap the Delete button.
    • Redial the last number: Tap the Call button to see the last number you dialed, then tap the Call button to call that number.
    • Paste a number you’ve copied: Tap the phone number field above the keypad, then tap Paste.
    • Enter a soft (2-second) pause: Touch and hold the star (*) key until a comma appears.
    • Enter a hard pause (to pause dialing until you tap the Dial button): Touch and hold the pound (#) key until a semicolon appears.
    • Enter a “+” for international calls: Touch and hold the “0” key until “+” appears.
  3. Tap the Call button to start the call.

To end the call, tap the End Call button.

Make FaceTime calls on iPhone 18 Pro

With an internet connection, you can make and receive calls in the FaceTime app.
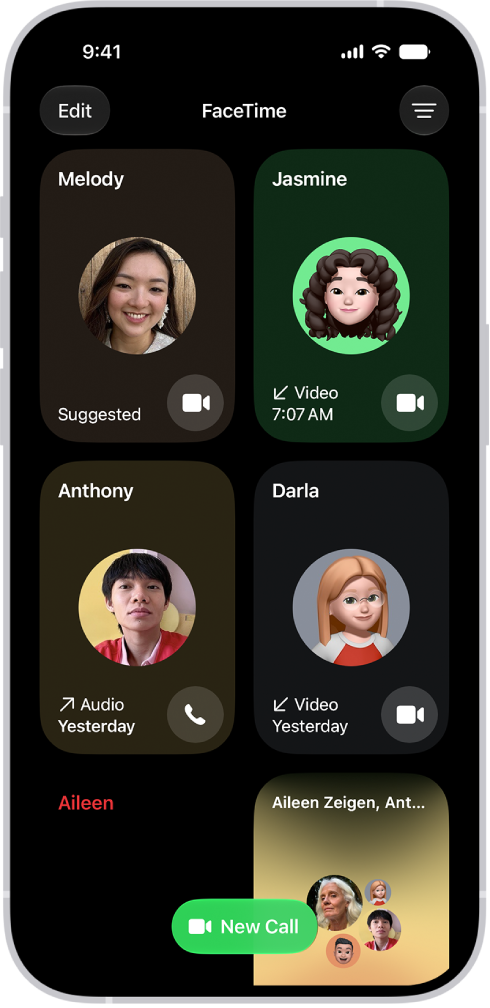
The screen for making a FaceTime call. The New Call button is at the bottom of the screen.

  1. Go to the FaceTime app on your iPhone.
  2. Tap New Call.
  3. Enter the name, number, or email of the person you want to call. Alternatively, you can tap the Add Contact button to open Contacts and add people from there, or tap a suggested contact.
  4. Tap FaceTime to make a video call or the Audio Call button to make an audio call.

Send and reply to messages on iPhone 18 Pro

You can send text messages, images, and much more. You can reply within a conversation or to specific comments in a thread. You can even use Siri to listen and respond to your messages.

Siri: Ask Siri something like, “Read my last message from Antonio.”
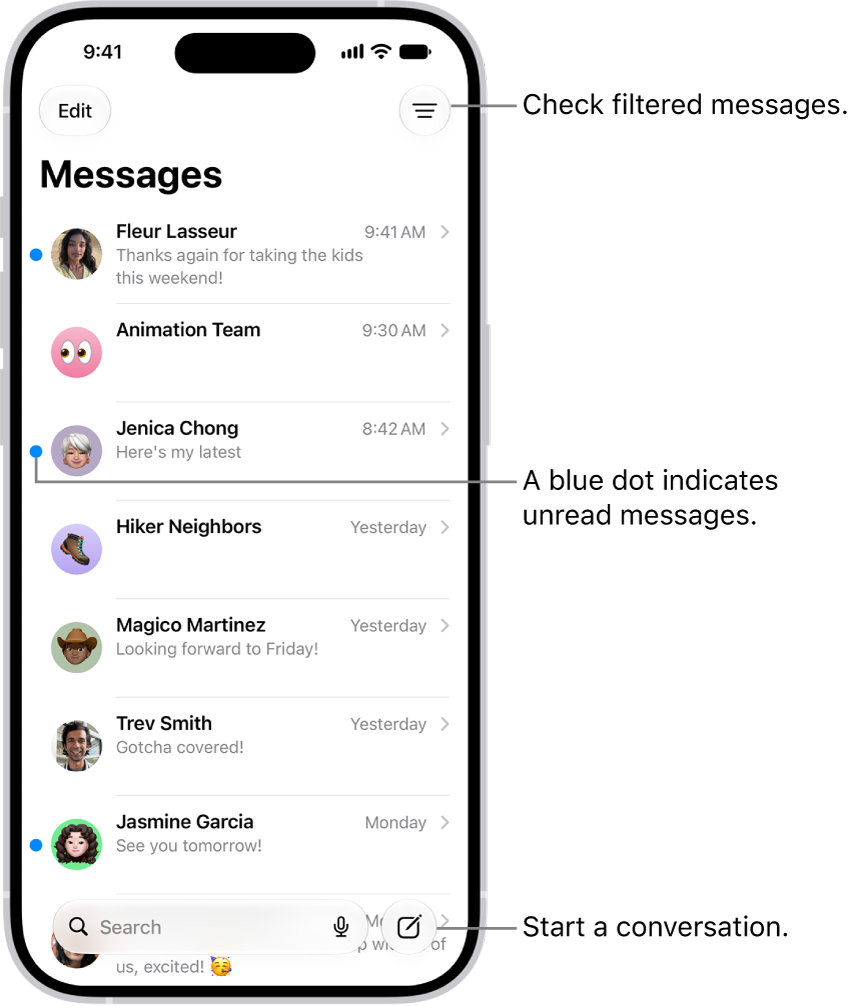
The Messages conversation list, with the Compose button at the bottom right. A blue dot to the left of a message indicates it's unread.

Start a conversation

You can send a text message to one or more people to start a new conversation.
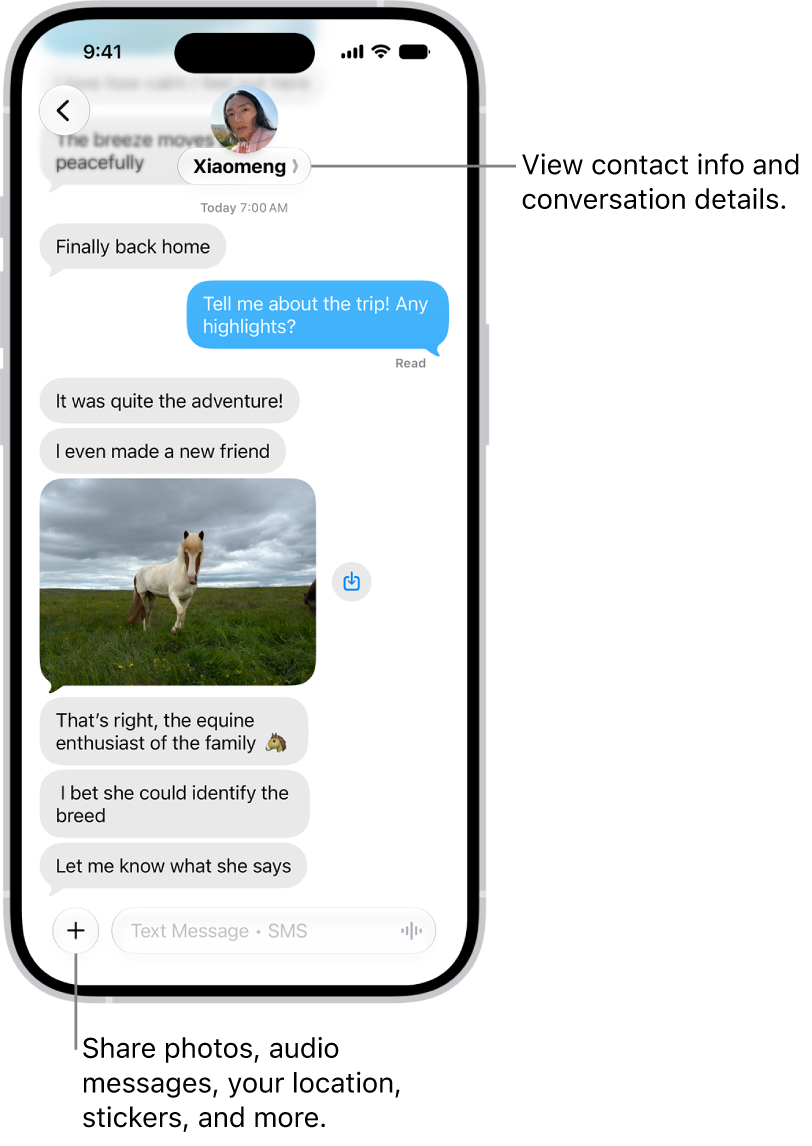
A Messages conversation. The name of the person you're sending messages to is at the top of the screen. You can tap their name to see conversation details. The Add button is in the bottom-left corner.

  1. Go to the Messages app on your iPhone.
  2. In the conversation list, tap the Compose button at the bottom of the screen.
  3. Tap the To field, then enter the phone number, contact name, or Apple Account of each recipient.

To choose recipients from your contacts, tap the Add Contact button in the To field.

  1. Do any of the following:

    • Tap the text field above the keyboard, then type your message.
    • Tap the Emoji key or the Next Keyboard key to add emoji.
    • Tap the Dictate key to dictate text in the language of your keyboard.
    • Tap the Add button (to the left of the text field) to send photos, videos, stickers, location, and more.
  2. Tap the Send button to send.

To return to the conversation list from a conversation, tap the Back button.

Reply to a message

Messages are grouped by conversation in the conversation list. A dot indicates you haven’t yet read one or more messages in that conversation.

  1. Go to the Messages app on your iPhone.
  2. Go to the conversation that you want to participate in.
  3. Tap the text field, create your message, then tap the Send button to send your message.

Use Camera on iPhone 18 Pro

Take a photo

  1. Open Camera on your iPhone 18 Pro.
  2. Tap the Shutter button or press either volume button to take a photo.
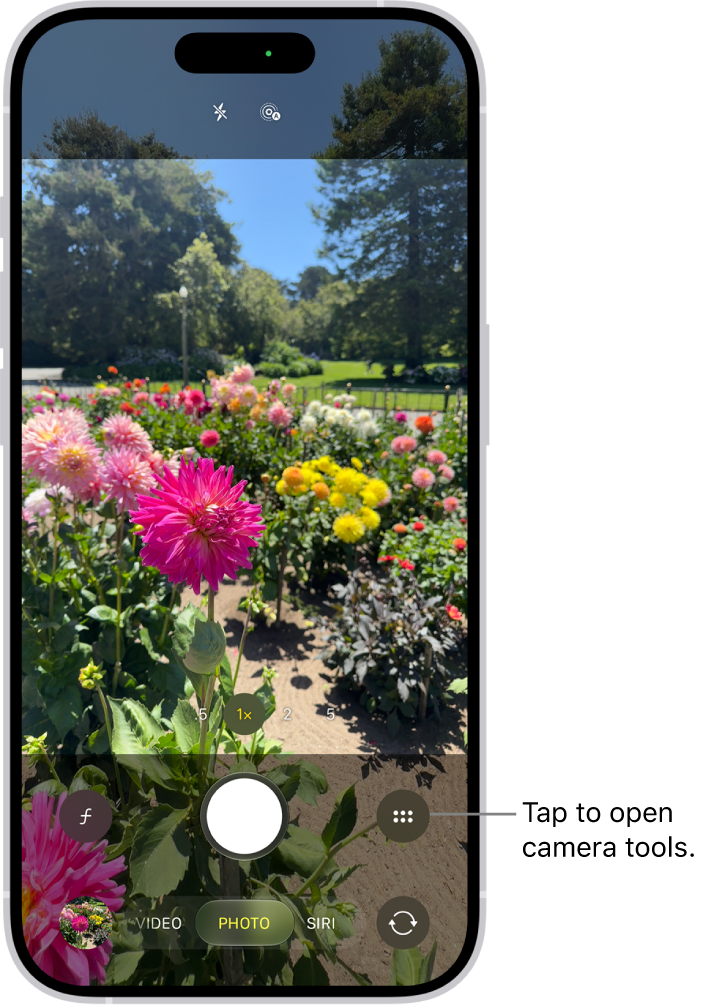
Camera is open in Photo mode. The Camera Controls button is in the top-right corner. The Photo and Video Viewer button is in the bottom-left corner. The Take Picture button is at the bottom center, and the Camera Chooser Back-Facing button is in the bottom-right corner.

You can also click the Camera Control button to open Camera, then click it again to take a photo.

Take a selfie with your iPhone 18 Pro camera

Use the front-facing camera on your iPhone 18 Pro to take a selfie. You can take selfies in Photo mode or Portrait mode.

  1. Open Camera on your iPhone.
  2. Tap the Camera Chooser Back-Facing button to switch to the front-facing camera.
  3. Before taking the selfie, you can do any of the following:

    • Tap the Selfie Zoom Zoomed In button to increase the field of view; tap the Selfie Zoom Zoomed Out button to return to the original view.
    • Tap the Change Aspect Ratio button to rotate the frame from portrait to landscape on supported models; tap the Change Aspect Ratio button to return to portrait.
  4. Tap the Shutter button, press either volume button, or click the Camera Control to take the selfie.
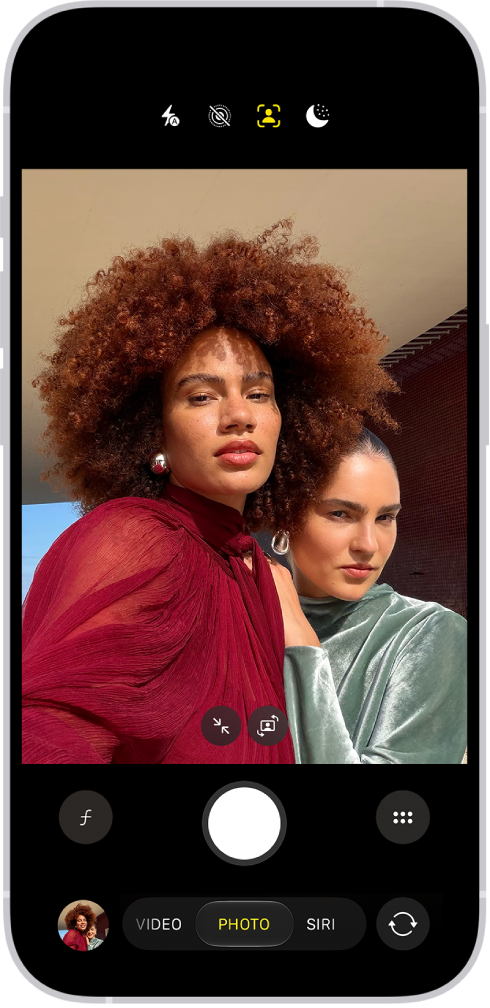
The Camera screen in Photo mode. Within the camera frame, the subjects are taking a selfie.

Use Siri AI on iPhone 18 Pro

Siri AI (Beta) is your conversational AI assistant with entirely new capabilities, including personal context understanding, onscreen awareness, and broad world knowledge. With Siri AI, you also have Siri mode in Camera, which allows you to search, ask questions, and take action based on what’s around you, and a dedicated Siri app that brings all your conversations in one place. These new capabilities make Siri a more capable assistant by allowing you to find what you need and get more done.

Siri AI

Turn on Siri AI on iPhone 18 Pro

  1. Go to the Settings app on your iPhone 18 Pro.
  2. Tap Siri, then do one of the following:

    • If Siri is off: Tap “Turn on Siri,” then tap “Try Siri AI (Beta).”
    • If Siri is on: Tap “Try Siri AI (Beta).”
  3. Follow the onscreen instructions.

An iPhone showing Siri finding content specified in the request.

Find what you need

Siri AI can search your photos, mail, messages, calendar, and more to find exactly what you’re looking for. Ask Siri to find a photo from years ago, a recommendation from a family member, and details about your friend’s flight itinerary from your email or calendar.

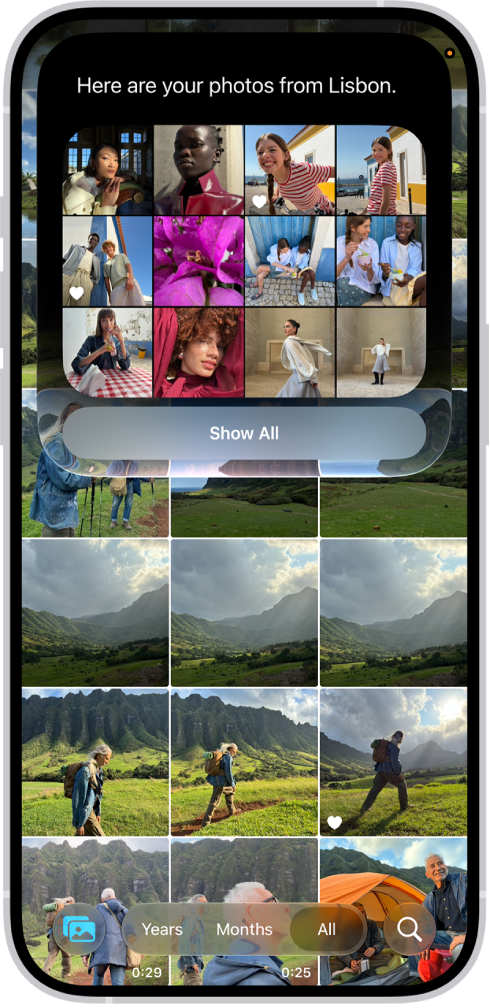
Siri AI: Activate Siri, then say something like, “Find photos from my trip to Lisbon” or “What time should I leave to pick up Antonio?”
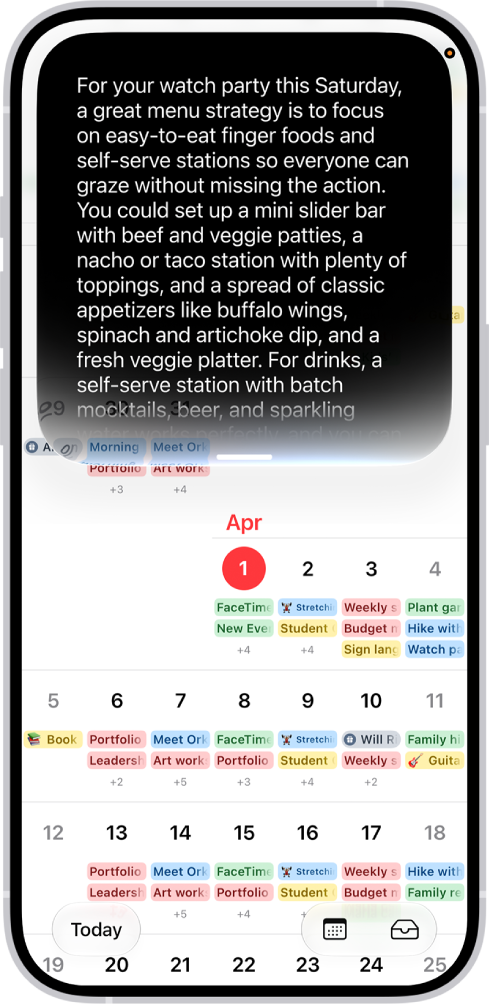
An iPhone showing Siri answering a request to plan a menu based on a calendar event.

Get more done

With onscreen awareness and an understanding of your personal context, Siri AI helps you get more done. Ask Siri to plan a menu for an event or add ingredients from a recipe to your shopping list. Siri can also take action in more apps and even make suggestions for what you might want to do next.

Siri AI: Activate Siri, then say something like, “Plan a menu for my watch party on Saturday.” Swipe down on the Siri response to see the full menu and make follow-up requests, like “Send this to the fantasy league group chat.”
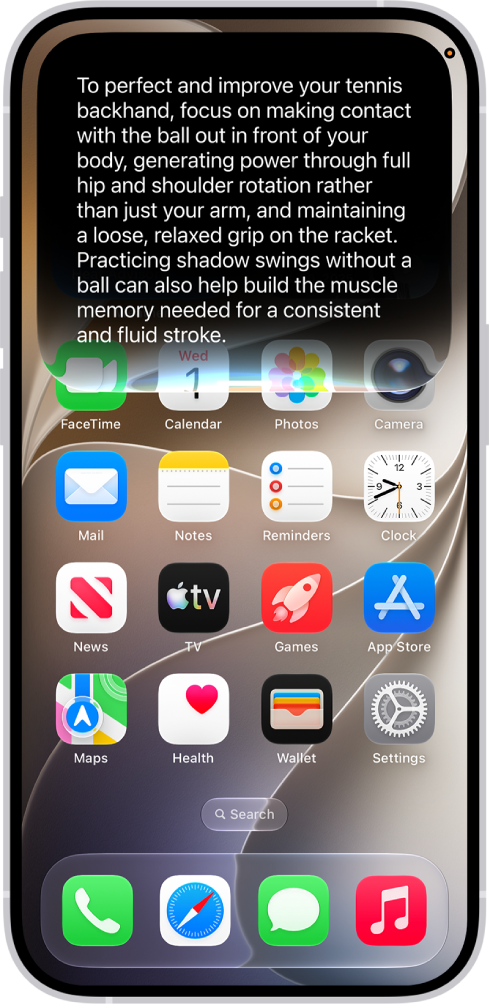
An iPhone showing Siri answering a request about how to improve a tennis backhand.

Ask about any topic

Siri AI has broad world knowledge, which is combined with your personal context to give you detailed, up-to-date, and relevant insights to your questions. Ask about virtually any topic–from finding the perfect weekend activity to do with family to details about the world around you.

Siri AI: Activate Siri, then say something like, “Give me some tips on how to improve my tennis backhand” or “When will cherry blossoms reach peak bloom this year?”
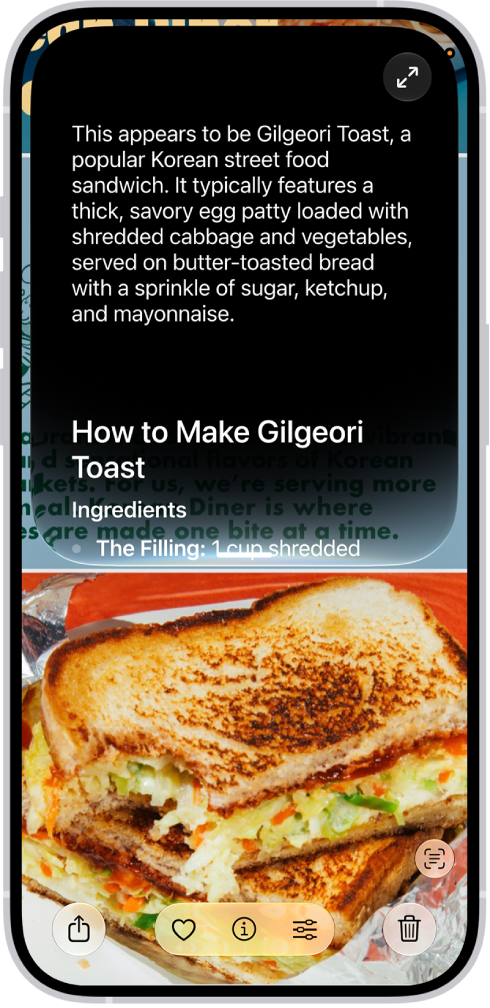
An iPhone screen shows a response from Siri identifying what's on the screen.

Learn about what’s on your screen

Ask Siri about content on your iPhone screen–like an image or PDF–to get answers, search, or take action.

Siri AI: Activate Siri, then say something like, “What is this and how do I make it?” Swipe down on the Siri response to see the recipe and make follow-up requests, like “Add the ingredients to my shopping list.”
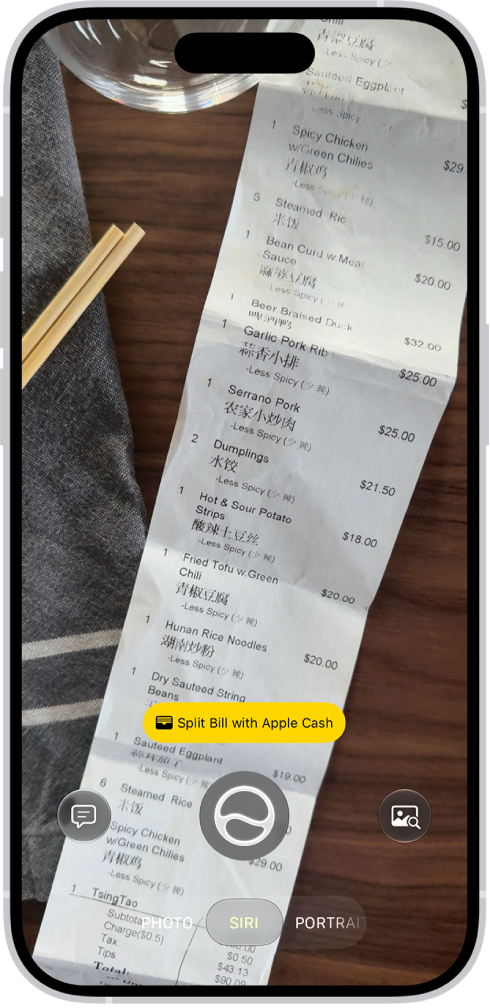
An iPhone with Siri mode in Camera showing a suggestion to split the bill with Apple Cash.

Discover and take action on the world around you

Siri mode in Camera uses Visual Intelligence to let you quickly identify something, ask questions, search based on what’s in your camera frame, or take quick actions–like splitting a bill with friends when you get the check or quickly importing a card to Apple Wallet.

Siri AI: On your iPhone with Camera open, tap Siri to switch to Siri mode, or click and hold the Camera Control when your iPhone is locked. Point your iPhone camera at something around you, then tap the Ask button to ask a question. You can also tap a suggestion–for example, while pointing the camera at a check, tap “Split Bill with Apple Cash” when it appears, then follow the onscreen instructions.
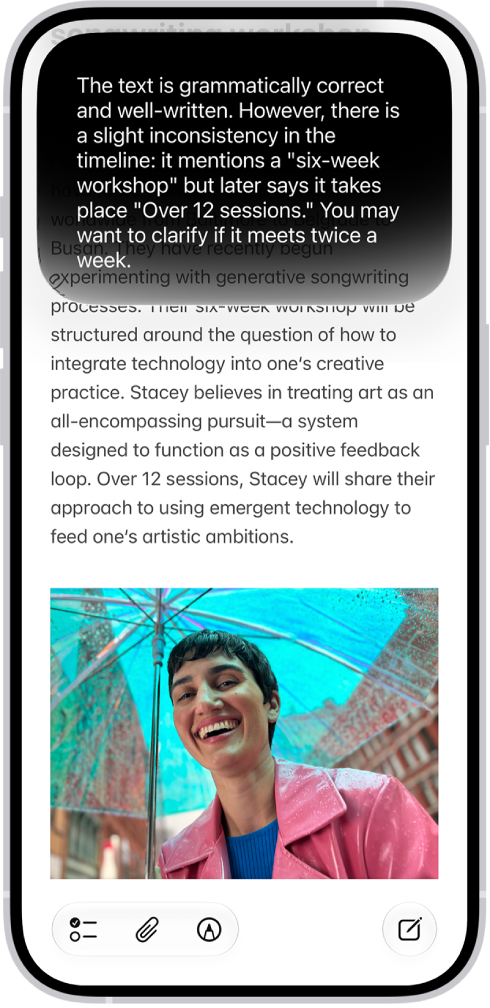
An iPhone showing Siri proofreading and giving feedback on text.

Write with Siri

Siri AI can generate a draft from scratch, summarize information, and provide feedback on what you’ve written–just describe what you want. For example, ask Siri to proofread a note or to write an itinerary for an upcoming trip.

Siri AI: Activate Siri, then say something like, “How’s this sound?” or “Write a day-by-day itinerary for a 3-day trip to New York.” Swipe down on the Siri response to continue to revise or ask follow-up questions.
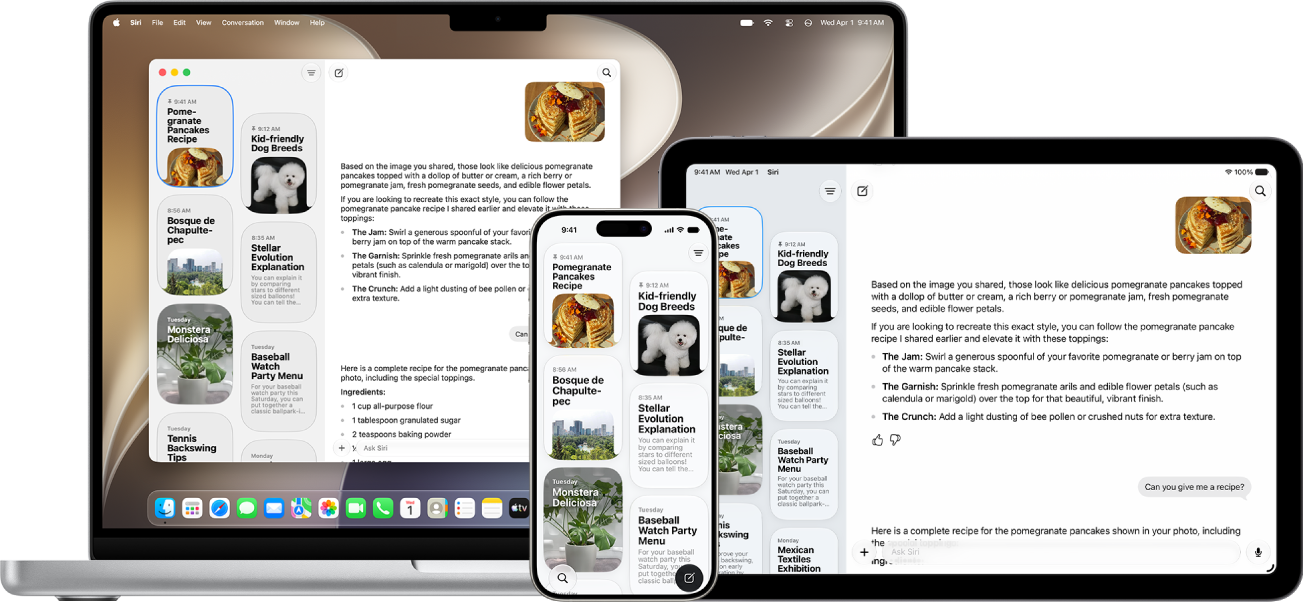
The Siri app on an iPhone, iPad, and Mac.

Keep the conversation going

The Siri app brings all your conversations in one place, allowing you to pick up where you left off or start new conversations.

Siri AI: Go to the Siri app on your iPhone, then select a conversation or tap the New Conversation button to start a new one.

View and respond to notifications on iPhone 18 Pro

Notifications help you keep track of what’s new–they let you know if you missed a call, if the date of an event moved, and more.

To see your notifications in Notification Center, do any of the following:

  • On the Lock Screen: Swipe up from the middle of the screen.
  • On other screens: Swipe down from the top-left corner. Then you can scroll up to see older notifications, if there are any.

To close Notification Center, swipe up from the bottom with one finger.

When you have multiple notifications in Notification Center or on the Lock Screen, they’re grouped by app, which makes them easier to view and manage. Notifications from some apps may also be grouped by organizing features within the app, such as by topic or thread. Grouped notifications appear as stacks, with the most recent notification on top.

Do any of the following:

  • To expand a group of notifications to see them individually: Tap the group. To close the group, tap Show Less.
  • To view a notification and perform quick actions if the app offers them (on supported models): Touch and hold the notification.
  • To open a notification’s app: Tap the notification.

Charge the iPhone 18 Pro battery

Battery icon with a lightning bolt indicates that the battery is charging.

The battery icon shows the battery level or charging status. When you’re syncing or using iPhone, it may take longer to charge the battery.

Charge the battery

To charge iPhone 18 Pro, do any of the following:

  • Connect iPhone 18 Pro to a power outlet using the charging cable (included) and an Apple USB power adapter or other compatible power adapter (sold separately).
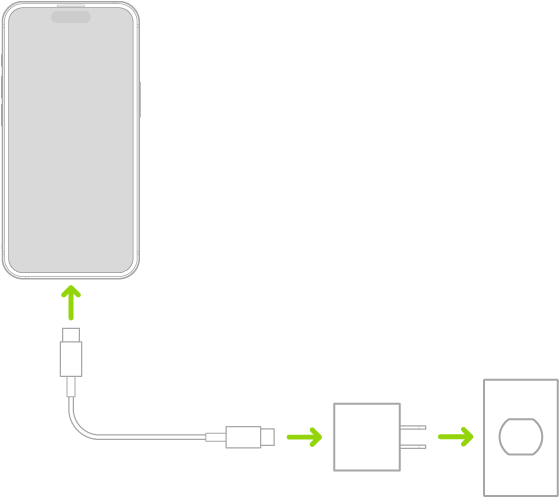
iPhone connected to the power adapter plugged into a power outlet.

  • Place iPhone 18 Pro face up on MagSafe Charger (connected to Apple 20W USB-C power adapter or other compatible power adapter) or on a Qi-certified charger. (MagSafe Charger, power adapters, and Qi-certified chargers are sold separately.)

Show the iPhone 18 Pro battery percentage

You can view how much charge remains in your iPhone 18 Pro battery in the status bar.

  1. Go to the Settings app on your iPhone.
  2. Tap Battery, then turn on Battery Percentage.

On an iPhone 18 Pro, the battery percentage appears inside the battery symbol on the status bar.

Tip: On iPhone 18 Pro, you can also swipe down from the top-right corner to quickly view the battery percentage in Control Center.


Apple released Siri AI in 2026: a digital assistant that works with voice recognition and typing, and represents a major expansion of the previous Apple Intelligence system woven throughout their operating systems. Siri AI marks the biggest step forward in this area the company has ever taken.

This comprehensive guide rounds up all of our Siri AI and Apple Intelligence coverage, making it a useful resource for casual users who haven’t had a chance to test out the new Siri and those who might not remember all of the new Siri features. It’s also a great resource to send to friends and family members who have questions about Siri AI features.

How Apple got here

Apple started deploying what’s loosely called “artificial intelligence” over a decade ago, when they silently switched the original Siri voice-assistant system to use a neural network—a software model that mimics neurons in the brain—in 2014. Unfortunately, even then, Siri was always somewhat frustrating to use unless you learned exactly the set of words you should use for particular kinds of instructions, and were patient when it got it wrong—repeatedly. Other voice assistants, like Amazon’s Alexa and Google Assistant, offered more natural interactions.

Meet Siri AI

Siri AI is the latest evolution of Apple’s original voice-only assistant. On supported devices, you can trigger Siri AI by voice, through a button press, or by swiping and typing, among other methods. Then you can ask it questions, or just search stuff that’s on your device.

Chatting with it

For the first time in Siri history, you can ask Siri questions or ask it to do something and almost always get a satisfactory outcome. Revolutionary! Even better, Siri retains context: you can have an ongoing conversation in the Siri app, and the vastly upgraded chatbot feature now doesn’t lose the thread.

Accessibility features

Apple devices have long offered a wide range of features intended to make them easier to use for people who have difficulties with some aspect of the default interface—which doesn’t necessarily imply a disability, but also encompasses personal preference and a limited tolerance for Apple’s Liquid Glass shenanigans, for example.

Visual Intelligence

Visual Intelligence’s remit has grown substantially since it originally let your iPhone describe what it saw via the Camera in iOS 18.2. Generally, Visual Intelligence lets you query what it “sees” in a screenshot or through the camera, or take action on what appears. Swipe your finger around something to prompt a visual search that can explain what you’ve highlighted.

Inside the apps

Apple Intelligence has its own role in Apple’s operating systems, starting iOS 18, iPadOS 18, and macOS 15. The company expanded Apple Intelligence offerings in the version 26 operating systems, and then added many more features across apps in version 27. These are the Apple Intelligence features built into Apple’s own apps.

The bits we don’t recommend

As writers and technologists with combined experience in the tech industry of well over six decades—much of it focused on Apple—we have fairly well-developed opinions about which features are genuinely useful to a wide range of people and which ones lack practical utility and are more effective as marketing tools. That’s especially true for people in our age range (Gen X) and older, who constitute the vast majority of our readers.

Even though we want to be thorough and describe all the Apple Intelligence capabilities, there are a few that we think most people are better off avoiding because they may waste your time or may negatively impact your life. Those are the Image Playground app, Genmoji, and Write with Siri (formerly known as Writing Tools); you can make up your own mind as to whether they’re worth your time.

Settings worth changing

The Siri pane of Settings/System Settings lets you configure numerous aspects of Siri AI. You can use this pane to understand whether Siri AI is currently engaged, which is not always the case.

An iPhone or iPad will detect any item within Bluetooth range that is traveling with you persistently, whether the device works with Apple’s or Google’s crowdsourced ecosystem. An alert helps you take action.

An iPhone or iPad shows an alert that reads “AirTag Found Moving with You” or “Item Detected With You,” depending on which is true. iOS 17.5/iPadOS 17.5 or later can also detect Google trackers.

You might see such an alert because you borrowed something that has an AirTag attached or hidden in it without that person sharing the item with you. For instance, my wife has a Find My item in the car she drives most frequently. We solved the problem with device sharing. See how to share an AirTag with someone else.

The name of an Apple tracker will appear as Person Name’s Name They Gave Device, like “Moses Johnson’s Wallet.” I haven’t determined where Apple pulls the name from, but likely the Apple Account associated with the device—another strong clue to or the actual identity of the tracking person. If the name isn’t retrievable, the generic model type is shown instead. Google items also reveal some identifying information, like their serial number.

Apple told me that the alert appears for someone in three particular circumstances:

  • They arrive home, as defined in the Me card in Contacts.
  • They arrive at a Significant Location (see sidebar ahead).
  • It is the “end of the day” and they haven’t been alerted yet. Apple declined to explain when the end of the day is measured.

Apple once said they planned, in a future release, to provide alerts “sooner” than the scenarios described above. They didn’t define what “sooner” means, however, and never set a timeline for changes. It’s been years!

Because Find My items routinely change the encrypted Bluetooth ID they transmit, this recognition that an item is moving with someone has to happen over what we believe is 12 to 24 hours. Apple doesn’t disclose the interval at which the Bluetooth ID changes.

What you can do about it

The person who receives the alert can ignore it. They may know they have someone else’s Find My item with them, or they may not know why they’re receiving it, and it isn’t of interest to them.

However, the person who sees the alert can tap it to open a screen explaining why it appeared. The screen explains that “The owner can look up its location,” that they can mute the alert, that they can play a sound, and that they can get “visual guidance” to locate it. Tap Continue, and a map appears showing the track detected with a red dashed line.

This map can be viewed later by tapping the item in the Items/Unknown Items Detected With You list in the Items view; see below.

This track is made up of points at which a device has detected that the item is traveling with someone. The device knows only the time-bounded encrypted Bluetooth ID of the item and a location that the device determines.

They can now choose an option:

  • Find: Find My guides you to the item, either with Precision Finding with an AirTag (see how to use Precision Finding) or imprecise location via Bluetooth.
  • Play Sound: Play Sound is the rare communication that passes from a device to a Find My item. It uses Bluetooth to trigger a sound from the device to help determine its physical location. AirTags produce a mid-level volume pattern of audio; the Chipolo ONE Spot has a 120 dB emitter that is pretty impossible to not pay attention to. Other Find My items vary from loud to extremely loud.
  • Pause Tracking Notifications: Pause Safety Alerts doesn’t disable tracking, but stops the device from popping up the “Detected/Moving with You” warning. Strangers can tap to disable notifications for a day; people in your Family Sharing group see the additional option to pause indefinitely. (I recommend sharing an item in this case.)

If you don’t take an immediate action on an item that’s been identified as traveling with you, it appears in the Items list in a new category, Items Detected With You.

I’d argue your best strategy is to find the device using Find and Play Sound, then use the Find My app’s ability to learn more about the item as described in how to identify an AirTag you have found.

You can use the native Find My app on an iPhone, iPad, or Apple Watch (the Find Items app) to find nearby Find My items. See how to identify an AirTag you have found.

With Android 6 or later and a 2024 update, you should receive alerts about Apple and Google tracking devices with no additional effort on your part. The message and options are similar to those on an iPhone or iPad.

There’s also a manual scanning app called Tracker Detect that Apple released for Android. It requires Android 9 or later. See how to identify an AirTag you have found.

Why an AirTag chirps alone

The iPhone or iPad requirement for the previous notification leaves out people with older hardware or who use an Android phone that doesn’t have Apple’s Tracker Detect app installed (or no smartphone at all). For them, Apple has the device itself issue a secondary warning.

Whenever an item becomes separated from its owner, it starts an internal timer. At a random point 8 to 24 hours later, the AirTag or third-party item plays a sound—but only when it’s moved. This timer is internal to the device, so it’s not reliant on other hardware tracking Bluetooth IDs over time.

Some third-party trackers produce a sound dramatically louder than the 1st-generation AirTag. Apple increased audio volume with the 2nd-generation AirTag, which the company says is 50% louder. While the company declined to answer questions about loudness and anti-stalking measures, it’s clear that the more intense sound benefits both finding an AirTag you placed intentionally and one placed without your knowledge.

This requirement that the device be moved strikes a balance between deterring stalking and allowing the use of Find My items for items that you want to remain in place without you around. Because the owner of an AirTag or other item knows where they left it the last time their paired device was nearby, the only information they can derive if it isn’t moved, is that it has remained in place. That could reveal some “negative knowledge”: that someone’s purse or car, say, remained in place. Yet, the unwanted-tracking party would never be sure whether or not it were moved and made a great racket. That risk will help deter misuse.

A great justification for the movement requirement comes from an example a friend gave me. His son wanted to put an AirTag on his bike when he parked it at school for more than eight hours at a time. If the bike started keening while left behind, this might lead passersby or university police or security to investigate.

The same is true if you’re traveling or living with other people. If you or others leave bags or items behind while elsewhere for extended periods, you and they don’t want a sound to go off in the middle of the night, say, or from an obscure closet.

Significant Locations stay on your device

Your iPhone or iPad takes note of places you frequently visit, and some others it thinks are “significant.” I went to a sushi place once, was there for a few minutes picking up takeout, and my phone decided that was significant.

Significant Locations are stored only on your devices, and are synced using end-to-end encryption. Apple says they never have access to them, and that iPhones, iPads, and Macs use them entirely on-device.

These locations are stored in Settings/System Settings > Privacy & Security > Location Services > System Services (tap on an iPhone or iPad; click Details on a Mac). The label reads Significant Locations & Routes starting in iOS 26/iPadOS 26 and Tahoe; it’s called Significant Locations in earlier releases. Tap the item or click Details next to it on a Mac. You can view the places you consider significant, disable the feature, or clear the locations currently stored.

Where to get help

There are many organizations beyond law enforcement eager to help people trapped in situations of domestic abuse or child subject to violence and an unsafe environment. For adults in the United States, that includes the National Domestic Violence Hotline; for children or those concerned about their welfare in the United States and Canada, the Childhelp National Child Abuse Hotline.

For those being stalked, one starting point is Safehope. It’s more likely you will need the help of police or federal authorities. Local police departments have their own paths to navigate, but for online or cyber stalking, it may be better to start with the FBI.

If the person you are worried about may be watching your device, use one they cannot see. Removing a tracker or turning off sharing can be noticed, and advocates warn that it can make a situation worse rather than better, so it is worth talking to someone before you act.

In a native Find My app or the Find Items app on an Apple Watch, you can discover the location of your AirTags and other Find My items in the Items view and any someone else has shared with you. The map zooms in as with Devices; in the version 27 releases, select again to deselect the item, and the map zooms out.

If you have any 2nd-generation AirTags, they appear only on devices updated to at least version 26.2.1 of Apple’s operating systems.

Ultrawideband (UWB) can be used for short-range finding, which Apple calls Precision Finding. (See AirTag 2 vs AirTag for the explanation of UWB.) A Find button with a Nearby label beneath it appears as an option if you have an iPhone 11 or later and you are trying to find an AirTag that’s nearby. It can also be used—in a more complicated manner—with certain Apple Watch models; see below. Precision Finding works with your own Find My items and any that other people have shared with you.

Tap Find and Find My pops up a wayfinding mechanism that tries to detect, range, and point to the item. Apple doesn’t provide details about the distance over which they expect Precision Finding to function. However, in my testing and that of many others, you typically start seeing a signal connection display within about 30 feet (10 meters). As you get within about 10 to 15 feet (3 to 4.5 m), a proximity indicator shows distance and direction.

That’s the baseline capability with a 1st-generation AirTag or either generation of AirTag with an iPhone that has a 1st-generation UWB chip. Apple upgraded UWB with a 2nd-generation chip in the 2nd-generation AirTag and in the iPhone 17 series, the iPhone Air, the Apple Watch Ultra 3, and the Apple Watch Series 11. A 2nd-generation AirTag and any of these devices should see about 50% greater range, according to Apple.

If your device has haptic feedback and it’s enabled, an iPhone vibrates more or less strongly as you lock onto the correct direction and come closer. You can tap the speaker button to briefly play a sound from the AirTag to aid in finding it.

When you’re adjacent to the item, Find My replaces the distance with the label “here” (yes, in lowercase), and shows a 3D rotating image of the item at the center of the display.

Why it says More Light Required

If you use Precision Finding when it’s dark around you, Find My might show the error “More Light Required.” It’s not that UWB requires light. Rather, it appears Apple uses some camera and sensor inputs to help orient your iPhone relative to an AirTag or AirPods Pro (2nd generation) charging case. You can tap the Flashlight button to help.

UWB is not available at all in 10 countries. Indonesia and Nepal allow its use only with items and devices that have the 2nd-generation UWB chip: the 2nd-generation AirTag, the iPhone 17 series, the iPhone Air, the Apple Watch Series 11, the Apple Watch Ultra 3, and the MagSafe Charging Case for AirPods Pro 3.

Precision Finding on an Apple Watch

Apple built a 1st-generation UWB chip into the Apple Watch starting with the Apple Watch Series 9 and the Apple Watch Ultra 2. But Apple didn’t enable Precision Finding until watchOS 26.2.1, and limited it to Apple Watch models with a 2nd-generation UWB chip: the Apple Watch Ultra 3 and the Apple Watch Series 11, as noted above.

Further, you don’t use Find Items for Precision Finding. Perhaps due to its late addition, Precision Finding can be used only via the Apple Watch Control Center. Press the side button to reveal Control Center, and scroll down to Edit and tap it. Tap the plus button, and any available AirTag appears. Tap to add it. Return to the Control Center when you want to use Precision Finding with that AirTag.

As you turn towards the AirTag, the display lights up green, indicating you’re getting warmer. If the item moves while you’re trying to find it, Find My shows a diffuse display indicating it’s in motion.

What else an item’s sheet offers

Select an item in the list and view its sheet of actions. Many of the actions are the same as for devices; here are the exceptions:

  • Share AirTag: Share or manage sharing of an AirTag. See how to share an AirTag with someone else. (For AirTags shared with you, a Shared AirTag label appears.)
  • Change Name and Emoji/Rename Item: On an iPhone or iPad, this option lets you change the item’s name, required because all items lack a display or interface. You can also change the emoji.
  • Find: When using the Find My app on any iPhone 11 series phone or later with an AirTag and the item is within a short distance, Directions is replaced with Find.
  • Serial number and other details: You can obtain the serial number of a Find My item in one of two ways when viewing its sheet of actions:

— AirTag: On an iPhone or iPad, tap the name area, and the serial number (and firmware release) appear.

— Find My item: On the sheet shown on an iPhone, iPad, or Mac, scroll or swipe down to see a panel of information, including the manufacturer’s name, the item’s model, serial number, and firmware version.

— Apple Watch: Select the item, scroll down, and tap Show Details for either an AirTag or Find My item.

Tags: Find My, iOS

AirTags, third-party items, and associated accessories can be used in a lot of ways, some of them more obvious than others. Clearly, you might add them to a keychain (AirTags require a keychain holder), or zip them into the pocket of a purse, messenger bag, backpack, or luggage.

Less obvious might be placing them in an interior pocket of a jacket, sewing them into clothing, or putting one in a saddle bag on your bicycle—or on a pet’s collar.

Apple differentiates between hardware that can use both the Find My Device options and Find My network and those, like AirTags, that can only use Find My network. The former, like Macs, iPads, and audio hardware, Apple always calls devices; the latter, items.

An AirTag is a powerful piece of always-on, always-broadcasting technology that can help you in four distinct ways:

  • Track stuff you lose: If you routinely can’t find things, I would urge you to not be ashamed of it. All brains are different and, as I’ve learned from my wife—an ADHD/executive-function coach—some people are not wired to retain the location of objects. Hurray, technology can help!
  • Track stuff that gets stolen: A sad fact of existence across all societies and in nature is that organisms steal from one another. If you’re concerned about theft or have been a victim of it, a Find My item can sometimes help with recovery.
  • Tracking kids: Parents definitely overestimate the risk of a child being abducted by a stranger. But the number of children who go “missing” for an hour or a few hours is huge. They might take the wrong bus, get lost, or actually be perfectly safe with a family friend, relative, parent, or guardian other than the one who is legally responsible. Putting a tracking tag in a kid’s backpack or clothing may alleviate worries and reduce anxiety.
  • Tracking animals: Those who have pets know they roam. Sometimes, we’re just curious where they get to. Other times, we need to rescue them when they’re stuck or lost. Except in quite rural areas, a lost or wayward pet is almost always quite near an Apple device possessed by people passing nearby.

Do not track adults

Tracking a child can be fraught with issues of agency, consent, and purpose, but it’s generally legal (this is not legal advice) and may be advisable. For adults, however, it’s nearly always unwarranted and unwelcome, and may violate civil statutes and constitute a crime unless one is in a guardianship relationship with the person (again, this is not legal advice). See how to check whether someone is tracking you for more on how Find My items can be misused.

Keys, wallets and small things

For items like keychains, wallets, and even non-Apple mobile devices like gaming consoles or Kindles, adding a Find My item can mean the difference between tearing your hair out while never finding something and easily recovering it.

Apple offers AirTag cases with key rings and other attachments from third parties at their online and retail stores, but there are many more, including those with built-in carabiners (and some of those with combination locks).

You might also consider a third-party Find My item that’s designed for attachment or fitting in a wallet. Many companies now make thin, wallet-sized trackers (3.35 by 2.1 inches or 85 by 54 mm), several of which can be wirelessly recharged using a Qi charger.

You can also “roll your own” solution. For an expensive pair of headphones one of my kids purchased and used away from the house, I attached a Chipolo ONE Spot: it’s thin, circular, matte, and flat—no bulge, unlike an AirTag. It blended in nearly invisibly with the headphones. We tested its weight by first attaching it with painter’s tape to wear around the house.

We paired it with their iPhone, and I attached it with an absurdly strong but removable acrylic adhesive film (3M’s 468MP). The ONE Spot has a remarkably similar black tint to the headphones, too.

Bags and luggage

We carry our lives in our purses, fanny packs/bum bags, messenger bags, and luggage. And they’re danged easy to lose, get stolen, or have an airport fling into the outer darkness, never to be seen again.

A Find My item is a chef’s-kiss match for bags. There are many ways to insert an AirTag or other item into a bag. Many AirTag cases are designed to snap onto, wrap around, or clip onto bag straps. Some even have adhesive to glue them inside a hidden area of your bag.

Even within an airport, the density of people with Apple devices and the precision of the Find My network can help you track down your luggage among thousands mounded all around you.

I started putting AirTags and Find My items in all my checked and carry-on bags—even in my wallet—when I resumed air travel in 2022. It’s worked like a charm. My family now uses about 15 AirTags across all our luggage and carry-on bags—and three trombones.

Starting in iOS 18.2/iPadOS 18.2 and macOS 15.2 Sequoia, you can opt to share a secure link that will allow them to track your item for up to seven days or until found. Apple added this to help airlines and other people recover your lost stuff that has a tracker in it. (See how to share an AirTag with someone else.)

Using iOS 26 and iPadOS 26 or later, you can add baggage to an airline flight record, so that you can see your tracked luggage at a glance. See how to track lost luggage with an AirTag.

Cars

A Find My item in a car won’t readily deter thieves because an item that’s separated from your paired device for any period of time or that travels with someone—i.e., thieves who have stolen your car—will alert a nearby iPhone, iPad, or Android device (see what an “AirTag Found Moving With You” alert means).

However, if you frequently have to park your car in different places in your neighborhood, in garages, or around work, using Find My can be a nice adjunct to dropping a pin in Maps.

My wife, who is savvy about privacy issues, opted to put an AirTag in the car she drives most often of our two after losing track of it in a badly designed, discontinuous, multi-part garage—with multiple identical-looking entrances to different subterranean floors. (I’ve lost my car in the same facility.) She was reassured by Apple’s security and privacy protocols with Find My items.

When someone else drives the car when you’re not in it, they would normally receive alerts about an AirTag moving with them. You can avoid that alert, however, by sharing the Find My item. You can share access to a Find My item with up to five other people; see how to share an AirTag. Everyone with shared access to a Find My item is treated like the owner: they don’t receive safety alerts and can track it.

Bikes

About 100 million bikes are in people’s homes in the United States, and a few tens of millions of people ride regularly. Annual thefts range from 150,000 (reported) to 2,000,000 (estimated). If you live in a high-theft area for bikes, the odds could be 5% or more that your bike will be stolen at some point across years of public use.

You can hide an AirTag in a lot of places on a bike—though I wouldn’t recommend it inside a bike, as the metal would prevent effective radio-signal transmission. I suggest an Elevation Lab TagVault: Bike. It’s a case that screws into a standard water-bottle cage mount. You can screw a cage in or use it by itself. It’s not obtrusive, and a thief might be unaware that it’s a tracker at all.

The Knog Scout is a hybrid option. It’s a Find My device that also offers Bluetooth-based alarm arming. Attached beneath a water bottle cage, you can use Find My to track it like any other item, and you can also arm it when within Bluetooth range to trigger a loud alarm. If you’re within range when the alarm goes off, you’re notified, too.

I got a deal on an Aventon e-bike several months ago, and—besides its excellent range and price—one of its selling points is a built-in GPS and cellular tracker. Even more remarkably, the first year is free, and subsequent years cost $20.

However, the Aventon tracker pushes the bike’s most recent location to your paired e-bike app only when the bike is powered down. You can activate Lost Mode, which then triggers location pings even when the bike is “off,” disabling the electric-motor assist, locking the bike’s rear wheel, and displaying an error code.

That’s all great, and I have insured the bike. But I also installed an AirTag using the Elevation Lab case. This gives me the best of both worlds: using an AirTag that’s difficult to remove, I can actively track the bike at any given time; if it’s stolen, I can engage the Aventon system to improve my odds of finding it or getting it back if a thief pries off the AirTag case.

Things that get wet

Depending on your item, you may need to consider whether it’s water-resistant—especially if it’s likely to be exposed to rain or even dunked. For portable items, here’s an incomplete selection of ratings:

  • AirTags (2021 and 2026 models) have a rating of IP67, offering protection against water intrusion from sprays, rain, and high-pressure water jets. They can also survive immersion in water up to 3.3 feet (one meter) deep for up to 30 minutes.
  • ElevationLab offers what it calls a “waterproof” TagVault in keychain and pet-collar attachment versions of AirTags. It doesn’t disclose an IP rating, but I tested one in a glass of water for several minutes with no ill effects.
  • The Chipolo ONE Spot tracker has an IPX5 rating, or resistance from water up through low-pressure water jets or sprays. The Pebblebee Clip 5 tracker is even better at IP66, which protects against high-pressure jets. Neither protects against immersion.
Tags: Find My, iOS

Pairing an AirTag is remarkably simple. Here’s how.

Set up an AirTag

  1. Unwrap the plastic around the AirTag and then pull the connected strip that’s part of it, preventing the battery from touching the internal contacts. The AirTag makes a “tweetle” sound (something like “tuh TWEE tuh WEE dull”).
  2. Hold a 2nd-generation AirTag close to an iPhone or iPad with iOS 26.2.1/iPadOS 26.2.1 or later installed; a first-generation AirTag can be held near an iPhone or iPad with iOS 14.5/iPadOS 14.5 or later. The device recognizes an unpaired AirTag using NFC.
  3. This prompts the phone to display a connection dialog. Tap Connect.
  4. You can then name it and assign an emoji, from a preset list or a custom one.
  5. Once the AirTag is paired, Apple warns you about its appropriate use and potential legal consequences. Tap Agree.
  6. Apple provides a summary of details about the item and actions you can take.
  7. Tap View in Find My App, or Done, to finish. Third-party items show a slightly different list here.

Before you ask: No, there’s no way to pair a 2nd-generation AirTag with a device that isn’t running those minimum versions of iOS 26/iPadOS 26.

Change the name or emoji of an AirTag

  1. Go to the Find My app 656662b1-6b5c-469e-9d04-915022f44dae on your iPhone.
  2. Tap Items b44f9563-4315-48bf-8490-64ca27d3e29c, tap the AirTag whose name or emoji you want to change, then tap the More button.
  3. Tap “Change Name and Emoji.”
  4. Choose a name from the list or choose Custom Name to type a name and select an emoji.
  5. Tap the Done button.

View more details about an AirTag

After you add an AirTag to your Apple Account, you can view more details about it in the Find My app.

  1. Go to the Find My app 656662b1-6b5c-469e-9d04-915022f44dae on your iPhone.
  2. Tap Items b44f9563-4315-48bf-8490-64ca27d3e29c, tap the AirTag you want to see more details about, then tap the More button.
  3. Tap the address of the AirTag to see the model, serial number, and the firmware version.

If the battery level is low, a message appears below the location of the AirTag. You can also see a low battery indicator next to the name of the AirTag in the Items list.

If the AirTag isn’t automatically recognized, tap the plus button in the upper-right corner of the People, Devices, or Items list at the bottom of the screen and tap Add AirTag.

The warning about being linked to your Apple Account is pertinent, as Apple doesn’t consider illegal use of an AirTag as something that it preserves user privacy over. See how Apple and Google detect an unwanted AirTag.

The limit is 32 items

Apple limits you to having access to 32 items in Find My, which includes both the ones you’ve paired and items shared by others. However, that limit is lower than it appears because earbud versions of AirPods count as two or more items. The AirPods and AirPods Pro 1 count as two; AirPods Pro 2 and later count as three. (It still seems unlikely most people will surpass 32.) While AirPods and Beats hardware show up in the Devices tab, they’re items at heart; see how to find a lost iPhone, Mac or AirPods.

Find My is a clever interconnected system that emphasizes privacy while also providing often near-continuous location tracking.

Find My lets you discover the current or last known location across three categories:

  • People: If other people have shared their location with you, you can see their current position, derived from Apple devices they carry and how they chose to indicate their presence. You can also share your location with others.

If you share Find My items, they don’t reveal someone’s shared location, only the items’ location or locations; see below.

  • Devices: Apple lets you track Apple-made devices (their term for this category) connected to your iCloud account or, as with Apple/Beats audio hardware, paired with an iPhone or iPad. If you’re in a Family Sharing group and members of the group have shared their location with you, you can also see the locations of their devices.
  • Items: You can deploy low-power, non-networked tracking devices, like the Apple AirTag, on or in your stuff, and find their locations on your devices by relying on a crowdsourced system. You can opt to share the locations of these with up to five other people. Apple refers to this category as items.

Hardware support for Find My services covers a variety of equipment, each of which may have a different set of remote capabilities and limitations. This support affects how your location and that of other people who share their position with you may be viewed, too. The hardware differences are as follows:

  • iPhone, iPad, Mac, and Apple Watch: You can see the device’s location. If it can connect to the internet, you can also play a sound on it, lock it or mark it lost, or erase it. (An Apple Watch picks up this setting from the iPhone with which it’s paired.) These devices are also relied on to locate you for someone else on a Find My map, or to identify other people’s location shared with you.

U.S. phone carriers also offer phone-tracking services, which can work across a family account and different smartphones and dumb phones. Each comes with a separate fee and various enhancements and limitations. If everyone in your family is using an iPhone, there is no advantage to the carrier’s plan.

  • AirPods and supported Beats devices: When paired with an iPhone or iPad, Find My is automatically enabled for all Apple audio hardware and most Beats devices. If you have Apple or Beats earbuds, check whether the earbuds, charging case, or both are tracked—it varies. For instance, the AirPods 4 (Active Noise Cancellation or ANC) and AirPods Pro 2 and later can track each earbud and the case separately, marking each as lost as well. Audio hardware appears in the Devices tab or in Find Devices apps.
  • AirTag: An AirTag’s location may be tracked via ultra-wideband (UWB) wireless and Bluetooth over inches to hundreds of feet (centimeters to tens of meters) from a nearby paired iPhone or iPad; or from anywhere, whenever it’s away from you and near anyone’s iPhone, iPad, or Mac that has an internet connection and has enabled Find My network participation. An AirTag can’t receive commands via the internet, but it can over Bluetooth. (See how the Find My network tracks a lost AirTag.)
  • Third-party items: Apple allows other companies to embed Find My technology inside their products. These products must be paired with an iPhone or iPad and, just like AirTags, can be found within Bluetooth range of paired devices and broadcast their secret identifier to other people’s iPhones, iPads, or Macs with Find My network enabled.

Some third-party Find My devices have a hybrid mode: they support Find My network features for Bluetooth and crowdsourcing but have their own set of features that works only over Bluetooth. The bike-attached Knog Scout, for instance, has a motion alarm that can be set by hand or via Bluetooth, and delivers an alert within Bluetooth range.

How Find My works out where a device is

Find My’s device-based tracking and personal location sharing relies on an iPhone, iPad, Mac, or Apple Watch sending Apple’s servers a regular update of their location derived from Wi-Fi and cellular data and GPS signals. All devices with Find My support provide details using Wi-Fi; iPhones and cellular iPads and Apple Watches add cellular radios and GPS.

With Find My active on a device with GPS, that device pulls down location information from the global satellite network. If it also has a cellular radio, it can derive location information from nearby cell phone towers. The Find My system on the device regularly sends location updates over a Wi-Fi or cellular network, allowing a fairly precise position to be calculated via trilateration.

You may be more familiar with the term triangulation, which relies on known fixed positions and angle measurements, such as using landmarks. Trilateration uses the intersection of geometric areas, such as the signal-strength radius from cell towers. (A researcher whose work played a key role in developing trilateration for GPS, Gladys West, died at 95 on January 17, 2026.)

All iPhones, iPads, and Macs also scan for nearby Wi-Fi networks and send a snapshot of that information to an online system run by Apple whenever the device has an internet connection.

Apple integrates that with information fed to it by iPhones and iPads with GPS and examines the signal strength of Wi-Fi gateways, allowing it to figure out fairly precisely where each is located. (Gateways broadcast a unique hardware network identifier along with a network name, which can be scanned without connecting to a network.)

Apple caches some information about location on the phone for up to seven days to avoid frequent network access to look up information, or to use Wi-Fi positioning in an area you’ve been in recently, even if you don’t have current internet access.

This is a two-way connection: through the Find My app’s Device tab or a Find Devices app, you can push a sound and message, as well as lock or erase the hardware.

Using Find My also tells your remote devices you’re looking for them, and when they receive that message, they update their position more frequently, typically even when they’re in standby mode. There’s a flaw with this finding process: a lookup requires an active connection.

Which device stands in for you

Use the Me view in the full Find My apps to see how your devices locate you:

  • On an iPhone, iPad, or in macOS 27, tap or click the Me button.
  • In macOS 26 or earlier, click People, click Me, and click the Info button next to your avatar on the map.
  • On an Apple Watch with watchOS 27, tap People and then tap Me. With watchOS 26 or earlier, tap the Me entry in Find People.

Details about how your location is derived appear under My Location. Your current location appears with an address, a map, or a label like Home if you’ve defined it in Find My (see how to see someone’s location). To the right of or below the Sharing From label, you see the location used to derive your location as shared with other people. If it’s literally the current device, it’s shown as This Device, like “This iPhone”. Otherwise, the device name appears.

Find My determines a person’s location by picking one device that the person owns as representing their presence: the person is assumed to be wherever that device is. If you own at least one iPhone, Apple picks your primary iPhone for presence by default. A person’s current location always reflects the device’s updated location.

Apple lets you switch presence among any iPhone, iPad, or iPod touch you own; Macs and Apple Watches don’t qualify. You can’t change presence from the current device that’s providing it. Instead, go to the device you want to use. In the Me view, tap Use This Device Name as My Location.

If you own a cellular Apple Watch and the paired phone is set to My Location, Find My switches to the watch as your current location when it’s on your wrist and you’re out of Bluetooth range of your iPhone.

Apple shares people’s locations in Find My as “continuous streaming updates” if they’re on a robust enough connection and have enough battery life, seemingly depending on other variables. You can see the difference when you’re looking at the device’s details: a label with the last updated time will show Now if it’s recent—typically within the last minute—and Live if it’s currently streaming. (See how to read the Find My app’s status labels.)

The three apps, and their limits

You access Find My through three kinds of apps:

  • Full-featured Find My native app: The Find My app for iPhone, iPad, Mac, and Apple Watch (watchOS 27) provides access to all categories of items.
  • Find Devices, Find People, and Find Items apps for Apple Watch (watchOS 26 and earlier): Apple previously split up the single Find My app into three smaller apps, one of each category, on an Apple Watch.
  • Find Devices web app: iCloud.com offers a “Find My” app called Find Devices, which locates only devices and audio hardware.

Devices and items appear in Find My apps in the following circumstances:

  • Family Sharing: If you have Family Sharing enabled, you can see the location of the devices of any member who is sharing their location with you. This includes audio hardware. You can view their devices in any Find My app, including the web app. The same is true for anyone in the group with whom you share your location. (On an Apple Watch, you have to tap Show Family Devices.) If they aren’t sharing the location, you still see the device. To take action on their device, such as marking it as lost, you need the other person’s Apple Account password.

Family Sharing doesn’t automatically share a person’s location, even though you can see all their devices.

  • Find My item sharing: You can share or have shared with you any Find My item. This is entirely unrelated to Family Sharing. A Find My item can be shared with up to five other people, and each item can be shared with a different set of people. Shared items appear in the Items view in any Find My native app—but not the web app.

Apple’s central user account, Apple Account, is how you access Find My on devices, indirectly via items, and through the iCloud.com website. When you’re signed in to this account from a device and have Find My enabled, all your other devices, your account at iCloud.com, and people in your Family Sharing group with whom you’ve shared your location have access to the location of that device. Find My items paired with an iPhone or iPad are available from native Find My apps via the same Apple Account connection.

Apple’s two-factor authentication for Apple Account can trip up family members trying to help you recover a lost item. See how to find a lost iPhone, Mac or AirPods for how to prepare.

How far back Find My works

Find My Device has a surprisingly long look-back. It works on iPhones and iPads running iOS 5 or later; for marking as lost, iOS 6 is the minimum; for Activation Lock, iOS 7. Any version of watchOS can use Find My, as it’s relayed via an iPhone. On Macs, OS X 10.7.5 Lion or later is required.

The only significant version-based limitation is that to receive alerts about Google trackers near you or traveling near you, you must have an iPhone or iPad with iOS 17.5/iPadOS 17.5 or later installed.

It took a little while after Google’s introduction of the Google Find Hub in 2024 for third-party manufacturers to ramp up production of compatible trackers. At first, several companies released Find Hub versions alongside existing Apple Find My items. However, over the last year, many companies have gone a step further and developed trackers with components for both networks.

This reduces the SKU (stock-keeping unit) count for makers—it’s cheaper to produce a bunch of one thing and keep it in stock than two things and have to guess at production. As a user, you can buy a multi-pack and not worry about compatibility. During setup, you can activate the device on just one of the two ecosystems. But you can later reset it, then configure it for the other one.