Got a tip for us?

Screen

Summary

  • If your iPhone screen is not responding to touch, there are a few things you can try when troubleshooting the problem.
  • First, clean off your screen, and your fingers. If you have a case or a thick third party screen protector on the iPhone, remove them.
  • Next, try a force-restart. If that doesn’t work, you can update or reinstall the operating system.
  • If you’re still having problems, you can always contact Apple support.

The iPhone is one of the best smartphones out there, but even the best smartphones can experience hardware and software glitches from time to time. One common issue is when the iPhone touch screen stops working or becomes unresponsive to touch. It’s obvious when this happens, you’ll touch the screen and nothing happens, swipes will be ignored, taps don’t do anything, and other touch on the screen doesn’t register any behavior. It’s clearly annoying if the iPhone screen is no longer working and not responding to touch, and it’s not subtle. In this article, I will explain why the iPhone screen is not responding to touch and how to fix the problem.

Person typing on iPhone screen

Why is my iPhone screen not responding to touch?

Your iPhone screen may not be responding to touch due to several reasons. Sometimes it’s due to a software bug, crud on the screen, damage to the iPhone touch screen or iPhone itself, or perhaps some other issues as well. Read on to learn more.

We’ve got several steps to troubleshooting an unresponsive touch screen on an iPhone. If your iPhone is not responding well to touch and the screen seemingly is not working as well as it should with touch input, follow along and you should be able to fix the issue for good. I just experienced this problem on my iPhone, so this is the set of steps I used to troubleshoot the issue, for my specific situation the iPhone just needed to be hard rebooted and some storage freed up for the touch screen to work as expected again.

How to Fix an Unresponsive iPhone Screen

Try these troubleshooting tips one by one. Hopefully, one of these will resolve the issue. If not, it’s likely you have a hardware problem that may only be fixable by contacting Apple customer service to repair or replace your phone.

Clean Your Screen, And Your Fingers

The first thing you need to do when your iPhone screen is not responding to touch is to clean off your screen, and your fingers. If you have a case or a thick third party screen protector on the iPhone, you’ll want to remove those as you troubleshoot this as well.

Give your iPhone screen a good look in bright direct lighting and tilt it around a bit to reveal any obvious gunk, oil, residues, liquids, moistures, dried crust or food, or anything else that may be interfering in the screen. In the sunnier weather, sunscreen is another common thing that can get on a screen and make the iPhone touch screen unresponsive or erroneously responsive. You’ll want to make sure the iPhone screen is clean and clear of anything that can interfere with the ability to detect touch properly. Wiping it down with a soft cotton cloth is often sufficient to remove anything from the iPhone displays touch screen, but you may need to use a slightly damp (and I do mean slightly, never enough moisture to drip) cloth to wipe the screen free.

As for your fingers, just make sure they’re clean and dry. Wash your hands or your fingers if in doubt and if you have a bunch of gunk on them. Unusually dry skin or callouses generally don’t matter and should not cause any issue with the touch screen, though if your hands are wet that may cause issues.

Just make sure the screen is clean, and that your hands are clean and dry.

Force your iPhone to restart

An illustration of two iPhone models, one with a Home button and one without, with the screens facing up. The volume buttons for each model are on the left side of iPhone, and the side button is on the right.

Often times simply restarting the iPhone will fix the unresponsive touch screen. Unfortunately, if your iPhone screen is not responding to touch at all, you won’t be able to move the power-off slider to shut down your device. In this case, you’ll need to resort to a forced restart, which is basically like rebooting your iPhone without powering it down first.

When your iPhone boots back up, the touch screen should work just fine again if it’s a simple software issue like a bug or a software freeze with iOS or an app. The exact steps to force restart your iPhone will depend on what model you have. If you’re not sure which iPhone model you own, check out this article on how to identify your iPhone.

Quick tip: The button we call the Power buttonis also sometimes called the Lock button or the Side button.

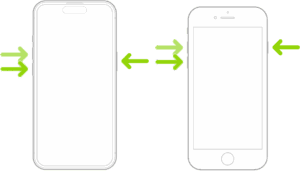
If you have an iPhone 8, iPhone SE (2nd and 3rd generations), iPhone X, iPhone 11, iPhone 12, iPhone 13, iPhone 14, iPhone 15, iPhone 16, iPhone 17, or iPhone Air

1. Press and release the Volume Up button.

2. Press and release the Volume Down button.

3. Press and hold the Side button (the Sleep button).

4. Wait until you see the Apple logo, and then release the button.

If you have an iPhone 7

1. Press and hold the Volume Down and Side (Sleep) buttons at the same time.

2. Hold the buttons until the Apple logo appears, then release the buttons.

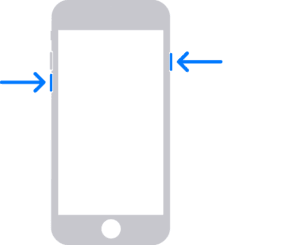
If you have an iPhone 6s, iPhone SE (1st generation), or earlier

1. Press and hold the Home and Side (Sleep) buttons at the same time.

2. Hold the buttons until the Apple logo appears, then release the buttons.

Disconnect any accessories from the Charging Port

On rare occasions, an accessory plugged into the phone’s charging port could interfere with the touchscreen. If anything is plugged into the port — including a microphone, power bank or charger — unplug it. If your screen works after removing an accessory, try using a different outlet, cable, or charger.

Delete and Update / Reinstall the Problematic App

Sometimes an iPhone touch screen is unresponsive in just one particular app. If this is the case, the problem is likely that app and not the iPhone touch screen at all, but since the app is open at the time the app stops responding as it "freezes". A frozen app will often not respond to any touch screen input at all, but swiping up from the bottom of the screen will often exit the app and go back to the Home Screen in these scenarios.

If your iPhone touch screen stops working while using a specific app, you’ll want to update it first. Open the App Store, tap your profile in the top-right and check to see if an update is available for the app in question, if an update is available, tap the Update button next to the app in question.

If there is still a problem with the touch screen not working in a specific app after you have updated that app, you can also delete the app, and then reinstall the problematic app. Relaunch it again to see if it works as expected. If it still fails, the app could have a bug that needs to be addressed. If the touch screen works with every other app except for the problematic one, that particular app is likely the problem and it’s probably nothing to do with the screen or iPhone at all.

Free up iOS Storage

When an iPhone has zero storage available, the device tend to misbehave, and that can include experiencing an unresponsive touch screen.

Make sure your iPhone has enough storage available. You can check this by going to Settings > General > iPhone Storage. Aim to have at least a 1GB, as iOS really starts underperforming with less space available.

Screenshot of iPhone Storage page in iPhone Settings

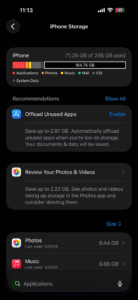
Deleting unused apps is an easy way to recover some storage space.

I have noticed this is particularly true with modern versions of iOS when an iPhone is totally full and has 0 bytes of storage remaining, in which case many apps become unresponsive as does the touch screen. Sometimes even the buttons along with the touch screen may be unresponsive and not work at all for a while on a totally full iPhone, until whatever software cache clearing mechanisms complete. This is often easily reproducible too; just fill up an iPhone so that it has zero bytes remaining, and then start trying to use apps that rely on a lot of caching like Instagram, X, Facebook, Spotify, etc, once those app caches build up you will likely notice the touch screen becomes unresponsive for short periods of time as iOS struggles to deal with having zero storage available. In such a case, just free up some space, then reboot the iPhone, it should work again.

Reinstall iOS

As a last resort before contacting Apple Support, you can try updating or restoring iOS. This is a good option if your iPhone successfully restarts but can’t get past the Apple logo.

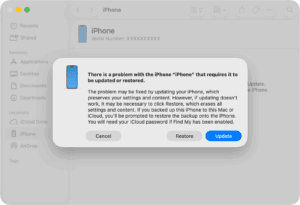
Even if your iPhone screen is not responding to touch, you can update or restore iOS by connecting your device to your computer and using Recovery Mode:

1. Connect your iPhone to your computer with a USB cable.

2. Open the Finder on your Mac, or open the Apple Devices app on your PC. If your PC doesn’t have the Apple Devices app, or your Mac is using macOS Mojave or earlier, open iTunes instead.

3. Put your iPhone in recovery mode following these steps:

  • iPhone 8 or later, including iPhone SE (2nd generation and later): Press and release the volume up button, press and release the volume down button, then press and hold the side button. Hold down the side button until you see the Connect to computer screen.
  • Animation showing the sequence of pressing the volume up, volume down, and then the side button on an iPhone to enter recovery mode.

  • iPhone 7 or iPhone 7 Plus: Press and hold the volume down button and Sleep/Wake button at the same time. Hold down the buttons until you see the Connect to computer screen.
  • iPhone with arrows indicating the volume down and thwntop and side buttons, which are used to enter recovery mode.

  • iPhone 6s or earlier, including iPhone SE (1st generation): Press and hold the Sleep/Wake button and Home button at the same time. Hold down the buttons until you see the Connect to computer screen.
  • Image showing how to put an iPhone into recovery mode by pressing the Home button and the top (or side) button, indicated by arrows.

4. When you see the option to restore or update your iPhone on your computer, chooseUpdate. iTunes or Finder will update the phone without deleting your apps and data. Do not choose Restore, which will erase all of your data.

Restore and update information in the Finder after connecting an iPhone in Recovery mode.

5. If the Update doesn’t work, your final option is to choose Restore. This option will restore your iPhone to its factory settings.

Important: If you choose Restore, iOS will be reinstalled and all of your data will be erased. You will, however, have an opportunity to restore a backup from iCloud. For this reason, it’s important to back up your data.

Is the iPhone Touch Screen Cracked? Is the iPhone Touch Screen Damaged? Was the iPhone damaged or dropped?

This is probably obvious from the get-go, but if the iPhone touch screen is cracked it can become unresponsive, partially unresponsive, or just not work at all. Likewise if the iPhone is damaged, it may not work at all, or the touch screen may not work reliably.

Water damage can also ruin an iPhone touch screen, or the entire phone as well. If an iPhone has been dropped, it’s also possible that internal components came loose, which may cause the touch screen to not be working.

If your iPhone has obvious visible damage and the iPhone touch screen is not working, the damage is likely to be the cause. In such a situation, take the iPhone to an authorized Apple repair center or an Apple store and have them give it a look.

iPhone touch screen STILL Unresponsive? Contact Professional Help

If all above troubleshooting methods have failed, it’s time to contact Apple support, go to an Apple Store, or visit an Apple authorized repair center. Have them inspect your iPhone touch screen to figure out what’s wrong with it, it may need a repair. It may be a hardware problem that is unseen, or it could be some other issue that you overlooked.

Did these troubleshooting tips fix your iPhone touch screen issue? Do you have any tips or tricks to resolving problems with an unresponsive or non-working touch screen on iPhone? Let us know in the comments below.

Tag: Screen

If you are unfortunate enough to have gotten a cracked screen on your iPhone 15 Pro, the first thing you probably want to know is how much it will cost to fix it. The second thing you probably want to know is what your options are for getting it fixed.

In this article, we will outline the cost (in $US) of repairing an iPhone 15 Pro Screen and the options you have for repair through Apple or an Apple-authorized repair shop. We’ll also discuss AppleCare (the one-year limited warranty) and AppleCare . All costs and warranty information are relevant to U.S. customers.

The costs to fix an iPhone 15 Pro Screen

For some, the cost is going to determine whether they actually want to get the screen repaired at all. Many iPhone users took advantage of the great discounts that many cell carriers in the U.S. were offering and picked up a new iPhone 15 Pro. Those who appreciate a good deal may not want to spend a lot to fix their iPhone 15 Pro; some may have no choice if the screen is too badly damaged.

Apple’s estimated costs to repair iPhone 15 screens

We list here the estimated costs to repair any of the iPhone 15 models.

Estimated Cost — No AppleCare Estimated Cost with AppleCare
iPhone 15 $279 $29
iPhone 15 Plus $329 $29
iPhone 15 Pro $329 $29
iPhone 15 Pro Max $379 $29

As you can see in the chart, the cost of repairing a screen increases with a larger screen size and depends on whether the iPhone is a Pro model. The cost with AppleCare is the same for all models because the (upfront) cost of the AppleCare plans are different.

Do I have or can I get AppleCare ?

Obviously, if you are looking at the repair costs for your iPhone 15 Pro, you will wish you had AppleCare . You may have one of the following questions about AppleCare:

  • Does the AppleCare warranty that comes with the iPhone cover the damage?
  • Do I have AppleCare ? How can I check?
  • Can I still get AppleCare and get the repair discount?

Does the AppleCare Warranty that comes with the iPhone cover the damage?

Apple offers a one-year limited warranty for new iPhones. The Apple Limited Warranty covers your iPhone and the Apple-branded accessories that come in the box with the iPhone against manufacturing issues. Accidental damage is not covered by the Apple warranty, so it doesn’t help you get your screen repaired.

Do I have AppleCare ? How can I check?

We have previously written about how to check your AppleCare warranty status: How to Check your AppleCare Warranty Status & How to Buy.

Can I still get AppleCare and get the repair discount?

It is only possible to purchase AppleCare within 60 days of your iPhone purchase. If you are still within this time period, you have a few ways that you can purchase AppleCare :

  • On your iPhone: Go to Settings > General > About and tap on AppleCare Coverage Available. If you don’t see it, you aren’t eligible.
  • Online: You will need to verify your serial number and run a remote diagnostic.
  • At an Apple Store: They will inspect your phone and require proof of purchase.
  • By calling 800-275-2273: You will need to provide proof of purchase and run a remote diagnostic.

The good news is that if you purchase AppleCare , you can transfer it to a new owner if you sell your iPhone (or give it to a family member).

How to get your iPhone 15 Pro screen repaired

There are three options for getting your iPhone 15 Pro screen repaired:

  • Schedule a visit at an Apple Store or an Apple Authorized Service Provider.
  • Send your iPhone in for repair. Apple will send you a box, and you will mail your device to Apple. It is estimated to take 5-9 days.
  • Schedule an onsite service. An authorized repair person will come to your home or office.

You can arrange for any of the above options from Apple’s iPhone screen replacement page. You can also talk to Apple Support if you have more questions or have Apple Support call you.

Tag: Screen

Several iPhone 12 mini users have been facing display issues on their device. Users have complained about flickering screen, a green tint and other colour inaccuracies in the phone’s display. Users have further stated that the issue occurs when brightness is set around 90 percent or lower in some cases.

If your iPhone 12 mini display is exhibiting flickering, a green or gray glow, or other unintended lighting variations under some conditions, work through these steps to get everything back to normal.

Solution #1: Reboot Your iPhone

The easiest way to ensure this isn’t a temporary glitch is to first restart your iPhone. Doing that kills all the active third-party background services and processes. It will also refresh your iPhone’s components in case any one of them had crashed during a taskt. Go to settings > general > shut down.

After rebooting, if the display is no longer failing, you should go ahead and review all the recent apps you’ve installed.

See also: Tips to Speed Up iOS 14 on iPhone & iPad

Solution #2: Disable Auto Brightness

accessibility > Display & Text Size.

Solution #3: Check for Updates

general > software update.

See also: How to Fix iPhone 12 mini Wi-Fi Issues

Solution #4: Perform a factory Reset

Rebooting is the most rudimentary troubleshooting method you can execute and for most problems it will do the trick.

However, if it doesn’t fix iPhone 12 mini display issues, the next step is wiping your phone entirely by performing a hard reset. That will restore your phone to its factory settings and clear the cache.

So if there’s any unprocessed data hampering your iPhone’s functions, a hard reset will clear everything right away. Of course, you can back up your phone (here’s how to backup iPhone data if there’s anything you’d like to restore later.

Go to the Settings > General,tap the Reset button and Erase All Content and Settings. Your iPhone will take a few minutes to reset depending on the amount of data it houses.

Solution #5: Get it checked by apple

Your last resort is, of course, to get in touch with Apple Support and have it checked out by a professional. If none of the aforementioned techniques fixed your iPhone 12 mini Display Problems, it’s likely a hardware failure. In most scenarios, you will have to hand in your iPhone for a repair.

There’s no guarantee that any of those steps will be able to save your iPhone. Even if Genius Bar has a solution, chances are it won’t be cheap. So, it’s worth giving each one of these a shot before deciding between a paid repair or a new iPhone:

  • Reboot your iPhone
  • Disable auto-brightness
  • Check for updates
  • perform a Factory Reset
  • Get it checked by Apple

While it’s never fun to troubleshoot, hopefully these tips and tricks will help get your iPhone 12 mini display back to working condition.

And for other types of issues, take a look at these fixes for when your iPhone 12 mini is overheating.

Is Screen Sharing not working on MacBook? You are not alone! If you are unable to share your Mac or MacBook’s screen with others, you have come to the right place.

With a huge number of people working or studying from home, sharing screen with others has become a necessity. Screen sharing, also known as desktop sharing, is when you (or someone else) share some or all of the contents of your screen with other devices (like other computers, tablets, or phones). Sharing your screen allows you to quickly show co-workers, supervisors, colleagues, teachers or just about anyone anything that’s on your screen in real-time without having to send any files. Screen sharing simplifies collaboration or reviewing things like presentations, documents, graphs, and even illustrations.

But what if Screen sharing is not working and are unable to share your Mac or MacBook’s screen with others?

In the past few weeks, several users reported they are unable to share their screens during their online meetings or classes. Many report issues with third-party conferencing apps not working in screen share mode for apps such as Zoom, Microsoft Teams, Skype, and other similar apps.

Fix Screen Sharing not Working on Mac

If share screen is not working on Mac, here are the steps you can take to quickly get screen share working on your Mac so you can continue with your activity.

Fix 1: Force quit and restart

If Screen Sharing stopped working, the first thing you should try is to force quit the app and then open again. This may resolve your problem. Here is how:

  • Press the Option, Command, and Esc (Escape) keys together (or click the Apple menu and Force Quit).
  • The force quit window will appear.
  • Select the app.
  • Click Force Quit.
  • Now see if Screen Sharing is working.

Fix 2: Restart your Mac

restarting your Mac may fix this issue. You can restart your Mac by choosing the Restart option from the Apple menu in the upper-left corner of your screen.

Fix 4: Update your apps

If Screen Sharing is not working on apps such as Skype, Zoom, Microsoft Teams etc, try updating the apps. You can check for an update in the Mac App Store or via the developer’s site.

Launch the App Store by clicking the icon in your dock, by clicking the Apple icon on your menu bar and select “App Store,” or by pressing Command+Spacebar and searching for it. Head to the “Updates” tab to view a list of available updates. You can opt to update one app at a time, or click “Update All”

Fix 5: Update your Mac

If Screen Sharing is not working on Mac Catalina, Big Sur ETC, make sure that your Mac is running the latest version of the macOS software. You can easily update your Mac. Here is how:

  • macOS Mojave or higher: Go to System Preferences and then Software Update.
  • macOS High Sierra or older: launch the App Store on your Mac and then click the Updates tab.

Fix 6: Edit security permissions

  1. Start by clicking the Apple menu.
  2. Next, go to System Preferences > Click Security & Privacy > Privacy tab.
  3. Click Screen Recording.
  4. Click the lock icon to make changes.
  5. If asked, type in your admin password.
  6. Finally, click the checkbox next to the app you are having problem with for example GoToMeeting, Microsoft Teams, Skype etc.
  7. You will see a notification window asking you to restart it. Agree and then try again and see if the problem is resolved.

Fix 7: Select NetAuthAgent from Activity Monitor

  1. Click Applications to get started.
  2. Next, click the Utilities Folder.
  3. Launch Activity Monitor.
  4. Find a process known as NetAuthAgent.
  5. If you find it, select it.
  6. Click Quit Process.
Tag: Screen

Want to show your non-tech-savvy relative how to set up their email without actually having to do it for them? Apple makes it easy to record screen of your iPhone 12 without installing third party Apps.
Screen recording is handy for recording short demos or documenting a glitch with your iPhone 12. The recording can be done in silent or include audio captured by your iPhone’s internal microphone.

Taking a screenshot of your iPhone screen is a quick and easy process, and most people are aware of the two buttons to push to capture a screenshot of their iPhone’s screen and save the image in the Photos app. However, most people do not know how to record a video of their iPhone’s screen.

Fortunately, the process of capturing iPhone’s screen is quick and straight forward. During recording, you can launch various Apps on your iPhone , make selections, and essentially do anything with your phone that you would basically do. The recording is saved as a video on your iPhones camera roll and you can share it on social media, email, or upload just like you would with any other file.

There are two things to remember. First, before you can record the screen of your iPhone 12, you need to enable the feature by adding it to your Control Center. Second: The steps for accessing the record button is determined by the version of iOS you are running, therefore, keep in mind to follow the correct steps outlined below.

To demonstrate the quickest and easiest way to do it, I took a screen recording of my iPhone 12. As it turns out, most people do not know exactly how to do it.

So here’s how to screen record on iPhone 12.

Setting up screen recording on iPhone 12

Although screen recording is a simple and straight forward process, you need to add the screen recording icon to the Control Center on your iPhone.  To enable screen recording, navigate to Settings > Control Center > Customize Controls. Tap the plus icon (+) next to Screen Recording. A Screen Record icon should now be available in the Control Center, and you can find it by swiping down from the top right edge of your iPhone screen.

The steps given in this guide will also work for iPhone 12 mini, iPhone 12 Pro, and iPhone 12 pro max.

Now you’re ready to start recording.

Recording your iPhone 12 screen

Here is how to record screen on iPhone 12

  1. Navigate to the screen where you want to start recording.
  2. Swipe down from the upper right corner of the screen to find the recording icon.
  3. Now, tap on the Record icon.
  4. After a three second countdown, the Record icon will change to red and it will start recording your iPhones screen, even if you navigate away from the Control Center. You’ll know Recording is still in progress because the icon , displayed in the upper left hand corner, will be red.
  5. When you are finished recording, tap the red icon at the top left of the screen and then tap “Stop.”to stop recording. The recording will be saved in the photos app.

Locating and editing your recording

Once you are through with recording, you may want to edit the captured video. Apple’s Photos app makes it pretty simple to edit video. Your new recording will be saved in the Camera App on your iPhone. To view it, launch the Photos app and the recorded video will be the most recent item.
Editing a screen recording is the same as editing any other video in the Photos app.
You can edit the beginning or end part of your recording. You can trim the video and save it as a different clip. It won’t have any effect on the original video, however, you will get an fine tuned version that you can send anywhere you want.
To edit a screen recording, do the following:

  1. Locate the video in the camera roll of your iPhone and tap on it.
  2. Tap “ Edit.”
  3. Tap and drag the arrow at the beginning of the video to the right. It will turn into a yellow frame.
  4. Size the frame to trim the video down to just the section you want to retain. You can hit play at any given point to make sure you are satisfied with the output.
  5. Hit “Done” and then tap “Save as New Clip.”

That’s pretty much it! Happy recording.

Looking to guard the screen of your iPhone or iPad? No problem. In this article , we shall provide you with merits and demerits of tempered glass screen protector and liquid screen protector.

Getting a screen protector for your iPhone or iPad is very important therefore, in case you are planning to purchase a screen protector to shield your iPhone from those annoying scratches you see on smartphones screen, you have come to the right place. Here is a complete guide which will help you to choose between Tempered glass screen protector vs liquid screen protector.

Its worth mentioning that both tempered glass screen protector and liquid screen protector do an excellent job at protecting your iPhone’s screen. They have unique physical characteristics That sets them apart.
Tempered glass protector
is made with tempered glass. On the other hand, Liquid screen protector uses liquid glass.
Without further ado, let’s dive into identifying the differences between Tempered glass screen protector vs liquid screen protector and establish which one is superior to the other!

Tempered glass screen protector vs liquid screen protector for iPhone

Here is a comprehensive comparison between Tempered glass protector Vs liquid screen protector.

Liquid Screen Protector

Liquid screen protector

Pros:

  • Very smooth
    Liquid screen protector is very smooth. It’s quick and simple to install on your iPhone or iPad screen. In this regard, it can defend your device screen from scratch.
  • Highly transparent
    Liquid glass protector is highly transparent due to its thin layer to your iPhone screen. It offers clear viewing experience from all angles.
  • Enormously responsive to the touch
    Liquid screen protector is highly sensitive to the screen. In this regard, it responds swiftly to taps and swipes.
  • Extremely lightweight
    Liquid glass protector adds a very thin layer on your device screen. Thanks to its’ ultra-light design, it’s barely noticeable to most users.
  • Bubble Free, Easy to Clean
    The liquid screen is capable of protecting your device screen against bubbles. If you are averse to bubbles and can’t put up with them, it can be a great choice. In addition, It is easy to clean using a soft piece of cloth.

Cons:

  • Less Impact Protection
    When it comes to providing full protection against drops, bumps and scratches, toughened glass blows liquid screen guard out of water. If you are looking to guarding your iPhone from accidental bumps or drops, tempered glass protector is a better option.
  • Comparatively Less Scratch Resistance
    Liquid glass protector can only defend your touchscreen to a given extent. Your iPhone display would be susceptible to sharp scratch.
  • Gets Easily Discoloured from Sun and Oil
    The other drawback of the liquid screen protector is that it doesn’t have adequate resistance to ward off the sun, oil, and grime for a long period of time. In addition, it’s more susceptible to fingerprint.

Tempered Glass Screen Protector

Tempered glass protector

Pros:

  • Highly protective
    tempered glass offers a high level of protection. To prove it’s efficiency, you can use it in passenger vehicle windows, shower doors, smartphones screen protectors and more. Tempered glass screen protector boasts an hardness rating of 9H. In this regard, it can adequately protect your device from bumps, dropps or scratches.
  • A Lot Safer
    Tempering puts the interior into tension and exterior into compression. In this regard, should the glass break, it crushes into tiny granular pieces that cause less damage to your device.
  • Boasts Four to Six Times stronger than regular Glass
    Most tempered glass screen protectors are highly durable. Compared to the regular glass, tempered glass is 4 to 6 times stronger. It’s pretty tough and entirely capable of shielding your iPhone’ screen from those annoying Scratches.
  • Exceptionally Sensitive to the Touch
    tempered glass is highly sensitive to the touch. Moreover, it’s capable of protecting your device from oil, grime, dust and those ugly fingerprints allowing it to remain functional for a long time. What makes it durable is the oleophobic coating.
  • Incredibly Transparent
    Tempered glass offers the highest level of transparency and provides crystal clear display. Its’ HD clearness offers users great viewing experience from all angles making them worth investing in.

Cons:

  • Prone to Breakage
    Tempered glass screen protector is prone to damage. If the edge of the glass develops a crack, the whole unit Will in the end get damaged.
  • Less aesthetic
    Sleekness is a major determiner when it comes to buying a smartphone. Therefore, thick, inconspicuous tempered glass screen protector can be a deal breaker to many.
  • Can Pose Security Risk
    Tempered glass could pose security risk in some cases. The tendency to get completely shattered upon hard impact pose a security risk especially to kids.

The Verdict:

Putting Liquid Screen Protector Vs Tempered Glass head to head, Tempered glass screen protector is superior compared to liquid screen protector. Whether you want to protect your iPhone from drops, bumps, or scratchs, the former is superior to the latter. Though liquid screen protector can guard your device from scratches and cracks, you cannot compare it to the thicker, harder tempered glass protector.

Most people prefer the tempered glass protector for its ease of installation. In addition, it offers maximum screen protection to your
iPhone
Moreover, tempered Glass protectors are totally bubble-free, easy to remove and clean. Therefore, liquid screen guards does not beat it in this regard either.

So, Liquid Screen Protector Vs Tempered Glass? Which one do you choose? Let us know in the comment section below. We also have plenty of other articles that I suggest you check right now.