Got a tip for us?

Apple Watch

The Workout app offers a variety of fitness options—from cardio-focused workouts such as High Intensity Interval Training (HIIT), Outdoor Run, and Outdoor Cycle, to strength-based workouts like Functional Strength Training, Core Training, and Kickboxing. During your workout, you can pause and resume, mark segments, start a Check-In, and more.

The order of workouts reflects your preferences as you use the app. And for wheelchair users, there’s an outdoor push workout that tracks pushes instead of steps, at a walking pace or running pace.

Siri: Ask Siri something like, “Start a 30-minute outdoor run.”

Start a workout
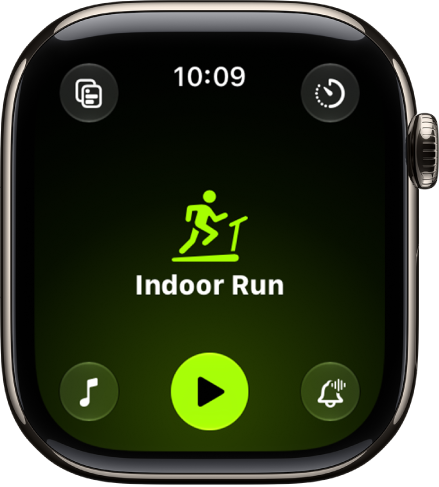
The Workout screen with the Outdoor Run workout highlighted.

  1. Open the Workout app on your Apple Watch.
  2. Turn the Digital Crown to the workout you want to do.

    To view all workouts, scroll down, then tap the Add button at the bottom of the workout list.

  3. When you’re ready to start your workout, tap the Play button.

    Tip: You can also tap the center of the screen to quickly start your workout. And on Apple Watch Ultra models, you can start a workout with the Action button. See Customize the Action button.

As you use the app and choose workouts, the order of workouts reflects your preferences.

Quick tip: A workout widget in your Smart Stack can show your three most recent workout types. See our article, Use the Smart Stack to show timely widgets.

Start an outdoor push workout

If you’ve specified that you use a wheelchair, the Workout app can start an outdoor push workout, with your Apple Watch tracking pushes instead of steps. You can choose walking pace or running pace, too. Read our guide, Track daily activity with Apple Watch.

  1. Open the Workout app on your Apple Watch.
  2. Turn the Digital Crown to Outdoor Push Running Pace or Outdoor Push Walking Pace.
  3. When you’re ready to start your workout, tap the Start button.

Conserve power during workouts

Starting an Extended Workout turns on Low Power Mode, and certain workout metrics are unavailable depending on the workout type. For Outdoor Walk, Outdoor Run, and Hiking workouts, you can also start a Max Extended Workout, where certain metrics and splits aren’t available.

  1. Open the Workout app on your Apple Watch.
  2. Turn the Digital Crown to the workout you want to do.
  3. Tap the Goals button, tap Extended, and tap Extended Workout or Max Extended Workout (if available).

You can also automatically turn on Low Power Mode for all workouts. Go to the Settings app, tap Workout, then turn on Low Power Mode.

During workouts, Low Power Mode turns off certain features, such as Always On Display, background heart rate and blood oxygen measurements, and heart rate notifications. Other notifications may be delayed, emergency alerts may not arrive, and certain cellular and Wi-Fi connections are limited. Cellular is turned off until you require it—when you stream music or send a message, for example.

Use the workout controls

  1. Open the Workout app on your Apple Watch.
  2. Start a workout.
  3. Swipe right, then do any of the following:

    • Pause the workout: Tap Pause.

      Tip: To pause the workout at any time, press the side button and the Digital Crown at the same time.

    • Add a workout: Tap New and tap a workout type. Tap Quick Start, or select a custom workout.
    • Mark a segment: Tap Segment. You can also double-tap the display.
    • Stop viewing the workout on your iPhone: Tap Stop. To resume viewing on iPhone, tap View.
    • Mute Workout Buddy*: Tap Mute. To learn more, see Set Up Workout Buddy.
    • Start a Check In: Tap Check In and then follow the onscreen instructions. To learn more, see Start a Check In from Workout.
    • End the workout: Tap End. Turn the Digital Crown to rate your effort and view the workout summary and tap the End button at the top.

Check your progress during a workout

  1. Open the Workout app on your Apple Watch.
  2. Start a workout.
  3. Do any of the following:

    • See your workout stats: Raise your wrist to see your workout stats, including your goal completion ring, elapsed time, average pace, distance covered, calories burned, and heart rate.

      Note: There’s no goal ring if you haven’t set a goal.

    • Switch workout views: Turn the Digital Crown.

      To change the workout views you want to see during a workout, see Customize workout views.

You can also receive voice feedback for key alerts and progress against your Activity rings. To turn Voice Feedback on or off, go to the Settings app on your Apple Watch, tap Workout, then tap Voice Feedback.

Rate your effort

You can adjust estimated ratings of how hard you exercised after completing a cardio-focused workout. Each rating factors in your VO2 max, heart rate, and personal data like age, height, and weight.

  1. Open the Workout app on your Apple Watch.
  2. Start a workout.
  3. When you’re finished with your workout, swipe right, then tap End.
  4. Turn the Digital Crown to indicate your effort. Then tap the Done button.

    Note: To change your rating, turn the Digital Crown to scroll through the workout summary, tap Effort, then make a change.

  5. When you’re finished, tap the End button at the top.

To edit your effort rating on iPhone, go to the Fitness app on your iPhone, tap Sessions, tap a workout, tap Effort, drag the slider to change your rating, then tap Update.

*Apple Intelligence is available with Siri and device language set to Chinese (Simplified), Chinese (Traditional), Danish, Dutch, English, French, German, Italian, Japanese, Korean, Norwegian, Portuguese, Spanish, Swedish, Turkish, or Vietnamese. Some features may not be available in all regions or languages. Some devices may not be available in all regions. Siri AI is available in beta in iOS 27, iPadOS 27, macOS 27, watchOS 27, and visionOS 27 and requires an Apple Intelligence–enabled device set to a supported language. Available in English to start. Siri AI will not be initially available in the EU on iOS, iPadOS, and watchOS. Certain Apple Intelligence features that rely on server-side models are subject to daily usage limits, including but not limited to Siri AI, Intelligent Photo Editing Tools, Image Playground, and AFM 3 Cloud models in Shortcuts. Daily limits may vary by feature, request complexity, system demand, system policies, and other factors. Expanded access to such features will be available for a fee in the future. Use of these features is subject to the Apple Intelligence Terms and Conditions.

See also
Tag: Fitness

Apple Watch Ultra models have a built-in siren that emits high-intensity sound patterns to attract help in case of emergency. Your watch also taps your wrist as the siren sounds.

You can activate the siren with the Action button, the side button, the Siren app, or Siri. It keeps sounding, and your watch keeps tapping your wrist, until you stop it or the battery on Apple Watch Ultra runs out of power.

WARNING: If possible, do not turn on the siren close to your ears or in enclosed environments.

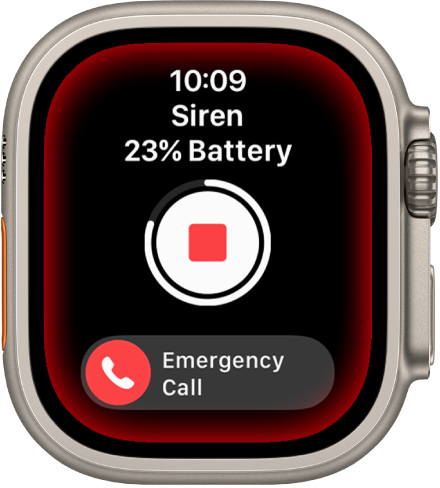
Siren counting down. Near the top is the battery charge, in the middle is a Play button, and at the bottom is the Emergency Call slider.

Activate the siren with the Action button on Apple Watch Ultra models

  1. Press and hold the Action button and then wait for the countdown to finish.
  2. Apple Watch Ultra continues to emit the sound and tap your wrist until you stop the siren by tapping the Stop button or until the battery on Apple Watch Ultra runs out of power.

Note: To prevent the siren from sounding when you hold down the Action button, go to the Settings app, tap Action button, then turn off Hold to Turn On (below Siren).

Other ways to activate the siren on Apple Watch Ultra models

In addition to using the Action button, you can activate the siren with any of the following methods:

  • Side button: Press and hold the side button, then drag the Siren slider to the right.
  • Siren app: Go to the Siren app on your Apple Watch, then tap the Play button.
  • Siri: Say “Start the siren,” then tap the Play button.

See also

You can create waypoints to mark locations in Compass, then display them on your watch. It’s handy. Cellular waypoints need an Apple Watch with a cellular plan, while emergency call waypoints work only in the U.S., Canada, and Australia. Apple Watch automatically generates waypoints for the following:

  • Where you parked your car.
  • The last location where your Apple Watch or iPhone could make a cellular connection.
  • Where Emergency SOS was last available (not supported in all countries or regions).

About cellular and emergency call waypoints

When available, cellular waypoints mark the most recent or closest approximate location where either your Apple Watch or iPhone connected to your carrier’s cellular network. When available, emergency call waypoints mark the most recent or closest approximate location where either your Apple Watch or iPhone detected that service from a carrier might be available to make an emergency call. Your surroundings, environmental conditions, and other factors may impact call connectivity or waypoint availability. Reconnecting may not be possible near these waypoints depending on these conditions.

To use the cellular waypoints feature, you need an iPhone using iOS 17 or later and an Apple Watch with a cellular plan.

Note: Emergency call waypoints are available only in the U.S., Canada, and Australia.

Create a waypoint

  1. Go to the Compass app on your Apple Watch.
  2. Tap the Waypoint button to add a waypoint.
  3. Do any of the following:
    • Create a waypoint of your current location: Enter waypoint information such as label, color, or symbol (car or home, for example). Then tap the Checkmark button.
    • Create a waypoint of another location: Turn the Digital Crown to scroll to the bottom of the screen. Tap Coordinates. Tap Latitude or Longitude, enter the coordinates, and tap Done. Tap the Back button, then tap the Checkmark button

Quick tip: Pressing the Action button on Apple Watch Ultra models is a quick way to drop a waypoint. Read our article, Use the Action button on Apple Watch Ultra models.

Display waypoints

  1. Open the Compass app on your Apple Watch.
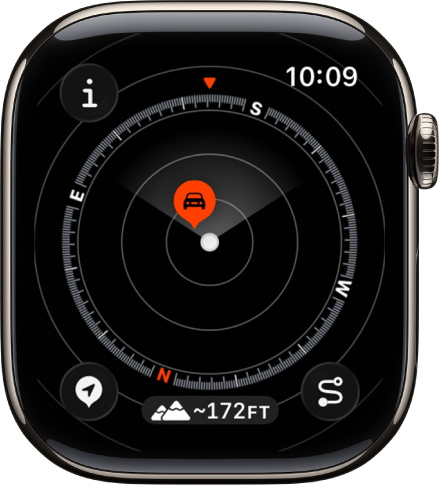
  2. Turn the Digital Crown down to see the waypoints near you. Keep turning the Digital Crown to expand the range up to 50 miles.

    The Compass app showing a waypoint within a dial. The Info button is at the top left, the Waypoints button is at the bottom left, the Elevation button is at the middle bottom, and the Backtrack button is at the bottom right.

  3. Do any of the following:

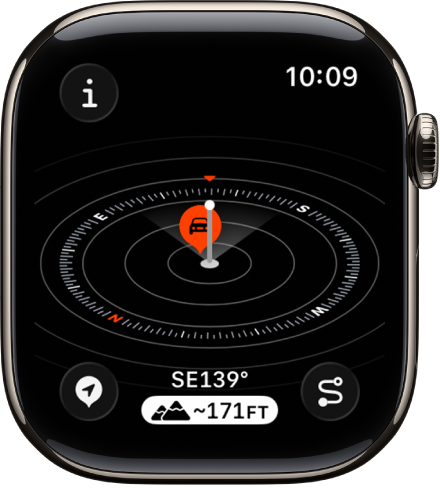
    • View waypoints relative to your current elevation: Tap the Elevation button.

      The Compass app showing the Elevation view. A waypoint is on a tilted dial. A white post indicates the current elevation, which is taller than the other waypoints on the dial. The Info button is at the top left, the Waypoints button is at the bottom left, the Elevation button is at the middle bottom, and the Backtrack button is at the bottom right.

    • See the distance, direction, and relative elevation of a waypoint: Tap a waypoint, turn the Digital Crown to select a waypoint, and tap Select.
    • Browse waypoints: Tap the Info button, then tap Waypoints.

See also

Tag: Compass

The Compass app shows the direction your Apple Watch is facing, as well as your current location and elevation. You can create waypoints and then find the distance and direction between them, or be alerted when you’ve exceeded a particular elevation.

It can even estimate the point where your Apple Watch was last able to establish a cellular connection or make an SOS call. And you can use Backtrack to retrace your steps, or use true north rather than magnetic north. You can see your bearing, elevation, and coordinates, too.

Note: Your coordinates and elevation may not be available in certain countries or regions. If you remove the Compass app from your iPhone, it’s also removed from Apple Watch.

View your bearing, elevation, and coordinates

  1. Open the Compass app on your Apple Watch.
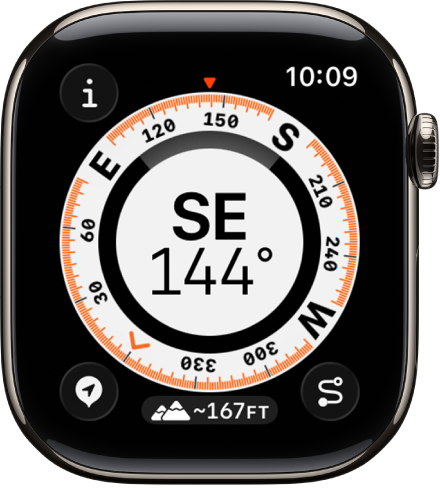
  2. See your bearing in the center and your elevation at the bottom.

    The Compass app showing a dial with the compass heading in the middle, a dot representing a waypoint in the inner ring, and compass points on the outer ring. The Info button is at the top left, the Waypoints button is at the lower left, the Elevation button is at the middle bottom, and the Backtrack button is at the lower right.

  3. Do any of the following:

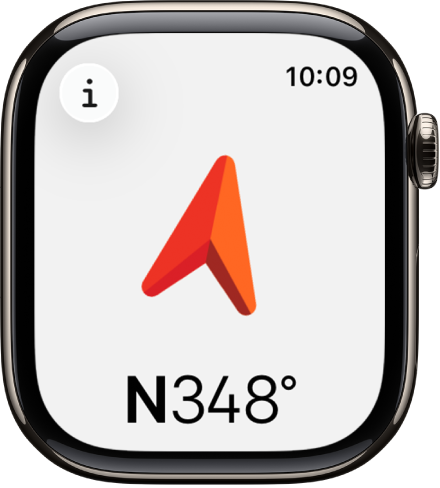
    • See your heading: Turn the Digital Crown up.

      The Compass app showing a large arrow pointing in the direction of the heading that appears below. The Info button is at the top left.

    • See the latitude and longitude: Tap the Info button.

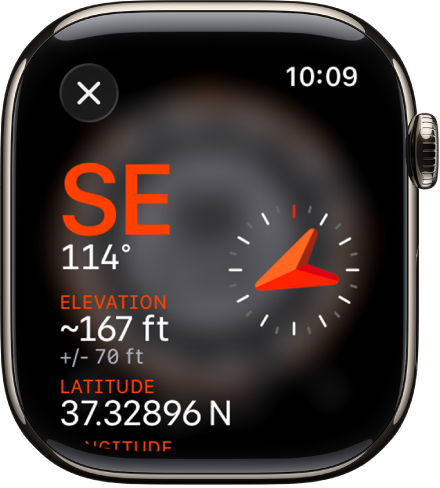
      The Compass app showing the Info screen. The bearing appears at the middle left with compass direction (southeast) and degrees (114 degrees). Current incline and elevation are shown below. A compass indicator is on the right. A close button is at the top left.

Set a bearing and target elevation alert

  1. Open the Compass app on your Apple Watch.
  2. Tap the Info button.
  3. Set any of the following:

    • Bearing: Tap Bearing, turn the Digital Crown to the intended bearing, and then tap the Checkmark button.
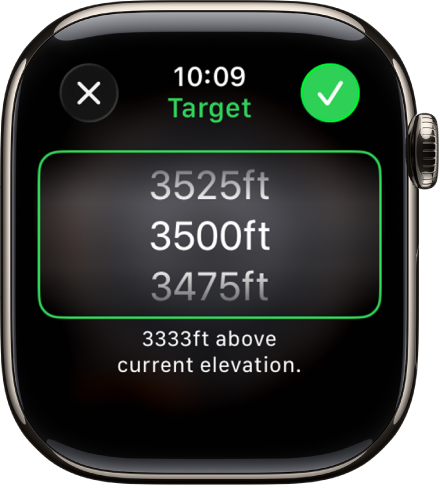
    • Target elevation alert: Tap Set Target Alert, turn the Digital Crown to the target elevation, and then tap the Checkmark button.

      The Compass app showing the Target Elevation screen. A scrolling list of elevations appears in the middle of the screen. Below the list is an indication of how far the selected elevation is above or below your current elevation. At the top are Close and Check buttons.

Use true north

To use true north rather than magnetic north, do the following:

  1. Open the Settings app on your Apple Watch.
  2. Tap Compass, then turn on Use True North.

On the Compass settings screen, you can also choose a grid system, such as DMS, decimal degrees, MGRS/USNG, or UTM.

If you see a red spinning radar screen

A red spinning radar screen that appears when you open the Compass app may be caused by any of the following:

  • Apple Watch may be in a poor magnetic environment: Compass can be affected by magnetic materials in some watch bands.
  • Location Services is turned off: To turn Location Services on or off, go to the Settings app on your Apple Watch, tap Privacy, then tap Location Services.
  • Compass Calibration is disabled: To turn Compass Calibration on or off, go to the Settings app on your iPhone, go to Privacy & Security > Location Services, then tap System Services.

See also

Tag: Compass

You can use Backtrack in the Compass app to track your route and then help you retrace your steps in case you get lost.

On Apple Watch Ultra models, you can even start Backtrack with the Action button.

Here’s how to use Backtrack to retrace your steps on Apple Watch.

Note: Backtrack is for use in remote settings—away from familiar places like your home or workplace—and outside densely populated areas with Wi-Fi. Backtrack does not account for external conditions, such as changes in elevation or objects in the environment.

Record and retrace your path

  1. Open the Compass app on your Apple Watch.
  2. To begin recording your route, tap the Backtrack button. Then tap Record Path.
  3. To retrace your steps, tap the Record Steps button. Tap Retrace Path.

    The path back to the location where you first tapped the Backtrack button appears on the screen. The initial location appears as a white dot at the beginning of the path.

  4. Follow the path back to return to where you first turned on Backtrack.
  5. When you’re finished, tap the Retrace Steps button, then tap Delete Path.

Quick tip: On Apple Watch Ultra models, pressing the Action button starts Backtrack quickly. See our guide, Use the Action button on Apple Watch Ultra models.

See also

Tag: Compass

On Apple Watch Ultra models, the customizable Action button gives you quick, physical control over a variety of functions. It can do things like start a workout, mark a Compass Waypoint, or begin a dive.

During setup, you choose a function for the Action button, and you can change it any time, with Quick Switch making it even faster. Some actions offer additional options, too, and third-party apps may support the Action button.

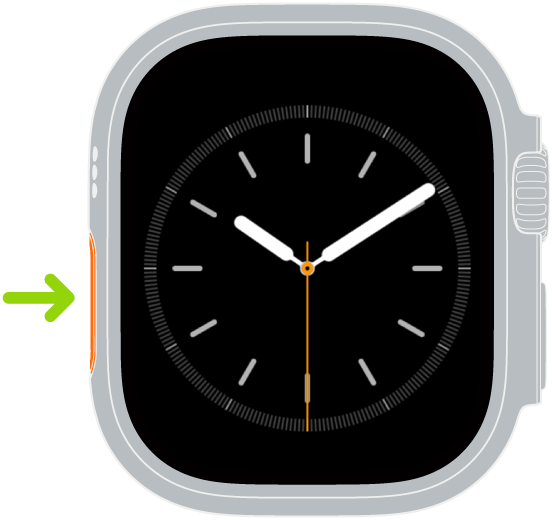
Illustration of Apple Watch with an arrow pointing to the Action button on the left side.

Available functions for the Action button

Some actions offer additional options when you press the Action and side buttons simultaneously. The following list isn’t exhaustive; third-party apps may support the Action button.

Action What it does
Workout Press once: Go to the Workout app or start a selected workout.

Press again: Perform a secondary action based on the selected workout.

Press the Action button and side button together: Pause.

Stopwatch Press once: Start.

Press again: Mark a lap.

Press the Action button and side button together: Pause.

Waypoint Drop a Compass Waypoint
Backtrack Press once: Record your route.

Press the Action button and side button together: Toggle between Record and Retrace.

Dive Press once: Start a dive.

Press the Action button and side button together: Perform a secondary action based on the selected diving app.

Flashlight Press once: On

Press again: Off

Shortcut Start the selected shortcut.
Voice Memo Press once: Start a voice memo.

Press again: Stop recording.

Translate Press once: Start translating.

Press again: Stop translating.

Accessibility Press once: Turn on the selected Accessibility feature.

Press again: Turn off the selected Accessibility feature.

Recognize Music Press once: Listen and identify music.

Press again: Stop.

Customize the Action button

On Apple Watch Ultra models, you’re asked to choose a function for the Action button during setup. You can change the function any time.

  1. Go to the Settings app on Apple Watch Ultra.
  2. Tap Action Button and then do any of the following:

    • Change the action: Tap Action and choose an action, such as Workout, Backtrack, or Dive.

      Tip: You can change the action later using Quick Switch.

    • Choose an app: If the selected action is supported by more than one app, tap the app shown. Choose a different app.
    • Change the actions available in Quick Switch: Tap Quick Switch and turn on or off any of the available actions. You can also turn off Quick Switch.
    • Deactivate Siren: If you don’t want to activate Siren by pressing and holding the Action button, turn off Hold to Turn On.

Quickly switch the function of the Action button

On Apple Watch Ultra models, you can do the following:

  1. Press and hold the Action button.
  2. Choose an action.

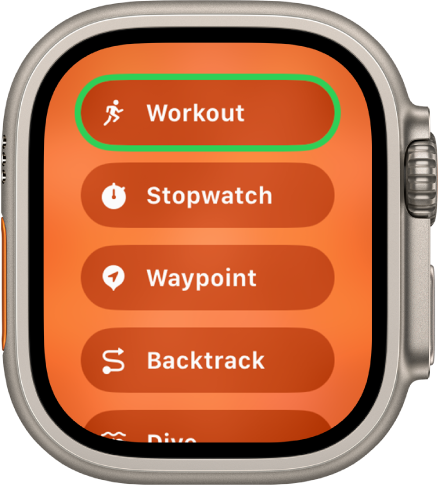
    The Quick Switch screen showing the actions that can be assigned to the Action button, such as Workout, Stopwatch, and Waypoint.

To customize Quick Switch, go to the Settings app, tap Action Button, tap Quick Switch, then choose the actions you want to be included in Quick Switch. You can also turn off Quick Switch.

Turn off the Action button

  1. Go to the Settings app on Apple Watch Ultra.
  2. Tap Action Button, tap Action, and tap None.

See also

People with physical and motor disabilities may find it easier to control their Apple Watch from the larger screen on their paired iPhone. With Apple Watch Mirroring, you can control Apple Watch using iPhone’s assistive features like Voice Control and Switch Control.

You can use inputs including voice commands, sound actions, head tracking, or external Made for iPhone switches as alternatives to tapping the Apple Watch display. An image that mirrors your Apple Watch display appears on your iPhone, and you use gestures on that mirrored image.

Note: Apple Watch Mirroring isn’t available on Apple Watch SE.

  1. Go to the Settings app on the paired iPhone.
  2. Go to Accessibility and tap Apple Watch Mirroring. Then turn on Apple Watch Mirroring.
  • Scroll: Swipe the display up or down.
  • Swipe between screens: Swipe the display left or right.
  • Press the Digital Crown: Tap the Digital Crown on the display.
  • Press the side button: Tap the side button on the display.
  • Press the Action button: (Apple Watch Ultra models) Tap the Action button on the left side of the display.
  • Use Siri: Touch and hold the Digital Crown on the display.

See also

Just as you can control your Apple Watch with your iPhone, you can also control nearby devices, like your iPhone or iPad, with your Apple Watch. It’s handy. Your watch shows buttons that replicate the controls on your device, like the Home button, App Switcher, and Control Center, as long as both are signed in with the same Apple Account.

  1. Start the Settings app on your Apple Watch.
  2. Go to Accessibility and tap Control Nearby Devices.

    Your iPhone or iPad must be signed in to iCloud with the same Apple Account and be on the same network.

  3. Choose a device if more than one is nearby and tap a button.

    Buttons replicate the controls on your device and include the following:

    • Home button
    • App Switcher
    • Notifications Center
    • Control Center
    • Siri
    • Options (includes media play controls and customizable hand gestures)

With VoiceOver enabled on your Apple Watch, controlling a nearby device turns VoiceOver on there too, and the VoiceOver gestures you use on your Apple Watch are performed on that device.

Similarly, when you enable Switch Control on your nearby device, Switch Control buttons, such as Move, Next, and Select, appear on your watch.

See also

With Live Speech, you can type and have your words spoken aloud, both in person and on phone and FaceTime audio calls.

On a call, people hear your words in the conversation; otherwise, they come out of the speaker on your Apple Watch. You can even use your Personal Voice, a synthesized voice that sounds like your own.

Here’s how to type to speak using Live Speech on Apple Watch.

Set up Live Speech

  1. Start the Settings app on your Apple Watch.
  2. Go to Accessibility and tap Live Speech. Turn on Live Speech.
  3. Tap Voices, choose a voice, and tap Speak Sample to hear it.

    To use the voice, tap Download [name of voice], then tap Use Voice.

  4. To set up the Accessibility Shortcut to turn on Live Speech, open Settings, tap Accessibility, tap Accessibility Shortcut, and choose Live Speech.

Type to speak

  1. Triple-click the Digital Crown and choose Live Speech if you have more than one accessibility shortcut enabled. Then type what you’d like to have spoken or choose a favorite phrase.

    Tip: Add your most frequently used phrases so you can quickly access them. Go to Settings > Accessibility > Live Speech, then tap Favorite Phrases.

  2. Tap Send to have your phrase spoken.

On a phone or FaceTime audio call, people hear your words spoken in the conversation. Otherwise, your words come out of the speaker on your Apple Watch.

Use your Personal Voice with Live Speech

With Personal Voice, you can create a synthesized voice that sounds like your own to communicate with family and friends. Use your Personal Voice to type to speak in FaceTime and phone calls, assistive communication apps, and in-person conversations. (Available in select languages.)

After you create a Personal Voice, you can use it on Apple Watch:

  1. Start the Settings app on your Apple Watch.
  2. Go to Accessibility and tap Live Speech.
  3. Tap English (US), then choose your Personal Voice.

Important: You may only use Personal Voice to create a voice on your iPhone, iPad, or Mac that sounds like you using your own personal voice for your personal, noncommercial use.

See also

Siri is often the easiest way to start using accessibility features with your Apple Watch. Use Siri to open apps, turn many settings on or off, or act as your intelligent personal assistant.

You can set how long Siri waits for you to finish speaking. And you can use Siri without speaking at all, by typing your requests instead.

Here’s how to use accessibility features with Siri on Apple Watch.

Siri: Ask Siri something like, “Turn on VoiceOver.” See Control your Apple Watch and smart home accessories with Siri.

Set how long Siri waits for you to finish speaking

  1. Start the Settings app on your Apple Watch.
  2. Go to Accessibility, tap Siri, scroll down, and tap Default, Longer, or Longest below Siri Pause Time.

Type instead of speaking to Siri

You can use Siri without speaking. Follow these steps to type rather than speak Siri requests.

  1. Start the Settings app on your Apple Watch.
  2. Go to Accessibility, tap Siri, and turn on Type to Siri.

See also