In this article, I’ll show you how you can delete individual messages (including SMS, text and iMessages)
and entire conversations in Messages on your Mac. Moreover, I’ll show you how you can set up your Mac to automatically delete messages.
Your Mac keeps a permanent copy of your messages forever by default. There is a high chance that you will not
save a lot of space on yourMac
by deleting messages. But if you have tons of messages, you may become overwhelmed. To take control of your messages, it is important to delete some of your messages
so that you can keep your messages organized particularly if you chat with lots of people.
Before you jump into it, please keep in mind that you can’t recover a deleted message or conversation.
Delete a message
Follow these steps to delete a single message in a conversation:
On your Mac, launch the Messages app.
Identify the conversation that you wish to delete a message from.
Look for the individual message you wish to delete.
Click once on the message to highlight it.
On your keyboard, press the delete key.
You will see a popup that says “are you sure you want to delete this message? You cannot undo this action.”
Click Delete to confirm your action.
Now, the message will go away.
Delete a conversation
Follow these steps to delete the whole conversation:
Identify the message thread you wish to delete from the Messages list.
Select the conversation. Then:
You can right-click (control-click) and select Delete Conversation. Again, you’ll see a popup that says “would you like to delete this conversation? You
cannot undo this action”. Just hit Delete to confirm.
Alternatively, click File from the menu bar and select Delete Conversation. Click Delete again.
Finally, if you are using a trackpad or a Magic Mouse, you can swipe left with two fingers and then click the red Delete button. Click Delete one more time
to confirm your action.
Keep in mind, if you are using Messages in iCloud, therefore, conversations you delete from Mac will automatically be deleted from your other Apple devices like your iPhone, iPad or iPod Touch.
Auto-delete
macOS offers you an option to keep your messages for 30 days, a year, or forever. This means that your Mac will automatically delete your messages after
the selected time period elapse. This will include the attachments as well. Here are instructions for how to turn on automatic removal:
On your Mac, launch the Messages app.
Now, click on Messages.
Next, click Preferences.
Next on, Click the General tab.
Lastly, click the “Keep messages” pop-up menu and then choose how long you want to keep messages.
For instance, if you select 30 days, your conversations and attachments will be deleted after 30-day is over. By default, forever is selected. Therefore,
your Mac keeps all messages forever unless you delete them manually.
Zoom security problems have recently thrown some cold water on one of the hottest apps in the world. As such, you may want to delete Zoom account permanently. Actually, tons of people around the world still rely on Zoom, but now, nobody seems
sure about how much faith they should put into the service.
With that in mind, we’ve decided to look at some of the more notable Zoom security problems out there. If these problems scare you off the virtual meeting
app, then we’ve also explained how to delete your Zoom account and use other popular Zoom alternatives instead.
Zoom Security Problems
You’ve probably heard of some recent Zoom security problems that severely impacted user trust in the service. The following are some of the main Zoom security problems
that have been discovered so far.
Recorded Video Vulnerabilities
Hackers discovered a couple of Zoom security problems with the service’s recorded video options.
The first, and most important, is that it was previously possible to hack the Zoom cloud and download recorded videos. While this is not a simple process,
a relatively experienced hacker could do it without too many problems. In addition, it appears that recorded Zoom meetings can linger in the cloud
even after being deleted by the user.
Zoom has addressed this issue to some extent by enabling increased password protection by default. However, older recordings can still be vulnerable. In addition,
general concerns remain about the security of the Zoom cloud.
Zoombombing
It is possible for your Zoom call to be hijacked through a process called Zoombombing. That basically means that someone can make their way to your
Zoom conversation or account.
There is some debate as to how widespread this issue is, but it’s been suggested that this Zoom security issue hasn’t yet been properly addressed.
Therefore, it remains a major concern about Zoom security.
User Data Sharing
Zoom has been called out over their previously generous data sharing policies. Basically,Zoom had a somewhat relaxed policy because it involves sharing user
data via Facebook and other social media channels.
While Zoom has stated that they are working to address this issue and better protect user information, some are still concerned about the company’s policies
and history with this issue.
Other Zoom security vulnerabilities exist, but these are the ones that are most of the focus and concerns at the moment. In short, many belief
that Zoom is inherently vulnerable platform with a unstable history of protecting user information.
Is Zoom Still Safe to Use?
This question is somehow tricky
First, it’s a matter of public record that Zoom has recently suffered from significant security vulnerabilities. Everyone is aware that there are inherent problems with
the service, and that’s always something to be concerned about.
Though, Zoom has taken steps to ensure that its existing problems are resolved. That’s cool, and some argue that Zoom’s response to these issues
is indicative of their intention to keep abreast of such issues in the future. They’ve said that Zoom could ultimately become the safest of such platforms
because they have had a lot of early issues.
Whether you believe that it is really a matter of trust in the company, but the logic is solid. At the very least, Zoom doesn’t appear to be noticeably
less secure than some of the major alternatives in the market.
How to Delete Zoom Account on iPhone
If you just want to delete your Zoom account, the process is easy and straightforward. Here’s how to delete Zoom account on iPhone:
Log in to the web portal of your Zoom account
Go to Account Management > Account Profile
Click on “Terminate My Account”
When asked to confirm the deletion of your account, select “Yes”
After completing the last step, you can safely delete the Zoom app from your device. This can be done using the usual methods of deleting an app. If
You don’t know that process, just hold down the Zoom icon on your device until you see the “Delete App” option.
Keep in mind, you cannot delete Zoom account from app. If you delete the app from your device, your account will not be deleted. If you don’t delete your account first, your data will
remain active with Zoom. So, to delete zoom account on iPhone, you will want to log in to the web portal of your Zoom account.
How to Deactivate a Zoom User
Deleting your own account is pretty easy, but you may also want to remove someone else’s Zoom access.
There are a number of reasons why you may need to remove someone from your Zoom account. For example, you may have accounts for your employees and a member
is no longer part of the company. Either way, the steps to remove someone remains the same. Simply follow these steps:
Log in to the Zoom account web portal
Select the User Management option and then navigate to Users
Find the user you want to remove
Click the ellipses icon next to their name and choose the Deactivate option.
Keep in mind, you can easily reactivate a user account by following the same steps as mentioned above, but select Activate rather than Deactivate.
How to Secure Your Zoom Account
There are a few easy steps you can follow to better protect your Zoom account. While none of them guarantees 100% security, they can all help in due course. Simply follow these steps:
Avoid sharing your meeting ID unless you have to. Even then, only share it via the safest channels.
Always generate a random meeting ID instead of manually setting one.
Turn on the waiting room feature to make sure you know who you are inviting to a meeting.
Use Zoom settings to make sure that you’re the only one who can screen share during a meeting. Note, there may be times when this option is not available.
From the Manage Participants menu, you can lock your meeting. This is a great Zoom security option if you’re certain nobody else needs
to join.
Do not record your meetings unless it’s obligatory. This is an easy way to protect yourself against notable security issues.
Remove, report, and block any problematic participant. This is an great way to keep abreast of problems as they appear.
Zoom Alternatives
Here are some of the best Zoom alternatives
GoToMeeting
GoToMeeting is a professional, established, and generally secure virtual meeting available today. While it lacks some of Zoom’s cool features, it certainly isn’t
lacking when it comes to professional meeting options.
FaceTime
FaceTime is not the best “full feature” virtual meeting app available today. What it is, however, is an accessible, easy-to-use, and generally reliable way to
have a virtual conversation. If you don’t need much more, it may offer pretty much everything that you need.
As we’ve already mentioned, chances are you already use Slack in your office. If that’s the case, it also means you have access to its
virtual meeting options. While these options are not as extensive as those of Zoom and other services, Slack is still one of the easiest ways to
start a meeting with your colleagues.
Cisco WebEx
It would be a lie if we told you that Cisco is as “fantastic’ as Zoom. However, As far as security and professionalism is concerned, this is one of the most reliable options
available today. There’s certainly not much to complain about as far as hosting virtual meetings with this app is concern.
See alsoBest video conferencing apps for iPhone and iPad
In this article, I’ll show you exactly how you can zip and unzip files and folders on your Mac.
macOS features a built-in compression system, called Archive Utility, which
can help you do the job.
Zip files are also known as compressed. These files do not take up
large storage space.
Also, a zip file is pretty easy to send or receive over the Internet. For instance, you can send a whole heap of documents in a zip file through email, instead of attaching
each file individually. It’s easy to create zip file on MacBook. In the same token, it’s easy to open Zip file on Mac.
How to zip files on MacBook)
Here’s how to compress files on Mac:
Select file(s) and /or folder(s). You can command-click (press and hold down the Command key and then select files or folders) to select multiple files or
folders.
Next, control-click or right-click.
Compress items
You will see a shortcut menu. From the menu, simply click Compress.
It’s worth noting:
If you zip multiple files or folders, the name of the zip file will be Archive.zip. You can change this if you want. To do this, Select the Archive.zip file,
and click Return and type in a new name.
If you zip a single file or folder, the name will be its name with .zip extension like GeeksModo.zip.
How to zip files on Mac using Terminal
TheTerminal app on Mac also allows users to create zip files. Here is how:
On your Mac, launch Terminal (Applications >
Utilities).
You can type in the following command:
zip archive.zip file.txt
Alternatively, you can type zip and then drag and drop the files you want to compress into the Terminal window.
How to unzip (uncompress)
Here’s how to open compressed zip file on Mac:
Locate the zip file.
Double-click it. Alternatively, you can right-click it, then choose Open With > Archive Utility.
It’s worth noting:
Your unzip file will remain in the same folder/location that zip file stored in. For instance, if you’re extracting an archive named “GeeksModo.zip” on
your desktop, the extracted folder, named GeeksModo, will be created on the desktop.
How to open Zip files on Mac with Terminal
You can also use Terminal to unzip your files. Here is how to use terminal to unzip files on Mac:
On your Mac, launch Terminal.
And type in the following command:
unzip archive.zip
Mac features a built-in Voice Memos recorder app that allows users to easily record their voice, a conference, a lecture, a note, a meeting, or any
other audio. Apple has made it really easy to create these voice memos with your Macs built-in microphone, a wired or Bluetooth headphones, or a supported microphone (see this article
your microphone is not working: fix).
You can also edit (like trimming) or share your recordings. In this article, I’ll show you exactly how to use the macOS Voice Memos app.
You can also use iCloud
to sync all of your voice memos across all your Apple devices.
All MacBooks that supports macOS Mojave and higher features a built-in Voice Memos app.
How to record voice memos on MacBook
Please follow these steps:
On your Mac, launch the Voice Memos app. You can open the app in several ways:
You can use Launchpad.
You can
use Spotlight.
You can launch the Applications folder and click the Voice Memos app.
Or ask
Siri.
If you are opening this app for the first time, you will see a Welcome screen that says “Welcome to Voice Memos”. This screen gives an introduction.
Click Continue.
You might also see the following two popups:
One indicating “Voice Memos” would like to use your current location. You can click OK if you want to allow this. When you OK this, your recordings will be
named alongside the location where they are recorded. Do not worry It’s easy to change this setting by heading over to System Preferences > Security & Privacy
> Privacy > Location Services. Also, you can disable location-based naming by heading over to Voice Memos > Preferences and then uncheck the “Location-based Naming”
Box.
Also, you might see a popup stating “iCloud Syncing”. You can turn on this if you want to access your recordings across all of your Apple devices. Again,
you can change this later by heading over to System Preferences > Apple ID > iCloud.
Voice Memos iCloud.
To start a voice memo recording, click the Record button. And recording will start.
You will see a new screen. This is your recording screen.
When you are done recording, simply hit Done. If you want to pause your recording, then you can click the pause icon.
Your audio recording will be named with your location, if you enabled this setting. If not, your recording will be named as a “New Recording X”. To rename
your recordings, simply click their names.
Edit a memo
Apple provides multiple editing options:
Trim from the beginning or end
To edit an existingvoice memo, click a recording and then edit.
If you want to edit as you record, simply pause your video.
You can click the trim button.
Now, yellow handles will appear. Drag the yellow arrow. Then click Trim.
Delete a voice memo
Locate and click the voice memo you wish to erase.
Now, click Delete or right-click (control-click) and select Delete.
The deleted voice and audio files will be stored in the Recently Deleted folder for 30 days. You can change this setting by heading over to Voice Memos > Preferences.
Apple offers you multiple options to choose from:
After every thirty days.
After every seven days.
After one day.
Immediately.
Never.
Replace part of a voice memo
. Identify the recording you want to edit and hit Edit.
Now, click on the red Replace button.
After clicking the Replace button, your recording will be re-recorded.
In this article, I’m going to tell you exactly what iMessage is, how it
works and what you can do when it’s not working.
What is an iMessage?
iMessage is a free, secure encrypted messaging service for Mac, iPhone, iPad, and Apple Watch.iMessage
is Apple’s own messaging service. The Cupertino based brand introduced iMessage in 2011.
iMessage can be called an “Over The Top” (OTT) service that does not require a cellular data connection. Your messages can either be sent over cellular data or Wi-Fi connection
. If your device is not connected to a Wi-Fi network, your message will be sent over cellular data. If you use Wi-Fi to send or receive iMessages, it’s free of charge. As
such, iMessage may use your
cellular data
which will be deducted from your cellular data plan. And iMessage may consume huge amount of data particularly if you are sending photos, audio, or videos via iMessage.
Conversely, iMessages you send over cellular are not part of your monthly text message allowance if your cellular data plan sets a limit.
Regular text messages (SMS or MMS) require a cellular data plan with text-message abilities. Wireless carriers usually offers three types of text message plans as listed below:
Unlimited text plan. As the title says, you can send unlimited text messages.
Limited text plan. In this type of plan, you have a messaging allowance, usually monthly, that means, you can send a certain number of text messages.
And pay per message. Meaning your carrier will charge you for every message you send or receive.
Irrespective of your data plan, you can send unlimited number of iMessages.
How to send an iMessage
To be able to send and receive iMessage, you need to have Apple’s Messages app on your device running iOS 5 or higher, watchOS 1 or higher or OS X Mountain Lion or higher.
You and your recipient need to have a compatible Mac, iPhone, iPad, iPod touch, or Apple Watch to use iMessage.
Everything is automatic. Both the sender and the recipient just need a device that supports iMessage. On your apple device, simply launch the Messages app and type and
then send your message. Then Messages will check with Apple servers if your recipient is set up for iMessage. If yes, your message will automatically be
delivered as an iMessage. Otherwise, your message will be sent as a regular text message (SMS/MMS). Please note, iMessages appears in blue bubbles while regular text messages appears in green bubbles.
To turn on or off iMessage on your device, please follow these steps:
On your iPhone, iPad or iPod touch, Start the Settings app and go to Messages and iMessage.
On your Mac, to
turn off iMessage,
start the Messages app and then click Messages > Preferences, then click Accounts and select your iMessage account.
iMessage features
iMessage has numerous awesome features. You can send and receive text, photos, audios, video , voice messages, location, money, heartbeats etc. The following are some iMessage
features:
You can participate in group iMessage chats.
iMessage shows
read receipts.
You can
send pictures, audio or videos via iMessage.
You can send or receive cash with Apple Pay.
You can
send your location via iMessage.
You can apply
message effects.
You can use iMessage apps.
You can send a sketch, tap, or heartbeat using Digital Touch.
You can send GIFs using
#images.
You can use Messages in Cloud to sync your entire message history across all your apple devices.
How to troubleshoot iMessage problems
If iMessage is not working on your iPhone, iPad or Mac, please try the following fixes:
Make sure that your Apple device is running the latest version of iOS, iPadOS, macOS or watchOS.
To update your iPhone, iPad or iPod touch, go to Settings > General > Software Update.
To update macOS Mojave or higher, head over to System Preferences and then Software Update.
To update macOS High Sierra or older, launch the App Store on your Mac and then click the Updates tab.
Turn off iMessage (check the section above to turn on/off iMessage), then restart your device and then turn iMessage back on.
Sign out and sign in:
On your Mac: Launch Messages, select Messages > Preferences, then click Accounts and select your iMessage account. Click Sign Out. Then restart your Mac
and sign back in.
On your iPad, iPhone or iPod touch: Go to Settings > Messages > Send & Receive. Tap your Apple ID, then tap Sign Out. Then restart your device and sign back in.
Ensure that your device is connected to the Internet (a cellular data or Wi-Fi network).
In this article, I’ll explain exactly how you can set up and make FaceTime conference calls (also called group calls) on your iPhone, iPad, iPod touch or Mac. A conference
call refers to an audio or video call in which 3 or more participants converse at the same time. And you can do this using your iPhone, iPad or Mac
without buying extra software or tools. It is pretty simple and straightforward.
FaceTime Conference Call Requirements
You can conference call up to 31 people, 32 if you include yourself on FaceTime.
All of the participants need to have an Apple device:
iPhone 6s or newer, iPad Pro or newer, iPad Air 2 or newer, iPad mini 4 or newer, iPad (5th generation) or newer, or iPod touch (7th generation) or newer,
running iOS 12.1.4 or higher, or iPadOS. To check your software version and update your device, head over to Settings > General > Software Update.
Mac computers running macOS Mojave 10.14.3 or higher. To check your macOS version, click the Apple menu and About This Mac.
Obviously, all participants should have FaceTime on their devices. If you deleted the app, you canget it from the App Store.
Other users including Android users, Windows users, etc cannot participate.
How to make FaceTime conference call on iPhone,iPad or iPod Touch
You can make FaceTime conference call in two ways :
You can start a call from the FaceTime app.
You can also start a call from the Messages app.
How to make FaceTime conference call using the FaceTime app
Here is how to make FaceTime conference call using the FaceTime app:
Launch the FaceTime app.
Tap the (+) add icon (located in the top-right-hand corner of the screen).
This new screen will read “New FaceTime”. In the “To:” field, start typing the participants, you can enter names, numbers or emails. If you tap the
(+) add icon in the “To:” field, you can add participants right from your contacts.
As you type, iOS will provide you with a list of suggested participants. You will notice that some contacts will appear in blue while others will appear in gray. Only
the blue contacts can be added. Blue contacts is an indication that their devices and software support conference FaceTime.
As we’ve already pointed out, you can add up to 32 participants at a go.
When you are finished adding participants, initiate the conference call by tapping either the audio or video button.
How to make FaceTime conference call using the Messages app
Here is how to make FaceTime conference call using messages app
Launch the Messages app on your Apple device.
Create a
group message:
Tap the new message icon which is located in the upper right corner of the screen. Open an existing group conversation.
New message
Type in participants in the “To:” field. You can also tap the add button to add participants right from your contact list.
At the top of the conversation lists, you will see avatars, tap on it.
And then tap the FaceTime icon.
How to answer a conference call
So someone has given you a FaceTime conference call. Here is how you can answer it on your iPhone, iPad or iPod touch:
You will get a notification.
Now, tap the notification to answer or decline a call.
Also, you can join the call from the Messages app and FaceTime app.
How to make a FaceTime conference call on Mac
You can also start a conference FaceTime call on your Mac. Just like the iPhone and iPad, you can use the Messages app to start a call. You can
only use the FaceTime app to make the call. Here is how to make a FaceTime conference call on Mac:
Launch the FaceTime app on your Mac.
Type in the names, emails or numbers of people you want to call on the search field.
You can add up to 32 participants.
Finally, tap the Video or Audio button to start your FaceTime conference call.
Use Messages on your Mac
On your Mac, launch the Messages app.
Click on the group message.
Now, click on Details.
Finally, click the video or phone button to start your audio or video conference call.
How to answer a conference call on your Mac
So you’ve received a conference call on your Mac?
You will get a notification.
Use the notification to answer (or decline) the call.
iPhone or iPad: Head over to Settings > General > Date & Time and then enable Set Automatically.
macOS: Click the Apple menu, go to System Preferences > Date & Time > and then check the “set date and time automatically” box. You will need to click the
lock icon and type in your password for your changes to take effect.
The use ofvideo conferencing is becoming the order of the day. Almost every company out there, including WhatsApp, Google Duo, Microsoft Teams, etc., is expanding their video calling platform with new features and tweaks. Among them,FaceTime seems to be the the most preferred option for iPhone users. And why not? It’s easy to set up, offers plenty of features, and up to 32 people can join a group video call on FaceTime.
During group FaceTime video calls, Apple enlarges the tile of the person speaking to the meetup. This feature is known as Automatic Prominence, and Apple does this to highlight the speaker. While useful for small group video calling, some may find the behavior annoying when several people are speaking at the same time. With the release of iOS 13.5, Apple has added an option to disable the Automatic Prominence feature in FaceTime. Here are the steps to turn off moving faces in the FaceTime group.
Disable moving faces in FaceTime group
Step-1: Start the Settings app on the iPhone.
Step-2: Go to General -> Software Update and update to iOS 13.5.
Step-3: After a successful update, start the Settings app on your iPhone and go to the FaceTime app.
Step-4: In the FaceTime settings, you will see the Speaking option under the Automatic prominence menu.
Step-5: Uncheck the Speak option and it will disable moving faces in a Group FaceTime video call.
The contagious Coronavirus has forced us all to stay at home. But you can still keep in touch with your colleagues by trying some of the best video conferencing apps on your iPhone and iPad. Social distancing and self-quarantine are the order of the day, but work and communication need not stop.
See alsobest video conferencing apps for iPhone and iPad
Have you disabled the Automatic speak option in the Settings menu? Sound off in the comment section below.
With the release ofmacOS Catalina 10.15.5, Apple has introduced a new Battery Health management feature for macOS. Similar to what is already found in iOS, this feature aims to extend the life of your MacBook by reducing its wear.
Most people use their MacBooks for up to 5 years or even longer. The battery is usually the first to be used on older MacBooks, as the hardware is usually good enough to survive five years of intensive use. While it is possible to replace the battery on MacBooks, most consumers usually don’t because it is expensive. With the new Battery Health management feature in macOS Catalina 10.15.5, Apple hopes to extend the battery life of MacBooks depending on a person’s usage.
How does Battery Health Management work in macOS Catalina?
The Battery Health management feature in macOS Catalina 10.15.5 analyzes the usage and charging habits of your MacBook and automatically prevents it from being charged to 100% when deemed necessary. A battery that is always 100% charged and connected is not good for its life, which is why Apple introduced this feature. Many MacBook owners use their machine as a desktop replacement, which means it is almost always plugged into a power source. In such cases, the Battery Health management feature prevents your MacBook from charging to 100%, thereby extending battery life.
Enabling Battery Health management does not mean that your MacBook will stop charging the battery to 100%. The feature first analyzes your usage patterns and then makes adjustments accordingly. If you have a very erratic schedule or are always on the go, consider disabling the Battery Health Management feature as it won’t help you much. However, if you’re always near a power source and want to extend the battery life of your MacBook, keep this feature turned on.
Compatible MacBooks
All MacBook and MacBook Pro models with a Thunderbolt 3 port and launched on or after 2016 support the Battery Health Management feature. This means that all MacBooks and MacBook Pro models launched in or after 2016 are compatible with this feature. Older non-battery powered MacBooks and Macs are not compatible with this feature.
Battery Health Management is enabled by default when you update your MacBook to macOS 10.15.5. However, if you get a new MacBook out of the box with macOS Catalina 10.15.5, you will need to enable the Battery Health Management feature manually.
How to disable Battery Health Management on your MacBook
Step-1: Head over to System Preferences -> Energy Saver on your MacBook running macOS Catalina 10.15.5.
Step-2: Click on the “Battery Health” option located at the bottom of the window.
Step-3: In the dialog box that appears, you have the option to disable the battery health management feature. You must click ‘Disable’ again to confirm your selection.
What do you think of the Battery Health management feature of macOS Catalina 10.15.5? Leave a comment and let us know!
If your iPhone is disabled because you’ve forgotten the passcode and now can’t unlock your device, help is at hand! In this article, I’ll explain how to unlock a disabled iPhone without iTunes or iCloud or computer.
If you tried the wrong passcode repeatedly or your kids type randomly in the lock screen, it will cause the iPhone to be disabled. As a result, you will be informed that “iPhone is disabled connect to iTunes”. The good news is that you’ll know everything about how to unlock a disabled iPhone without iTunes or iCloud or computer in this guide.
Part 1: How to Unlock a Disabled iPhone with iTunes
Just as the iPhone message tells you, you can unlock the disabled iPhone with iTunes. With the synced iTunes on your computer (Windows/Mac), you can restore the disabled iPhone to remove the lock screen.
Step-1: Get a USB cable and connect your iPhone to the computer and open iTunes.
Step-2: To enter your iPhone, you can click the phone icon and then hit the Summary option on the left side. In this way, you can view the iPhone details and get the restore option.
Step-3: Here comes the most important step—click the Restore iPhone button. If you see a message that says “Find My iPhone must be turned off”, you can try the next way to unlock the disabled iPhone.
Step-4: Click Restore on the confirmation window. After that, just wait until the restoration process is complete. When it finishes the restoration, you can set up your iPhone again.
Part 2: How to Unlock a Disabled iPhone with iCloud
If you fail to unlock the disabled iPhone with iTunes, or if you encountered any error during the restoration process, you can make good use of the iCloud to unlock the disabled iPhone. Here are the steps.
Step-1: Open a web browser on your computer or another mobile phone and go to icloud.com.
Step-2: Sign in to iCloud with your Apple ID and passcode. It must be the Apple ID that is linked to the disabled iPhone. If you find there is two-factor authentication for your Apple ID, it means that you need to get the verification code to unlock your iPhone. The most effective way is to take out the SIM card and install it on another mobile phone to get the code. Or you can try the next method to unlock the disabled iPhone with a third-party tool.
Step-3: Once you’ve successfully sign in to iCloud, click Find My iPhone at the bottom right corner.
Step-4: In Find My iPhone interface, click the All Devices button to get the drop-down option. Then you can click the disabled iPhone and get its location.
Step-5: To unlock the disabled iPhone, simply click the Erase iPhone option and then confirm the action. Now, your iPhone will be erased and restarted like a new device. You need to activate it again as you did before.
Part 3: How to Unlock a Disabled iPhone without iTunes or iCloud
Unlock a Disabled iPhone without iTunes/iCloud using PassFab iPhone Unlocker
To unlock a disabled iPhone without iTunes or iCloud, you will need an iPhone unlocking tool like PassFab iPhone Unlocker. It allows you to unlock your iPhone, iPad, and iPod touch without the lock screen password, Face ID, or Touch ID. That’s why you can use it to unlock iPhone without passcode or Face ID easily.
PassFab iPhone Unlocker is designed to be a super simple tool that works effectively in letting you unlock a disabled iPhone without iTunes including iPhone 14, iPhone 13, iPhone 12, iPhone 11, iPhone X, iPhone 8, iPhone 8 Plus etc). The process doesn’t involve any lengthy workaround and can be done with ease.
It doesn’t matter whether you have set a 4-digit custom numeric code or 6-digit alphanumeric passcode, you can get rid of the password including Touch ID and Face ID info without any hassle.
Key Features of PassFab iPhone Unlocker
Unlock a disabled iPhone without iTunes
Remove 4/6-digit passcode, Touch ID, or Face ID
Remove iCloud from iOS device without password
Supports all iPhone models including the iPhone 14 Pro Max
Supports various iOS versions including the latest iOS 16
Factory Reset iPhone without Password
Only 3 Steps to Unlock a disabled iPhone
How to Unlock a disabled iPhone without iTunes Using PassFab iPhone Unlocker
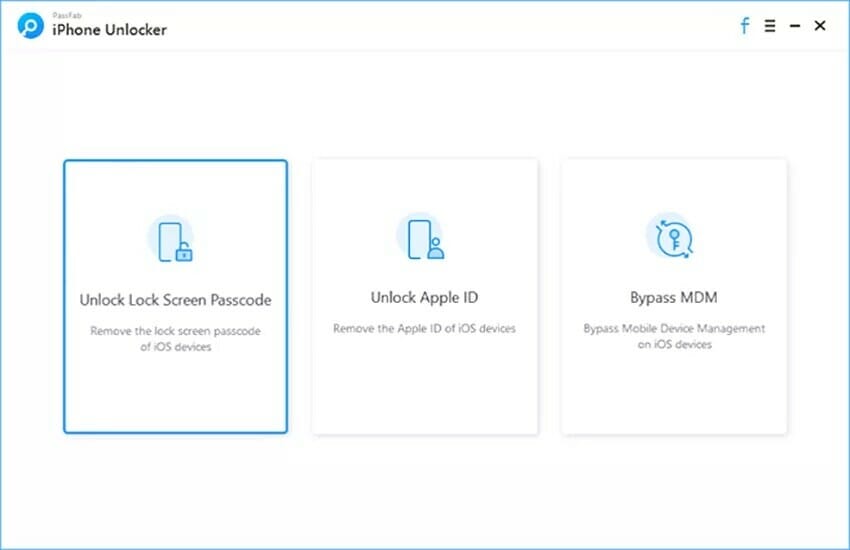
Step 1: First off, download and install PassFab iPhone Unlocker on your PC/Mac. Then, open the software on your computer and select ‘Unlock Lock Screen Passcode’.
Step 2: Now, you need to connect the disabled iPhone to the computer via USB cable.
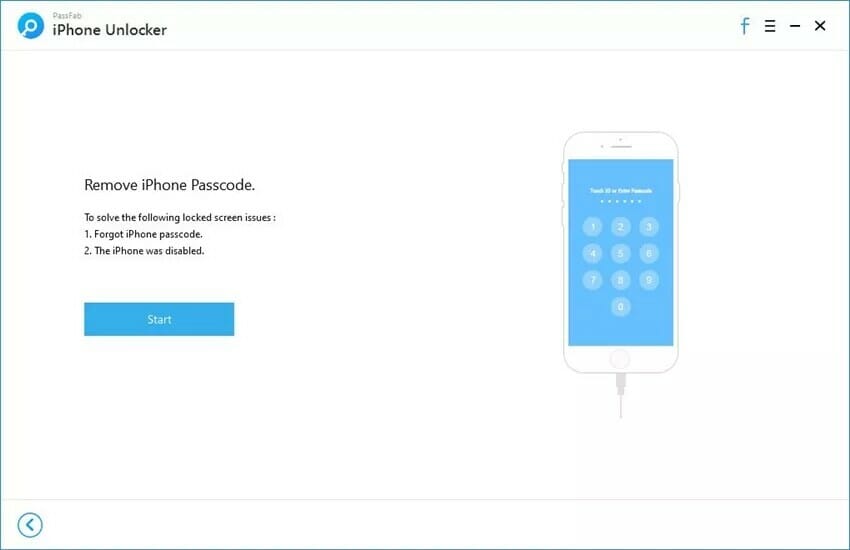
Step 3: After PassFab iPhone Unlocker has recognized your device, click ‘Start’ to remove iPhone passcode.
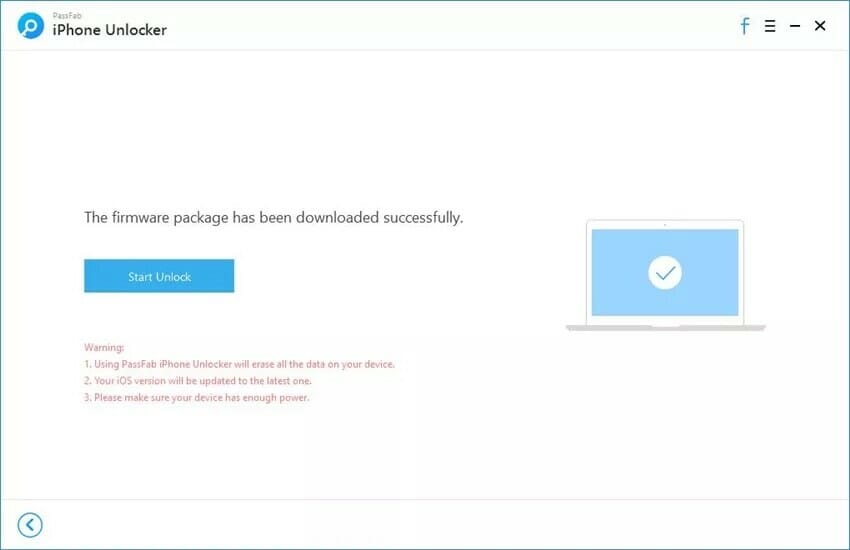
Step 4: Next up, you have to download the latest iOS firmware.
Once the firmware is downloaded click ‘Start Unlock’ to start Unlocking a disabled iPhone without iTunes.
Step 5: Up next, you have to wait for some time until the process is successfully completed. Make sure to keep your device connected to your computer.
After the process is finished, you can set up your device as new or restore it from the most recent backup.
PassFab iPhone Unlocker is right on the money when it comes to letting you unlock a disabled iPhone without iCloud or iTunes. Beyond removing lock screen, the tool also comes handy when your iPhone seems to be completely down and out and refuses to get restored via Apple’s mobile management tool.
Unlock a Disabled iPhone without iTunes/iCloud using StarzSoft KeyPass
StarzSoft KeyPass let’s you unlock a disabled iPhone without iTunes or iCloud within minutes. You can easily unlock your disabled iPhone without worrying about losing data, .
This tool can unlock various iOS devices including iPhone 14, iPhone 13, iPhone 12, iPhone 11, iPhone X, iPhone 8, iPhone 7, iPhone 6S, etc without the need for a pass code.
This tool can reset iOS device without pass code.
It’s compatible with the latest iOS version including iOS 16.
Easy to run. You don’t need to be an IT expert to run this tool.
Please follow these steps to unlock a disabled iPhone without iTunes using StarzSoft KeyPass:
Step-1: Download, install, and launch StarzSoft KeyPass on your computer
Step-2: Build a connection between the disabled iPhone and your computer via USB cable.
Step-3: quickly press the plus and minus volume buttons at the same time and then hold the power button until “connect to iTunes” flashes on the screen. StarzSoft Keypass will start to unlock your disabled iPhone without you having to restore anything or putting in any additional effort.
StatSoft KeyPass is one of the best tools available on the market, which lets users unlock their disabled iPhone without iTunes or iCloud. StatSoft KeyPass process is also much smoother than using iTunes to unlock a disabled iPhone.
The process will take less than 5 minutes and all your data will be safe and sound by the end of the process.
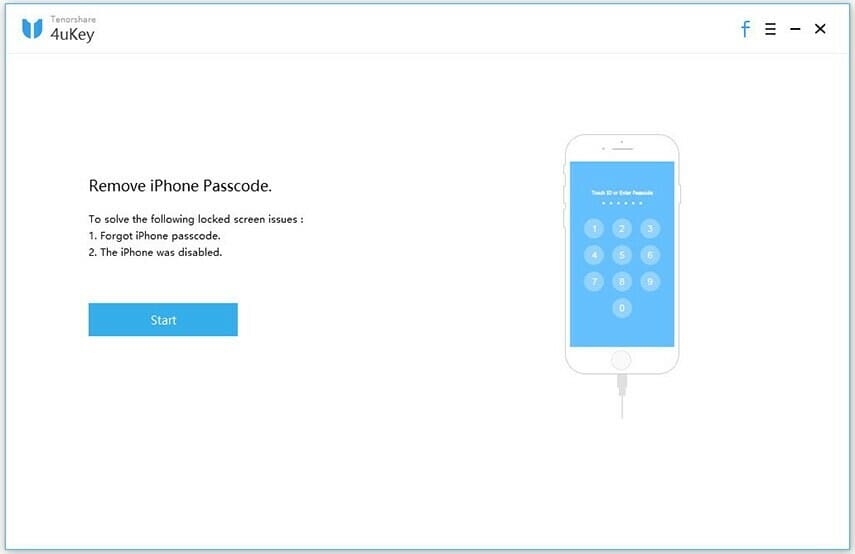
Unlock a Disabled iPhone without iTunes/iCloud using Tenorshare 4uKey
You can use Tenorshare 4uKey to remove the lock screen within few simple clicks. You do not need to have the screen lock passcode and Apple ID passcode, as well as the synced iTunes. Tenorshare creates iOS troubleshooting software for Mac and PC, and their program “4uKey” will help you bypass your iOS device’s passcode, even if it’s disabled.
Please follow these steps to unlock a disabled iPhone without iTunes using Tenorshare 4uKey:
Step-1: Download, install and launch 4uKey on your Mac or Windows computer. It is necessary to sign in to the software with your registration
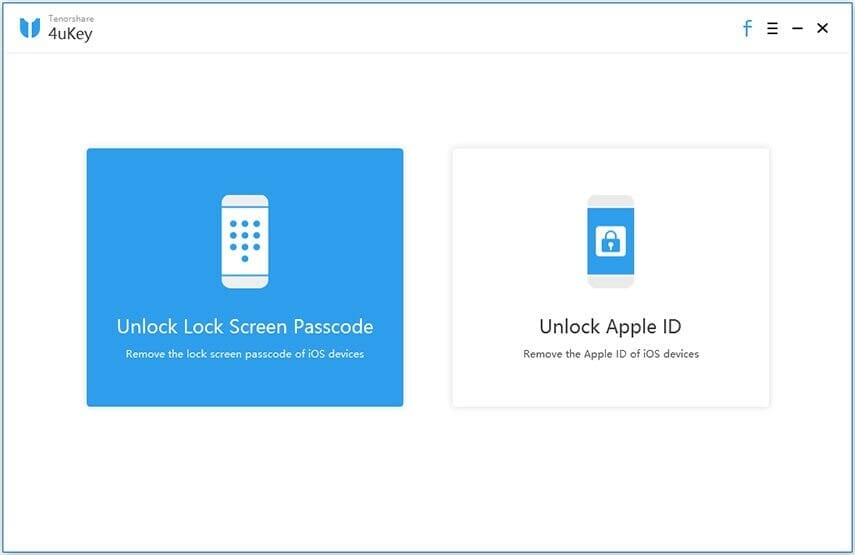
code. Then, select feature “Unlock Lock Screen Passcode” to get started.
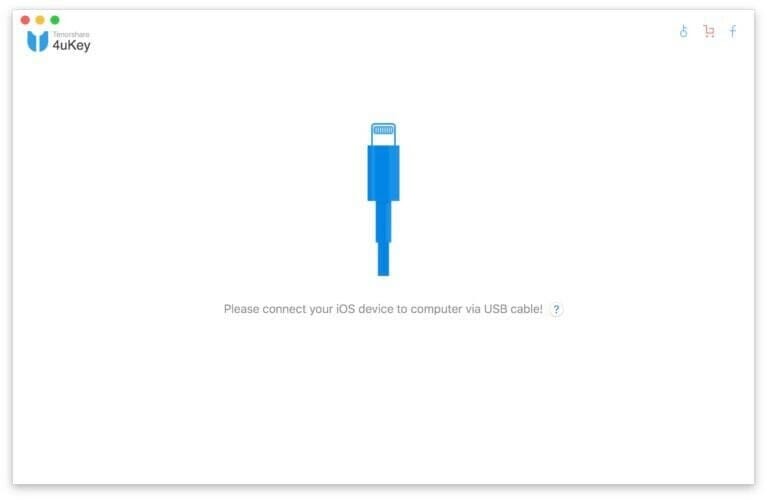
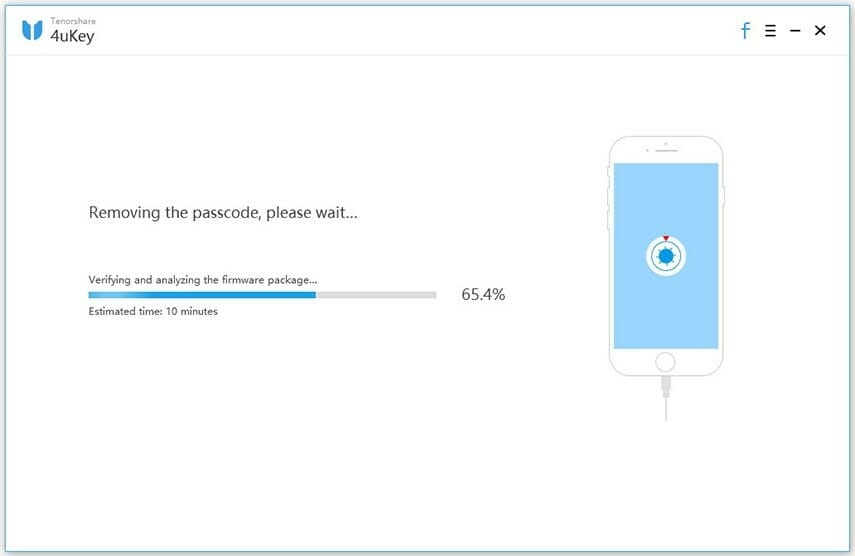
Step-2: Build the connection between the disabled iPhone and Mac or Windows computer with a USB cable. Step-3: Click the Start button on the main interface
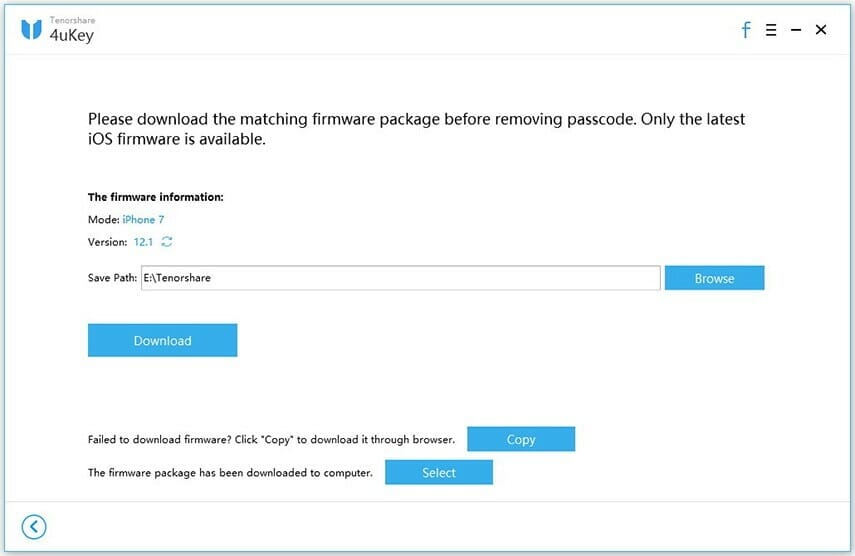
Step-4: Now, you can view that the software has detected your iPhone iOS details. And in the download firmware package online interface, you just
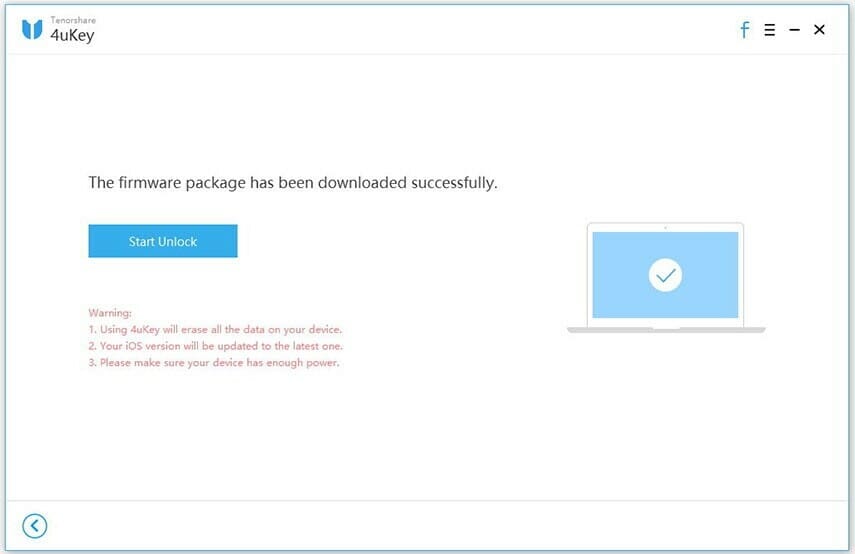
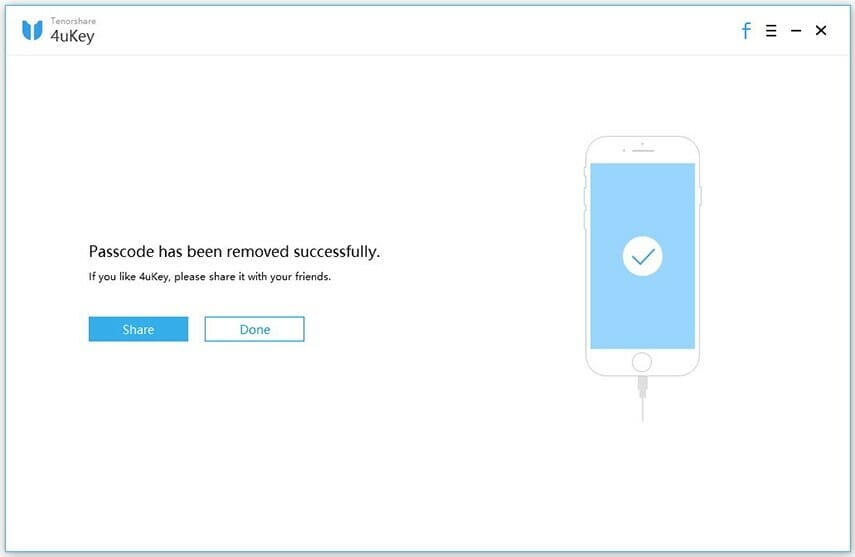
need to Choose a save path and click the Download button. Step-5: When the process completes, Tenorshare 4uKey will say that the passcode has been removed. Step-6: When iPhone passcode has been removed successfully, Follow the on-screen instructions to set up your iPhone. You can restore from an iCloud backup, iTunes backup, or set up
your iPhone as new. If you have a backup available, we recommend restoring from it so you don’t lose any of your data.
Part 4: How to Unlock a Disabled iPhone without iTunes/iCloud/ Computer
If you have no computer to utilize iTunes/iCloud/ third-party tool to unlock the disabled iPhone, what to do? You can use another accessible iPhone to unlock it with iCloud or Find My iPhone app. To unlock iPhone with iCloud, you can refer Part 2 tutorial to conduct the operation. Here we will guide you to unlock iPhone without a computer via Find My iPhone app on another iPhone.
Step-1: Get another accessible iPhone and open Find My.
Step 2: Log in with your Apple ID and password.
Step-3: Next, you will see all iOS devices which share the same iCloud account. You need to find the disabled iPhone from the list and tap it.
Step-4: Then tap on Actions at the bottom of the iPhone screen. After that, you are offered three options. Tap Erase iPhone and then you will get the disabled iPhone erased. Of course, the locked screen is removed from the iPhone.
As a matter of fact, this process is similar to unlock the disabled iPhone with iCloud. The most important part is that you need to enter the right iCloud account and password.
Are you experiencing an issue with your Apple products? Well. Apple has a range of tech
support
options for its customers. The support options ranges from phone call toonline live chat. In addition, there is
email support. However, you may need to get hands-on, personal support and help from an Apple expert, in case your problem is hardware relate.
For instance, if you are having a cracked screen problem, water damage, etc. You may have to visit your nearest Apple Store.
Apple provides tech support in each Apple Retail Store. This support is provided by the Genius Bar stations. Employees of the Genius Bar, called Geniuses,
Are experts trained to help customers with Apple hardware and software.
Before you visit the Genius Bars, you should make a reservation. You can make a genius bar reservation online. In this post, I’ve explained in details
how you can make an Apple Genius Bar appointment.
Recently, Apple has changed how genius bar reservation are made. The company has made it a little bit challenging now. It’s like Apple wants to provide support
throughonline live chat or phone calls.
What is the Genius Bar
The Genius Bar is a hands-on technical support station situated within Apple’s retail stores. If you need support or have questions related to your Apple products,
such as iPhone, iPad, Mac, Apple Watch, or Apple TV, you can get expert advice and training at the Genius Bar in any Apple Retail Store.
The Genius Bar employees, known as Geniuses, are specially trained and certified Apple experts. The central work of the Geniuses are to help their customers with
hardware and software issues. They can provide answer to your questions, offer personal supports, and fix your device. Most of the services they offer are free. They
can repair your device, however, you will need to pay for non-warranty services if your device is not covered by the
Apple warranty,
an
AppleCare plan.
You can make a Genius Bar reservation at an Apple Store in two ways:
Through the Apple Store app or,
By making a reservation via the Apple support web site.
1. iOS device / Apple Support App and Genius Bar appointments (the easiest way)
Launch the Apple Support app (if you do not haven’t downloaded it on your device, Go to the App Store and download and install it – or get it here)
Now, tap on Get Support
Next, choose your device. In this post, we selected iPhone 11 Pro and then Repairs & Physical Damage and “Buttons not working”. Note that some
problems can only allow you to get support via phone calls or live chat sessions.
Tap Bring in for Repair and choose a location and date and time and then tap Reserve. Then your reservation will be made.
You will probably see a notification saying “You don’t have any reservations”, since you are trying to make a reservation. To make a new reservation, tap Find a store
2. Genius bar appointment via the web site
If you don’t want to use the app option, you can also receive an appointment through Apple’s support page. Simply follow these steps:
Head over to Apple’s Genius Bar page. (URL:
https://www.apple.com/retail/geniusbar/)
Scroll down, you’ll see Get hardware help. Click on it.
Choose the device or the service that you need help with. In this article, we will select the iPhone option.
Now, choose Repairs and Physical and then choose your issue or select the “The topic is not listed” option. If you choose the “Topic is not listed” option,
Provide details for your issue, then hit continue.
Next, choose “Bring in for Repair”
Next on, you’ll be asked to type in your Apple ID and password
Now, choose your location. You can find your location by city, zip code, or name. Alternatively, you can browse all Apple retail stores. Find the nearest Apple Store that you
Wish to go to.
Next, choose the date and time
Now, your reservation will be confirmed.
Now you have made a Genius Bar reservation. You should also receive a confirmation email from Apple. Also, It’s easy to cancel or reschedule it if you want to. Remember to back up your devicebefore visiting the Apple store.
How to prepare for your appointment
Before your appointment, you may want to prepare for your appointment. Keep in mind toback up your device (you can use iCloud).
It’s also a good idea to bring with you all of the hardware (that you are experiencing problems with). For instant, if you are experiencing issues with your Mac, bring all of the
accessories such as your mouse, keyboard. Also, bring with you your sales receipt.
Ensure that you know your
Apple ID
password (you may need to turn off Find My).
Finally, remember to bring your ID with you.
Usually, the Genius Bar appointment lasts for about 15 minutes. If your device needs a hardware repair, the Genius will discuss with you about your available repair options including any applicable charges.