Got a tip for us?

iPad

The iPad is a tablet computer from Apple that runs the iOS mobile operating system. Similar in functionality to the iPhone, the iPads purpose is often quite different, sometimes even serving as a general desktop computer replacement.

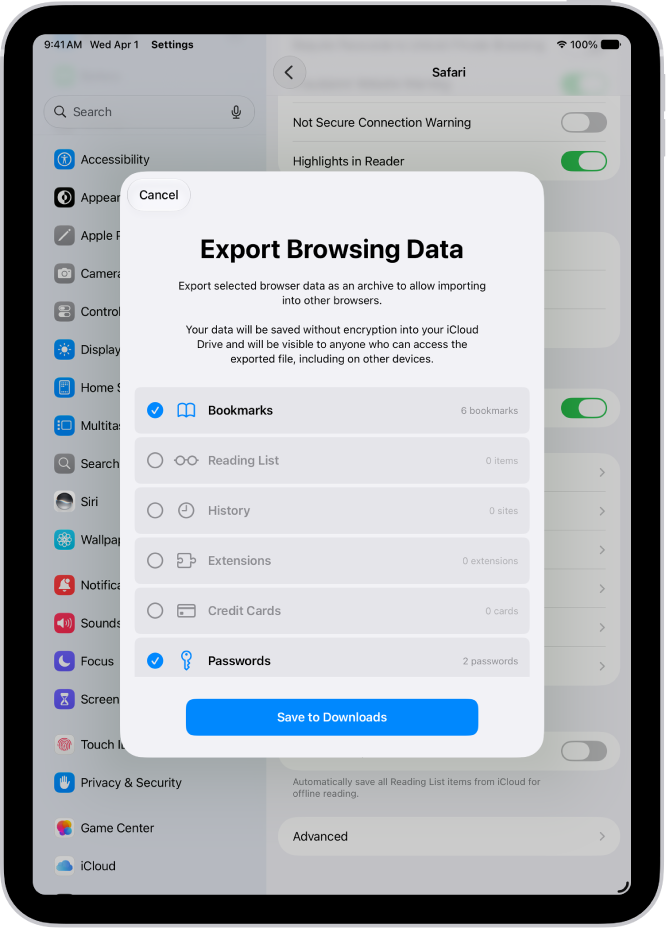
You can export your passwords for websites and accounts to a CSV file, and then import them into another password manager. You just choose what to include in the export. You can’t export Wi-Fi passwords, passwords you shared with a group unless you created it, or Sign in with Apple account passwords, though.

WARNING: Your exported passwords are not encrypted and are visible to anyone who can access the file. After you import the passwords into another password manager, delete the file you exported.

The Export Browsing Data screen, with the Passwords option selected for export to another password manager.

  1. Start the Settings app on your iPad.
  2. Tap Apps, then tap Safari.
  3. Below History and Website Data, tap Export.
  4. Select Passwords.

    Deselect the other choices.

  5. Tap Save to Downloads.
  6. Tap Done.

Note: You can’t export Wi-Fi passwords, passwords you’ve shared with a group (unless you’re the one who created the group), or Sign in with Apple account passwords.

See also

After you create an Apple Music profile, you can find and follow friends to see what they’re listening to.

To choose who to share music with, Music first needs access to your contacts, and it can recommend new friends to you. You can also let friends find you by your Apple Account, and follow friends who are in your contacts list and use Apple Music.

Here’s how to see what friends are listening to in Music on iPad.

Choose how to find friends

To choose which friends to share music with, you first need to allow Music to access your contacts.

  1. Open the Music app on your iPad.
  2. Tap the Show Sidebar button. Then tap your name at the bottom of the sidebar.
  3. Do any of the following:
    • Allow Apple Music access to your contacts: Select the Contacts on Apple Music option so Apple Music can access your contacts and recommend new friends to you periodically.
    • Allow friends to find you by Apple Account: Select the Allow Finding by Apple Account option and friends who have your Apple Account information can see you as a recommended friend.

Follow friends

You can follow people in several ways:

  • Add friends when you set up a profile.
  • After you set up your profile, swipe to the bottom of the profile screen, tap Follow More Friends, then tap Follow next to those you want to follow.

    You can follow friends who are in your contacts list and who use Apple Music.

  • On the profile screen, touch and hold a profile picture, then tap Follow.
  • Tap Search, enter a friend’s name, tap it in the results, then tap Follow.

    Note: You can only find friends who have an Apple Music profile using Search. Additionally, you must be 13 years or older to view Apple Music profiles. (Age restrictions vary by region.)

To see the people you’re following and those who follow you, open the profile screen, then swipe up.

When you see a lock on a profile picture, you’ll need to ask that person to follow them. If they accept your request, the person’s shared playlists and the music they’re listening to appear.

See what your friends are listening to

  1. Open the Music app on your iPad.
  2. Tap Home in the sidebar, then do any of the following:
    • See what your friends are listening to: Scroll down to Friends Are Listening To and then tap an item to play it.
    • Listen to a mix of songs your friends are listening to: Swipe left on Made For You. Then tap Friends Mix.
    • See what a follower or person you follow is listening to: Tap the Show Sidebar button, tap your name at the bottom of the sidebar, and then tap Music Profile. Tap a person’s profile picture to see shared playlists and music they’re listening to. You also see their followers and the people they follow.

Stop following friends

Stop following a friend, and you’ll no longer see what they’re listening to.

  1. Open the Music app on your iPad.
  2. Tap the Show Sidebar button. Then tap your name at the bottom of the sidebar.
  3. Tap Music Profile and touch and hold the profile picture of a person you follow. Tap Unfollow.

See also

Tag: Music

In some countries and regions, you can record a FaceTime audio call when you’re talking to one other person, and view the transcript of the call in the Notes app. You can also use Hold Assist to get a notification when a live agent becomes available while you’re placed on hold.

You’ll both hear an audio notice when recording starts, and the recording lands in a Call Recordings folder in Notes. You can turn off Call Recording, too.

Record an audio call

Before you begin, check the iOS and iPadOS Feature Availability website to see if call recording is available in your language and region, and make sure the other call participant is willing to be recorded.

  1. During a one-to-one audio call in the FaceTime app, tap the More button and then tap Call Recording.

    Both call participants hear an audio notice that the call is being recorded.

  2. To stop recording, tap the Stop button.

    If the Stop button doesn’t appear, tap the More button, then tap Stop next to Call Recording. Call recording also stops when you end the call.

The Notes app automatically saves call recordings to a Call Recordings folder.

Play a call recording

  1. Start the Notes app on your iPad.
  2. Select a note in the Call Recordings folder and then tap the Play button.

View a call transcript

You’ll find the transcript of a recorded call in the Notes app in select regions and languages. The transcript may take a moment to appear. You may see a message that the transcription is in progress.

Note: A transcription might not be a perfect representation of the conversation, so verify its accuracy before relying on it.

  1. Start the Notes app on your iPad.
  2. Select a note in the Call Recordings folder. Then tap the More button.

    Note: Spoken words in supported languages are automatically transcribed. If you don’t see Transcript, your iPad doesn’t meet the minimum requirements or detect a supported language.

    In the transcript, the speaker of each statement is identified.

  3. While viewing the transcript, you can do any of the following:

    • Play the audio from a specific point: Select the text you want to hear.
    • Search the transcript: Tap the More button and then tap Find in Transcript.
    • Copy the transcript: Tap the More button and choose Add Transcript to Note or Copy Transcript.
    • Save or delete the audio recording: Tap the More button. Choose Save Audio to Files or Delete.

      Note: Deleting the audio recording also deletes the transcript.

    • View the waveform of the recording: Tap the Hide Transcript button.

With Apple Intelligence*, you can summarize a recorded FaceTime call. See View a summary of an audio recording.

Turn off Call Recording

Call Recording is turned on by default, but you can turn it off.

  1. Start the Settings app on your iPad.
  2. Tap Apps, then tap Phone.
  3. Tap Audio Call Recording and turn off Audio Call Recording.

Use Hold Assist

If you’re placed on hold during a FaceTime audio call, Hold Assist can let you know when a live agent is available. Read our guide, Receive a notification when you’re no longer on hold.

*Apple Intelligence is available with Siri and device language set to Chinese (Simplified), Chinese (Traditional), Danish, Dutch, English, French, German, Italian, Japanese, Korean, Norwegian, Portuguese, Spanish, Swedish, Turkish, or Vietnamese. Some features may not be available in all regions or languages. Some devices may not be available in all regions. Siri AI is available in beta in iOS 27, iPadOS 27, macOS 27, watchOS 27, and visionOS 27 and requires an Apple Intelligence–enabled device set to a supported language. Available in English to start. Siri AI will not be initially available in the EU on iOS, iPadOS, and watchOS. Certain Apple Intelligence features that rely on server-side models are subject to daily usage limits, including but not limited to Siri AI, Intelligent Photo Editing Tools, Image Playground, and AFM 3 Cloud models in Shortcuts. Daily limits may vary by feature, request complexity, system demand, system policies, and other factors. Expanded access to such features will be available for a fee in the future. Use of these features is subject to the Apple Intelligence Terms and Conditions.

See also

During a video call in the FaceTime app, you can turn on Live Captions to see the spoken conversation transcribed and displayed in real time. On an iPad with Apple Intelligence, you can turn on Live Translation to see the other person’s words translated from their language to your preferred language and displayed on your screen as they speak.

Live Captions can make it easier to follow along if you’re having difficulty hearing the conversation, and Live Translation works with languages you download.

Turn on Live Captions

Having difficulty hearing the conversation? Live Captions, on supported models, can make it easier to follow along.

Note: Live Captions aren’t available in all languages or regions.

  1. During a FaceTime video call, tap the screen to show the FaceTime controls (if they aren’t visible).
  2. Tap the More button, then tap Live Captions.

    A Live Captions window appears, showing the automatically transcribed dialogue of the call near the top of the screen and who’s speaking.

Important: The accuracy of Live Captions may vary and shouldn’t be relied upon in high-risk or emergency situations. Live Captions uses additional battery.

See translated captions in FaceTime

Apple Intelligence can translate captions into your preferred language when you’re on a FaceTime call with someone who speaks a different language.

Live Translation requires you to first download the input and output languages.

Note: Apple Intelligence on iPadOS 27 or later is available on an Apple Intelligence-enabled iPad mini (A17 Pro) and iPad models with M1 or later. Apple Intelligence is not available in all languages or regions. Usage limits may apply.* Live Translation in FaceTime is available for one-on-one calls in English (UK, U.S.), French (France), German, Italian, Portuguese (Brazil), Spanish (Spain), Chinese (Simplified), Chinese (Traditional), Japanese, and Korean.

  1. Open the FaceTime app on your iPad.
  2. Turn on Live Captions.

    When the caller speaks a different language, captions are automatically translated into your preferred language.

*Apple Intelligence is available with Siri and device language set to Chinese (Simplified), Chinese (Traditional), Danish, Dutch, English, French, German, Italian, Japanese, Korean, Norwegian, Portuguese, Spanish, Swedish, Turkish, or Vietnamese. Some features may not be available in all regions or languages. Some devices may not be available in all regions. Siri AI is available in beta in iOS 27, iPadOS 27, macOS 27, watchOS 27, and visionOS 27 and requires an Apple Intelligence–enabled device set to a supported language. Available in English to start. Siri AI will not be initially available in the EU on iOS, iPadOS, and watchOS. Certain Apple Intelligence features that rely on server-side models are subject to daily usage limits, including but not limited to Siri AI, Intelligent Photo Editing Tools, Image Playground, and AFM 3 Cloud models in Shortcuts. Daily limits may vary by feature, request complexity, system demand, system policies, and other factors. Expanded access to such features will be available for a fee in the future. Use of these features is subject to the Apple Intelligence Terms and Conditions.

See also

Learn how to use the FaceTime app to visit face-to-face with friends and family—over Wi-Fi or cellular. While on a call, you can watch TV shows and movies, listen to music, and even work out together, and if someone doesn’t answer, you can leave a video message.

While on a call, the FaceTime controls let you turn your camera or mic on or off and share your screen. You can also start a call on one device and move it to your iPad, or move it to another device.

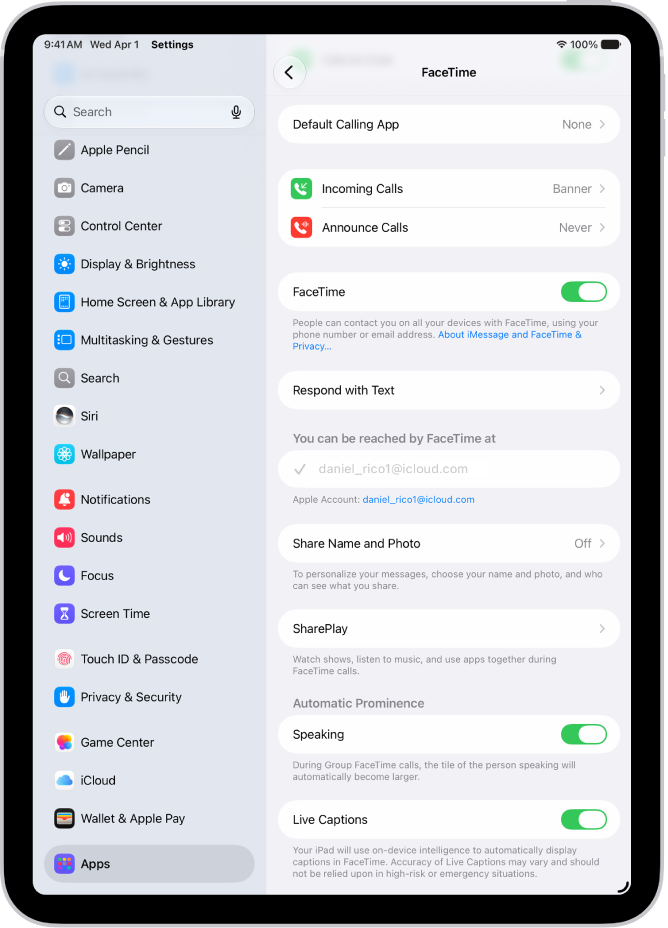
The FaceTime Settings screen, showing the Default Calling App option, the control to turn FaceTime on or off, and the Apple Account that is being used for FaceTime.

Set up FaceTime

Go to the Settings app, tap Apps, then tap FaceTime. Make sure that you’re signed in to your Apple Account and FaceTime is turned on. You can choose a default calling option for audio calls below Default Calling App. If more than one contact method appears below “You can be reached by FaceTime at,” you can tap to select or deselect it.

The Record Video screen, showing that the person you’re calling is unavailable. The screen includes a Call Again button and a Record Video button you can tap to record a video message.

Leave a video message

If someone doesn’t answer your FaceTime video call, you can leave a video message. Tap Record Video, then record your message. When you’re finished recording, tap the Stop button, then tap the Send button.

A FaceTime video call in progress, showing one participant at the bottom left. An image of three other participants fills the rest of the screen. At the bottom right are the Camera, Microphone, More, and End Call buttons.

Use the FaceTime controls

While on a FaceTime call, use the FaceTime controls to turn your camera or mic on or off, share your screen, and more. If you don’t see the controls, tap your screen.

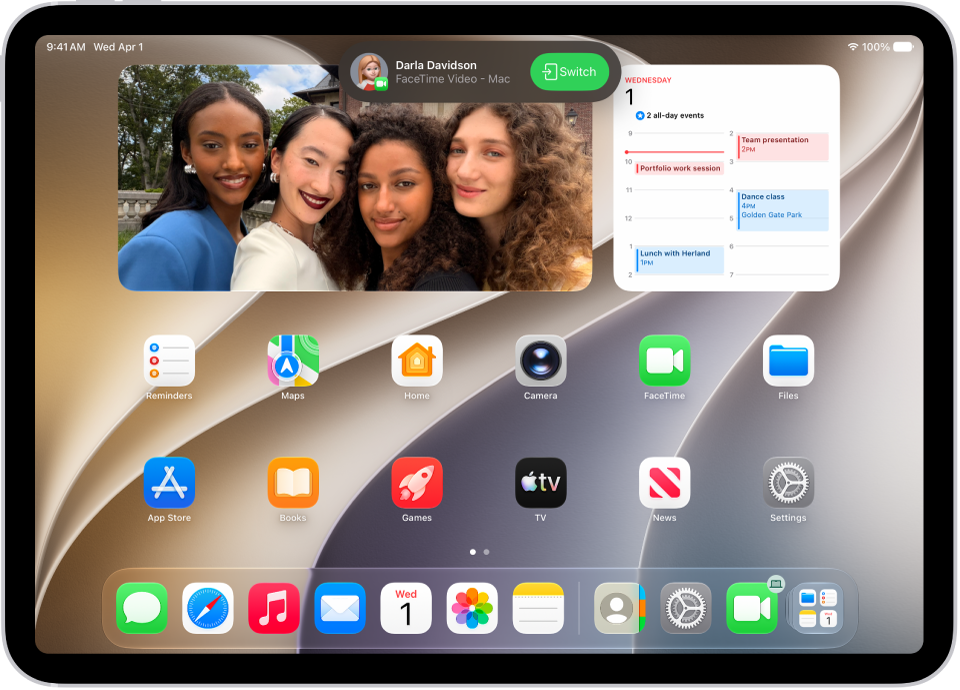
The iPad Home Screen showing a FaceTime video call notification from an iPhone at the top. Tap Switch to move the call to your iPad.

Switch a FaceTime call to another device

When you’re signed in to your Apple Account on multiple devices, you can start a FaceTime call on one of them, then move it to your iPad. You can also move your call from your iPad to another device. On the device you want to switch to, tap the FaceTime Video Call button or the FaceTime Audio Call button at the top of the screen or the suggestion “Move call to this [device],” then tap Switch.

There’s plenty more to FaceTime, and these guides walk you through it:

Note: Not all features and content are available in all countries or regions.

With SharePlay in the FaceTime app, you can stream TV shows, movies, and music in sync with friends and family while on a FaceTime call. You can also play supported multiplayer games in Game Center with friends during a FaceTime call, and watch supported live sports events together.

If you’ve started watching a video together, you can move it to the big screen of Apple TV 4K. And when you listen to music together, anyone with access can see what’s next and add songs to a shared queue.

SharePlay can also be used in other apps during a FaceTime call. To see which apps are supported, tap the More button, tap SharePlay, then scroll through the apps.

Note: Apple TV (includes Friday Night Baseball, MLS, or both in some countries and regions, and Formula 1 in the U.S.), Apple TV channels, and some apps that support SharePlay require a subscription. To watch a movie, TV show, or live sports event together, every participant needs to have access to the content on their own device, through either a subscription or purchase. Each device must meet the minimum system requirements. SharePlay may not support the sharing of some movies, TV shows, or live sports events across different countries or regions. FaceTime, some FaceTime features, and other Apple services may not be available in all countries or regions.

Watch video together during a FaceTime call

When you’re on a FaceTime call, movies, TV shows, and supported live sports events play in sync for you and your friends and family.

  1. Start a call or a Group FaceTime call in the FaceTime app on your iPad.
  2. Tap the More button, tap SharePlay, and then tap an app below Listen and Play Together (for example, the Apple TV app).

    Alternatively, you can go to the Home Screen, then open a video streaming app that supports SharePlay.

  3. Select a show, movie, or live sports event that you want to watch.
  4. Tap the Play button. Then select SharePlay (if it appears) to begin watching with everyone on the call. (Others on the call may have to tap Join SharePlay to see the video.)

    For everyone on the call who has access to the content, the video starts playing at the same time. People who don’t have access are asked to get access (through a subscription, a transaction, or a free trial, if available).

Each person watching the content can use the playback controls to play, pause, rewind or fast-forward. (Settings like closed captioning and volume are controlled separately by each person.)

With Picture in Picture, the video keeps playing while you use another app to order food or check your email. You can even jump into the Messages app to discuss the video by text when you don’t want interruptions to the movie or TV show’s sound.

Invite friends to watch video together from a supported app during a FaceTime call

If your iPad meets the minimum system requirements, you can start a FaceTime call from the Apple TV app or another supported video app while browsing or watching video content, and use SharePlay to share it in sync with others. Everyone on the call needs the same type of access to the content, like a subscription or purchase, on their own device.

  1. In the Apple TV app (or other supported video app), find a show, movie, or live sports event that you want to share.
  2. Tap the item to see its details and tap the Share button. Tap SharePlay.
  3. In the To field, enter the contacts you want to share with. Tap FaceTime.
  4. When the FaceTime call connects, tap Start or Play to begin using SharePlay.

    The recipients tap Open to begin viewing.

Note: If the content requires a subscription, people who aren’t subscribers can subscribe before watching.

Once playback starts, you can stream the video to Apple TV 4K, too. See Send what you’re watching in SharePlay to Apple TV 4K, below.

Send what you’re watching in SharePlay to Apple TV 4K

You can send a video you’ve already started watching together on iPad to Apple TV 4K and enjoy it on the big screen.

To send it from your iPad, do one of the following:

  • In the streaming app, tap the AirPlay button, then choose Apple TV as the playback destination.
  • Open Control Center, tap the AirPlay button, then choose Apple TV as the playback destination.

The video plays in sync on Apple TV 4K. Meanwhile, the conversation continues on your iPad.

Listen to music together during a FaceTime call

Listening to an album or favorite playlist together works on a FaceTime call, too. If someone on the call has access to the music on a device that meets the minimum system requirements, say through a subscription, a transaction, or a free trial, they can see what’s next, listen along, add songs to a shared queue, and more.

  1. Start a call in the FaceTime app on your iPad.
  2. Tap the More button, tap SharePlay, and tap an app below Listen and Play Together.

    Alternatively, you can go to the Home Screen, then open a music streaming app that supports SharePlay (for example, the Music app).

  3. Select the music you want to listen to and then tap the Play button to begin listening to the music together. (Others on the call may have to tap Join SharePlay to hear the music.)

    For everyone on the call who has access to the content, the music starts playing at the same time. People who don’t have access are asked to get access (through a subscription, a transaction, or a free trial, if available).

Each person can use the music controls to pause, rewind, fast-forward, scrub to a different part of the song, or go to the next track. And anyone on the call can add songs to the shared queue.

Invite friends to listen to music together on FaceTime from a supported app

In the Music app or another supported music app, an iPad that meets the minimum system requirements can start a FaceTime call and share the music in sync with everyone on the call using SharePlay. With the music controls, each person can rewind, pause, fast-forward, or scrub to a different part of the song. The shared queue is open to anyone using SharePlay for adding songs. Everyone on the call needs access to the content, such as through a subscription.

  1. Go to the Music app (or other supported music app). Tap the music you want to share.
  2. Do one of the following:

    • Tap the More button next to the music, tap the Share button, then tap SharePlay.
    • Tap the More button at the top right, tap the Share button, then tap the SharePlay button.
  3. In the To field, enter the contacts you want to share with. Tap FaceTime.
  4. When the FaceTime call connects, tap Start.

    To begin listening, recipients tap the song title at the top of the FaceTime controls, then tap Open. The music starts playing at the same time for everyone on the call who has access to the content.

Note: Every participant needs to have access to the content on their own device, either through a subscription or a purchase. People who don’t have access to the content you share are asked to get access.

Play games in Game Center with friends during a FaceTime call

To play supported multiplayer games on a FaceTime call, set up your Game Center profile in the Settings app, add friends, and find and download a supported multiplayer game for Game Center in the App Store.

During a FaceTime call, open the game, tap Start SharePlay, then follow the onscreen instructions.

To play games together, read our guide, Play with friends in the Apple Games app.

During the conversation, sharing your screen lets you show apps, webpages, and more. See our article, Share your screen in a FaceTime call.

SharePlay lets you work out with others using Apple Fitness+.

See also

If members of your home use HomePod for Intercom messages, iPad can transcribe the messages for you. It takes just two settings. Show Audio Transcriptions handles the captions, and the Home app lets you choose when you receive Intercom notifications. You can also get live captions of spoken audio and display subtitles and captions on iPad.

  1. Open Settings, tap Accessibility, tap Subtitles & Captioning, and turn on Show Audio Transcriptions.
  2. In the Home app, tap the More button and tap Home Settings.
  3. Tap Intercom, then choose when you receive notifications.

See also

With Live Captions on iPad, you can get a real-time transcription of spoken audio. Use Live Captions to more easily follow the audio in any app, such as FaceTime or Podcasts, and in live conversations around you.

You can set it up and customize it, and choose whether to save captions from calls for one minute or one hour.

Here’s how to get live captions of spoken audio on iPad.

Note: Live Captions is available on supported models. Live Captions isn’t available in all languages, countries or regions. The accuracy of Live Captions may vary and shouldn’t be relied upon in high-risk or emergency situations.

Set up and customize Live Captions

  1. Open the Settings app on your iPad.
  2. Tap Accessibility and tap Live Captions. Then turn on Live Captions.
  3. Tap Appearance to customize the text, size, and color of the captions.
  4. Tap Keep Call Captions and then choose an option:

    • 1 Minute: Select 1 Minute to save captions from calls for up to one minute during a call. All call captions are cleared after the call ends. If you select 1 Minute, you won’t be able to copy, take a screenshot, or take a screen recording of the call transcription.
    • 1 Hour: Select 1 Hour to save captions from calls for up to one hour after a call ends. If you select 1 Hour, you’ll be able to copy, take a screenshot, and take a screen recording of the call transcription.

    Note: When you choose 1 Hour, all call participants hear a brief audio announcement (“This call is being transcribed”) at the start of the call. If Live Captions is paused or the Keep Call Captions options is changed from 1 Hour to 1 Minute during a call, all participants hear an audio announcement (“This call is no longer being transcribed”).

Use Live Captions

Once you turn on Live Captions, iPad transcribes the spoken audio in apps, or from dialogue around you, automatically, and then you can do any of the following:

  • Transcribe an in-person conversation: Tap Live Captions, then tap Microphone.
  • Transcribe iPad audio: Tap Live Captions, then tap iPad Audio.
  • Pause the transcription: Tap Live Captions, then tap Pause Listening.
  • Copy the transcription: Tap the More Options button, then tap Copy Captions. You can paste your transcriptions in another app—like in Notes or Messages.
  • Clear the transcription: Tap the More Options button, then tap Clear All.
  • Move the Live Captions window: Drag the Live Captions window to reposition it on the screen.
  • Make the Live Captions window longer or shorter: Drag the bottom of the Live Captions window up or down.
  • Hide the Live Captions window: The Live Captions window is automatically hidden when no audio is detected. If the window is showing, swipe left or right on the window to hide it. To restore the window, tap the Live Captions Collapsed button.
  • Make the transcription window full-screen: Tap the Maximize button. To restore the window to the smaller size, tap the Minimize button.
  • Take a screenshot or screen recording of the transcription: Position the Live Captions window, then take a screenshot or take a screen recording.

Note: Screenshots, screen recordings, and copying transcriptions work during and after a call only if you selected 1 Hour when you set up Live Captions.

See also

iPad can provide subtitles, closed captions, and transcriptions so you can follow along more easily with audio and video. On supported models, you can also get automatic subtitles, including in another language.

In a supported app, subtitles and closed captions can be turned on when they’re available, and you can customize how they look. You can also choose accessible captions, like subtitles for the deaf and hard of hearing (SDH). Subtitles transcribed from spoken audio are labeled in the list of subtitles, too.

Note: Generated subtitles and viewing subtitles in multiple languages is supported on iPadOS 27 or later and is available on iPad mini (A17 Pro) and iPad models with M1 or later. Generated subtitles are available in English (U.S. and Canada) when the content doesn’t include them.

An iPad showing an example of subtitles with a custom style.

Turn on subtitles and captions in supported apps

If a supported app has subtitles and closed captions for the video content you’re playing, you can turn them on. iPad usually shows standard subtitles and captions. Special accessible captions are another choice when available, including subtitles for the deaf and hard of hearing (SDH).

Note: You may see subtitles appear automatically in supported apps. Those transcribed from spoken audio are labeled “Transcribed” in the list of subtitles, and those translated into another language are labeled “Translated”.

  1. While playing video content, tap the Legible Options button.
  2. Choose from the list of available subtitles and captions.

Customize the subtitles and captions in supported video apps

  1. Open Settings, tap Accessibility, and then tap Subtitles & Captioning.
  2. If you prefer closed captioning or subtitles for the deaf and hard of hearing when available, turn on Closed Captions + SDH.
  3. Tap Style and choose an existing caption style or create a new style based on the following:
    • Font, size, and color
    • Background color and opacity
    • Text opacity, edge style, and highlight

Manage when subtitles automatically appear

In a supported app, subtitles may appear automatically when your iPad is muted, when you skip back a few seconds, or when the video is in another language. The same goes for generated subtitles from videos in Photos and Messages.

  1. Open the Settings app on your iPad.
  2. Tap Accessibility, tap Subtitles & Captioning, and tap Automatic Subtitles.
  3. Do any of the following:
    • Automatically show subtitles in your preferred language: Turn on When Languages Don’t Match.
    • Automatically turn on subtitles when volume is muted: Turn on Show When Muted.
    • Temporarily turn on subtitles when you skip back in a video: Turn on Show on Skip Back.

View generated subtitles in another language

With on-device translation, iPad can generate subtitles in another language in supported apps. Translation works when a video has English subtitles available. If you’ve added more than one preferred language in Settings, you can see the subtitles translated into one of your other languages.

  1. While playing video content, tap the Captions button.
  2. Tap Languages, then choose the language you’d like to view subtitles in.

See also

You can connect Magic Trackpad, including Magic Trackpad 2, to your iPad (Magic Trackpad sold separately). If it’s already paired with your Mac or another iPad, though, you must unpair them first, and you can reconnect it to your iPad later.

Pair Magic Trackpad

  1. Make sure Magic Trackpad is turned on and charged.
  2. On iPad, open Settings, tap Bluetooth, and then turn on Bluetooth.
  3. Select the device when it appears in the Other Devices list.

Note: Before you can connect Magic Trackpad to your iPad, unpair Magic Trackpad from your Mac or another iPad if it’s paired there, by doing one of the following:

  • On iPhone or iPad: See Unpair a Bluetooth accessory.
  • On macOS 13 or later: Choose Apple menu > System Settings, click Bluetooth in the sidebar, Control-click the device, then choose Forget.
  • On macOS 12.5 or earlier: Choose Apple menu > System Preferences, click Bluetooth, Control-click the device, then click Remove.

Reconnect Magic Trackpad to iPad

Turn the Magic Trackpad switch to Off, or move it or iPad out of Bluetooth® range (about 33 feet, or 10 meters), and the trackpad disconnects.

To reconnect, turn the trackpad switch to On, or bring the trackpad and iPad back into range, then click the trackpad.

See also