Got a tip for us?

iPad

The iPad is a tablet computer from Apple that runs the iOS mobile operating system. Similar in functionality to the iPhone, the iPads purpose is often quite different, sometimes even serving as a general desktop computer replacement.

You can get detailed driving directions to your destination. When you drive in select cities, you see enhanced details for crosswalks, bike lanes, and buildings, plus a street-level perspective that helps you find the right lane at complex intersections (supported models).

You can also estimate travel time for a future departure or arrival, and avoid tolls. You can get directions from anywhere on the map, or from an address you search for.

Here’s how to get driving directions in Maps on iPad.

Note: Turn-by-turn spoken directions and directions for multiple stops aren’t available in all countries or regions. Features for Wi-Fi + Cellular models require a cellular data plan and Cellular Data turned on in Settings > Apps > Maps. See View or change cellular data settings.

Get driving directions

  1. Go to the Maps app on your iPad.
  2. Do either of the following:
    • Touch and hold anywhere on the map, then tap Directions.
    • Enter an address in the search field, then tap the blue button that displays the Driving icon and the travel time.
  3. Tap the directions button and then tap Go or Steps for the route you want to take.

If your preferred travel mode is Walking, Transit, or Cycling, tap the directions button, then tap the Driving button.
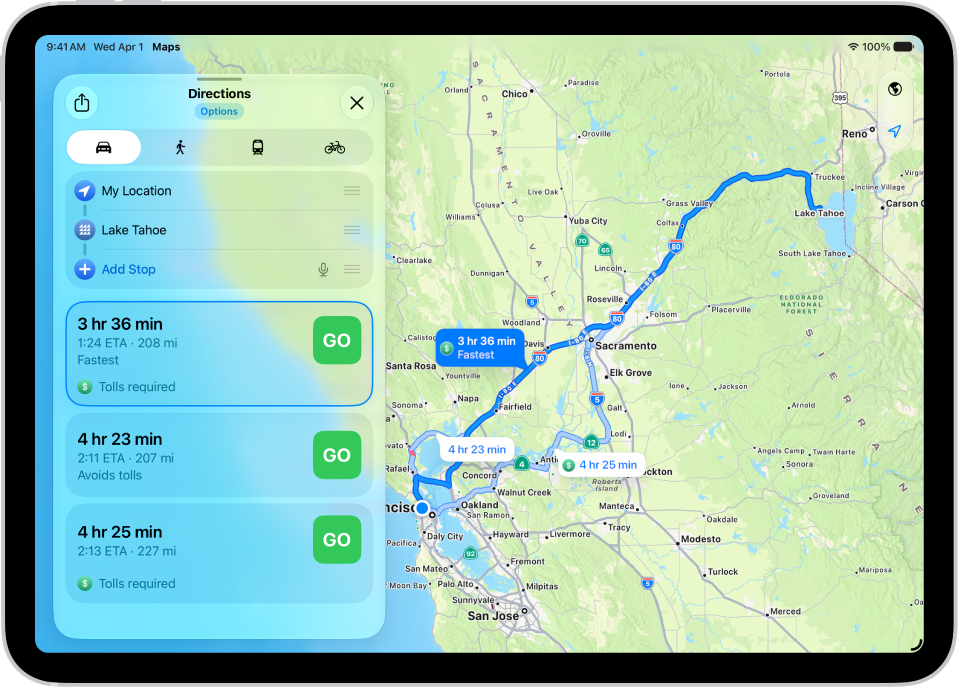
An iPad showing a map with several driving route options to the same destination. Each route shows the estimated time and distance, and a Steps button to see detailed directions. Color coding on each route indicates traffic conditions.

Siri: Ask Siri something like, “Give me driving directions home.” Learn how to use Siri.

Estimate travel time for a future departure or arrival

  1. Open the Maps app on your iPad.
  2. Get driving directions, as above.
  3. Tap Options (below Directions), tap Leave at or Arrive by, select a time and date, and then tap the Done button.

    The estimated travel time may change based on predicted traffic.

Avoid tolls or highways

  1. Open the Maps app on your iPad.
  2. Get driving directions, as above.
  3. Tap Options (below Directions), make your choices (below Avoid) and then tap the Done button.

Show or hide the compass or the speed limit

If you have an iPad with Wi-Fi + Cellular, you can show or hide the compass or speed limit.

  1. Open the Settings app on your iPad.
  2. Tap Apps, then tap Maps.
  3. Below Directions, tap Driving. Turn on or off Compass and Speed Limit.

See also
Tag: Maps

If you experience discomfort when you use iPad while riding as a passenger in a car or other on-road vehicle, you can turn on Vehicle Motion Cues—onscreen cues that may help reduce motion sickness. Vehicle Motion Cues appear as animated dots on the edges of the screen that represent how the vehicle is moving without interfering with what you’re doing on iPad.

You can customize the pattern, color, and visibility of the dots, like using larger dots or more dots.

Note: Vehicle Motion Cues should not be used while operating a moving vehicle and in other situations requiring attention to safety. For important information about avoiding distractions that could lead to dangerous situations, see Important safety information for iPad. Vehicle Motion Cues work best when you’re seated facing forward in the vehicle.

Use iPad more comfortably while riding in a vehicle

  1. Open the Settings app on your iPad.
  2. Tap Accessibility, then tap Motion.
  3. Tap Vehicle Motion Cues and then turn on Vehicle Motion Cues.
  4. To show or hide Vehicle Motion Cues, open Control Center and tap the Vehicle Motion Cues button.

    Tip: You can also set up a shortcut to turn Vehicle Motion Cues on or off. See Quickly turn accessibility features on or off.

Customize Vehicle Motion Cues

  1. Open the Settings app on your iPad.
  2. Tap Accessibility, then tap Motion.
  3. Tap Vehicle Motion Cues and tap Customize Appearance.
  4. Customize any of the following:
    • Pattern: Select Regular for a stable and predictable pattern, or Dynamic for a more engaging visual experience.
    • Color: Select a color. Color saturation will automatically adjust to maintain contrast with the content behind each dot.
    • Visibility: Select Larger Dots to increase the size of the dots or More Dots to increase the number of dots.

See also

You can turn on Reduce Motion to customize onscreen motion, and with it off, you’ll see even more motion, including the fluid morphing effects of Liquid Glass. Turning on Vehicle Motion Cues adds animated dots to the edges of the screen, which may help reduce motion sickness. It’s also possible to customize how some elements on the screen move, such as:

  • Motion effects for wallpaper, apps, and alerts
  • Screen transitions
  • Siri animations
  • Typing autocompletion
  • Animated full-screen and bubble effects in the Messages app
  • Animated images on the web and in apps

Customize onscreen motion

  1. Open the Settings app on your iPad.
  2. Tap Accessibility, then tap Motion.
  3. Do any of the following:
    • Reduce Motion: Turn on. (When off, you’ll see more motion, like the fluid morphing effects of Liquid Glass.)
    • Vehicle Motion Cues: Turn on. You can also customize the appearance of the cues including the pattern, color, and visibility. (When on, animated dots appear on the edges of the screen and may help reduce motion sickness.)
    • Auto-Play Animated Images: Turn off. (When on, rapid animated images and moving elements such as GIFs in Messages and Safari play automatically.)
    • Auto-Play Video Previews: Turn off. (When on, it allows apps such as the App Store to automatically play video previews.)
    • Auto-Play Message Effects: Turn off. (When on, the Messages app automatically plays full-screen effects. If you turn this setting off, you can still manually play effects by tapping Replay below the message bubble.)
    • Prefer Non-Blinking Cursor: Turn on. (Stop the blinking of the vertical bar that appears at the insertion point where you’re typing. If you use a braille display with iPad, the cursor indicator on the display also stops blinking.)
    • Limit Frame Rate: Turn on. (On models with ProMotion display technology, this limits the maximum frame rate of the display to 60 frames per second.)

Reduce flashing and strobing lights in videos

  1. Open the Settings app on your iPad.
  2. Tap Accessibility, then tap Display & Text Size.
  3. Turn on Dim Flashing Lights.

Reduce bright effects of onscreen elements

You can reduce highlighting and flashing effects that may appear when interacting with certain onscreen elements, like the keyboard.

  1. Open the Settings app on your iPad.
  2. Tap Accessibility, then tap Display & Text Size.
  3. Turn on Reduce Bright Effects.

To apply some of these effects to specific apps, read our guide, Customize visual accessibility settings for specific apps.

Important: Your iPad uses an on-device algorithm to detect flashing or strobing lights included in supported media and automatically dims them on your iPad in real time. Motion settings should not be relied upon in high-risk situations, or for the treatment of any medical condition.

See also

Your photos and videos are organized into curated collections such as Memories, Trips, People & Pets, and more. Some collections are also organized by category such as Live Photos, Selfies, Recently Saved, and Recently Viewed.

You can change how collections are displayed, reorder them, and pin your favorite collections and albums. You can also see all the collections in a category, and view collections with larger or smaller image tiles, or with no images at all.

Here’s how to browse your photo collections on iPad.

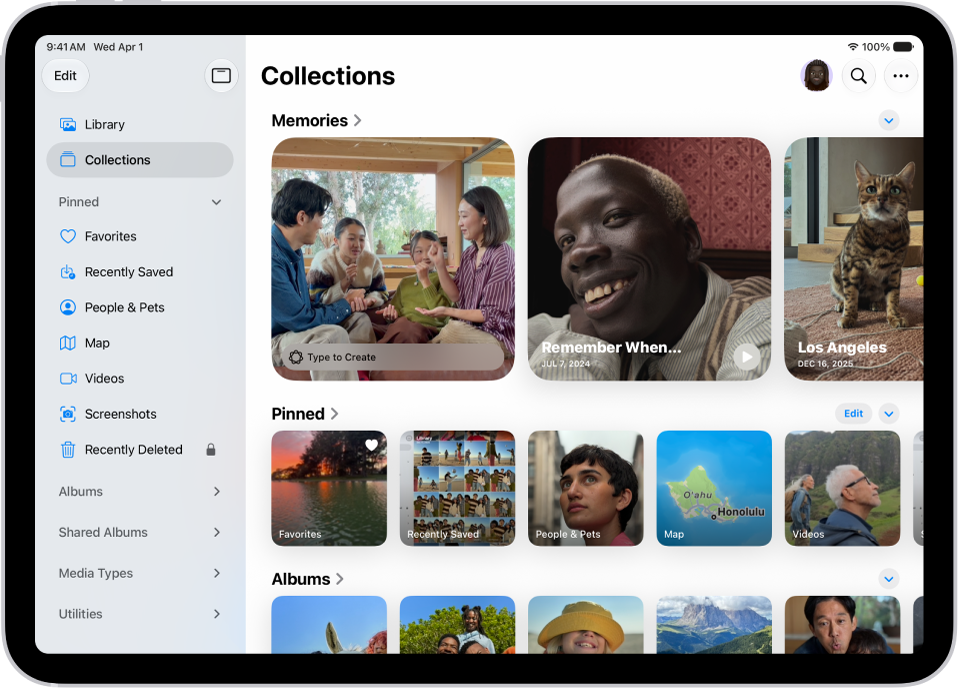
The Photos app is open and the Collections tab is selected in the sidebar.

View your collections

  1. Open the Photos app on your iPad.
  2. Tap Collections.
  3. Swipe up to view the collections.

    Under each collection heading, swipe left or right to see different collections. Or tap the heading to see all the collections in that category.

  4. Tap a collection to open it.

Quick tip: To close the sidebar, tap the Hide Sidebar button, and to bring it back, tap the Toggle Sidebar button.

Change the collections display

Collections can show larger or smaller image tiles, or none at all, and you can change the order they appear on the screen.

  1. Open the Photos app on your iPad.
  2. Tap Collections.
  3. Tap the More button and then do any of the following:
    • Enlarge the size of the collection tiles: Tap the Large Grid button.
    • Reduce the size of the collection tiles: Tap the Small Grid button.
    • Show the default display: Tap the Mixed Grid button.
    • Hide the collection tiles: Tap Collapse All.
    • Reorder collections: Tap Reorder, drag a collection into a new position, and then tap the Done button.
    • Choose which photo library to include in collections (if you’re part of an iCloud Shared Photo Library): Tap Both Libraries, Personal Library, or Shared Library.

Quick tip: For a single collection, tap the Forward button to hide its image tiles, then tap it again to stop hiding them.

By default, videos and Live Photos automatically play when you tap Collections. To turn autoplay off, tap your account in the top-right corner, then turn off Auto-Play Motion and Loop Videos.

Reorder collections

You can change the order of collections so the ones you go to most frequently appear first. For example, if you frequently view your Shared Albums, you can move them above other collections.

  1. Open the Photos app on your iPad.
  2. Tap Collections.
  3. Scroll to the bottom of the screen and tap Reorder. Then drag a collection into a new position.
  4. Tap Done.

You can also tap the More button, then tap Reorder.

Pin collections and albums

The Pinned collection at the top of the screen holds whatever you choose, so your most-viewed collections are easy to find.

  1. Open the Photos app on your iPad.
  2. Tap Collections.
  3. Tap Edit (to the right of the Pinned heading), then do any of the following:

    • Remove a pinned collection: Tap the Remove button and tap the Trash button.
    • Pin a collection: Tap the suggested collection you want to add, or tap Any Collection or Album to see more options.
    • Reorder pinned collections: Touch and hold a pinned collection. Then drag it to a new position.

      Note: Collections with the Remove button next to them are currently in your pinned collections. Collections with the Add button next to them are not yet pinned.

  4. When you’re done, tap the Close button.

Quick tip: To add a collection to Pinned, touch and hold it and tap Pin. To take it off Pinned later, touch and hold it again, then tap Unpin.

Filter and sort items in a collection

Filter items in a collection by category, like Edited, Rating, or Captured by Me, or sort them so the newest or oldest show first.

  1. Open the Photos app on your iPad.
  2. Tap Collections, then tap a collection to open it.
  3. Tap the Sort and Filter button and then do either of the following:
    • Filter items: Tap the filter you want to apply.
    • Sort items: Tap Sort By. Tap Newest First or Oldest First.

See also

Tag: Photos

You can set the Photos app to show certain people, days, and holidays less frequently or not at all in your memories, featured photos, and the Photos widget. You can also turn off memories and featured photos in the Photos app and the widget on your iPad Home Screen.

You can feature a person less, feature them again later, and keep holiday events in your home country or region out of memories and featured content.

Show a person less frequently or not at all

  1. Start the Photos app on your iPad.
  2. Open a photo of the person you want to show less often.
  3. Tap the More button, then tap Feature a Person.

    If there’s more than one person in the photo, tap the person you want to feature less, then tap Next.

  4. Choose Feature This Person Less or Never Feature This Person.
  5. Tap Confirm.

To feature someone again, tap Collections, tap your account in the top-right corner, then tap Reset People & Pets Suggestions.

Turn off memories, holidays, and other featured content

You can turn off memories or featured photos in the Photos app, and prevent holiday events in your home country or region from appearing in memories and featured content.

  1. Start the Photos app on your iPad.
  2. Tap Collections.
  3. Tap your account in the top-right corner.
  4. Do any of the following:
    • Hide featured content and memories: Turn off Show Featured Content to prevent Photos from automatically generating featured photos and memories.
    • Turn off holiday events: Turn off Show Holiday Events to prevent Photos from creating memories and featured content about holidays.

See also

Tag: Photos

Photos you take in the Photo Booth app are saved in the Photos app, where you can view and edit them. If you use iCloud Photos, you can view your Photo Booth photos on your other devices signed in to the same Apple Account, too.

View and edit photos in the Photos app

  1. Open the Photos app and then tap Library.
  2. Tap the thumbnail to view the photo in full screen and tap the Edit Photos button. Use the edit controls to make changes.
  3. Tap Done.

See Browse your photo library on iPad and Edit photos and videos.

View photos on all your devices

With iCloud Photos, you can view your photos on other devices that meet the minimum system requirements, which are iPadOS 13, iOS 11, and macOS 10.13. You’ll need to be signed in to the same Apple Account on all of them.

See also

Tag: Photos

You can delete, copy, and share the photos you take in the Photo Booth app. You can also choose Copy Photo to paste a photo into another document, or Add to Shared Album to put it in a shared album in the Photos app.

Delete a photo in Photo Booth

  1. Tap a photo thumbnail at the bottom of the screen.
  2. Tap the Delete button, then tap Delete Photo.

Share or copy a photo in Photo Booth

  1. Tap a photo thumbnail at the bottom of the screen.
  2. Tap the Share button and choose a share option.

    You can also choose Copy Photo to paste the photo into another document or Add to Shared Album to add the photo to a shared album in the Photos app, see Create shared albums in Photos.

See also

Tags: camera, Photos

Use the Photo Booth app to take selfies and photos with fun effects. Photo Booth uses the front camera to show your subject in multiple tiles, each with a different effect, like Kaleidoscope, Stretch, and X-Ray, and the tile in the center shows Normal view. You’ll hear a shutter sound when you take a photo, too.

Take a Photo Booth photo

Using the front camera, Photo Booth shows the subject on the iPad screen in multiple tiles, each with a different effect, such as Kaleidoscope, Stretch, X-Ray, and more. Normal view appears in the tile in the center of the screen.

  1. Aim iPad at your subject to frame your shot.
  2. Tap the tile of the effect you want to capture and then do any of the following:

    • Switch between the front and rear-facing cameras: Tap the Camera Chooser button at the bottom of the screen.
    • Change the effect: Tap the Filters button at the bottom left of the screen.

      With some effects, you can drag your finger across the screen, or pinch, swipe, or rotate the image to alter the appearance.

  3. Tap the shutter button to take the shot.

iPad makes a shutter sound when you take a photo, and the volume buttons control how loud it is. Read our article, Adjust the volume.

Note: In some regions, sound effects are played even if your iPad is set to silent.

See also

Tag: camera

In Settings, you can customize your preferences for the Notes app. Choose the default account for new notes, set a password, and more.

You can add or remove accounts, choose your preferred language when you’ve added more than one, and allow content from Notes to appear in Search and widgets. Siri can also make suggestions based on how you use Notes.

Here’s how to change your Notes settings on iPad.

Customize your Notes settings

  1. Start the Settings app on your iPad.
  2. Tap Apps, then tap Notes.
  3. Adjust any of the following:
    • Accounts: Add or remove accounts in Notes.
    • Siri: Allow Siri to make suggestions across apps based on the way you use Notes. See Customize where suggestions appear.
    • Search: Allow suggestions and content from Notes to appear in Search and widgets.
    • Language: Choose your preferred language (option appears when multiple languages are added).
    • Default Account: Choose the default account when creating notes using Siri and the Notes widget.
    • Password: Lock important notes.
    • “On My iPad” Account: Turn on the On My iPad account.
    • Mention Notifications: Receive notifications when your name is mentioned in shared notes.
    • Viewing: Choose viewing options such as the sort order, lines and grids, and group notes by date.
    • Quick Notes: Choose corner gestures to quickly create a new note or resume the last Quick Note.
    • App Links: Get suggested app links.
    • Auto Convert to Tag: Automatically change #text to a tag when typing a space.
    • Save to Photos: Save photos and videos taken in Notes to the Photos app.
    • Access Notes from Lock Screen: Choose Always Create New Note or Resume Last Note. Or turn it off to prevent access from the Lock Screen.

See also

Tag: Notes

As soon as you subscribe to Apple Music, you can make selections so that you see playlists, albums, and songs based on your preferences. If you don’t want Music to make recommendations, you can also turn off your listening history.

Apple Music asks you what you like at first, and uses those preferences when recommending music. Turning off your listening history also hides the music you play from your followers on Apple Music.

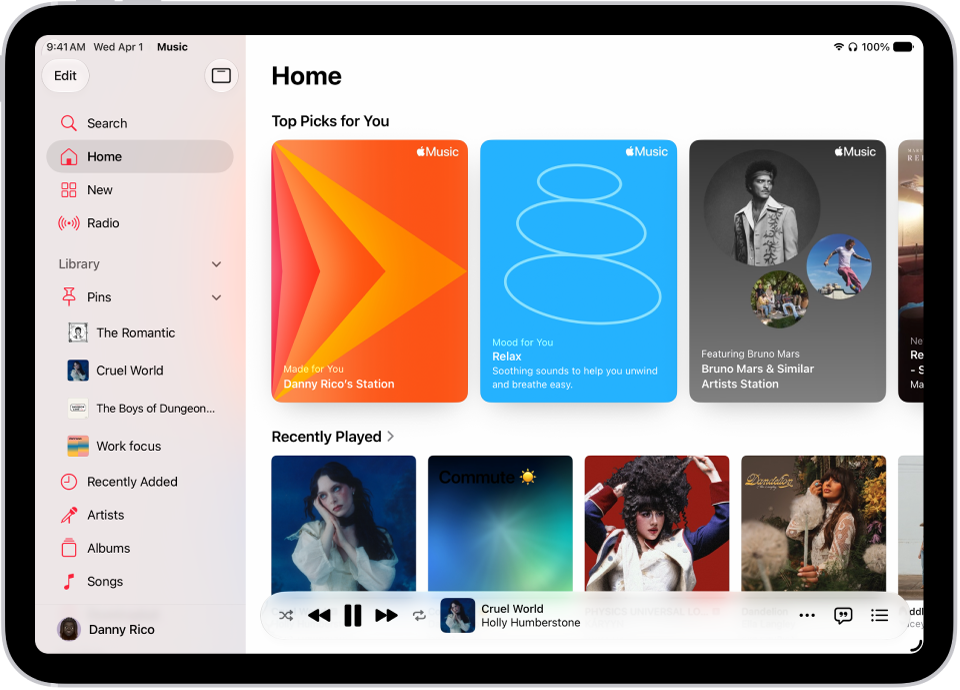
The Home tab in the Music app showing the sidebar on the left and the Home section at the right. The Home tab shows Top Picks at the top. Recently Played music appears below, showing four album covers. The MiniPlayer is at the bottom.

Select your favorite genres and artists

When you first tap Home in the sidebar, you’re asked to tell Apple Music what you like. Apple Music uses these preferences when recommending music.

  1. Open the Music app on your iPad.
  2. Tap the genres you like (double-tap those you love, and touch and hold the genres you don’t care for).
  3. Tap Next. Then do the same with the artists that appear.

Tell Apple Music to ignore your listening habits

With your listening history off, Apple Music ignores your listening habits, so new music recommendations and the contents of Replay playlists adjust to match.

  1. Open the Settings app on your iPad.
  2. Tap Apps and tap Music.
  3. Turn off Use Listening History.

Doing this also keeps all the music you play hidden from your followers on Apple Music. If you only want to hide certain playlists or albums, check out our guide, Hide music from your followers.

Quick tip: You can create a custom Focus to turn off Use Listening History. For example, if you’re a parent listening to your favorite songs and your child wants to listen to something they like, you can turn on that Focus so their songs don’t influence your recommendations.

See also

Tag: Music