Got a tip for us?

iPad

The iPad is a tablet computer from Apple that runs the iOS mobile operating system. Similar in functionality to the iPhone, the iPads purpose is often quite different, sometimes even serving as a general desktop computer replacement.

You can erase your browsing history and data to clear the cache on your iPad. It removes the history of websites you visited and recent searches, along with the cookies and permissions you granted websites to use your location or send you notifications.

You can choose how much of your browsing history to clear. And if you have Safari profiles set up, you can clear the history of just one profile or of all profiles.

Note: Clearing your browsing history in Safari doesn’t clear any browsing histories kept independently by websites you visited, or your browsing history in other apps.

  1. Go to the Safari app on your iPad.
  2. Tap the Show Sidebar button, then tap History.

    If you don’t see History, tap the Back button at the top of the sidebar.

  3. Tap the More button and then tap Clear.
  4. Below Clear Timeframe, choose how much of your browsing history to clear.

    Note: If you have Safari profiles set up, select a profile to clear only the history of that profile, or select All Profiles.

  5. Tap Clear History.

See also

Tag: Safari

With Siri AI (Beta), Siri can use Visual Intelligence to ask questions, take action, and search based on what’s on your screen and what’s in screenshots you take on your iPad. Screen Time also lets you choose which Siri features you can use and what content Siri can access.

Siri AI is available in beta on iPadOS 27 or later on an Apple Intelligence-enabled iPad mini (A17 Pro) or iPad model with M1 or later set to a supported language. Available in English to start. Siri AI will not initially be available in the EU on iPadOS. Usage limits may apply.*

Ask Siri questions about what’s on your screen

  1. On your iPad, activate Siri and then ask a question about something on your screen. For example, say something like:
    • “Explain this from my class notes” with a diagram open in the Notes app.
    • Or select two documents in the Files app, touch and hold one of them, choose Ask Siri, then ask Siri something like, “Which quarterly report grew faster?”
  2. Tap the Send button on your keyboard (if necessary).
  3. Swipe down on Siri’s answer to start a conversation with Siri and ask follow-up questions.

Ask questions about and take action on screenshots

  1. On your iPad, quickly press and release the side button and the volume up button at the same time to take a screenshot.

    Tip: If you want Siri to focus on only part of the screenshot, drag the rectangle corners to enclose the area you want to ask Siri about.

  2. Use the Visual Intelligence tools at the bottom of the screen to do any of the following:

    • Ask a specific question about what’s in the screenshot: Tap the Ask button and then ask a question. For example, take a screenshot of a magazine and then say something like “What place is this and how do I get there?”
    • Take action: Tap an action if one appears. For example, take a screenshot of a photo of a recipe. Then tap Look up nutrition when it appears.
    • Search for similar images on the internet: Tap the Search button.

You can use Screen Time settings to choose which Siri features you’re able to use and which content Siri can access. See our article, Block features or content with Screen Time.

*Apple Intelligence is available with Siri and device language set to Chinese (Simplified), Chinese (Traditional), Danish, Dutch, English, French, German, Italian, Japanese, Korean, Norwegian, Portuguese, Spanish, Swedish, Turkish, or Vietnamese. Some features may not be available in all regions or languages. Some devices may not be available in all regions. Siri AI is available in beta in iOS 27, iPadOS 27, macOS 27, watchOS 27, and visionOS 27 and requires an Apple Intelligence–enabled device set to a supported language. Available in English to start. Siri AI will not be initially available in the EU on iOS, iPadOS, and watchOS. Certain Apple Intelligence features that rely on server-side models are subject to daily usage limits, including but not limited to Siri AI, Intelligent Photo Editing Tools, Image Playground, and AFM 3 Cloud models in Shortcuts. Daily limits may vary by feature, request complexity, system demand, system policies, and other factors. Expanded access to such features will be available for a fee in the future. Use of these features is subject to the Apple Intelligence Terms and Conditions.

See also

Tag: Siri AI

You can view, create, complete, and edit reminders from the Reminders app right in Calendar.

Your scheduled reminders appear alongside your events, at their time in the full-day schedule, or at the top of the calendar if they’re all day. You can create reminders, complete reminders, hide reminders, and edit or delete reminders. You can also add images, notes, or a priority level to a reminder, and choose a specific reminders list for new ones.

Show reminders

You can show scheduled reminders you added to the Reminders app in Calendar.

  1. Go to the Calendar app on your iPad.
  2. Tap the Calendars button at the top left and then select Scheduled Reminders.

The all-day section at the top of the calendar shows reminders scheduled as all day, while a reminder scheduled at a specific time shows up at that time in the full-day schedule.

Create reminders

  1. Start the Calendar app on your iPad.
  2. Tap the Add button at the top of the screen.
  3. Tap Reminder, then enter a title.
  4. To choose a date for the reminder, tap Date.
  5. Optionally, turn on Time and choose a specific time for the reminder.

    You can also add other information—like images, notes, or a priority level to a reminder. See Add details.

Note: It’s possible to select a specific reminders list for new scheduled reminders. If you don’t select one, they go into the default list you chose for Reminders. Read our guide, Change your Reminders settings.

Complete reminders

  1. Start the Calendar app on your iPad.
  2. Tap the circle next to a reminder’s name.

    Complete reminders are dimmed. Deselect the circle next to a reminder to mark it as incomplete.

Note: If you set a scheduled reminder to repeat, its future instances are dimmed, and you can’t mark them complete until the most current instance is marked complete.

Hide reminders

  1. Start the Calendar app on your iPad.
  2. Tap the Calendars button at the top left.
  3. Deselect Scheduled Reminders.

Removing reminders from Calendar doesn’t delete the reminders from the Reminders app.

Edit or delete reminders

  1. Start the Calendar app on your iPad.
  2. Tap a reminder and tap Edit to edit the details or Delete Reminder to delete.

    Deleted reminders go to the Recently Deleted list in Reminders for 30 days before being permanently deleted.

See also

You can add reminders in the Reminders and Calendar apps on your iPad, or create one instantly without leaving the app you’re currently in. With Apple Intelligence, you can create a reminder from a description, or get suggested reminders like shopping lists and action items based on text from other apps.

You might type something like “Feed the cat every evening at 5pm,” and Reminders sets it up for you.

Here’s how to create reminders on iPad.

Siri: Ask Siri something like, “Add artichokes to my groceries list.” Learn how to use Siri.

A new task is being added in the Reminders list.

Every Reminders feature in this guide works when you use updated reminders in iCloud, but some aren’t available with other accounts.

Create a reminder

  1. Go to the Reminders app on your iPad.
  2. Tap the New Reminder button. Enter the title, date, time, and any other information you want for the reminder.

    Tip: With Apple Intelligence, you can also type a description of the reminder—for example “Feed the cat every evening at 5pm”—and Reminders automatically fills in the details and timing based on what you typed.

  3. Tap the Done button.

Note: Apple Intelligence on iPadOS 27 or later is available on an Apple Intelligence-enabled iPad mini (A17 Pro) and iPad models with M1 or later. Apple Intelligence is not available in all languages or regions. Usage limits may apply.*

Create a reminder without switching apps

Here’s how to create a reminder over any app or screen:

  • Add the Quick Note button to Control Center, then tap the Quick Note button in Control Center.

Create a reminder in Calendar

For the steps, check out our guide, Use reminders in Calendar on iPad.

Get suggested reminders

If you have Apple Intelligence, you can get reminders suggested from text in other apps. Think action items from an email in Mail, or grocery items from an online recipe in Safari.

Note: Apple Intelligence on iPadOS 27 or later is available on an Apple Intelligence-enabled iPad mini (A17 Pro) and iPad models with M1 or later. Apple Intelligence is not available in all languages or regions. Usage limits may apply.*

  1. Open the information you want added to a list, like a recipe in Safari or meeting notes in Notes.
  2. Tap the Share button, then tap Reminders.

    Tip: You can also select specific text or bullets you want Apple Intelligence to review. Select text, tap Share, then tap Reminders.

    Suggested reminders may appear below the text you selected.

  3. To change which list the reminders are added to, tap the pop-up menu at the top of the screen and then choose a list.
  4. Tap the Add button next to a suggestion to add it to your list, or tap Include All to add all suggestions.
  5. Tap the Done button.

    Your reminders are added to the list you chose.

*Apple Intelligence is available with Siri and device language set to Chinese (Simplified), Chinese (Traditional), Danish, Dutch, English, French, German, Italian, Japanese, Korean, Norwegian, Portuguese, Spanish, Swedish, Turkish, or Vietnamese. Some features may not be available in all regions or languages. Some devices may not be available in all regions. Siri AI is available in beta in iOS 27, iPadOS 27, macOS 27, watchOS 27, and visionOS 27 and requires an Apple Intelligence–enabled device set to a supported language. Available in English to start. Siri AI will not be initially available in the EU on iOS, iPadOS, and watchOS. Certain Apple Intelligence features that rely on server-side models are subject to daily usage limits, including but not limited to Siri AI, Intelligent Photo Editing Tools, Image Playground, and AFM 3 Cloud models in Shortcuts. Daily limits may vary by feature, request complexity, system demand, system policies, and other factors. Expanded access to such features will be available for a fee in the future. Use of these features is subject to the Apple Intelligence Terms and Conditions.

See also

You can customize your preferences for the Reminders app in Settings. Choose the default list for new items, adjust notifications, and more.

You can add or remove accounts, allow content from Reminders to appear in Search and widgets, and change the sound for reminder alerts. Siri can make suggestions based on how you use Reminders, and you can choose your preferred languages when you’ve added more than one.

Here’s how to change your Reminders settings on iPad.

Customize your Reminders settings

  1. Start the Settings app on your iPad.
  2. Tap Apps and tap Reminders.
  3. Adjust any of the following:
    • Accounts: Add or remove accounts in Reminders.
    • Siri: Allow Siri to make suggestions across apps based on the way you use Reminders.
    • Search: Allow suggestions and content from Reminders to appear in Search and widgets.
    • Notifications: Change notification settings.
    • Language: Choose your preferred languages (option only appears when multiple languages are added).
    • Default List: Choose the list for new reminders you create outside of a specific list, such as reminders you create using Siri.
    • Today Notification: Set a time to see notifications for all-day reminders that have been assigned a date without a time.
    • Show as Overdue: The scheduled date turns red for overdue all-day reminders.
    • Time Zone: Set the time zone used to display and create reminders.
    • Include Due Today: The badge count includes overdue items and items due today.
    • Mute Notifications: Turn off notifications for assigned reminders.
    • Show Suggestions: If you type text that matches a previously completed reminder, that reminder appears as a suggestion.
    • Add Language: Set an additional language that Reminders uses to automatically place grocery items into categories.
    • Reset Categories: Clears the categorization that was learned as you manually moved items in grocery or auto-categorized lists. This applies to new items you add on any of your devices, including in lists you’ve shared. Existing items and lists shared with you won’t be affected.

Change the sound for reminder alerts

  1. Start the Settings app on your iPad.
  2. Tap Sounds & Haptics, then tap Reminder Alerts.
  3. Choose a sound from the list.

You can also choose None if you don’t want to hear a sound when you receive a reminder alert.

See also

You can add details to your reminders such as notes, links, due dates, and photos.

Reminders can come on a certain date, at a set time or place, or while you’re texting someone in Messages, and you can set a flag and priority, too. Reminders that have a due date show up in Calendar as an all-day event. You can add a photo or scanned document as well, though some features aren’t available when using other accounts.

Note: All Reminders features in this guide are available with updated reminders in iCloud, but some aren’t available when using other accounts.

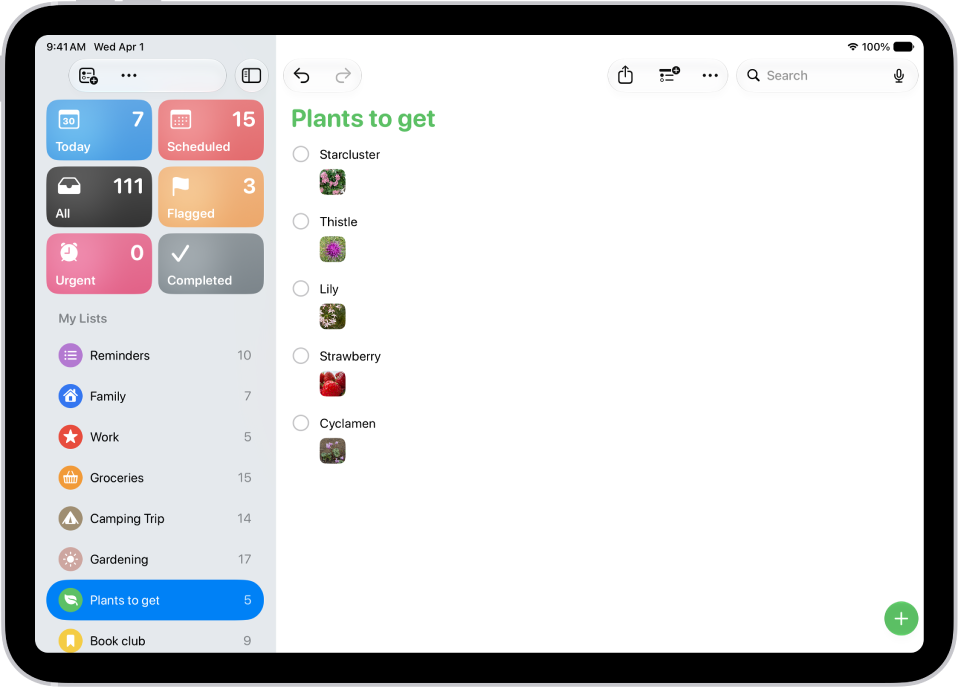
The Reminders app showing a list with photos in each reminder.

Add a note, URL, and other details to a reminder

  1. Go to the Reminders app on your iPad.
  2. Tap an item.
  3. Tap Add Note and then add more information.
  4. Tap the Edit Details button to edit the item details. For example, you can set a date and time, set a location-based reminder, flag an important item, or attach a photo.

Set when and where to be reminded

You can get reminded at a specific time or location, on a certain date, or when you’re texting someone in Messages.

  1. Open the Reminders app on your iPad.
  2. Tap an item and then do any of the following:

    • Schedule a date and time: Tap the Date and Time button, then choose an option.

      Tip: Reminders with a due date appear as an all-day event in Calendar. See Use Reminders in Calendar.

    • Mark a reminder as urgent: Tap the Edit Details button. Then turn on Urgent to get an alarm when the reminder is due. If Date and Time aren’t already set, they default to the next hour. You can edit Date and Time to change when the alarm activates.
    • Set a recurring reminder: Tap the Edit Details button, turn on Date or Time, tap Repeat, and choose the frequency.
    • Get an early reminder before the scheduled date and time: Tap the Edit Details button, tap Early Reminder, and choose when you want to be reminded. For example, “5 minutes before,” “2 days before,” or another choice.
    • Add a location: Tap the Location button. Then choose where you want to be reminded—for example, when you arrive home or get into a car with a Bluetooth® connection to your iPad.

      Note: To receive location-based reminders, you must allow Reminders to use your precise location. Go to Settings > Privacy & Security > Location Services. Turn on Location Services, tap Reminders, choose While Using the App, then turn on Precise Location.

    • Get a reminder in Messages: Tap the Edit Details button and turn on When Messaging. Then choose someone from your contacts list. The reminder appears the next time you chat with that person in Messages.
  3. Tap the Done button.

Set a flag and priority

  1. Open the Reminders app on your iPad.
  2. Tap an item.
  3. Do any of the following:
    • Flag an important item: Tap the Flag button.
    • Set a priority: Tap the Edit Details button, tap Priority, and then choose Low, Medium, or High.

Add a photo or scan a document

  1. Open the Reminders app on your iPad.
  2. Tap an item and tap the Edit Details button.
  3. Tap Add Image and then do any of the following:
    • Take a new photo.
    • Scan a document.
    • Choose a photo from your photo library.

See also

In the Reminders app, you can create a grocery list to make shopping easier. Items are automatically sorted into categories such as Produce and Seafood.

On supported devices, Apple Intelligence sorts your items even when the list uses more than one language. You can change how items are grouped, and the list remembers how you like it. If you’ve already got a list going, you’ll be able to convert it to a grocery list, too.

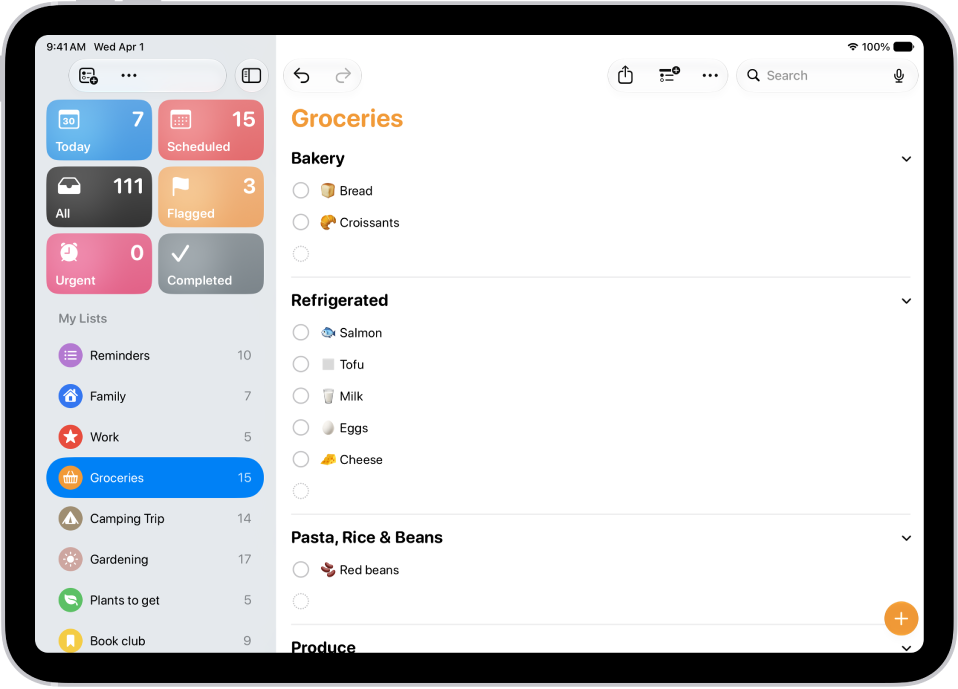
The Reminders app showing a grocery list with items in categories such as Breads & Cereals and Dairy, Eggs, & Cheese.

Note: Some Reminders features in this guide need updated reminders in iCloud, since they aren’t available when using other accounts.

Create a new grocery list

  1. Start the Reminders app on your iPad.
  2. Tap the Add List button.
  3. Enter a name for the list, tap List Type, and choose Groceries.
  4. Choose a color and symbol for the list (optional).
  5. Tap the Done button.

Reminders can use Apple Intelligence to automatically build a list of suggested grocery items from text in other apps, like an online recipe in Safari; for more, read our article, Get suggested reminders.

Note: Apple Intelligence on iPadOS 27 or later is available on an Apple Intelligence-enabled iPad mini (A17 Pro) and iPad models with M1 or later. Apple Intelligence is not available in all languages or regions. Usage limits may apply.

Convert an existing list to a grocery list

  1. Start the Reminders app on your iPad.
  2. Tap a list and tap the More button. Tap Show List Info.
  3. Tap List Type, then choose Groceries.
  4. Tap the Done button.

Add an item to your grocery list

  1. Start the Reminders app on your iPad.
  2. In your grocery list, tap the New Item button. Enter a description.
  3. To enter more information, tap Add Note.
  4. Tap the Edit Details button to edit the item details. For example, you can attach a photo, set a location-based reminder, or flag an important item.
  5. Tap the Done button.

Items added to the list are automatically placed in categories. If you enter grocery items in a language different from the system language of your iPad, you can add an additional language in Settings. (Grocery categorization is available for supported languages.)

*Apple Intelligence is available with Siri and device language set to Chinese (Simplified), Chinese (Traditional), Danish, Dutch, English, French, German, Italian, Japanese, Korean, Norwegian, Portuguese, Spanish, Swedish, Turkish, or Vietnamese. Some features may not be available in all regions or languages. Some devices may not be available in all regions. Siri AI is available in beta in iOS 27, iPadOS 27, macOS 27, watchOS 27, and visionOS 27 and requires an Apple Intelligence–enabled device set to a supported language. Available in English to start. Siri AI will not be initially available in the EU on iOS, iPadOS, and watchOS. Certain Apple Intelligence features that rely on server-side models are subject to daily usage limits, including but not limited to Siri AI, Intelligent Photo Editing Tools, Image Playground, and AFM 3 Cloud models in Shortcuts. Daily limits may vary by feature, request complexity, system demand, system policies, and other factors. Expanded access to such features will be available for a fee in the future. Use of these features is subject to the Apple Intelligence Terms and Conditions.

See also

In the Reminders app, use iCloud to share to-do lists. You can collaborate and assign tasks to other people who also use iCloud.

People who accept the invitation can add and edit items, and you can assign a task to anyone on the list, including yourself. If you send the invitation in Messages, you’ll get activity updates in that conversation. You can turn notifications on or off for a shared list, too.

Note: With updated reminders, all Reminders features described in this guide are available, though some features aren’t available when using other accounts.

Collaborate on a list using iCloud

Lists can be shared with people who use iCloud so you can collaborate. Anyone who accepts the invitation can add and edit items and mark items as completed, and all the participants see everyone’s changes. To collaborate, everyone needs to be signed in to their Apple Account and have Reminders turned on in iCloud settings.

  1. Start the Reminders app on your iPad.
  2. View the list you want to share. Then tap the Share button.

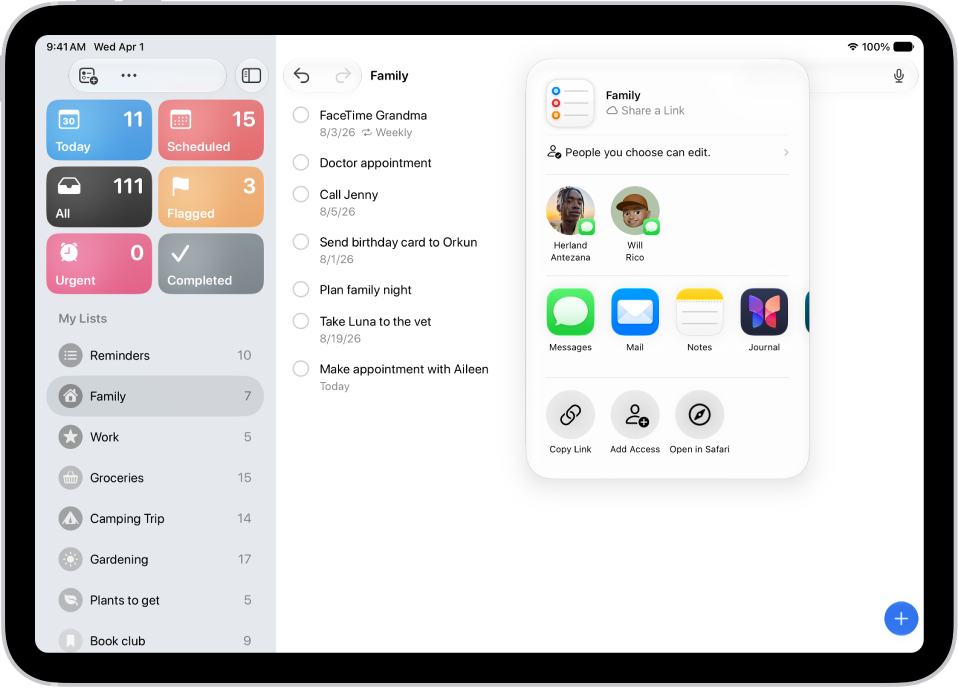
    A Reminders screen showing a list with options for sharing on the right.

  3. By default, participants on the list can invite other people. To restrict sharing, tap People you invite can add others and then turn off Allow others to invite.
  4. Choose how to send your invitation (for example, using Messages or Mail).

    If you send the invitation in Messages, you get activity updates in the Messages conversation when someone makes changes in the shared list. Tap the updates to go to the shared list.

Assign reminders in a shared list

You can assign a task to any person on the list, including yourself.

  1. Start the Reminders app on your iPad.
  2. In the shared list, create or edit a reminder, then do either of the following:
    • Type @ followed by the person’s name or choose a person from the menu above the keyboard.
    • Tap the Person button, then choose a person.

Quick tip: You can quickly see all reminders assigned to you if you use the Assigned to Me Smart List.

Turn notifications on or off for a shared list

  1. Start the Reminders app on your iPad.
  2. In the shared list, tap the Collaborate button and tap Manage Shared List.
  3. Below Notify When, turn on or off any of the following:
    • Adding Items: Receive an alert when someone adds an item to the list.
    • Completing Items: Receive an alert when someone completes an item on the list.

See also

In the Messages app, you can send a text message to invite people to collaborate on a project, and everyone in the conversation is added to the document, spreadsheet, or other shared file.

You can also start from another app, like Notes or Freeform, and then discuss your content in Messages. Files can come from Reminders, Safari, Keynote, Numbers, Pages, and more, but you first need to save the content somewhere others can access it, such as iCloud Drive.

Note: Collaborating on a project with Messages requires you and your recipients to use iMessage on iOS 16, iPadOS 16, macOS 13, watchOS 9, or visionOS 1 or later. First, save the content somewhere others can access it, such as iCloud Drive. And with iPad apps, you may need to turn on iCloud before using their collaboration features.

Invite people to collaborate

Invite people to collaborate on a project from another app, then talk about your content in Messages. You can share files from apps like Notes, Freeform, Reminders, Safari, Keynote, Numbers, Pages, and more. First, though, turn on their collaboration features in iCloud settings, and store the content somewhere others can get to it, such as iCloud Drive.

The process for inviting someone to collaborate depends on the app. Here’s one way you might start a collaboration in a supported app:

  1. Select the file you want to share and tap the Share button, or tap Collaborate.
  2. Make sure Share a Link (rather than Send a Copy) is selected. Tap the group or individual you want to collaborate with. If you don’t see the group or person listed, tap the Messages app icon.

    The suggested icons may correspond with groups or individuals with active FaceTime calls or recent Messages conversations.

  3. A Messages conversation opens with the invitation ready to send. Add a note (optional) and then tap the Send button.
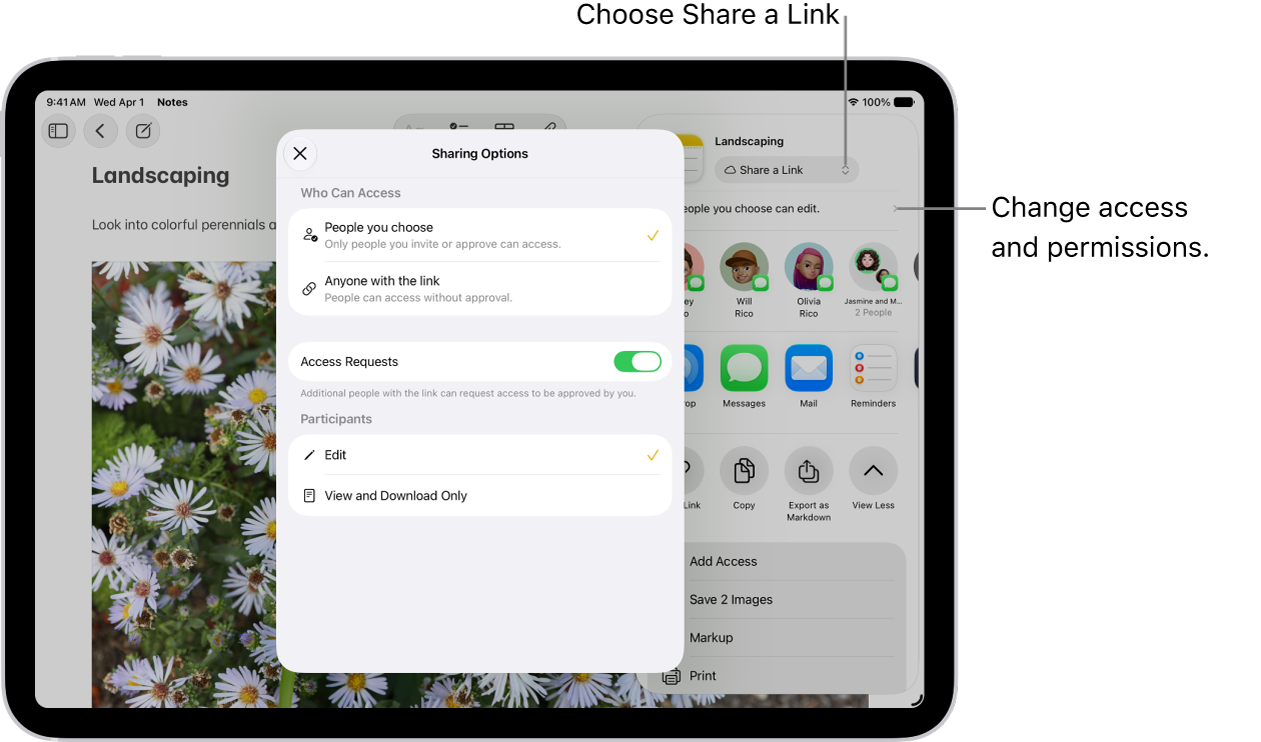
A collaboration invitation to a brainstorm in Notes, showing Share a Link for the share option and “People you choose can edit” as the access and permission setting. Four possible recipients, including a group, form a row below that. The next row offers different ways to share the note: AirDrop, Messages, Mail, and Reminders. The last row contains buttons to copy, export, and save the note.

After you invite participants in Messages, you can work on the project in the other app and return to the Messages conversation by tapping the collaboration button in that app.

When someone edits the file, you see updates at the top of the Messages thread. To return to the shared project and see changes, tap an update.

Note: Participants may have to accept your invitation or join the shared item first. Until then, they can’t interact with it or see any updates.

Quick tip: With Files and Messages open in Split Screen, a collaboration starts when you drop a file into the new message window and pick Collaborate in the pop-up menu before sending.

Collaborate on a project in Messages

After you share your project, you see activity updates at the top of the Messages conversation whenever someone makes an edit.

  1. Start the Messages app on your iPad.
  2. Go to the conversation that contains the invitation to the project you’ve started collaborating on and then do any of the following to return to the project:
    • Tap the file in your conversation to open it.
    • If you see an update at the top of the conversation, tap Show.
    • Tap the icon of the participant or group at the top of the screen, scroll to Collaboration, then tap the shared project.

When you make any changes or edits to the project, your participants get updates in the conversation.

Note: New people you add to a group conversation don’t automatically get access to the projects you’re collaborating on, so grant it yourself. If someone joined the group conversation recently, tap the notification at the top of the screen to add them, and you can also invite them to collaborate.

Manage the collaboration and group

If you share a project with two or more people in a Messages conversation, you can add or remove participants.

  1. Start the Messages app on your iPad.
  2. Go to the conversation you want to manage. Tap the group icon at the top of the conversation to open details about the group’s conversation.
  3. Do any of the following:

    • Add new participants: Tap Add Access, then add contacts. (You may need to scroll down to see Add.)

      If you started collaborating with just one other person, you must start a new conversation to add people to the collaboration.

      Note: You must add new participants to any files that were shared in the conversation before they joined. As you add participants, a notification appears at the top of the conversation. Tap Show in the notification to review the previously shared files you can add new participants to.

    • Remove a participant from the conversation: Touch and hold their icon. Then tap Remove from Group.

      Important: The apps where the collaboration happens usually control access to the project. Check participant access in the app itself to remove viewing or editing privileges completely.

The people in the Messages collaboration may not be the same group that’s collaborating on the file. You might invite people to collaborate on the file outside of Messages, for example, or have two different groups in Messages, each with a collaboration conversation of its own.

Adding someone to a document you shared with others earlier gives you a choice: add them to an existing conversation, or keep the conversations separate. Anyone added to a conversation can’t read messages sent before they joined it.

Stop collaborating on a project in Messages

Access to the project is usually controlled by the apps where the collaboration happens. Collaborating on a document in the Pages app, for example, means the Pages settings take precedence over the Messages settings. Still, you can unsend or delete the invitation from the conversation, just like any other message.

Important: When you delete an invitation from a thread, that conversation is no longer associated with the collaboration, but it doesn’t remove participants from the file. Check participant access in the app to remove viewing or editing privileges completely.

See also

You can share images, links, and other content using the Messages app. When someone shares content with you, you can find it in a Shared with You section in apps like Photos, Music, and News.

You can share a recent photo or video right from a conversation, or share a message attachment with someone else. You can also copy, save, or print your attachment, and find all the content someone shared with you.

Share content with others

  1. Open the Messages app on your iPad.
  2. In a conversation, do one of the following:

    • Copy and paste an image or a link into your message.
    • Tap the Add button, tap Photos to browse recent photos and videos, then tap to add.
    • Tap a message attachment, tap the Share button, then tap a contact or the Messages app icon.

      Tip: When you tap the Share button, you can also copy, save, or print your attachment.

  3. Add a message (optional), then tap the Send button.

From another app (like Podcasts, News, or Music), select the content you want to share, tap the More button, tap Share, then choose Messages.

Find all the content someone shared with you

  1. Open the Messages app on your iPad.
  2. Open the conversation whose content you want to see.
  3. Tap the contact or group icon at the top of the conversation.
  4. Swipe left, then tap Photos, Links, Documents, Locations, or Wallet.

    If a category doesn’t appear, you didn’t receive anything of that type in this conversation.

Note: If the person who sent the content isn’t in your contacts, it won’t appear in Shared with You.

You can find a Shared with You section in Photos, Safari, Music, Podcasts, and other supported apps. If you don’t want items someone sends to you to appear in those other apps, tap the contact or group icon at the top of the conversation, tap Info, then turn off Shared with You.

Review and save photos or videos

Multiple photos or videos you receive at the same time are automatically grouped, with two to three items forming a collage and four or more forming a stack.

  1. Open the Messages app on your iPad.
  2. Do one of the following:
    • Look inside a stack: Tap to open. Then swipe through a stack to view, reply, or interact with each photo or video individually.
    • Save a photo or video: Tap the Save Photo button next to the photo or stack.

Pin shared content

If someone shares content that’s especially interesting, you can quickly pin it in Messages. This elevates it in the Shared with You section of supported apps, in Messages search, and in the conversation details (the info you see when you tap the contact or group icon at the top of the conversation).

  1. Open the Messages app on your iPad.
  2. Open the conversation with the content you want to pin.
  3. Touch and hold the message bubble containing the attachment. Tap Pin.

Note: Photos can be saved to your library, but not pinned.

Hide shared content

You can adjust your settings to hide an app’s Shared with You section.

  1. Open the Settings app on your iPad.
  2. Tap Apps, then tap Messages.
  3. Tap Shared with You. Turn off Automatic Sharing, or turn off Shared with You for a specific app.

Note: You can have your (or a family member’s) iPad receive warnings about sensitive content and warn you before it’s sent or received.

See also