Got a tip for us?

iPad

The iPad is a tablet computer from Apple that runs the iOS mobile operating system. Similar in functionality to the iPhone, the iPads purpose is often quite different, sometimes even serving as a general desktop computer replacement.

In the Notes app, you can send a copy of a note to a friend. You can also share a link to invite people to collaborate in real time on a note or on a folder of notes in iCloud, and everyone will see the latest changes.

You can set who can access what you share, but you can’t collaborate on a locked note. You can also view activity in a shared note.
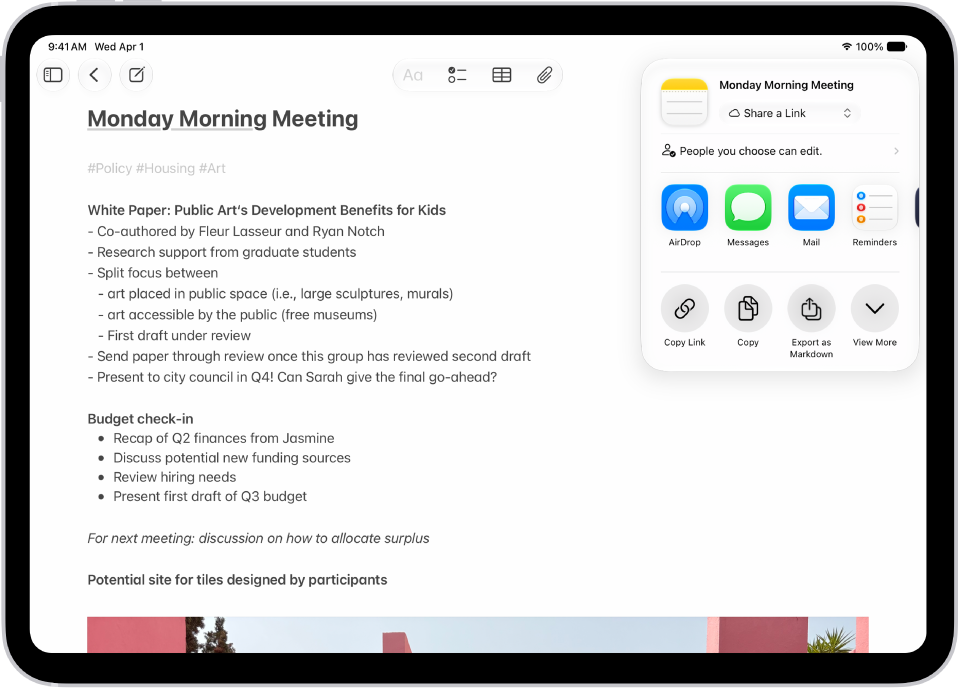
A note with an overlay showing sharing options.

Share a copy of a note

  1. Open the Notes app on your iPad.
  2. Open the note you want to share.
  3. Tap the Share button, tap the menu under the note title, and tap Send Copy.
  4. Choose how to send your note.

Collaborate on a note or folder of notes using iCloud

Sharing a link in iCloud to a note or a folder of notes is how you collaborate with others. You decide who can access what you share and set editing permissions, and all participants see changes in real time. Participants also need to be signed in to their Apple Account and have Notes turned on in iCloud settings.

Note: Collaborating isn’t possible on a locked note or a folder with locked notes.

  1. Open the Notes app on your iPad.
  2. Do one of the following:

    • Collaborate on a note: Open the note you want to share, tap the Share button, tap the menu under the note title, and then tap Share a Link.
    • Collaborate on a folder: Open the folder you want to share. Then tap the Share button.
  3. To change the access and permissions, tap Only invited people can edit and then set any of the following:

    • Who can access: Choose People you choose or Anyone with the link. With People you choose, you can turn on Access Requests.

      Note: Requesting access to a note sends an email to the address associated with the owner’s Apple Account.

    • Permissions: Choose Edit or View and Download Only.

Quick tip: When you send the invitation in Messages, you get activity updates in the Messages conversation whenever someone makes changes in the shared note. Tap the updates, and you’ll go to the shared note.

View activity in a note

An orange dot to the left of a note title in the notes list means the note’s changed since you last looked at it.

  1. Open the Notes app on your iPad.
  2. Open the note and then swipe right on the note or swipe up on the Activity card to see who made changes and when.
  3. To adjust how the activity is shown, tap the Collaborate button. Choose any of the following:
    • Show Updates: Shows changes made since you last opened the note.
    • Show All Activity: Shows all activity in the note.
    • Show Highlights: Shows names, dates, and changes made by each participant.

Quick tip: Type an @ sign followed by a participant’s name to mention them and notify them of important updates.

View activity in a folder

  1. Open the Notes app on your iPad.
  2. Touch and hold the folder. Then tap Show Folder Activity.

Change sharing settings

  1. Open the Notes app on your iPad.
  2. The owner of a shared note or folder can change the sharing settings by doing one of the following:

    • Manage a shared note: Tap the Collaborate button, then tap Manage Shared Note.
    • Manage a shared folder: Tap the Folder Actions button. Then tap Manage Shared Folder.
  3. Do any of the following:

    • Remove participants or cancel invitations: Tap the participant you want to remove, then tap Remove Participant or Cancel Invitation.
    • Change access and permission settings: To change the settings for one person, tap their name. To change the settings for all participants, tap Sharing Options.

      Making a participant a Co-Owner allows them to manage participants and permissions for everyone except the owner.

    • Stop sharing: When you choose this option, the shared note or folder is deleted from the devices of the other participants.

See also
Tags: iCloud, Notes

In supported apps, such as Notes and Photos, you can use the Markup tools to add text, shapes, stickers, and image descriptions to your images and documents.

You can move or resize a shape, and adjust its border color, border width, fill color, and opacity. You can even draw geometrically perfect shapes, like lines and arcs, and VoiceOver reads the custom image descriptions you add.

Here’s how to add text, shapes, stickers, and more with Markup on iPad.

Note: Tap the Markup button or Markup whenever the Markup toolbar isn’t showing in a supported app. If the toolbar is minimized, tap its minimized version to bring it back.

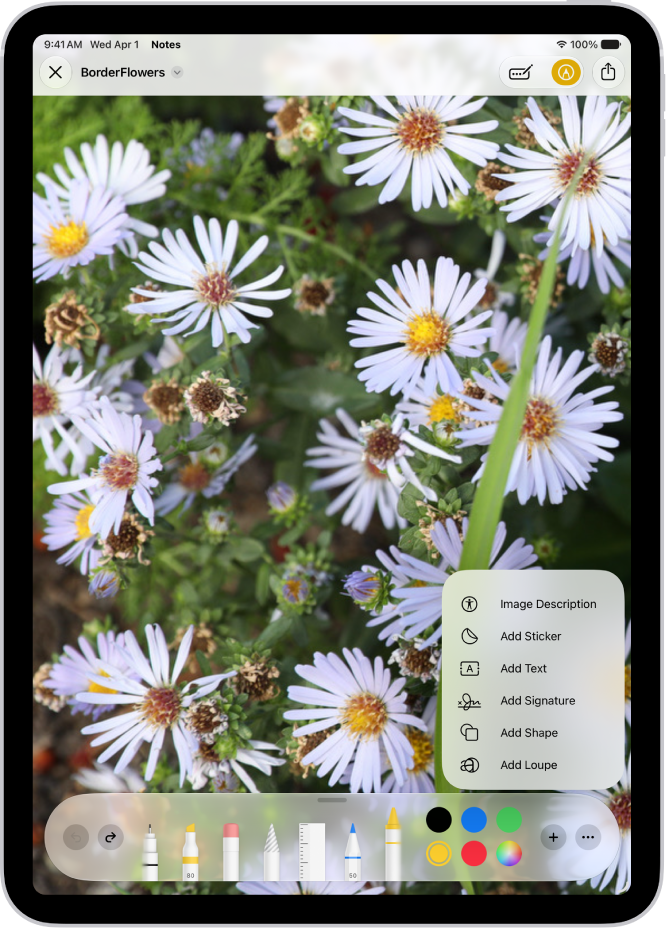
The Markup toolbar is open at the bottom of a note in the Notes app and the Add button in the bottom-right corner of the screen is selected. The following options are available in the Add menu: Add Sticker, Add Text, Add Signature, and Add Shape.

Add text

  1. In the Markup toolbar, tap the Add Annotation button, then tap Add Text.
  2. Tap the text box. Then use the keyboard to enter text.
  3. To adjust the text’s font, size, justification, style, or color, tap the text editing options at the bottom of the Markup toolbar.
  4. When you’re done, tap outside the text box.
  5. To close the Markup toolbar, tap the Show Handwriting Tools button or Done.

To cut, copy, duplicate, share, or delete a text box, tap it, tap the More button beside it, then tap an option.

Add a shape

  1. In the Markup toolbar, tap the Add button. Tap Add Shape.
  2. Tap the shape you want to add. Then do any of the following:
    • Move the shape: Drag it.
    • Resize the shape: Drag any dot along the shape’s outline.
    • Adjust the shape’s border color, border width, fill color, and opacity: Tap an option in the Markup toolbar.
    • Adjust the shape’s direction or dimension: Drag any green dot along the shape’s outline.
    • Cut, copy, duplicate, share, or delete: Tap the More button next to the shape. Then tap an option.
  3. When you’re done adjusting the shape, tap the screen.
  4. To close the Markup toolbar, tap the Show Handwriting Tools button or Done.

Quick tip: Zoom in on the document by pinching the screen open, which lets you adjust shapes up close. While zoomed in, drag two fingers to pan, then pinch closed to zoom back out.

Draw a shape

Markup can draw geometrically perfect shapes, like lines, arcs, and more, for your diagrams and sketches.

  1. In the Markup toolbar, tap a drawing tool.
  2. Draw a shape in one stroke with your finger or Apple Pencil (on supported models). Then pause.

    A perfect version of the shape snaps into place, replacing the drawing. (If you prefer to keep the freehand shape, tap the Undo button.)

Among the shapes you can draw are hearts, stars, clouds, and chat bubbles, along with squares, circles, rectangles, triangles, pentagons, straight lines, arrows, arcs, and continuous lines with 90-degree turns.

Add a sticker with Markup

Markup can also add stickers from your sticker collection to documents and images.

  1. In a supported app, tap the Markup button or Markup.
  2. In the Markup toolbar, tap the Add button and tap Add Sticker.
  3. Touch a sticker and then drag it onto your document or photo.
  4. Tap to select the sticker and then do any of the following:
    • Adjust its angle: Use two fingers to rotate it.
    • Adjust its size: Drag a blue dot on the bounding box of the sticker.

You can download sticker packs from the App Store, create Live stickers in the Messages app or by lifting subjects from your photos, or make stickers in any supported app.

Add custom image descriptions

Markup can add descriptions to images in supported apps like Photos, and VoiceOver reads those custom descriptions when you use the Image Explorer.

  1. In the Markup toolbar, tap the Add button, then tap Image Description.
  2. Enter your description, then tap the Done button.

See also

Tag: Markup

Apple Pencil unlocks a whole new iPad experience, letting you edit, draw, mark up, and annotate in the apps you use every day. You can write in any text area and have your words turn into typed text, gather ideas in Freeform, and quickly take and mark up a screenshot to give clear feedback on a team project.

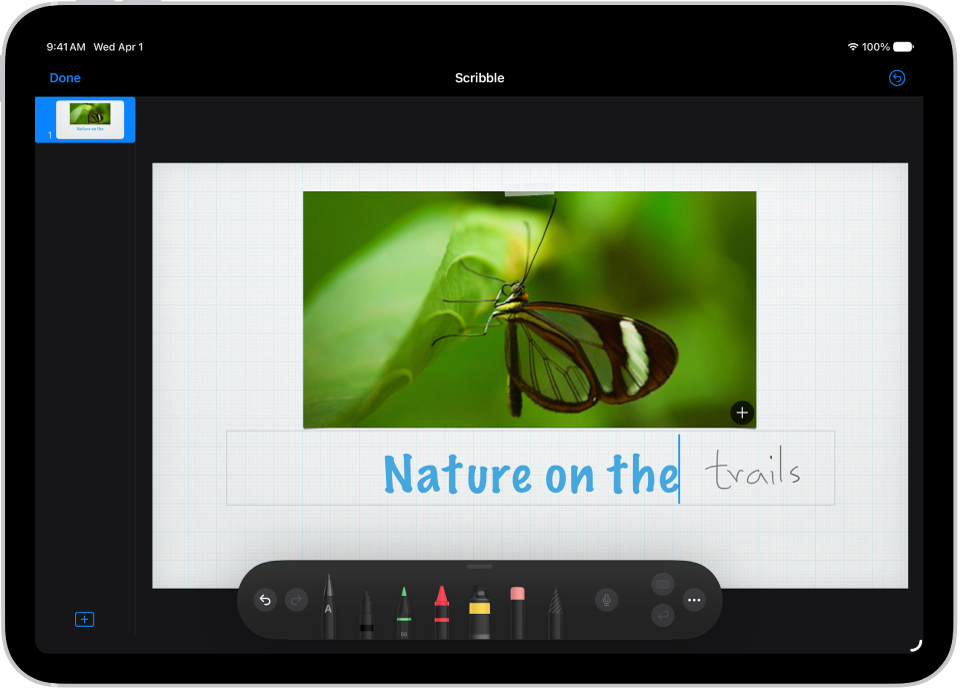
A title is being added to a Keynote slide. As text is handwritten using Apple Pencil, the words turn into typed text.

Turn handwriting into typed text

You can write with Apple Pencil in any text area, and your words automatically transform to typed text. Your handwriting is converted to text directly on your iPad, so your writing stays private. Go to Settings, tap Apple Pencil, then turn on Scribble.

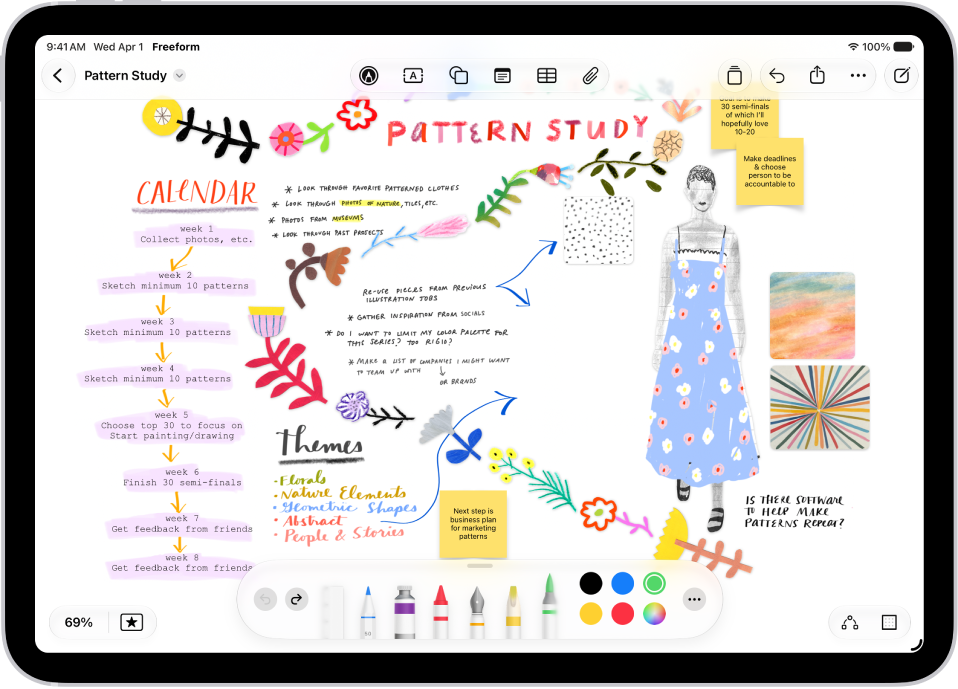
A Freeform board with drawings of plants and the drawing tools at the bottom.

Gather ideas in Freeform

The Freeform app provides a flexible canvas where you can see and share your ideas all in one place. You can diagram new projects, brainstorm your next big idea, or draw together with a friend over FaceTime. To create a board, tap the New Board button, then start drawing with Apple Pencil. Use tools like the watercolor brush, calligraphy pen, and highlighter to express your ideas on a board—the only limit is your imagination.

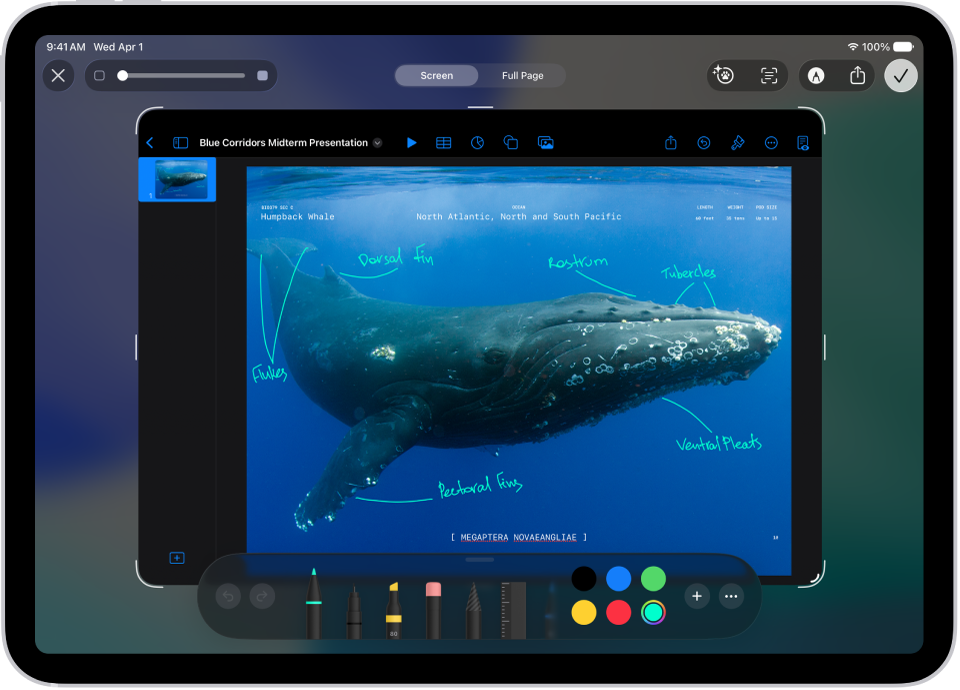
A screenshot of a Keynote document with annotated comments written using the blue marker tool.

Mark up a screenshot

Quickly take and mark up a screenshot so you can give clear feedback on a team project. To take a screenshot, swipe Apple Pencil from the bottom-left corner of iPad, then use the drawing tools to add your thoughts. Tap the Share button to share your feedback.

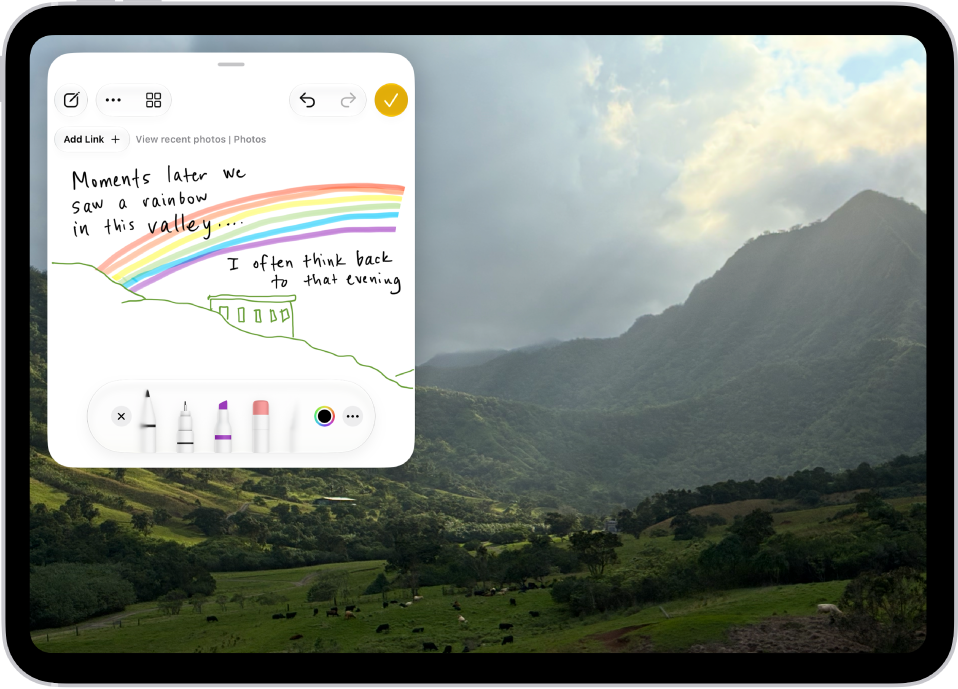
A Quick Note is open at the bottom right over a Keynote document.

Write a quick note

With Quick Note, you can jot down ideas and add links, no matter what you’re doing on your iPad. Swipe Apple Pencil from the bottom-right corner of iPad, tap the note, then start writing.

For more ways to put Apple Pencil to work, these guides are a good next stop:

According to Apple, the availability of features may vary depending on your language and country or region.

In the Photos app, you can make stickers from the subjects in your photos and animated stickers from the subjects in your Live Photos. Then use your stickers to decorate messages, photos, notes, and more.

Your stickers appear in the stickers menu, which you can open from the onscreen keyboard or the Markup tools. You can delete a sticker you no longer want, too.

Here’s how to make stickers from your photos on iPad.

Turn a photo or Live Photo into a sticker

You can turn a photo’s main subject into a sticker.

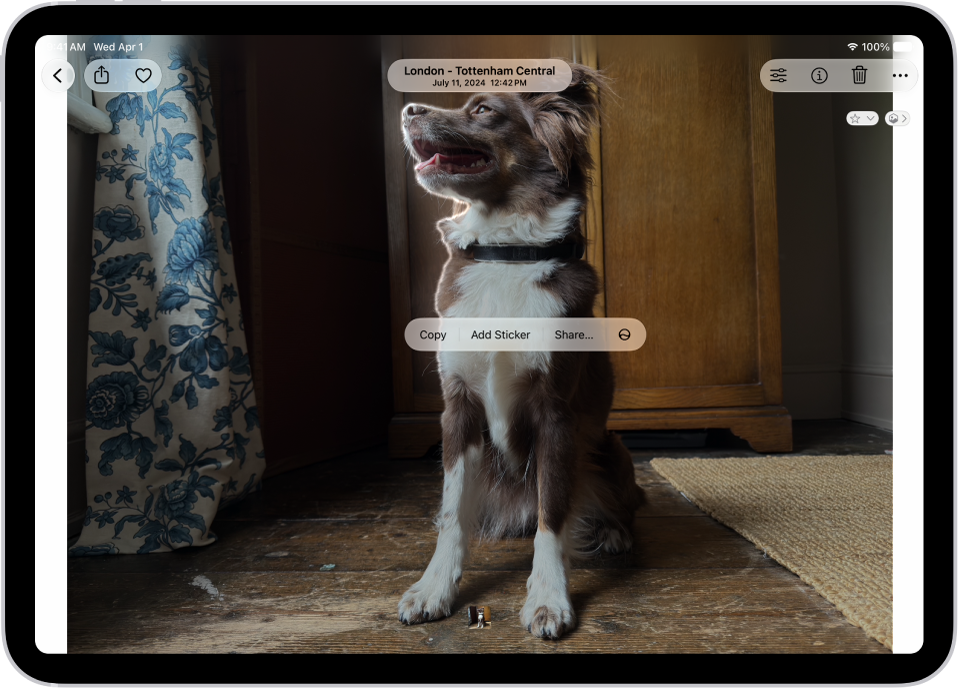
The Photos app is open to a photo of a dog. The dog is selected, and the option Add Sticker is available in the menu above.

  1. Start the Photos app on your iPad.
  2. Tap a photo to open it in full screen.
  3. Touch and hold the subject and then let go.
  4. Tap Add Sticker.

    The sticker appears in your stickers menu, which you can access when you use the iPad onscreen keyboard or Markup tools.

  5. Tap Add Effect to apply a visual effect such as Outline, or Comic, or turn the Live Photo animation on or off.

Quick tip: Stickers you’ve created can decorate a photo, too. See our guide, Edit photos and videos.

Delete a sticker

  1. Start the Photos app on your iPad.
  2. Open a photo and then tap the Edit button.
  3. Tap the Markup button, then tap the Add button.
  4. Tap Add Sticker, touch and hold the sticker you want to delete, and tap Remove.

Stickers sync with iCloud, so you’ll have them on each iPhone, iPad, Mac, and Apple Vision Pro device that’s signed in to the same Apple Account.

See also

Tags: iCloud, Photos

Use the Calendar app to track meetings, appointments, and reminders, all in one place. You can add calendar accounts from providers like iCloud, Google, or Microsoft Exchange, create events, add quick reminders alongside them, and sync your calendar across devices.

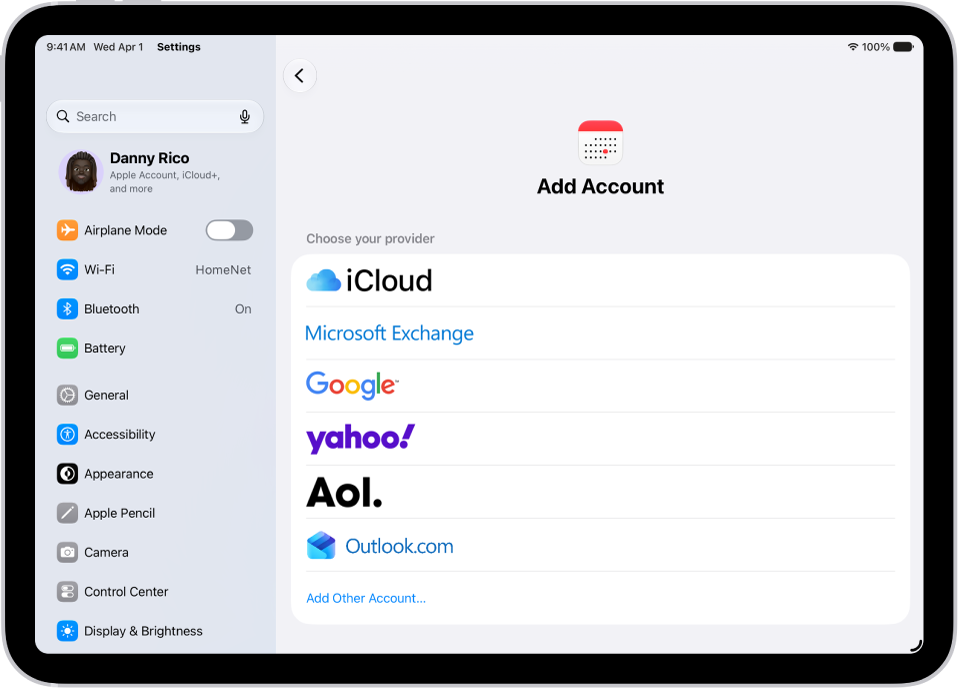
The add calendar account settings showing different calendar providers.

All your events in one place

With Calendar, you can add multiple calendar accounts from providers like iCloud, Google, or Microsoft Exchange. To add an account, go to Settings > Apps > Calendar. Tap Calendar Accounts, then choose Add Account.

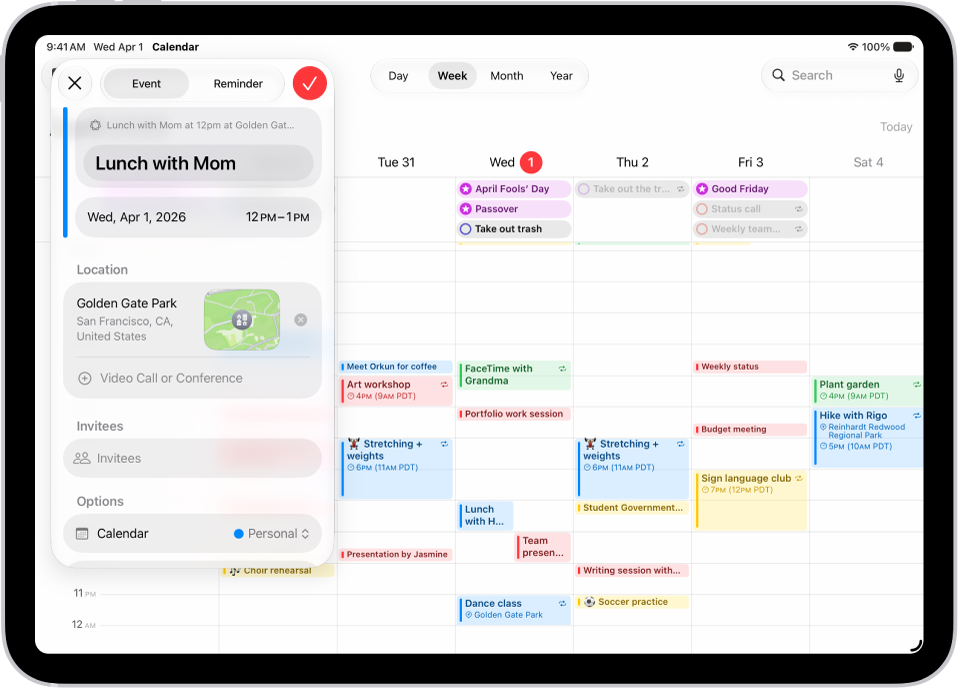
A calendar in Week view showing the create event window.

Create events

Create events to keep track of everything—from work meetings to family fun. Tap the Add button at the top of the screen, enter your details, then tap the Done button.

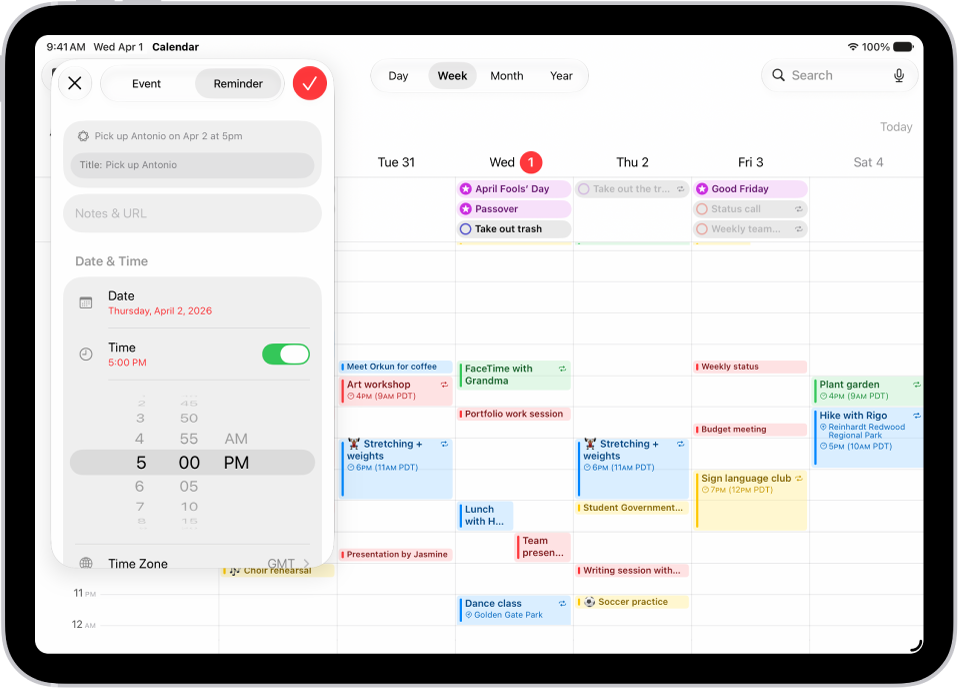
A calendar in Week view showing the create reminder window.

Add a quick reminder

Stay organized by adding reminders alongside your events. Tap the Add button at the top of the screen, then tap Reminder and enter a title. Tap Date to choose a date for the reminder, then tap the Done button.

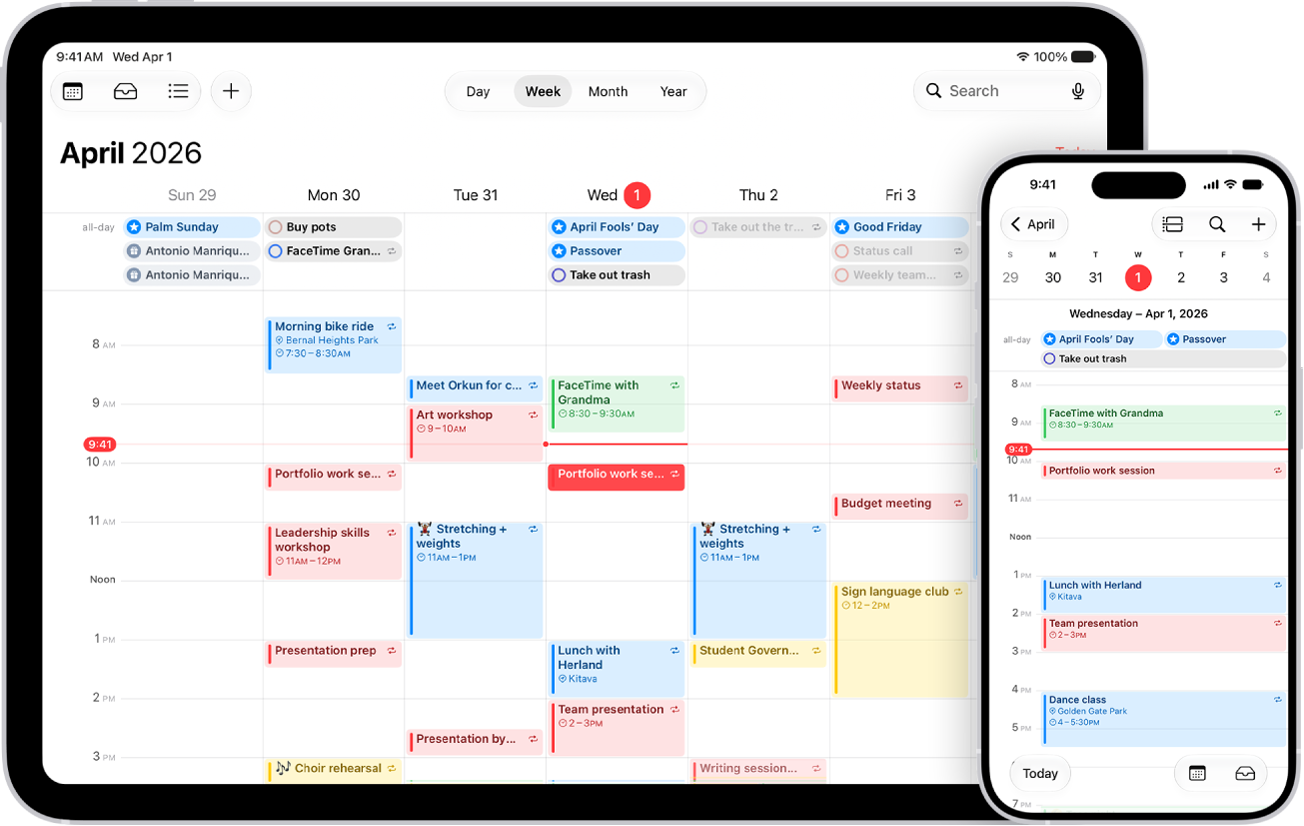
A calendar on iPad in Week view and the same calendar on iPhone in Day view.

Sync your calendar across devices

You can use iCloud to keep your calendar information up to date on all your devices where you’re signed in to the same Apple Account. Go to Settings > [your name] > iCloud. Tap See All next to Saved to iCloud, then turn on Calendar.

These guides cover more of what Calendar can do:

The Shortcuts app lets you automate tasks you do often with just a tap or by asking Siri. You can create shortcuts to get directions to the next event in your Calendar, move text from one app to another, and more.

There are ready-made shortcuts in the Gallery. Or you can build your own with different apps, and it’ll run multiple steps in a task for you.

With Vocal Shortcuts, you can teach iPad to perform an action when you speak a word or another sound of your choosing. Vocal Shortcuts can be useful if you have moderate to severe atypical speech but can reliably vocalize certain utterances. Audio is processed on device.

An action can even be a request to Siri. While Vocal Shortcuts is listening, the Microphone In Use icon appears in the status bar.

Set up Vocal Shortcuts

  1. Open Settings, tap Accessibility, and then tap Vocal Shortcuts.
  2. Tap Set Up, then tap Continue.
  3. Choose an action for iPad to perform when you say the shortcut. If you want the action to be a request to Siri, tap Siri Request. Enter the request.
  4. Enter the phrase you’ll say when you want iPad to perform the action and then follow the onscreen instructions to repeat the phrase out loud so that iPad can recognize it.

After you set up Vocal Shortcuts, the Microphone In Use icon is shown in the status bar to indicate that Vocal Shortcuts is using the iPad microphone to listen for shortcuts. When you don’t want Vocal Shortcuts to use the microphone, go to Settings > Accessibility > Vocal Shortcuts, then turn off Vocal Shortcuts.

Add a Vocal Shortcut

  1. Open Settings, tap Accessibility, and then tap Vocal Shortcuts.
  2. Tap Add Action, then tap Continue.
  3. Choose an action for iPad to perform when you say the shortcut. If you want the action to be a request to Siri, tap Siri Request. Enter the request.
  4. Enter the phrase you’ll say when you want iPad to perform the action and then follow the onscreen instructions to repeat the phrase out loud so that iPad can recognize it.

Use a Vocal Shortcut

With Vocal Shortcuts set up, just say the phrase for one of the shortcuts you’ve created.

Delete a Vocal Shortcut

  1. Open Settings, tap Accessibility, and then tap Vocal Shortcuts.
  2. Tap Edit, tap the Remove button next to the shortcut you want to delete, and tap Delete.

Quick tip: If you have an acquired or progressive condition that affects speech, you can have Siri listen for and recognize a wider range of atypical speech patterns. See Change Siri accessibility settings.

See also

You can quickly turn many accessibility features on or off by clicking an iPad button. You can also use Control Center, Siri, or Vocal Shortcuts.

With the Accessibility Shortcut, the top button or Home button turns the features you choose on or off, and if you select only one feature, it turns on or off right away. iPad can even recognize a slower triple-click.

Here’s how to quickly turn accessibility features on or off on iPad.

Use the Accessibility Shortcut

Triple-click the top button or Home button to turn the accessibility features of your choice on or off.

  1. Open Settings, tap Accessibility, tap Accessibility Shortcut, and select the features you want.

    If you select only one feature, the feature is immediately turned on or off when you click the button shortcut.

  2. Triple-click one of the following:

    • The Home button (on an iPad with a Home button)
    • The top button (on other iPad models)

    To have iPad recognize a slower triple-click, see Adjust settings for the top or Home button.

  3. Tap the feature you want to turn on or off (if Accessibility Shortcut is set up with more than one feature).

Note: Some features, like Assistive Access or Guided Access, need to be set up before you can add them to the Accessibility Shortcut. The Accessibility Shortcut can enter and exit Assistive Access, but while Assistive Access is active, you can’t use it to turn on other features. And to use the Accessibility Shortcut while Guided Access is on, turn on Accessibility Shortcut in Guided Access settings.

Use Control Center

You can add accessibility features to Control Center for quick access when you swipe down from the top-right corner of the screen.

  1. To change the features available in Control Center, swipe down from the top-right corner of the screen and tap the Add button in the top-left corner. Tap Add a Control.
  2. Tap a control to add it to Control Center. Scroll down to see more controls, including categories of controls for accessibility, hearing, mobility, and vision.

You can change which features appear when you tap the Hearing button in Control Center. Go to Settings > Accessibility > Hearing Control Center, then add or remove features.

Use Siri

Siri: Ask Siri something like, “Turn on Voice Control.” Learn how to use Siri.

Use a Vocal Shortcut

iPad can learn to turn on an accessibility feature whenever you say a word or make another sound of your choosing. Read our guide, Use Vocal Shortcuts.

Use the Shortcuts app

You can create a shortcut to get one or more tasks done with your apps using just a tap or by asking Siri. For example, if you have short-term memory loss, you can use Remember This to log what happens throughout the day. You can also run the In Case of Emergency shortcut to send your location to your chosen emergency contacts, share a message with custom instructions, and display a message of your choice onscreen for first responders to see.

See also

Express yourself by adding stickers that match your personality and mood to your text messages.

You can send Live Stickers you or a friend made, Memoji stickers, and stickers from other creators you download from the App Store. You can also place stickers right on a conversation, then move, resize, or delete them. Memoji stickers come in their own sticker pack.

Here’s how to send stickers in Messages on iPad.

Send a sticker in a message

  1. Go to the Messages app on your iPad.
  2. In a conversation, tap the Add button.
  3. Tap Stickers and then tap the icon for any of the following sticker packs:
    • Live Stickers you or a friend made: Tap the Live Stickers button. See Create Live Stickers and Save other people’s Live Stickers, below.
    • Emoji: Tap the Emoji button.
    • Memoji: Tap the Memoji Stickers button, tap a Memoji in the top row to view the stickers in the sticker pack, and choose a pose or expression. See Create and send Memoji.
    • Stickers from other creators: Download a sticker app from the App Store. See Add iMessage apps.
  4. Add a message (optional), then tap the Send button.

From the emoji keyboard, you can also send stickers; read our guide, Make a sticker.

Place stickers on a conversation

You can add stickers on message bubbles in conversations, angle them, or make them different sizes, and place one sticker on top of another.

  1. Open the Messages app on your iPad.
  2. In a conversation, tap the Add button.
  3. Tap Stickers. Then tap an icon—such as the Live Stickers button, the Emoji button, or the Memoji Stickers button—in the top row to browse a sticker pack.
  4. Drag a sticker onto a bubble. Do any of the following:

    • Adjust the angle: Rotate a second finger around the finger dragging the sticker.
    • Adjust the size: Move a second finger closer to or away from the finger dragging the sticker.

    Your recipients see the sticker as soon as you place it on a message.

    To find out who sent a sticker in a conversation, touch and hold the sticker, then tap Sticker Details.

Quick tip: To quickly add stickers to messages, touch and hold a message and tap Attach Sticker, and choose a sticker to sit on a corner of that message bubble.

Move, resize, or delete stickers

You can still make changes to a sticker after you place it on top of message bubbles in conversations.

Do any of the following:

  • Move or resize a sticker: Touch and hold the sticker, then make any changes.
  • Delete a sticker: Touch and hold the message bubble, tap Sticker Details, swipe left on the sticker you want to delete (on your iPad only), then tap the Delete button.
  • See any text covered by a sticker: Double-tap the message bubble.

For changing stickers sent in a message bubble, see our article, Unsend and edit messages.

Note: Both you and your recipients must use iOS 17.2, iPadOS 17.2, macOS 14.1, or watchOS 10.2 or later, or visionOS 1 or later, to see these updates to stickers.

Create Live Stickers

To create your own Live Stickers for messages, lift subjects from photos and add effects that help bring the stickers to life.

This feature is available on supported models.

  1. Open the Messages app on your iPad.
  2. In a conversation, tap the Add button. Then tap Stickers.
  3. Tap the Live Stickers button and then tap the Add button.
  4. Tap a photo and then tap the Add button.

    Tip: To create a Live Sticker that moves, use a Live Photo. See Make stickers from your photos.

  5. To add an effect, touch and hold the sticker, tap Add Effect and choose an option (such as Comic or Shiny). Tap the Done button.

Save other people’s Live Stickers

If someone sends you a Live Sticker you like, save it to reuse later.

  1. Open the Messages app on your iPad.
  2. Open a conversation with a sticker you want to save.
  3. Touch and hold the sticker. Do one of the following:
    • For a sticker sent in a message: Tap Save to Stickers.
    • For a sticker placed on a message bubble: Tap Sticker Details and then tap Save.

Memoji are another option: create and send Memoji that use your voice and mirror your facial expressions.

See also

In the Mail app, Mail Privacy Protection makes it harder for senders to learn about your Mail activity. Mail Privacy Protection hides your IP address so senders can’t link it to your other online activity or determine your exact location. It also prevents senders from seeing if you’ve opened the email message they sent you.

It requires Limit IP Address Tracking. And with iCloud+, Hide My Email can keep your personal email address private, too.

Note: Mail Privacy Protection does not extend to links or email attachments such as PDF or other files.

  1. Open Settings, tap Apps, and then tap Mail.
  2. Tap Privacy Protection, then turn on Protect Mail Activity.

    Important: Mail Privacy Protection requires Limit IP Address Tracking to be enabled. To turn it on, go to Settings > Wi-Fi, tap the Info button next to your network, then enable Limit IP Address Tracking.

When you subscribe to iCloud+, you can also use Hide My Email to generate unique, random email addresses that forward to your personal email account, so you don’t have to share your personal email address when filling out forms on the web or signing up for newsletters. See Use Hide My Email.

See also