Got a tip for us?

iPad

The iPad is a tablet computer from Apple that runs the iOS mobile operating system. Similar in functionality to the iPhone, the iPads purpose is often quite different, sometimes even serving as a general desktop computer replacement.

VoiceOver changes how you use the onscreen keyboard when you activate an editable text field. You can enter, select, and delete text; change the keyboard language; and more.

There are a few typing styles, like standard typing and touch typing, and VoiceOver speaks each key as you select it and again when you enter the character. You can also edit text with the onscreen keyboard, and change the keyboard settings.

Enter text with the onscreen keyboard

  1. Select a text field, then double-tap.

    The insertion point and the onscreen keyboard appear.

  2. To enter text, do one of the following:

    • Standard typing: Select a key by swiping left or right on the keyboard and then double-tap to enter the character. Or move your finger around the keyboard to select a key and, while continuing to touch the key with one finger, tap the screen with another finger. VoiceOver speaks the key when it’s selected, and again when the character is entered.
    • Touch typing: Touch a key on the keyboard to select it and then lift your finger to enter the character. If you touch the wrong key, slide your finger to the key you want. VoiceOver speaks the character for each key as you touch it, but doesn’t enter a character until you lift your finger.
    • Direct Touch typing: VoiceOver is disabled for the keyboard only, so you can type just as you do when VoiceOver is off.
    • Dictation: Use a two-finger double tap on the keyboard to start and stop dictation.

To enter an accented character, do one of the following:

  • Standard typing: Select the plain character, then double-tap and hold until you hear a tone indicating alternate characters have appeared. Drag left or right to select and hear the choices. Release your finger to enter the current selection.
  • Touch typing: Touch and hold a character until the alternate characters appear.

Edit text with the onscreen keyboard

  • Move the insertion point: Use the rotor to choose whether you want to move the insertion point by character, by word, or by line. Swipe up or down to move the insertion point forward or backward in the text. To jump to the beginning or end, double-tap the text.

    VoiceOver makes a sound when the insertion point moves, and speaks the character, word, or line that the insertion point moves across. When moving forward by words, the insertion point is placed at the end of each word, after the space or punctuation that follows. When moving backward, the insertion point is placed before the first character of the word.

  • Move the insertion point past the punctuation at the end of a word or sentence: Use the rotor to switch back to character mode.

    When moving the insertion point by line, VoiceOver speaks each line as you move across it. When moving forward, the insertion point is placed at the end of the next line. When moving backward, the insertion point is placed at the beginning of the line that’s spoken.

  • Delete a character: Use the Delete key.
  • Select text: Do any of the following:

    • Set the rotor to Text Selection, swipe up or down to choose Character, Word, Line, or Sentence, then swipe left or right to move backward or forward. (You may need to enable Text Selection—go to Settings > Accessibility > VoiceOver > Rotor.)
    • Set the rotor to Edit, swipe up or down to choose Select or Select All, then double-tap. If you choose Select, the word closest to the insertion point is selected when you double-tap. To increase or decrease the selection, do a two-finger scrub (move two fingers back and forth three times quickly, making a “z”) to dismiss the pop-up menu, then pinch.
  • Cut, copy, or paste: Set the rotor to Edit, select the text, swipe up or down to choose Cut, Copy, or Paste, then double-tap.
  • Fix misspelled words: Set the rotor to Misspelled Words, then swipe up or down to jump to the previous or next misspelled word. Swipe left or right to choose a suggested replacement, then double-tap to use the replacement.
  • Undo: Shake iPad, swipe left or right to choose the action to undo, then double-tap.

Change the keyboard settings

  1. Open Settings, tap Accessibility, and then tap VoiceOver.
  2. Tap any of the following:
    • Typing Style: You can choose a new style. Or, set the rotor to Typing Mode and then swipe up or down.
    • Phonetic Feedback: Speak text character by character. VoiceOver first speaks the character, then its phonetic equivalent—for example, “f” and then “foxtrot.”
    • Typing Feedback: Choose to speak characters, words, both, or nothing.
    • Verbosity: Tap Deleting Text. To have VoiceOver speak deleted characters in a lower pitch, tap Change Pitch.

See also

You can mark items as “favorites” in Music to make them easier to find. If you subscribe to Apple Music, you can get notifications on new releases from your favorite artists, and easily get back to their music from the Home tab.

Artists you mark as favorites show up below Favorite Artists in Home, with their music recommended more often, and favorite songs go into the Favorite Songs playlist. You can remove favorites later.

Here’s how to mark items as favorites in Apple Music on iPad.

Add favorite playlists, artists, albums, and songs

  1. Start the Music app on your iPad.
  2. Do any of the following:

    • Add a favorite playlist: Touch and hold a playlist or tap the More button when viewing a playlist. Then tap Favorite.
    • Add a favorite artist: Go to an artist page and tap the More button. Tap the Favorite button at the top of the screen.

      When you mark an artist as a favorite, they appear below Favorite Artists in Home, and their music is recommended more often.

    • Add a favorite album: Touch and hold an album and then choose Favorite. Or tap an album, tap the More button, and tap Favorite.
    • Add a favorite song: Touch and hold a song or tap the More button next to a song. Tap Favorite. Or on the Now Playing screen, tap the Favorite button.

      When you mark a song as a favorite, it appears in the Favorite Songs playlist in the sidebar.

You can easily find favorite items in your music library. Below Library in the sidebar, choose Playlists, Artists, Albums, or Songs, tap the Filter button, then choose Favorites.

Remove playlists, artists, albums, and songs as favorites

  1. Start the Music app on your iPad.
  2. Tap the Show Sidebar button, tap a category under Library and tap the Filter button. Choose Favorites.
  3. Touch and hold a playlist, artist, album, or song. Tap Undo.

    Note: Deleting a song from your library doesn’t delete it from your favorites. To change this behavior, go to the Settings app, tap Apps, tap Music, then turn on Add & Delete Favorite Songs.

Quick tip: If you’d like songs you make a favorite added to your library, go to Settings > Apps > Music and turn on Add Favorite Songs.

See also

Tag: Music

In the Calendar app, you can share an iCloud calendar with other iCloud users. When you share a calendar, others can see it, and you can let them add or change events. You can also share a read-only version that anyone can view but not change.

The people you invite receive an invitation to join, and your contacts need an email address to be invited. You can change a person’s access later.

Create an iCloud calendar

  1. Open the Calendar app on your iPad.
  2. Tap the Calendars button at the top left.
  3. Tap Add Calendar.
  4. Tap Add Calendar, enter a name for the new calendar, and tap the Done button.

    If iCloud isn’t your default calendar, tap Accounts, then tap iCloud. See Change your Calendar settings.

Share an iCloud calendar

When you share a calendar in iCloud with one or more people, each of them gets an invitation to join the calendar.

  1. Open the Calendar app on your iPad.
  2. Tap the Calendars button at the top left.
  3. Tap the Info button next to the iCloud calendar you want to share.
  4. Tap Add Person and enter a name or email address, or tap the Add button to browse your contacts.

    Note: Your contacts must have an email address to share an iCloud calendar. See Add and use contact information.

  5. Tap the Done button.

Change a person’s access to a shared calendar

For anyone you’ve invited to share your calendar, you can turn their ability to edit it on or off, or stop sharing with that person altogether.

  1. Open the Calendar app on your iPad.
  2. Tap the Calendars button, tap the Info button next to the shared calendar, and then tap the person.
  3. Do any of the following:
    • Turn Allow Editing on or off.
    • Tap Delete.

Turn off notifications for shared calendars

You get notified whenever someone modifies a calendar you’re sharing, though you can turn off notifications for shared calendars if you’d rather not receive them.

  1. Open the Settings app on your iPad.
  2. Tap Notifications and tap Calendar.
  3. Tap Customize Notifications, then turn off Shared Calendar Changes.

Share a read-only calendar with anyone

  1. Open the Calendar app on your iPad.
  2. Tap the Calendars button and tap the Info button next to the iCloud calendar you want to share.
  3. Turn on Public Calendar. Then tap Share Link to copy or send the URL for your calendar.
  4. Choose a method for sending the URL—Message, Mail, and so on.

The URL lets anyone you send it to subscribe to the calendar in a compatible app, such as Calendar for macOS.

Delete a calendar

  1. Open the Calendar app on your iPad.
  2. Tap the Calendars button at the top left.
  3. Tap the Info button next to the iCloud calendar you want to delete.
  4. Tap Delete Calendar at the bottom of the list.

See also

After you subscribe to Apple Music, you can create an Apple Music profile that features your favorite playlists and what you’re currently listening to. You can share it with friends you invite or with other Apple Music subscribers.

You can choose which playlists to share, view profiles your friends created, and request to follow them to see what they’re listening to. You can edit or delete your profile, too, and a Family Sharing organizer can allow children ages 13 to 18 to create profiles.

Create a profile

  1. Start the Music app on your iPad.
  2. Tap the Show Sidebar button. Then tap your name at the bottom of the sidebar.
  3. Tap Set up Profile and then follow the onscreen instructions to create a profile.

After you finish setting up your profile, you can find friends whose music profile you’d like to follow or choose who you share music with (so you can show friends what you’re listening to).

Note: If you’re the organizer of a Family Sharing group, you can allow children ages 13 to 18 to create Apple Music profiles (or prevent them from doing so). Children under 13 can’t create Apple Music profiles. (Age restrictions vary by region.) See Block features or content with Screen Time on iPad.

Edit your profile

  1. Start the Music app on your iPad.
  2. Tap the Show Sidebar button. Then tap your name at the bottom of the sidebar.
  3. Tap Music Profile at the top of the screen, then tap Edit to make updates.

    You can edit your profile to choose who you share music with or to choose music to share with your followers.

Delete your profile

If you delete your profile, your playlists and music stop appearing in searches, and followers can no longer see your music or profile.

Note: Deleting your profile leaves your Apple Music subscription, library, and playlists as they are, but you can no longer see what your friends are listening to.

  1. Start the Music app on your iPad.
  2. Tap the Show Sidebar button. Then tap your name at the bottom of the sidebar.
  3. Tap Music Profile at the top of the screen and tap Edit.
  4. Scroll to the bottom, then tap Delete Profile.

    If you create your profile again within 90 days, your previous information and followers will be restored.

Note: It might take several minutes after you delete your profile before it’s no longer visible to your followers or in searches.

See also

Tag: Music

After you create an Apple Music profile, you can share music with your friends. You can allow anyone to follow you or just those you choose, and block others.

Your followers see the playlists you create by default, though you can choose not to share some of them, hide music from your followers, and share a playlist with people who don’t follow you. You can share your profile with others, too.

Choose music to share with your followers

Your followers see the playlists you create by default. But you can choose to keep some playlists unshared.

  1. Start the Music app on your iPad.
  2. Tap the Show Sidebar button. Then tap your name at the bottom of the sidebar.
  3. Tap Music Profile, tap Edit, and then turn Shared Playlists on or off.

To share playlists with people who don’t follow you, touch and hold a playlist, then tap Share Playlist.

Note: When you change music you share (say, you edit or stop sharing a playlist), those changes are reflected on your followers’ devices.

Hide music from your followers

  1. Start the Music app on your iPad.
  2. Tap the Show Sidebar button. Then tap your name at the bottom of the sidebar.
  3. Tap Music Profile.
  4. Touch and hold the playlist or album (below Listening To).
  5. Tap Hide from Profile.

The listening history for this item won’t appear in your profile or be visible to the people who follow you. If you don’t want your followers to see any of the music you listen to, tap Edit on the profile screen, then turn off Listening To at the bottom of the screen.

Note: It can take up to 10 minutes before your followers stop seeing music you hide.

If you’d rather keep all the music you play hidden from your followers on Apple Music, read our guide, Tell Apple Music to ignore your listening habits.

Share your profile

You can share your profile using email, Messages, or another app you choose.

  1. Start the Music app on your iPad.
  2. Tap the Show Sidebar button. Then tap your name at the bottom of the sidebar.
  3. Tap Music Profile.
  4. Tap the More button and tap Share. Then choose a sharing option.

You can also share the profile of anyone you follow, or who follows you.

Choose who you share music with

  1. Start the Music app on your iPad.
  2. Tap the Show Sidebar button. Then tap your name at the bottom of the sidebar.
  3. Tap Music Profile, tap Edit, and tap People You Approve to be followed only by people you choose. (Everyone includes all Apple Music subscribers who have a profile.)

For additional privacy settings, see Hide music from your followers.

Respond to follow requests

If someone asks to follow you, you can accept or decline the request. You only receive requests if you select People You Approve in your profile. For details, see Choose who you share music with.

  1. Start the Music app on your iPad.
  2. Tap the Show Sidebar button. Then tap your name at the bottom of the sidebar.
  3. Tap Follow Requests, then accept or decline the requests.

You may receive follow requests in other ways—as a link in an email or a text message, for example. To accept, tap the link.

Turn on or off notifications about your friends’ activity

  1. Start the Music app on your iPad.
  2. Tap the Show Sidebar button. Then tap your name at the bottom of the sidebar.
  3. Tap Notifications and turn on (or off) Friend Activity.

    When the option is on, you get notified when friends follow you and add your playlists.

Prevent users from following you

  1. Start the Music app on your iPad.
  2. Tap the Show Sidebar button. Then tap your name at the bottom of the sidebar.
  3. Tap Music Profile and touch and hold a profile picture. Then choose Block.

    People you block won’t see your music or be able to find your profile. They can still play your shared playlists if they added them to their library.

Report a concern

If you have a concern about a follower, touch and hold their profile picture, then tap Report a Concern.

See also

Tag: Music

You can mark up a webpage, highlight your favorite parts, draw and write notes, and share your document as a PDF with others. Markup works right inside Safari. When you’re done, your marked-up webpage is saved as a PDF in the location you choose.

  1. Go to the Safari app on your iPad.
  2. Go to a webpage, then tap the Share button.
  3. Tap View More, then tap Markup.
  4. Use the tools to annotate the webpage.
  5. Tap the Done button, then tap Save File To.
  6. Enter a name for the file, then tap Save.

See also

Tag: Safari

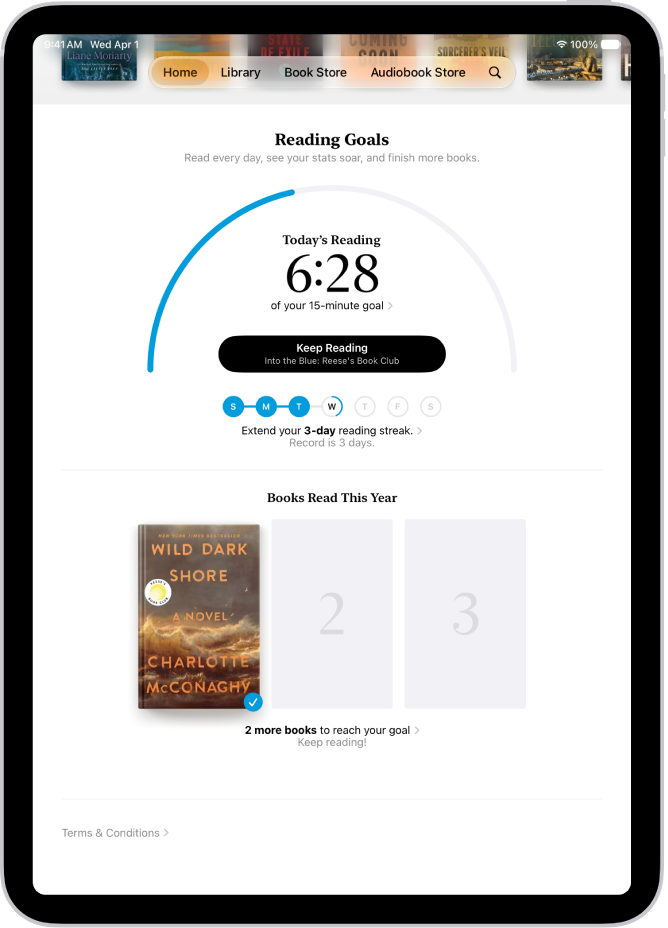
The Books app helps you keep track of how many minutes you read each day, and how many books and audiobooks you finish each year. You can customize your goals to spend more time reading, set new reading streaks, and receive encouragement to reach your goals.

The default yearly reading goal is three books, and you can count PDFs toward your goal, too. Finished books appear below Books Read This Year.

The Reading Goals screen showing stats for the user—such as today’s reading, their reading record for the week, and their books read this year.

Note: Apple Books isn’t available in all countries or regions.

Change your daily reading goal

Your daily reading goal is set to 5 minutes per day unless you customize it. Adjust it to how many minutes you want to read.

  1. Open the Books app on your iPad.
  2. Tap Home. Then tap the reading goals button at the top right of the screen.
  3. Tap the reading goal timer, then tap Adjust Goal.

    Note: To count PDFs toward your reading goal, go to Settings > Apps > Books, then turn on Include PDFs below Reading Goals.

  4. Slide the counter up or down to set the minutes per day that you want to read.
  5. Tap the Close button.

Change your yearly reading goal

When you finish reading a book, its cover shows up below Books Read This Year. Your yearly reading goal starts at three books per year, but you can increase or decrease it depending on how many books you want to finish.

  1. Open the Books app on your iPad.
  2. Tap Home. Then tap the reading goals button at the top right of the screen.
  3. Tap a book cover or a cover placeholder. Tap Adjust Goal.
  4. Slide the counter up or down to set the books per year that you want to read. Then tap the Close button.

Quick tip: To change a book’s status in your library to finished, tap the More button under a book or audiobook cover and then tap Mark as Finished.

Turn on coaching notifications

Books can encourage and nudge you toward your reading goals, with notifications you can turn on or off.

  1. Open the Books app on your iPad.
  2. Tap Home. Tap your account button in the top-right corner of the screen.
  3. Tap Notifications, then turn on Coaching.
  4. Tap the Close button.

Turn off reading goals notifications

You get notifications from Books when you achieve a reading goal or set a reading streak, though you can turn these notifications off or on.

  1. Open the Books app on your iPad.
  2. Tap Home. Tap your account button in the top-right corner of the screen.
  3. Tap Notifications, then turn off Goal Completion.
  4. Tap the Close button.

Turn off reading goals

  1. Open the Settings app on your iPad.
  2. Tap Apps, tap Books, and then turn off Reading Goals.

Turning off Reading Goals hides the reading indicators in the Home tab and stops reading notifications.

Clear reading data

You can clear your reading data, including reading goals, reading streaks, and time spent reading.

  1. Open the Settings app on your iPad.
  2. Tap Apps and tap Books. Then tap Clear Reading Goals Data.

See also

You can open and save PDFs in the Books app that you receive in Mail, Messages, and other apps.

You can open a PDF you receive in Books, share or print a PDF in Books, and mark up a PDF in Books, right alongside your other books and audiobooks. You can also save a PDF attachment to Books on your iPad.

Here’s how to read PDFs in the Books app on iPad.

Note: Apple Books isn’t available in all countries or regions.

Open a PDF you receive in Books

  1. Tap the PDF attachment to open it.
  2. Tap the Share button and then tap Books from the list options.

Share or print a PDF in Books

  1. Start the Books app on your iPad.
  2. Tap Library and tap the More button below the PDF.
  3. Tap the Share button. Then choose a share option such as AirDrop, Mail, or Messages, or tap Print.

Mark up a PDF in Books

  1. Start the Books app on your iPad.
  2. Open the PDF.
  3. Tap the page and tap the Markup button at the top of the screen to use the drawing and annotation tools.

See also

In the Notes app, you can lock notes to protect your sensitive information. You can access your locked notes using your device passcode or a custom password, and if you have multiple Notes accounts, you choose the locking method for each one.

Using your device passcode means you don’t have to create and remember a separate password. Notes locked that way need iOS 16, iPadOS 16, macOS 13, or later to open.

Lock notes with your device passcode

Using your device passcode to access locked notes means you have no separate password to create and remember, which reduces the chance of losing access to your locked notes. It also means you can use Face ID or Touch ID to access your locked notes.

When you sign in to the same Apple Account on multiple devices, each device’s own passcode, or the login password for a Mac, is how you access your locked notes on that device.

You need iOS 16, iPadOS 16, macOS 13, or later to access notes locked with a device passcode, so you won’t be able to access the locked notes on devices with an earlier version of the OS.

  1. Start the Settings app on your iPad.
  2. Tap Apps, then tap Notes.
  3. Tap Password.
  4. If you have multiple accounts, choose the account you want to set a password for.
  5. Tap Use Device Passcode.
  6. For added convenience, you can also turn on Face ID or Touch ID.

Lock notes with a custom password

A custom password for locked notes can provide additional security. Forget it, though, and you may lose access to your locked notes.

On every device where you’re signed in to the same Apple Account, your custom password is what you use to access your locked notes. And with more than one iCloud account or an “On My iPad” account, each account can have a different custom password.

You won’t see notes locked with a custom password on devices with an earlier version of the OS. Those notes need iOS 9.3, OS X 10.11.4, iPadOS 13, or later.

  1. Start the Settings app on your iPad.
  2. Tap Apps, then tap Notes.
  3. Tap Password.
  4. If you have multiple accounts, choose the account you want to set a password for.
  5. Tap Use Custom Password.
  6. For added convenience, you can also turn on Face ID or Touch ID.

    Don’t rely on Face ID or Touch ID as the only means of unlocking your notes. If you update your Face ID or Touch ID settings, or want to change your Notes password, you have to reenter your Notes password.

Important: If you forget your custom password, and you can’t use Face ID or Touch ID to access your locked notes, Apple can’t help you regain access to those notes.

You can reset your custom password, but this doesn’t give you access to previously locked notes. The new custom password applies to all notes you lock from now on. Go to the Settings app, tap Apps, tap Notes, tap Password, then tap Reset Password.

Change the locking method

A custom password isn’t permanent, since you can switch to using your device passcode. Any notes you accessed with the previous method begin using the new method when you change your locking method.

  1. Start the Settings app on your iPad.
  2. Tap Apps, then tap Notes.
  3. Tap Password, choose an account (if you have more than one), and then choose a password method.

Lock a note

Locking is limited to notes on your device and notes in iCloud. Even then, notes with tags, notes with video, audio, PDF, or file attachments, and notes that use features from a newer version of Notes can’t be locked. The same goes for Quick Notes, notes shared in iCloud, and notes that sync with other accounts.

  1. Start the Notes app on your iPad.
  2. Open the note and tap the Note Actions button (at the top-right corner).
  3. Tap Lock.

A locked note’s title remains visible in the notes list.

To remove a lock from a note, tap the Note Actions button, then tap Remove.

Open your locked notes

For several minutes after you open one locked note, all your other locked notes in the same account stay open, so you can jump into another note or copy and paste information from another app.

  1. Start the Notes app on your iPad.
  2. Tap the locked note and tap the Lock button or View Note.
  3. To open the note, use Face ID, Touch ID, your device passcode, or your Notes password.

To lock your notes again, do any of the following:

  • Tap the Unlock button at the top of the screen.
  • Tap Lock Now at the top of the notes list.

See also

Tag: Notes