Got a tip for us?

iPad

The iPad is a tablet computer from Apple that runs the iOS mobile operating system. Similar in functionality to the iPhone, the iPads purpose is often quite different, sometimes even serving as a general desktop computer replacement.

Use the Calendar app to create and edit events, appointments, and meetings.

You can add alerts and attachments, find events in other apps, and copy and paste an event. With Apple Intelligence, you can even describe your event, like a soccer game on Saturday, and you can paste a FaceTime link in the Location field. You can edit or delete an event later, too.

Here’s how to create and edit events in Calendar on iPad.
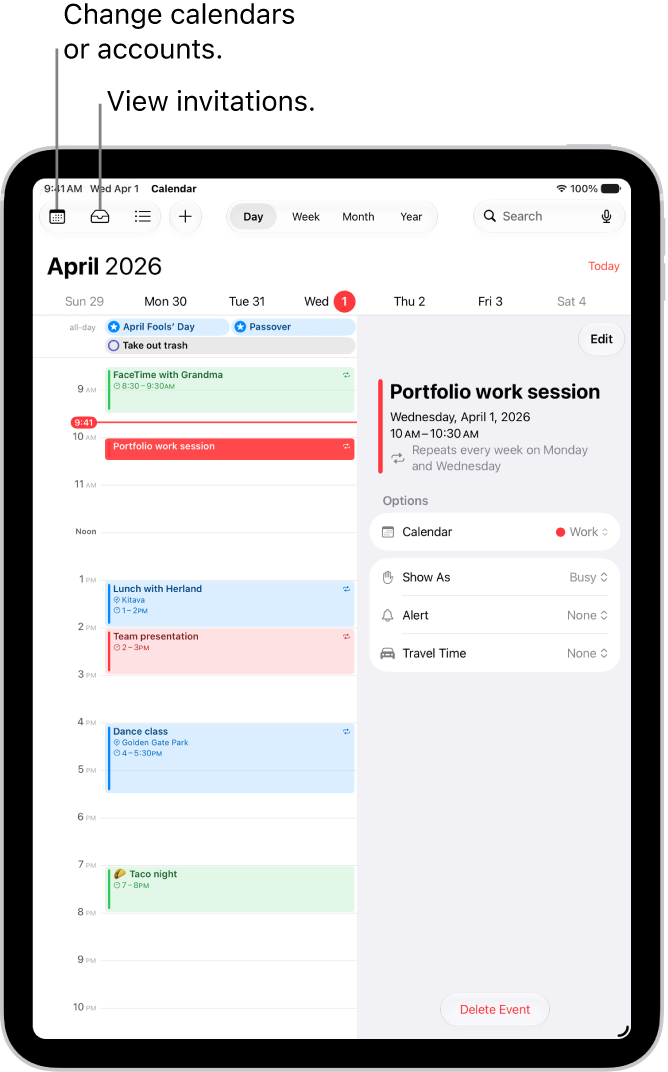
A calendar in Day view. The buttons at the top center let you change the view between Day, Week, Month, and Year. The Calendars button is at the top left of the screen, and the Inbox button is near the top left.

Siri: Ask Siri something like, “Set up a meeting with Gordon at 9.” Learn how to use Siri.

Add an event

  1. Start the Calendar app on your iPad.
  2. In Day view, tap the Add button at the top of the screen.
  3. Enter the title of the event.

    Tip: With Apple Intelligence, you can also enter a description of your event. For example, “Soccer game on Saturday from 11 a.m. – 1 p.m.” or “Vacation in Bahamas Mon-Fri.” Suggestions for filling in the event details appear in the event card.

  4. Tap Location or Video Call. Then enter a physical location or tap FaceTime to enter a video link for a remote event.

    You can also copy a FaceTime link you created or received and paste it in the Location field. See Create a link to a FaceTime call.

  5. Enter the start and end times for the event, the travel time, invitees, attachments, and so on. (Swipe up, if necessary, to enter all the meeting information.)
  6. Tap the Done button.

Note: Apple Intelligence on iPadOS 27 or later is available on an Apple Intelligence-enabled iPad mini (A17 Pro) and iPad models with M1 or later. Apple Intelligence is not available in all languages or regions. Usage limits may apply.*

Add an alert

You can set an alert to be reminded of an event beforehand.

  1. Start the Calendar app on your iPad.
  2. Tap the event, then tap Edit.
  3. In the event details, tap Alert.
  4. Choose when you want to be reminded.

    For example, “At time of event,” “5 minutes before,” or another choice.

    Note: If you add the address of the event’s location, Calendar uses Apple Maps to look up locations, traffic conditions, and transit options to tell you when it’s time to leave.

  5. Tap the Done button.

Add an attachment

You can add an attachment to a calendar event to share with invitees.

  1. Start the Calendar app on your iPad.
  2. Tap the event, then tap Edit.
  3. In the event details, tap Add attachment.
  4. Locate the file you want to attach.

    To find the file, you can enter its name in the search field, scroll, tap folders to open them, tap Browse to look in other locations (such as iCloud Drive), and so on. See Modify files, folders, and view downloads in Files.

  5. Tap the Done button.

To remove the attachment, tap the event, tap Edit near the top right, swipe left over the attachment, then tap Remove.

Find events in other apps

Siri can suggest events found in Mail, Messages, and Safari—such as flight reservations and hotel bookings—so you can add them easily in Calendar.

  1. Start the Settings app on your iPad.
  2. Tap Apps and then tap Calendar.
  3. Tap Siri and then turn on Show in App to allow Siri to suggest events found in other apps.

Learn from this App lets Siri make suggestions in other apps based on how you use Calendar, once it’s on.

Copy and paste an event

You can copy an event and paste it to another date.

  1. Start the Calendar app on your iPad.
  2. Touch and hold the event and then tap Copy.
  3. On another date, touch and hold the time where you want to paste the event.

    When you release, the New Event page appears and the copied event appears under Title with the date and time where you want to paste the event.

    Tip: You can also tap the Add button at the top of the screen after copying an event.

  4. Tap the copied event below Title.
  5. Tap the Done button.

Edit an event

You can change the time of an event and any of the other event details.

  1. Start the Calendar app on your iPad.
  2. Do any of the following:
    • Quickly change the event time and duration: In Day or Week view, touch and hold the event and then drag it to a new time, or adjust the grab points.
    • Change event details: Tap the event and then tap Edit near the top right. In the event details, tap a setting to change it, or tap in a field to type new information.

Delete an event

  1. Start the Calendar app on your iPad.
  2. Tap the event. Then tap Delete Event at the bottom of the screen.

*Apple Intelligence is available with Siri and device language set to Chinese (Simplified), Chinese (Traditional), Danish, Dutch, English, French, German, Italian, Japanese, Korean, Norwegian, Portuguese, Spanish, Swedish, Turkish, or Vietnamese. Some features may not be available in all regions or languages. Some devices may not be available in all regions. Siri AI is available in beta in iOS 27, iPadOS 27, macOS 27, watchOS 27, and visionOS 27 and requires an Apple Intelligence–enabled device set to a supported language. Available in English to start. Siri AI will not be initially available in the EU on iOS, iPadOS, and watchOS. Certain Apple Intelligence features that rely on server-side models are subject to daily usage limits, including but not limited to Siri AI, Intelligent Photo Editing Tools, Image Playground, and AFM 3 Cloud models in Shortcuts. Daily limits may vary by feature, request complexity, system demand, system policies, and other factors. Expanded access to such features will be available for a fee in the future. Use of these features is subject to the Apple Intelligence Terms and Conditions.

See also
In the Calendar app, you can reply to meeting and event invitations you’ve received, with Accept, Maybe, or Decline. You can also suggest a different meeting time, and any comments you add can be seen by the organizer but not by other attendees.

Reply to an event invitation

  1. To respond to an event notification, tap it.

    Or, in Calendar, tap the Inbox button, then tap an invitation.

  2. Tap your response—Accept, Maybe, or Decline.

To respond to an invitation you receive by email, tap the underlined text in the email, then tap Show in Calendar.

If you add comments to your response, your comments can be seen by the organizer but not by other attendees (comments may not be available for all calendars). To see events you declined, tap the Calendars button, then turn on Show Declined Events.

Suggest a different meeting time

For a meeting invitation you’ve received, you can suggest a different time.

  1. Start the Calendar app on your iPad.
  2. Tap the meeting, then tap Propose New Time.
  3. Tap the time, then enter a new one.
  4. Tap the Done button, then tap Send.

What the organizer receives, either a counter-proposal or an email with your suggestion, depends on the capabilities of your calendar server.

See also

In the Calendar app, you can send meeting and event invitations. iCloud, Microsoft Exchange, and some CalDAV servers also let you send meeting invitations, though not all calendar servers support every feature.

Before you invite people, you make sure your calendar accounts are turned on. You can invite people to an event you’ve already scheduled, and quickly email everyone who’s attending.

Here’s how to send invitations in Calendar on iPad.

Before you begin

You need to turn on your calendar accounts before you can invite people to events you’ve scheduled.

  1. Start the Settings app on your iPad.
  2. Tap Apps and then tap Calendar.
  3. Tap Calendar Accounts and select an account. Then check to see if Calendar is turned on.

    For more information about how to add calendars, see Set up multiple calendars.

Invite others to an event

You can invite people to an event you’ve scheduled.

  1. Start the Calendar app on your iPad.
  2. Tap the event. Then tap Edit near the top of the screen.
  3. Tap invitees.
  4. Do any of the following:

    • Add a name from your contacts: Enter a contact’s name, tap the name, and then tap the Done button.

      You can also tap the Add button to select contacts.

      Note: The contact must have an email address or phone number (supported in China and India). See Add and use contact information.

    • Add an email address: Enter an email address, tap Return, and tap the Done button.
    • Add a phone number: Enter a phone number, tap Return, and then tap the Done button.

      Note: Sending a calendar invitation to a phone number is supported only in China and India.

  5. To make an invitation optional, tap Invitees, swipe left on an invitee, and then tap Make Optional.

If you don’t want to be notified when someone declines a meeting, go to Settings > Apps > Calendar, then turn off Show Invitee Declines.

Note: You can invite people to an event you didn’t schedule if you’re using Microsoft Exchange or some other exchange servers.

Quickly email attendees

To share event details, for instance, you can email all attendees of an event.

  1. Start the Calendar app on your iPad.
  2. Tap an event that has attendees.
  3. Tap Invitees and tap the Send Mail to Invitees button.

See also

With Apple Intelligence, you can use intelligent photo editing tools, create original images and Genmoji, create custom memory movies with a description, and more to power your creativity. Clean Up, Extend, and Reframe let you keep working on a photo after you take it, and Image Playground produces fun, original images in moments.

Note: Apple Intelligence on iPadOS 27 or later is available on an Apple Intelligence-enabled iPad mini (A17 Pro) and iPad models with M1 or later. Apple Intelligence is not available in all languages or regions. Usage limits may apply.*

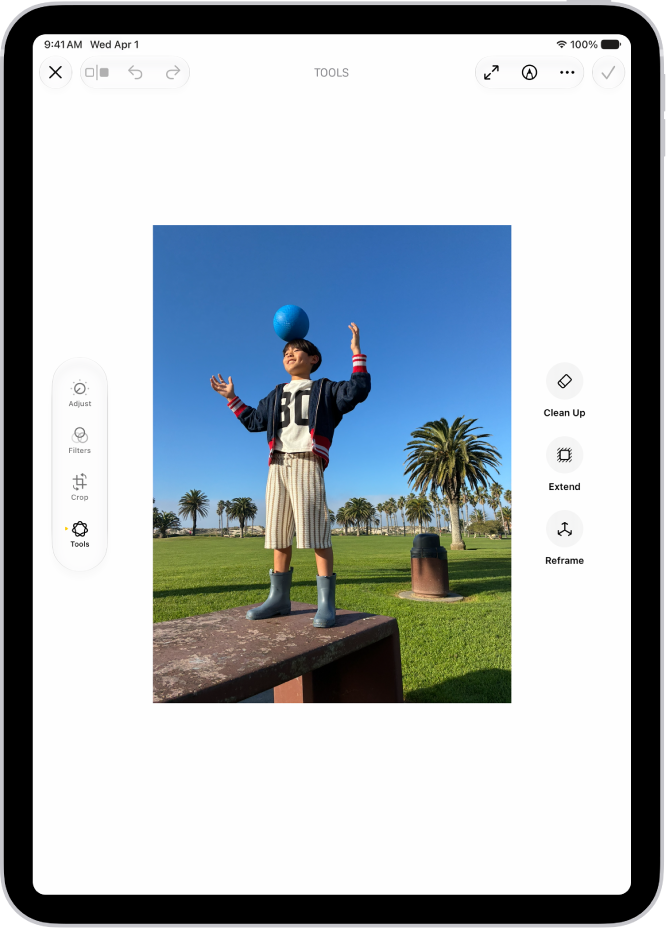
The buttons for Clean Up, Extend, and Reframe are displayed next to a photo.

Make your photos frame-worthy

You can remove distracting objects, extend a photo beyond its original frame, and adjust its perspective. With Clean Up, Extend, and Reframe, a photo doesn’t have to be finished once you take it. Open a photo in the Photos app, then tap the Edit button to get started.

Clean up, extend, and reframe photos

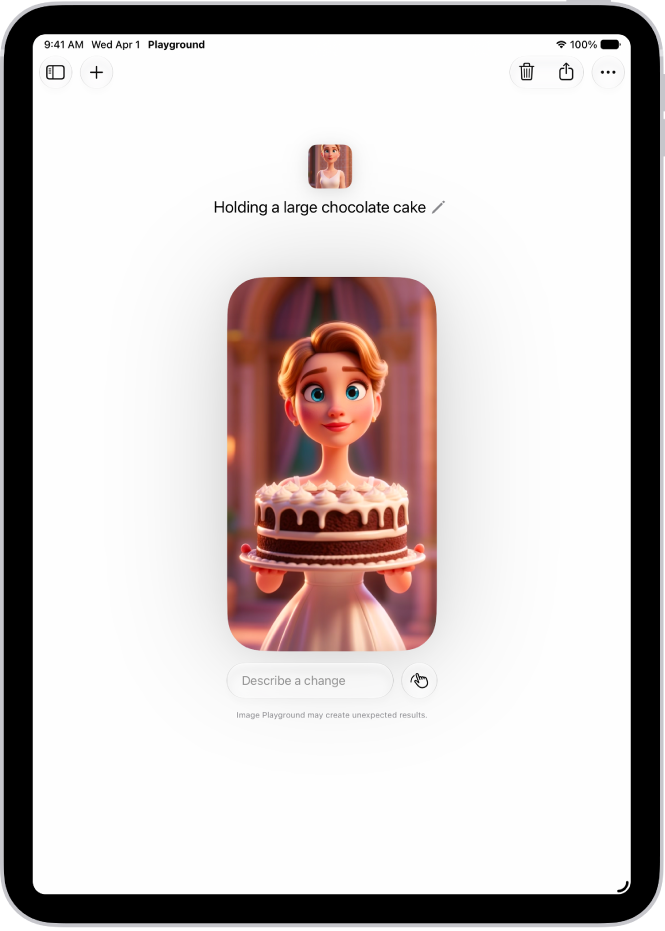
The Image Playground app window showing a created image of a woman holding a cake.

Create one-of-a-kind images with Image Playground

Produce fun, original images in moments with Image Playground. Open the Playground app, tap the Add button, then describe an image. Or choose a photo and apply an image style, like Animation or Sketch.

How to create original images

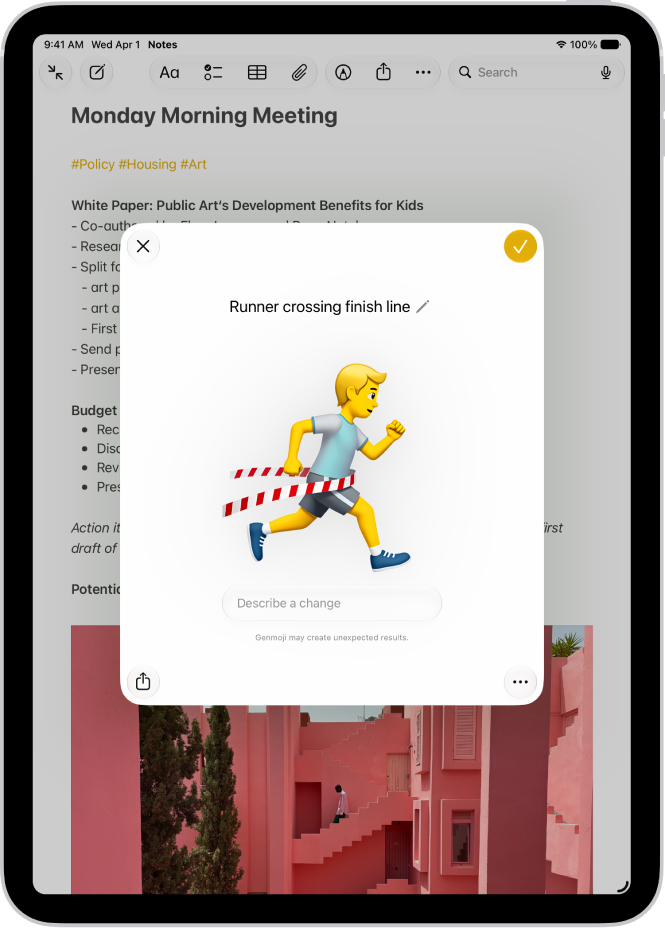
The Genmoji window showing a created Genmoji of a man running across a finish line.

Make your own emoji with Genmoji

You can also make custom emoji from simple text descriptions with Genmoji. To get started tap the Emoji button or the Next Keyboard key on your keyboard, then tap Genmoji.

How to create your own emoji

Even more creativity features

*Apple Intelligence is available with Siri and device language set to Chinese (Simplified), Chinese (Traditional), Danish, Dutch, English, French, German, Italian, Japanese, Korean, Norwegian, Portuguese, Spanish, Swedish, Turkish, or Vietnamese. Some features may not be available in all regions or languages. Some devices may not be available in all regions. Siri AI is available in beta in iOS 27, iPadOS 27, macOS 27, watchOS 27, and visionOS 27 and requires an Apple Intelligence–enabled device set to a supported language. Available in English to start. Siri AI will not be initially available in the EU on iOS, iPadOS, and watchOS. Certain Apple Intelligence features that rely on server-side models are subject to daily usage limits, including but not limited to Siri AI, Intelligent Photo Editing Tools, Image Playground, and AFM 3 Cloud models in Shortcuts. Daily limits may vary by feature, request complexity, system demand, system policies, and other factors. Expanded access to such features will be available for a fee in the future. Use of these features is subject to the Apple Intelligence Terms and Conditions.

You can add a background to an iMessage conversation. Other people in the conversation see the background on their devices too and can change the background for the group.

You can use a dynamic background, a photo, or an original background you create, and revert to a plain background anytime. With a photo, you can crop the image, remove the color, or apply a color filter.

Here’s how to add backgrounds in Messages on iPad.

Note: To add, view, or change conversation backgrounds, you need iMessage running on iOS 26, iPadOS 26, macOS Tahoe, watchOS 26, or visionOS 26 or later.

A Messages conversation with a background.

Use a dynamic background

  1. Go to the Messages app on your iPad.
  2. Go to the conversation where you want to add a background.
  3. Tap the contact or group icon at the top of the conversation, then tap Backgrounds.
  4. Tap Color, Sky, Water, or Aurora.
  5. Swipe left to choose an option.

    Tip: For Color, tap the swatches in the bottom corners to adjust the colors.

  6. Tap the Done button to add the background to your conversation.

Use a photo as a background

  1. Open the Messages app on your iPad.
  2. Go to the conversation where you want to add a photo to the background.
  3. Tap the contact or group icon at the top of the conversation, then tap Backgrounds.
  4. Tap Photo. Then tap to select a photo from your library.

    Tip: If someone shared a photo you want to use as a background, touch and hold the photo in the message, then tap Set as Background.

  5. Do any of the following:

    • Crop the image: Pinch in or out.
    • Remove the color: Swipe left to Black & White.
    • Apply a color filter: Swipe left to Duotone or Color Wash. Then tap the color swatch to change the palette.
  6. Tap the Done button to add the background to your conversation.

You can set conversations to showcase backgrounds when you return to them. Go to Settings > Apps > Messages, then turn on Start with Photos Visible.

Note: You can have your (or a family member’s) iPad receive warnings before a background image containing sensitive content is sent or received.

Create an original background

If you have Apple Intelligence, Image Playground can make one-of-a-kind images for your conversation backgrounds.

Note: Apple Intelligence on iPadOS 27 or later is available on an Apple Intelligence-enabled iPad mini (A17 Pro) and iPad models with M1 or later. Apple Intelligence is not available in all languages or regions. Usage limits may apply.*

  1. Open the Messages app on your iPad.
  2. Go to the conversation where you want to add a photo to the background.
  3. Tap the contact or group icon at the top of the conversation, then tap Backgrounds.
  4. Tap Playground, follow the onscreen instructions to create an image and then tap the Done button.
  5. Tap the Done button to add the background to your conversation.

Revert to a plain background

Note: Removing a background affects all participants in a conversation.

  1. Open the Messages app on your iPad.
  2. Go to the conversation with a background you want to remove.
  3. Tap the contact or group icon at the top of the conversation, then tap Backgrounds.
  4. Tap None.

Turn conversation backgrounds off

If you turn conversation backgrounds off, others in a conversation can still see any background chosen for it.

  1. Open the Settings app on your iPad.
  2. Tap Apps, then tap Messages.
  3. Turn Conversation Backgrounds off.

*Apple Intelligence is available with Siri and device language set to Chinese (Simplified), Chinese (Traditional), Danish, Dutch, English, French, German, Italian, Japanese, Korean, Norwegian, Portuguese, Spanish, Swedish, Turkish, or Vietnamese. Some features may not be available in all regions or languages. Some devices may not be available in all regions. Siri AI is available in beta in iOS 27, iPadOS 27, macOS 27, watchOS 27, and visionOS 27 and requires an Apple Intelligence–enabled device set to a supported language. Available in English to start. Siri AI will not be initially available in the EU on iOS, iPadOS, and watchOS. Certain Apple Intelligence features that rely on server-side models are subject to daily usage limits, including but not limited to Siri AI, Intelligent Photo Editing Tools, Image Playground, and AFM 3 Cloud models in Shortcuts. Daily limits may vary by feature, request complexity, system demand, system policies, and other factors. Expanded access to such features will be available for a fee in the future. Use of these features is subject to the Apple Intelligence Terms and Conditions.

See also
Tapbacks give you a quick and easy way to respond to a message, such as a heart, a thumbs-up or thumbs-down, laughter, exclamation points, a question mark, and any sticker, Memoji, or emoji.

A Tapback is attached to a specific message, and everyone in the conversation can see it. If a message has more than one, they appear in a stack, and you can see who added each one. You can edit or remove only the Tapbacks you added, too.

A Messages conversation with Tapbacks attributions visible near the top of the screen, and the Tapbacks menu visible above a message.

React with a Tapback

  1. Go to the Messages app on your iPad.
  2. Open a conversation.
  3. Double-tap (or touch and hold) a message.
  4. Swipe left to see suggested emoji and stickers, or tap the Emoji button. Then tap to choose any of the following kinds of Tapbacks:
    • Other emoji: Tap the Emoji button (jump to other emoji categories with icons to the right of the Emoji button).
    • Stickers: Tap the Live Stickers button.

Each Tapback sticks to a specific message in a conversation, where everyone who’s part of the conversation can see it.

Find out who sent a Tapback

If a message has more than one Tapback, they appear in a stack, and you can find out who added each one.

  1. Open the Messages app on your iPad.
  2. Open a conversation with Tapbacks.
  3. Tap a stack of Tapbacks.

    Senders and their Tapbacks appear near the top of the screen.

Edit or remove your Tapback

You can only edit or remove the Tapbacks you added, not Tapbacks other people added.

  1. Open the Messages app on your iPad.
  2. Open a conversation.
  3. Tap your Tapback and then do one of the following:
    • Use a different Tapback: Tap a different emoji, Memoji, or sticker.
    • Remove the Tapback: Tap the same Tapback you used (so it’s not highlighted).

Each message can have only one Tapback. To send additional stickers, read our guide, Place stickers on a conversation.

See also

You can express yourself in the messages you send by formatting and animating text, or by adding effects to message bubbles or the entire screen. You can also search #images to find trending GIFs to send, and save GIFs others send to you (not available in all countries or regions).

Bold, italics, and underlining can format your text, and playful effects like explode or shake can go on a single word, emoji, sentence, or your entire message. Bubble and screen effects play when your recipient gets your message.

Note: Sending and receiving messages with formatting or effects only works if you and your recipients use iMessage. Recipients can see text formatting and text effects if they use iMessage on a device running iOS 18, iPadOS 18, macOS 15, watchOS 11, or visionOS 2 or later. Otherwise, the messages appear in plain text.

Format and animate words

When you send texts with iMessage, you can use bold, italics, and underlining, or animate any letter, word, or sentence (even emoji) with playful effects like shake or explode.

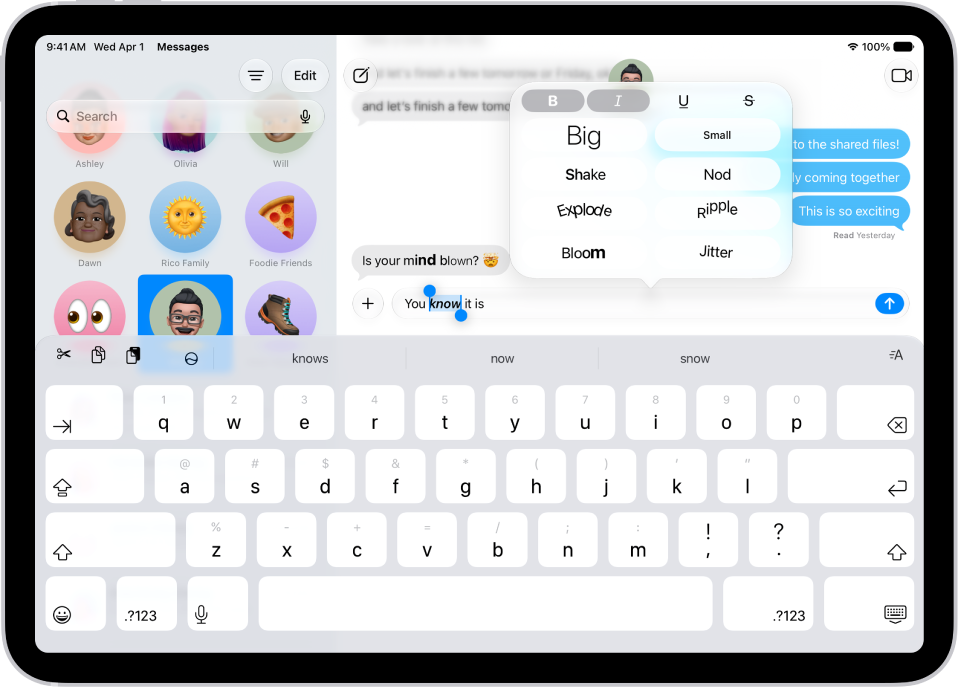
A Messages conversation with a word selected in the text field, and formatting and effects options shown above it. The selected text appears with a preview of the effect.

  1. Go to the Messages app on your iPad.
  2. In a conversation, enter a message and then select the text you want to format or animate.
  3. Tap the Text Format button above the keyboard and then select your preferred formatting (bold, italic, underline, or strikethrough) or text effect (big, small, shake, nod, explode, ripple, bloom, or jitter).
  4. Tap the Send button.

You can format or apply effects to a single word, emoji, sentence, or your entire message. Tap the Text Format button before entering the text you want to format or apply effects to.

Add effects to the message bubble or the full screen

Special effects you can add, which play when your recipient gets your message, include the following:

  • Bubble effects that change how the message appears—Slam or Loud make it pop out, Gentle makes it arrive softly, and Invisible Ink blurs the bubble until your recipient swipes to reveal it
  • Full-screen animations like fireworks, balloons, confetti, lively lasers, a moving spotlight, or the echo effect, which fills the conversation with copies of your message bubble

A conversation in Messages including a text message and a photo sent with the Invisible Ink effect.

  1. Open the Messages app on your iPad.
  2. In a conversation, enter a message or insert an image or link.
  3. Touch and hold the Send button and then do one of the following:
    • Tap a gray dot to preview a bubble effect.
    • Tap Screen, then swipe left to preview different screen effects.
  4. Tap the Send button to send the message with the effect or the Close button to cancel the effect and return to your message.

Messages automatically uses the following screen effects for specific text strings:

  • Balloons for “Happy birthday”
  • Confetti for “Congratulations”
  • Fireworks for “Happy New Year”

If a full-screen effect doesn’t appear, or you want to turn off effects on messages you receive, see our guide, Stop or reduce onscreen motion.

Add an animated GIF

  1. Open the Messages app on your iPad.
  2. In a conversation, tap the Add button and then tap #images. (You may have to swipe up.)
  3. To search for a specific GIF, tap “Find images,” enter a keyword (like “birthday”). Then tap a suggestion or tap the Search key on the keyboard.
  4. Tap a GIF to add it to your message. Then tap the Send button.

To save a GIF that you receive in a message to the Photos app so you can use it again later, touch and hold the GIF, then tap Save.

To freeze GIF animations as still images, check out our article, Customize onscreen motion.

Note: GIFs from #images animate in the Messages app on Apple devices, but nowhere else.

See also

In the Notes app, you can use the camera to scan text and documents.

In supported languages, you can insert scanned text right into a note. When you scan a document, iPad can capture it automatically once it detects the page boundaries, or you can capture it yourself. Either way, it’s saved as a PDF right in the note.

Here’s how to scan text and documents in Notes using the iPad camera.

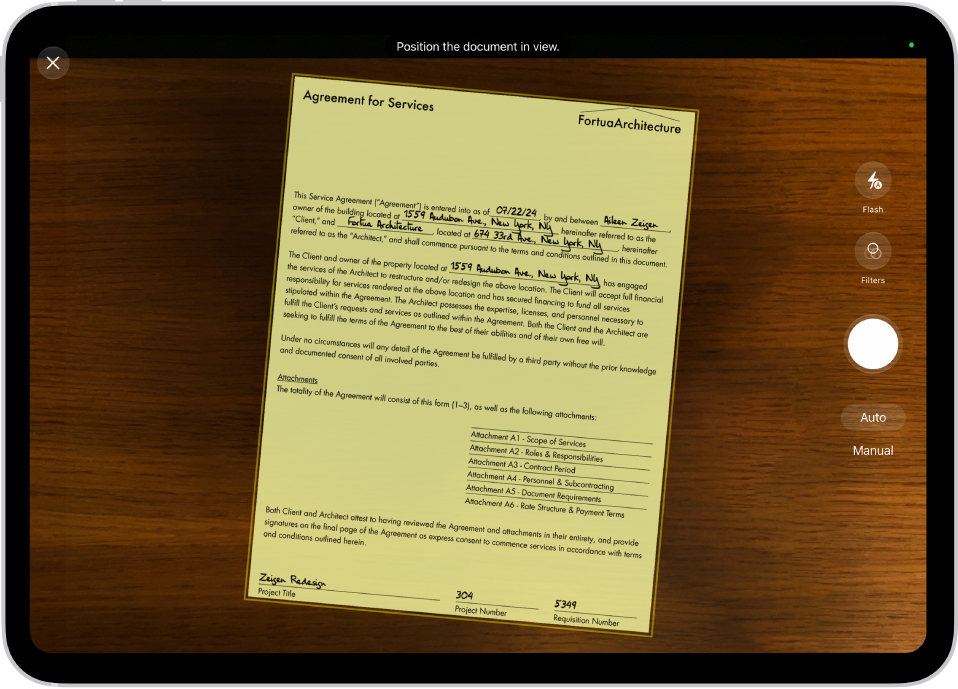
A screen showing a document being scanned. The Take Picture button is on the right.

Scan text into a note

The camera lets you insert scanned text in supported languages.

  1. Open the Notes app on your iPad.
  2. In a note, tap the Attachments button. Then tap Scan Text.
  3. Position your iPad so that the text appears within the camera frame.
  4. Drag or use grab points to select text and tap Insert.

Scan a document into a note

  1. Open the Notes app on your iPad.
  2. In a note, tap the Attachments button and tap Scan Documents.
  3. Position your iPad so that the document page appears on the screen, adjust any settings such as Flash (on supported models) or Filters. Do one of the following:

    • Automatic capture: Keep your iPad steady. Your iPad automatically captures the document when it detects the page boundaries. To make adjustments, tap the thumbnail, tap an option such as Adjust, make your changes, and then tap the Back button.
    • Manual capture: Tap Manual and tap the Take Picture button. Adjust the corners as needed and tap Retake or Keep.
  4. Scan additional pages, then tap the Done button when you’re done.

    The document is saved as a PDF in the note.

See also

Tags: camera, Notes

In the Notes app, you can attach, view, edit, and collaborate on PDFs, including documents you scanned into a note. You can also annotate or sketch directly on PDFs and scanned documents in your note using Apple Pencil or your finger, and even preview multiple PDFs in the same note.

You can change the viewing size to Small, Medium, or Large, view a PDF in full screen, and search in PDFs. When you collaborate on a note, others get real-time updates as you mark up a document.

Attach a PDF to a note

Do any of the following to attach a PDF from an app like Files or Mail:

  • Drag the file into a note.
  • Touch and hold the file, tap the Share button, tap Notes, choose a note, then tap Save.

View and edit a PDF in a note

  1. Open the Notes app on your iPad.
  2. In the note with the PDF, tap the Menu button. Then do any of the following:
    • Change the viewing size: Tap View As and choose Small, Medium, or Large.
    • View in full screen: Tap Quick Look.
    • Copy, save, print, share, rename, or delete the PDF: Choose an action.
  3. When viewing as Medium or Large, you can also do any of the following:
    • Show or hide thumbnails: Tap the Thumbnails button.
    • Zoom in and see more: Pinch the screen or swipe right to see more pages.
    • Edit a page: Tap the thumbnail for the page, tap the More button, and choose an action such as Rotate Left, Rotate Right, Filters, Crop Page, or Insert Blank Page. (Filters and Crop Page are supported only in scanned documents.)

Search in PDFs

For the steps, read our guide, Search through your notes.

Annotate a PDF in a note

  • Small preview size: Tap the PDF to open it, then tap the Handwriting Tools button.
  • Medium and large preview sizes: Start drawing or writing with Apple Pencil. Or to draw or write with your finger, tap the Handwriting Tools button.

To learn more about Markup, see our article, Write and draw in documents with Markup.

Collaborate with others

When you collaborate on a note with other people, updates happen in real time, so the people you share with see the changes on their devices as you add a sticker, draw a diagram, or mark up a document.

See also

Tag: Notes

You can search all your Freeform boards for text in handwriting, sticky notes, text boxes, shapes, and filenames. In the Freeform app, you can search within a board you’re in, or search all boards from the All Boards screen, where any board that contains the text appears in the results.

  1. Go to the Freeform app on your iPad.
  2. Do any of the following:

    • Search within a board: Tap the More button at the top right. Tap Find.
    • Search all boards: Tap the search field in the top-right corner of the All Boards screen. Any board that contains the text appears in the search results.

      (If you’re in a board, tap the Back button to access Search in All Boards.)

See also