Got a tip for us?

iPhone

The iPhone is a smartphone from Apple that runs the iOS mobile operating system. Between its apps, communication features, the camera, mobile internet access, and other functionalities, the iPhone has quickly become an integral part of many peoples tech lives.

You can delete directions that you recently viewed. There are two ways to do it: delete a single item, or delete all recent directions. Both are in Recents, in the card in the Maps app on your iPhone, and the list only keeps what you want.

  1. Start the Maps app on your iPhone.
  2. Scroll down in the card to Recents. Do one of the following:
    • Delete a single item: Tap the More button and then tap Clear.
    • Delete all recent directions: Tap Recents, then tap Clear.
Tag: Maps

In the Home app, you can create scenes that allow you to control multiple accessories at once. For example, you might define a “Reading” scene that adjusts the lights, plays soft music on HomePod, closes the drapes, and adjusts the thermostat.

The first accessory you add decides which room the scene belongs to. So if you start with your bedroom lamp, the scene is assigned to your bedroom. Each accessory can then be set to the state you want when you run the scene.

Create a scene

  1. Open the Home app on your iPhone.
  2. On the Home tab, tap the Add button, then tap Add Scene.
  3. Tap Custom and enter a name for the scene (such as “Dinner Party” or “Watching TV”). Then tap Add Accessories.
  4. Select the accessories you want this scene to include and then tap Done.

The first accessory you select determines the room the scene is assigned to. If you first select your bedroom lamp, for example, the scene is assigned to your bedroom.

  1. Set each accessory to the state you want it in when you run the scene.

For example, for a Reading scene, you could set the bedroom lights to 100 percent, choose a low volume for the HomePod, and set the thermostat to 68 degrees.

  1. Test the scene and choose whether or not to show it on the Home tab (scenes appear on the Home tab by default) and tap Done.

Use scenes

Here’s how to use your scenes once they’re set up:

  • Run a scene: Tap the scene on the Home tab.

    If you’ve decided not to show the scene on the Home tab, tap the More button, choose the room the scene is assigned to, then tap the scene.

  • Edit a scene: Touch and hold a scene, then tap Edit Scene. You can change the scene’s name, test the scene, add or remove accessories, and more.
Tag: Home

CarPlay works with your vehicle’s built-in controls, for example, a touchscreen, a rotary knob, or a touchpad. To learn how to operate your display, see the owner’s guide that came with your vehicle.

With those controls, you can open apps, move between CarPlay Dashboard and CarPlay Home, get back to your vehicle’s own Home Screen, and scroll quickly through long lists. You can also use Siri to control CarPlay with your voice instead.

  • Open an app: Tap the app on the touchscreen, or turn the rotary knob to select the app, then press the knob.
  • Switch between CarPlay Dashboard and CarPlay Home: CarPlay Dashboard displays several items you likely want to view or control, such as driving directions, audio playback, and suggestions from Siri. CarPlay Home shows all your CarPlay apps organized into pages.

    To go to CarPlay Home, tap the Home button on the touchscreen, or turn the rotary knob to select the Home button, then press the knob.

    To go to CarPlay Dashboard, tap the Dashboard button, or turn the rotary knob to select the Dashboard button, then press the knob.

  • Return to your vehicle’s Home Screen: Select the icon with your vehicle’s logo if it appears on CarPlay Home or, if available, the physical Home button on your radio.
  • Return to a recently used app: Tap its icon on the edge of the touchscreen, or turn the rotary knob to the icon, then press the knob.
  • View additional apps: If you have more than eight apps, some may appear on another page of CarPlay Home. To view them, swipe left on the touchscreen, or turn the rotary knob.
  • Scroll quickly through a list: Tap the letters in the list on the right side of the touchscreen, or turn the rotary knob.
  • Control audio playback: Use the audio playback controls on CarPlay Dashboard. Or from CarPlay Home, select Now Playing to view and control the current audio app.

Use Siri to control CarPlay

Siri allows you to control CarPlay using your voice instead of your vehicle’s built-in controls.

Use Siri AI (Beta) with CarPlay

Siri AI (Beta)* is your conversational AI assistant with entirely new capabilities that you can use in CarPlay. Use the Siri AI CarPlay app to get information, resume your prior conversations, and more.

Siri AI is available in beta on iOS 27 or later on an Apple Intelligence-enabled iPhone 15 Pro, iPhone 15 Pro Max, or iPhone 16 model or later with Siri and device language set to a supported language. Available in English to start. Siri AI will not initially be available in the EU on iOS. Usage limits may apply.

Siri is designed to protect your information, and you can choose what you share.

*Apple Intelligence is available with Siri and device language set to Chinese (Simplified), Chinese (Traditional), Danish, Dutch, English, French, German, Italian, Japanese, Korean, Norwegian, Portuguese, Spanish, Swedish, Turkish, or Vietnamese. Some features may not be available in all regions or languages. Some devices may not be available in all regions.

Siri AI is available in beta in iOS 27, iPadOS 27, macOS 27, watchOS 27, and visionOS 27 and requires an Apple Intelligence–enabled device set to a supported language. Available in English to start. Siri AI will not be initially available in the EU on iOS, iPadOS, and watchOS. Certain Apple Intelligence features that rely on server-side models are subject to daily usage limits, including but not limited to Siri AI, Intelligent Photo Editing Tools, Image Playground, and AFM 3 Cloud models in Shortcuts.

Daily limits may vary by feature, request complexity, system demand, system policies, and other factors. Expanded access to such features will be available for a fee in the future. Use of these features is subject to the Apple Intelligence Terms and Conditions.


Tag: carplay

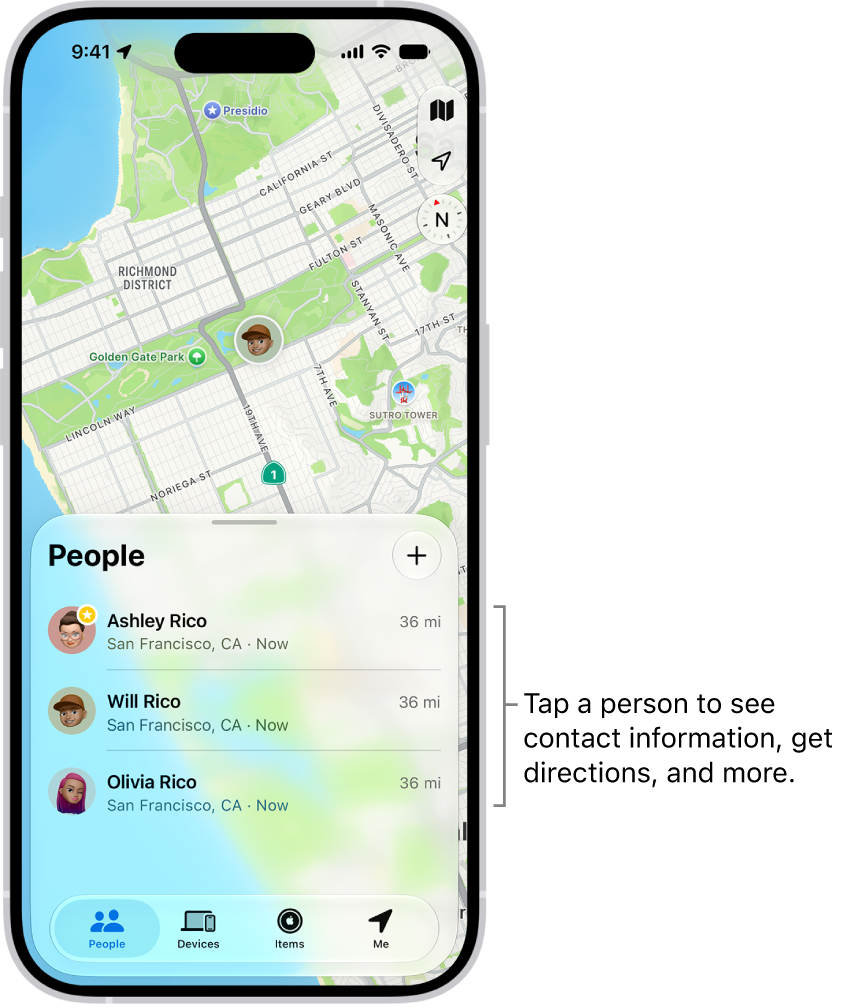
When a friend shares their location with you, you can use the Find My app to locate them on a map.

When your friend can’t be located, “No location found” appears below their name, and if you aren’t following them, you see “Can see your location” instead. You can also contact a friend, get directions to them, and set a label for a location.

Here’s how to locate a friend in Find My on iPhone.

Note: Want to know how far away your friends are? Turn on Precise Location for the Find My app.

The Find My screen open to the People list. There are four people in the list: Olivia Rico, Dawn Ramirez, Ashley Rico, and Will Rico. Tap the Add button at the top of the People list to share your location.

See the location of a friend

  1. Open the Find My app on your iPhone.
  2. Tap People. Then tap the name of the person you want to locate.
    • If your friend can be located: They appear on a map so you can see where they are.
    • If your friend can’t be located: You see No location found below their name.
    • If you aren’t following your friend: You see Can see your location below their name. You can ask to see a friend’s location.

Contact a friend

  1. Open the Find My app on your iPhone.
  2. Tap People, then tap the name of the person you want to contact.
  3. Tap Contact and choose how you want to contact your friend.

Get directions to a friend

The Maps app can give you directions to a friend’s current location.

  1. Open the Find My app on your iPhone.
  2. Tap People, then tap the name of the person you want to get directions to.
  3. Tap Directions to open Maps.

Set a label for a friend’s location

To make a friend’s current location more meaningful, you can give it a label, like Home or Work. When they’re at that location, the label appears below their name.

  1. Open the Find My app on your iPhone.
  2. Tap People, tap the name of the person you want to set a location label for, and tap the More button.
  3. Tap Edit Location Name and select a label.

To add a new label, tap Add Custom Label, enter a name, then tap Done.

Mark a friend as a favorite

Favorite friends are marked with a star and appear at the top of the People list.

  1. Open the Find My app on your iPhone.
  2. Tap People. Find the person you want to mark as a favorite.
  3. Do one of the following:
    • Tap the name of the person, tap the More button, then tap “Add to Favorites.”
    • Swipe left across the person’s name, then tap the star.

To remove a friend from your Favorites, swipe left and tap the star, or tap the friend, tap the More button, then tap “Remove from Favorites.”

Tag: Find My

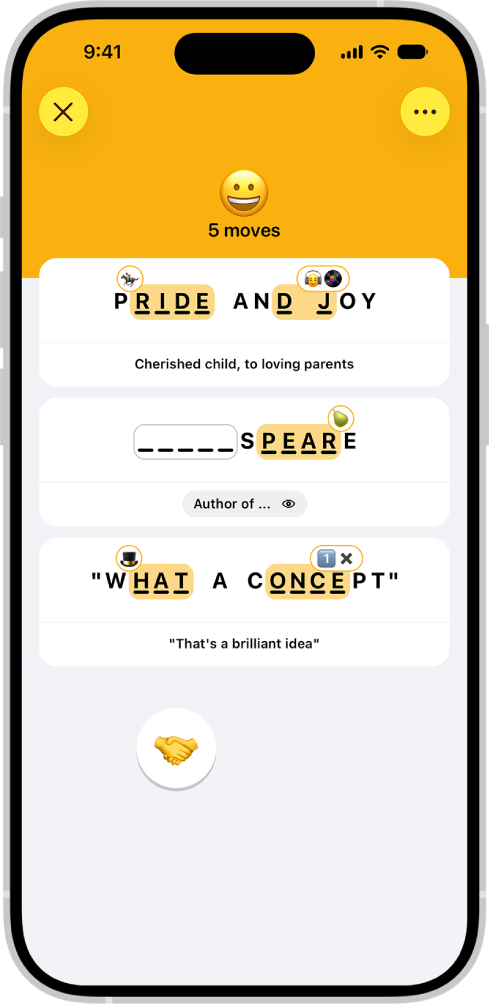
Apple News+ subscribers can solve daily Emoji Game puzzles by completing words and phrases with emoji. The object is to complete several phrases with as few moves as possible, and each emoji can be read directly, through association, or in combination with others. Trying an answer or expanding a clue counts as a move.

Letters relating to an emoji may appear nonconsecutively in an answer, and a group of emoji is interpreted as a whole. If you reveal the answers you didn’t find, the puzzle doesn’t count in your Scoreboard stats and streaks.

Note: Apple News, Apple News+, and puzzles aren’t available in all countries or regions.

The Emoji Game, showing the number of moves, two emoji placed as answers, and one about to be placed in an unanswered spot.

  1. Start the News app on your iPhone.
  2. Open an Emoji Game puzzle.
  3. Do any of the following:
    • Try an answer: Consider the various definitions or associations for the emoji and then drag the most appropriate emoji (or group of emoji) to complete each word or phrase. For example, a pear emoji 🍐 could complete DISAP_ _ _ _, but interpreted as fruit it could complete _ _ _ _ _ FUL. Letters relating to emoji may appear nonconsecutively in an answer. For example, dragging an earth emoji 🌍 to L_ _ _N _ _E ROPES completes the phrase learn the ropes. Interpret grouped emoji as a whole. For example, a single 🐠 could mean fish, while 🐠🐠🐠 might mean school.
    • Expand a clue: Tap the Expand button. This counts as a move.
    • Reveal answers: Tap the More button, then tap Reveal. The answers you didn’t find are shown. The puzzle doesn’t count in your Scoreboard stats and streaks.

Quick tip: For a quick Emoji Game tutorial, tap the More button and tap How to Play. You can also choose More Puzzles to open the Emoji Game feed.

Tag: News

You can use the Freeform app to create boards for brainstorming and collaborating. For example, propose a trip with friends and let everyone take part in the planning, adding text, sticky notes, photos, videos, and other types of files as you go.

There’s no page to fill. The canvas expands as you add content, so you’re never constrained by space limits or page formatting, and your board is saved automatically as you work.

Here’s how to create a Freeform board on iPhone.

Create a new board

  1. Open the Freeform app on your iPhone.
  2. Tap the New Board button.

    If you don’t see the New Board button, tap the Back button.

  3. Tap one of the options, such as the Add Text Box button or the Media button, to start building your board.

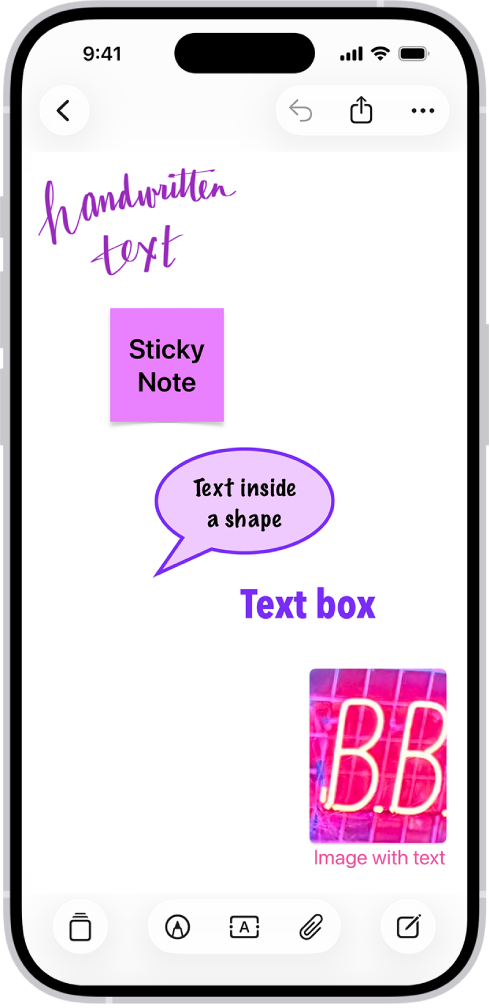
    A Freeform board with text rendered in a drawing, sticky note, shape, text box, and image.

  4. Move around your board by dragging your finger, and zoom in or out by pinching open or closed.

    Tip: To magnify more precisely, tap the More button, tap View Options, then tap a percent.

  5. Your board is saved automatically as you work. To name it, tap the More button and tap Rename.

Create a board from another app

To start a new Freeform board, you can use content from another supported app, such as Safari, Notes, Maps, Photos, Files, and more.

  1. On your iPhone, go to the app whose content you want to use on a new Freeform board.
  2. Open the item you want to place on the Freeform board (for example, a note, map, webpage, PDF, or screenshot).

    To share just one part of a file to a board (rather than the entire webpage or note), select what you want to share. If your selection includes text, only the text is shared.

  3. Tap Share or the Share button and then tap the Freeform app icon.
  4. Tap New Board, name the board and tap the Done button.

In the board, you’ll see either the item or a link.

Open a board

  1. Open the Freeform app on your iPhone.
  2. Tap the board you want to open, or do one of the following:
    • If you’re in a board: Tap the Back button, then tap a board.
    • Find a board you opened recently, shared with others, or marked as a favorite: Tap the Back button in the top-left corner, tap a category, and then tap a board.

Note: Check the Invitations section on the Shared Boards screen for any collaborations you get invited to in the Messages app. They stay there until you accept them.

Duplicate a board

  1. Open the Freeform app on your iPhone.
  2. While browsing All Boards, tap the More button. Tap Select.

    If you’re in a board, tap the Back button to browse All Boards.

  3. Tap the boards you want to copy. Then tap Duplicate.

Or touch and hold the thumbnail or name of the board, then tap Duplicate.

Note: If you duplicate a shared board, the copy isn’t shared.

Add a board to Favorites

  1. Open the Freeform app on your iPhone.
  2. Do one of the following:
    • While browsing All Boards: Touch and hold the thumbnail or name of the board, then tap Favorite.
    • If you’re in a board: Tap the More button and then tap Favorite.

You can use StandBy to turn your iPhone into a bedside clock, a photo frame, a display for viewing widgets or Live Activities in full screen, and more.

It starts when iPhone is charging and lying on its side, without moving. You need StandBy turned on in Settings first, and you can set display preferences for when StandBy is on.

Here’s how to use StandBy to view information at a distance while iPhone is charging.

Start StandBy

  1. Open the Settings app on your iPhone.
  2. Tap Standby and make sure StandBy is turned on.
  3. Connect iPhone to a charger and set it down on its side, keeping it stationary.
  4. Press the side button.
  5. Swipe left or right to switch between widgets, photos, and clocks. Swipe up or down to scroll between options for each of these views.

When StandBy has Night Mode turned on, the screen adapts to low ambient light at night and shows items with a red tint, so it’s not intrusive while you’re sleeping.

iPhone in Standby mode in low ambient light, displaying Clock and Calendar widgets.

With the Always-On display (on supported models), StandBy stays on to show useful information. For all other iPhone models, it’s easy to activate StandBy any time by either tapping the screen, gently nudging the table your iPhone is on, or using Siri.

Siri: Activate Siri, then tell Siri to turn StandBy on or off.

StandBy remembers your preferred view, like a clock, photos, or widgets, for each location where you charge iPhone with MagSafe. That means it can show family photos in the kitchen and an alarm clock at your bedside, for example.

Set display preferences for when StandBy is on

While StandBy is on, you decide how long your iPhone display stays on.

  1. Open the Settings app on your iPhone.
  2. Tap StandBy, then tap Display.
  3. Choose one of the following:
    • Automatically: The display turns off when iPhone isn’t in use and the room is dark.
    • After 20 Seconds: The display turns off after 20 seconds.
    • Never: The display stays on as long as StandBy is on.
Tag: StandBy

Save interesting items in your Reading List so you can revisit them later. You can even save the items in your Reading List and read them when you’re not connected to the internet.

You don’t even have to open a page to save it, because you can add a linked webpage to your Reading List straight from the link. You can also automatically save all Reading List items to iCloud for offline reading.

Add the current webpage to your Reading List

  1. Start the Safari app on your iPhone.
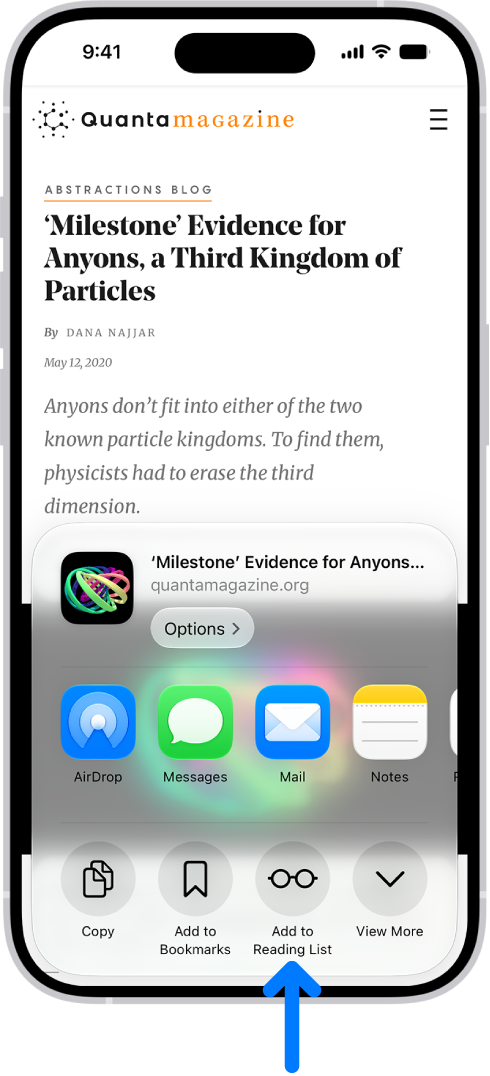
  2. Tap the Page Menu button and tap Share. If your Tabs layout is Bottom or Top, tap the Share button.
  3. Tap Add to Reading List.

Quick tip: You can add a linked webpage without opening it: Just touch and hold the link and tap Add to Reading List.

In Safari, the Share button on a webpage has been tapped, revealing a list of options, including Add to Reading List.

View your Reading List

  1. Start the Safari app on your iPhone.
  2. Do either of the following:
    • Go to your start page (or tap the Tabs button, then tap the Add button to open one), then tap the Reading List button.
    • If your Tabs layout is Bottom or Top, tap the Show Bookmarks button, then tap the Reading List button.

Quick tip: With Apple Intelligence, bookmarks and items you add to your Reading List are automatically organized into suggested topics if three or more of them are related. Tap a topic to view thumbnails, then tap a thumbnail to open it. To delete an item from your Reading List, swipe left on the item. Note: Apple Intelligence on iOS 27 or later is available on an Apple Intelligence-enabled iPhone 15 Pro, iPhone 15 Pro Max, or iPhone 16 model or later. Apple Intelligence is not available in all languages or regions. Usage limits may apply.*

Automatically save all Reading List items to iCloud for offline reading

  1. Start the Settings app on your iPhone.
  2. Tap Apps, then tap Safari.
  3. Turn on Automatically Save Offline (below Reading List).

*Apple Intelligence is available with Siri and device language set to Chinese (Simplified), Chinese (Traditional), Danish, Dutch, English, French, German, Italian, Japanese, Korean, Norwegian, Portuguese, Spanish, Swedish, Turkish, or Vietnamese. Some features may not be available in all regions or languages. Some devices may not be available in all regions. Siri AI is available in beta in iOS 27, iPadOS 27, macOS 27, watchOS 27, and visionOS 27 and requires an Apple Intelligence–enabled device set to a supported language. Available in English to start. Siri AI will not be initially available in the EU on iOS, iPadOS, and watchOS. Certain Apple Intelligence features that rely on server-side models are subject to daily usage limits, including but not limited to Siri AI, Intelligent Photo Editing Tools, Image Playground, and AFM 3 Cloud models in Shortcuts. Daily limits may vary by feature, request complexity, system demand, system policies, and other factors. Expanded access to such features will be available for a fee in the future. Use of these features is subject to the Apple Intelligence Terms and Conditions.

Tag: Safari

Your iPhone needs a SIM to connect to a cellular network. A physical SIM is a small card you insert into your device, and an eSIM is a digital SIM built into your device, with no card required. Not all options are available on all models or in all countries and regions, and on iPhone 14 and later, some models only use eSIM.

Contact your carrier to get a SIM and set up cellular service. You can also convert a physical SIM to an eSIM, and lock your SIM card.

Set up an eSIM

Supported iPhone models can store an eSIM from your carrier digitally. If your carrier supports eSIM Carrier Activation or eSIM Quick Transfer, you can activate your eSIM during setup by turning on your iPhone and following the instructions.

Quick tip: Your carrier can tell you whether to expect a notification or a QR code, or another method entirely. So if you’re not sure which method to use, contact them.

If you already completed setup, do the following:

  1. Make sure your iPhone is connected to an available Wi-Fi or cellular network. In some countries and regions, iPhone models that are eSIM only can activate without a Wi-Fi network.
  2. Add an eSIM using one of the following methods:

    • eSIM Carrier Activation: Some carriers can assign a new eSIM directly to your iPhone. When you receive the Finish Setting Up Cellular notification, tap it. Or go to the Settings app, tap Cellular, and tap Set Up Cellular or Add eSIM.
    • eSIM Quick Transfer: Some carriers support transferring a phone number from your previous iPhone to your new iPhone without needing to contact them. On your new iPhone, go to the Settings app, tap Cellular, tap Set Up Cellular or Add eSIM, and then tap Transfer From Nearby iPhone or choose a phone number. On your previous iPhone, follow the instructions to confirm the transfer.

      Note: After your phone number is transferred to your new iPhone, it stops working on your previous iPhone.

    • Scan a QR code provided by your carrier: Go to the Settings app, tap Cellular, tap Set Up Cellular or Add eSIM, and then tap Use QR Code. (You may need to tap Other Options first.) Position iPhone so the QR code appears in the frame, or enter the details manually. You may be asked to enter a confirmation code provided by your carrier.
    • Transfer from a different smartphone: If your previous phone isn’t an Apple iPhone, contact your carrier to transfer the phone number.
    • Activate service through a participating carrier’s app: Go to the App Store, download the carrier’s app. Then use the app to activate cellular service.
    • Visit your carrier’s store: In some countries and regions, you may need to activate your eSIM at the carrier store for an in-person ID check. Contact your carrier to find out.
    • Travel eSIM: A travel eSIM can maintain coverage and may help you avoid international roaming rates. Make sure you have cellular service or a Wi-Fi connection and then go to the Settings app, tap Cellular, tap Add eSIM, then tap View Travel Options.
  3. To verify the eSIM is activated, open the Settings app and tap Cellular. Make sure the new line (below eSIMs) is turned on.

Install a physical SIM

A nano-SIM card can come from a carrier, or you can move the one from your previous iPhone.

Note: Physical SIM isn’t supported on all models.

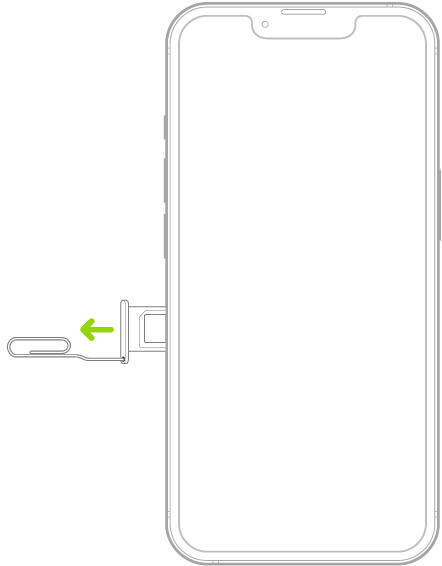
  1. Insert a paper clip or SIM eject tool into the small hole of the SIM tray. Then push in toward iPhone to eject the tray.

    A paper clip or SIM eject tool is inserted into the small hole of the tray on the left side of iPhone to eject and remove the tray.

    Note: The shape and orientation of the SIM tray depend on the iPhone model and your country or region.

  2. Remove the tray from iPhone.
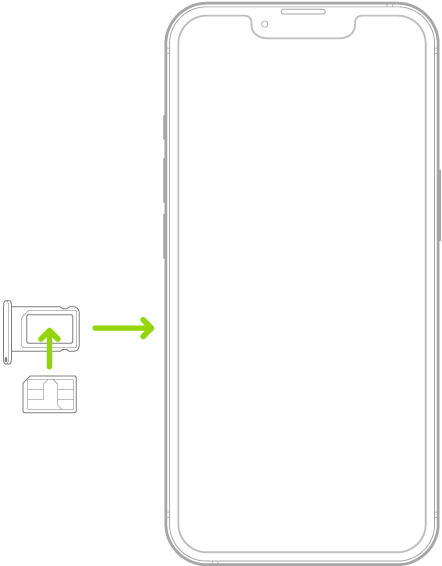
  3. Place the SIM in the tray. The angled corner determines the correct orientation.

    A SIM being inserted into the tray on iPhone; the angled corner is in the upper left.

  4. Insert the tray back into iPhone.
  5. If you previously set up a PIN on the SIM, carefully enter the PIN when prompted.

WARNING: Never try to guess a SIM PIN. An incorrect guess can permanently lock your SIM, and you won’t be able to make phone calls or use cellular data through your carrier until you get a new SIM.

Convert a physical SIM to an eSIM

Does your carrier support it? Then, on a supported iPhone model, you can convert a physical SIM to an eSIM.

Note: Your physical SIM stops working after you convert it to an eSIM.

  1. Start the Settings app on your iPhone.
  2. Tap Cellular and tap Set Up Cellular or Add eSIM.
  3. Choose the phone number with a physical SIM.
  4. Tap Convert to eSIM, then follow the onscreen instructions.

Lock your SIM card

To prevent others from using a SIM card your device uses for phone calls or cellular data, lock it with a personal identification number (PIN). The card then locks automatically every time you restart your device or remove the SIM card. You’ll have to enter your PIN.

Important: The availability of cellular capabilities depends on the wireless network, your iPhone model, and your location.

Consider applicable data, voice, and roaming charges when managing your cellular plans, especially when you travel with iPhone.

Some carriers let you unlock iPhone for use with another carrier (additional fees may apply). Contact your carrier for authorization and setup information.

You can search all your Freeform boards for text in handwriting, sticky notes, text boxes, shapes, and filenames. You can search within a board, or search all boards from the All Boards screen, and any board that contains the text appears in the search results.

  1. Open the Freeform app on your iPhone.
  2. Do any of the following:
    • Search within a board: Tap the More button, then tap Find.
    • Search all boards: Tap the search field (or the Search button) on the All Boards screen.

Any board that contains the text appears in the search results. (If you’re in a board, tap the Back button to access Search in All Boards.)