Got a tip for us?

iPhone

The iPhone is a smartphone from Apple that runs the iOS mobile operating system. Between its apps, communication features, the camera, mobile internet access, and other functionalities, the iPhone has quickly become an integral part of many peoples tech lives.

If you’re unable to speak or have lost your speech over time, you can use Live Speech on iPhone to have what you type spoken out loud during in-person conversations and in apps like FaceTime. You can choose from dozens of system voices or use a Personal Voice you create.

You can also save phrases and have them spoken out loud, and allow audio from other apps in calls, too.

Note: Live Speech is not available in all languages.

Have what you type spoken out loud

  1. Start the Settings app on your iPhone.
  2. Tap Accessibility and tap Live Speech. Then turn on Live Speech.
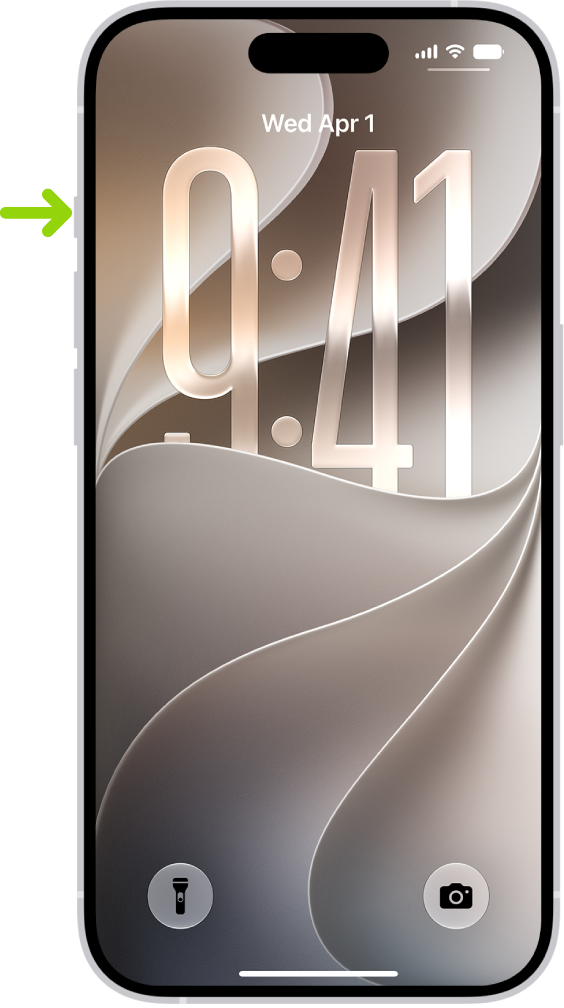
  3. Triple-click the side button or Home button (depending on your iPhone model). Tap Live Speech (if the Accessibility Shortcut is set up with more than one feature).
  4. Tap the Live Speech window, type what you want to have spoken and then tap Speak.

You can also paste copied text into the window, or tap suggested words that appear above the keyboard as you type.

If you’re on a FaceTime call, the other end of the call gets Live Speech. If not, your iPhone outputs Live Speech through its speaker.

Have saved phrases spoken out loud

Live Speech gives you a list of phrases you use often to choose from, and you can sort your phrases into custom categories like school or work.

  1. Start the Settings app on your iPhone.
  2. Tap Accessibility and tap Live Speech. Then turn on Live Speech.
  3. Tap Phrases and then do any of the following:
    • Create a new category: Tap the Add category button, enter a category name, select an icon, and tap Add Category.
    • Add a new saved phrase: Tap a category, tap the Add phrase button, enter a phrase, and then tap Save.
  4. Triple-click the side button or Home button (depending on your iPhone model). Tap Live Speech (if the Accessibility Shortcut is set up with more than one feature).
  5. Tap the Phrases window and then do any of the following:
    • Speak a phrase from a saved category: Scroll to the left to select a category, then tap a phrase.
    • Quickly add a new phrase: Tap the Add phrase button in any category, enter a phrase and tap done. Then tap the phrase.
    • Quickly speak a recently used phrase: Tap Recent and then tap a phrase.

To remove a phrase, swipe left on it, then tap Delete.

Allow audio from other apps in calls

If you use apps that assist with speaking and communication, it can help to make audio from apps audible in voice and video calls.

  1. Start the Settings app on your iPhone.
  2. Tap Accessibility, tap Audio & Visual, and tap Add Audio in Calls.
  3. Turn on Allow Apps to Add Audio in Calls.

With this option on, calls include both audio and microphone input. Muting the microphone silences all audio during a call.

With handwriting mode in VoiceOver, you can enter text by writing characters on the screen with your finger. In addition to typing or dictation, use handwriting mode to enter your iPhone passcode silently or to open apps from the Home Screen.

To use it, you set the rotor to Handwriting. You can also use it to move quickly through a long list.

Here’s how to write with your finger in VoiceOver on iPhone.

Use handwriting mode

  1. Set the rotor to Handwriting.

    If Handwriting isn’t in the rotor, go to Settings > Accessibility > VoiceOver > Rotor, then add it.

  2. To choose a character type (lowercase, numbers, uppercase, or punctuation), swipe up or down with three fingers.

    To hear the selected character type, tap with three fingers.

  3. Trace a character on the screen with your finger.

    You can also do any of the following:

    • Enter an alternate character (a character with an accent, for example): Write the character and then swipe up or down with two fingers until you hear the character you want.
    • Enter a space: Swipe right with two fingers.
    • Go to a new line: Swipe right with three fingers.
    • Delete the previous character: Swipe left with two fingers.
  4. To exit handwriting mode, do a two-finger scrub (move two fingers back and forth three times quickly, making a “z”), or set the rotor to a different setting.

Enter your passcode silently with handwriting mode

  1. On the passcode screen, set the rotor to Handwriting.
  2. Write the characters of your passcode with your finger.

Select an item on the Home Screen

  1. On the Home Screen, set the rotor to Handwriting.
  2. Start writing the name of the item with your finger.

If there are multiple matches, continue to spell the name until it’s unique, or swipe up or down with two fingers to choose from the current matches.

Quickly navigate a long list

  1. Select the index to the right of the list (for example, next to your Contacts list or in the VoiceOver Item Chooser).
  2. Set the rotor to Handwriting and then use your finger to write the letter you want to go to.

If you’re at risk of speech loss or someone with a speech disability, you can use Personal Voice on iPhone to create a synthesized voice that sounds like you.

You can use your Personal Voice with Live Speech and have what you type spoken out loud during in-person conversations, in Phone and FaceTime calls, and in assistive communication apps. It’s saved securely on your iPhone. To create one, you must first set a passcode.

Note: Personal Voice is available in English (U.S.), Mandarin Chinese (China mainland), and Spanish (Mexico) and is available on iPhone 15 Pro models, iPhone 16 models and later.

  1. Start the Settings app on your iPhone.
  2. Tap Accessibility and then tap Personal Voice.
  3. Tap Create a Personal Voice and then follow the onscreen instructions.

    (If you need to pause your recording session, tap Done. To resume, tap the name of your Personal Voice, then tap Continue Recording.)

Turn on Share Across Devices, and your Personal Voice can be used on all of your devices with iCloud. And with Allow Apps to Request to Use turned on, apps can ask to use your Personal Voice.

Note: To see the option to create your Personal Voice, you must first set a passcode. Personal Voice is available on supported iPhone models and is not available in all languages.

Your Personal Voice, Apple says, is saved securely on your iPhone for you to use during Phone and FaceTime calls, in-person conversations, and third-party alternative and augmentative communication (AAC) apps.

Important: Personal Voice can be used only with Live Speech and with third-party apps that you allow, such as Augmentative and Alternative Communication (AAC) apps. You can use Personal Voice only to create a voice that sounds like you on device, using your own voice, and for your own personal, noncommercial use.

Your Legacy Contact won’t be able to access your Personal Voice.

After you set up iCloud Drive, you can share folders and individual files with friends and colleagues. When you make changes to a shared folder or file, others see your changes automatically, and if you allow people to make edits, their changes appear automatically as well.

You can also send a copy of a file or folder, invite more people to collaborate, or share it with more people using a link.

Files and folders you share in iCloud Drive have these important characteristics:

  • If you collaborate on a folder, all items added to that folder by you or other participants are automatically shared.
  • The link to a shared file includes its name. If the name or content is confidential, be sure to ask recipients not to forward the link to anyone else.
  • If you move a shared file to another folder or location, the link no longer works, and people lose access to the item.
  • Depending on the app, users might need to reopen a file or tap the original link to see the latest changes.

Share or collaborate on a file or folder

For a file or folder you own in iCloud Drive, you can invite other people to view its contents or collaborate on them.

A file or folder can be shared so only people you pick can open it, or so anyone with the link can.

Allow changes to the contents of a file or folder, or restrict access so people can only view the contents.

  1. Open the Files app on your iPhone.
  2. Go to a location and then touch and hold the file or folder you want to share.
  3. Tap the Share button, tap the menu under the item’s title, and tap Share a Link.
  4. To change who can access the file or folder and whether they can edit or just view and download, tap People you choose can edit and then do any of the following:

    • Only allow people you invite or approve to access the file or folder: Tap People you choose.

      Note: When you select “People you choose,” you can turn on Access Requests, which lets other people with the link ask you to approve their access.

    • Allow anyone with the link to access the file or folder: Tap Anyone with the link.
  5. Under New Participants Can, choose whether participants can edit or view and download only.
  6. Choose how you want to send your invitation.

Send a copy of a file or folder

  1. Open the Files app on your iPhone.
  2. Go to a location and then touch and hold the file or folder you want to share.
  3. Tap the Share button and tap the menu under the item’s title. Then tap Send a Copy.
  4. Choose how you want to send your copy.

Invite more people to collaborate on a folder or file

If a folder or file you already shared has access set to “People you choose,” you can share it with more people.

  1. Open the Files app on your iPhone.
  2. Tap Shared.
  3. Touch and hold the folder or file you want to share.
  4. Tap Manage Shared Folder or Manage Shared File.
  5. Tap Add Participant and choose a method for sending the link.
  6. Enter any other requested information. Send or post the invitation.

Share a folder or file with more people using a link

When you set access to a shared folder or file to “Anyone with the link,” anyone who has the link can share it with others.

  1. Open the Files app on your iPhone.
  2. Tap Shared.
  3. Touch and hold the folder or file you want to share.
  4. Tap Manage Shared Folder or Manage Shared File. Then tap Copy Link.
  5. Choose a method for sending the link, enter any other requested information, and send or post the invitation.

Change access and permission settings for everyone

Owners of a shared folder or file can change its access at any time. It affects everyone you shared the link with.

  1. Open the Files app on your iPhone.
  2. Touch and hold the folder or file whose permissions you want to change.
  3. Tap Manage Shared Folder or Manage Shared File, then tap Sharing Options.
  4. Change either or both of the options.
    • Access option: When you change the access option from Anyone with the link to People you choose, the original link no longer works for anyone, and only people who receive a new invitation from you can open the folder or file.
    • Permission option: When you change the permission option, everyone who has the file open when you change the permission sees an alert. New settings take effect when the alert is dismissed.

Change access and permission settings for one person

As the owner of a shared folder or file with access set to “People you choose,” you can change one person’s permission without affecting anyone else’s. You can also remove that person’s access.

  1. Open the Files app on your iPhone.
  2. Touch and hold the folder or file whose permissions you want to change.
  3. Tap Manage Shared Folder or Manage Shared File.
  4. Tap the person’s name, then select an option.

Stop sharing a folder or file

If you’re the owner of a shared folder or file, you can stop sharing it.

  1. Open the Files app on your iPhone.
  2. Open the location of the folder or file you want to stop sharing.
  3. Touch and hold the folder or file. Tap Manage Shared Folder or Manage Shared File.
  4. Tap Stop Sharing.

Anyone who has the file open when you stop sharing it gets an alert. After they dismiss it, the item closes, the file disappears from their iCloud Drive, and the link stops working. Share the item again later with access set to “Anyone with the link,” and the original link works again. With “People you choose,” only the people you reinvite to share the item can use the original link again.

Tags: Files, iCloud

You can permanently delete items from your Reminders lists. If you accidentally delete an item, you can recover it within 30 days from the Recently Deleted list.

Items left in Recently Deleted are removed automatically and permanently after 30 days. A recovered item moves to the default list, while a permanently deleted item is removed immediately from all your devices.

Here’s how to delete or recover items in Reminders on iPhone.

Delete an item

  1. Open the Reminders app on your iPhone.
  2. While viewing a list, swipe left on an item. Tap Delete.

To undo immediately, tap with three fingers or shake your iPhone.

Recover or permanently delete recently deleted items

  1. Open the Reminders app on your iPhone.
  2. In the list view, tap Recently Deleted.
  3. Do one of the following:
    • Recover an item: Tap the item, then tap Recover. The item moves to the default list.
    • Permanently delete an item: Swipe left on the item, tap Delete, and tap Delete again. The item is removed immediately from all your devices.

After 30 days, items left in Recently Deleted are permanently removed automatically.

On supported models, you can request Roadside Assistance via satellite when you’re outside cellular and Wi-Fi coverage. Roadside Assistance via satellite requires an active SIM.

It starts in the Messages app on your iPhone. Once you’re connected, you’re asked about things like the model of your car and the issue you’re having, and you can send messages directly to a roadside assistance provider.

Note: Roadside Assistance via satellite isn’t available in all countries or regions.

Request Roadside Assistance via satellite on your iPhone

  1. Open the Messages app on your iPhone.
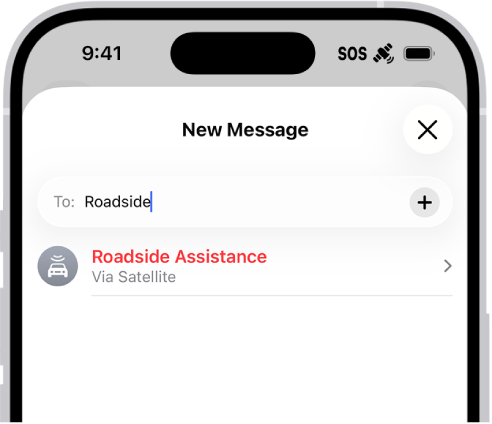
  2. Tap the Compose button. Type “Roadside” in the address field.

    A new message addressed to “roadside.” Below it is a link for Roadside Assistance via satellite.

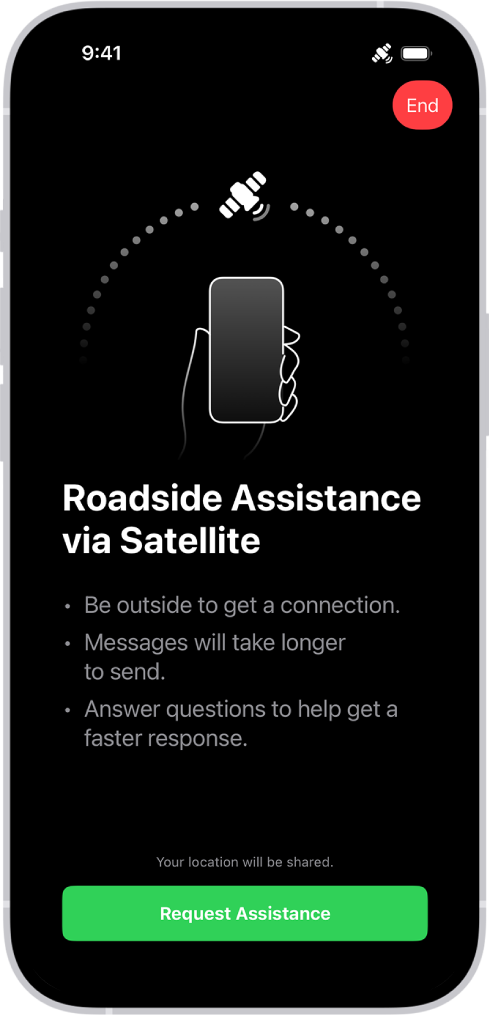
  3. Tap Roadside Assistance and follow the onscreen instructions.

Important: To help you connect to a satellite, make sure to hold your phone naturally in your hand—you don’t need to raise your arm or hold your phone up, but make sure your phone has a clear line of sight to the sky. If you’re under heavy foliage or surrounded by other obstructions, you might not be able to connect to a satellite.

You’ll be asked for important information once connected, such as your car’s model and the issue you’re having.

After answering the questions, you’re guided to connect to a satellite and message a roadside assistance provider directly. The provider may ask follow-up questions to make sure they’re sending the right kind of help. You can ask them about the estimated time until someone arrives, too, as well as any fees associated with the service.

The Roadside Assistance via satellite screen. The Request Assistance button is at the bottom of the screen.

There are a number of ways you can make a phone call on your iPhone: dial the number on the keypad, or call a favorite, a recent call, or a number in your contacts list.

Siri can dial for you, too. And on models with Dual SIM, you can choose which line to use before you call. You can also add or remove contacts from your Favorites.

Here’s how to make a call on iPhone.
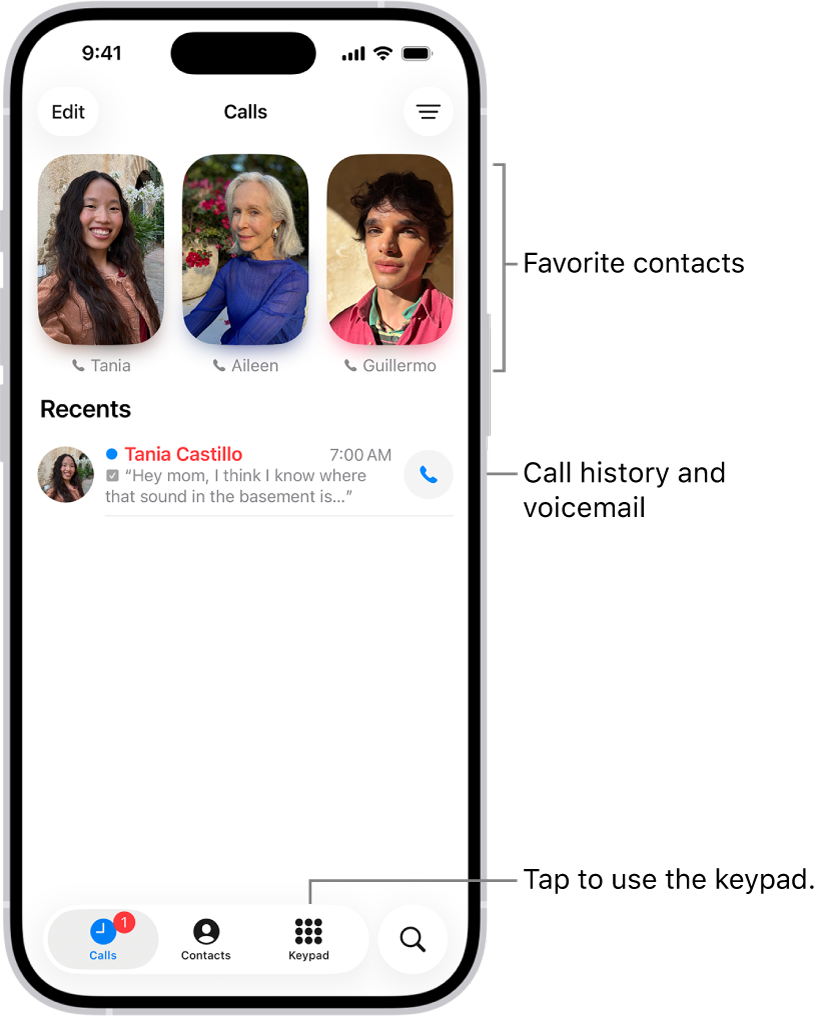
The Calls tab in the Phone app in Unified layout. Favorite contacts appear at the top. Below the Favorites is a list of recent calls and voicemail. Buttons to view the Calls, Contacts, and Keypad tabs appear at the bottom. The Search button is in the bottom-right corner.

Dial a number

Siri: Ask Siri to call or dial a number. Speak each digit separately—for example, “four one five, five five five….” For the 800 area code in the U.S., you can say “eight hundred.” Or without using Siri:

  1. Start the Phone app on your iPhone.
  2. Tap Keypad and then do any of the following:
    • Use a different line: On models with Dual SIM, tap the line at the top and choose a line.
    • Enter the number using the keypad: If you make a mistake, tap the Delete button.
    • Redial the last number: Tap the Call button to see the last number you dialed and then tap the Call button to call that number.
    • Paste a number you’ve copied: Tap the phone number field above the keypad and tap Paste.
    • Enter a soft (2-second) pause: Touch and hold the star (*) key until a comma appears.
    • Enter a hard pause (to pause dialing until you tap the Dial button): Touch and hold the pound (#) key until a semicolon appears.
    • Enter a “+” for international calls: Touch and hold the “0” key until “+” appears.
  3. Tap the Call button to start the call.

To end the call, tap the End Call button.

View information when you make a call

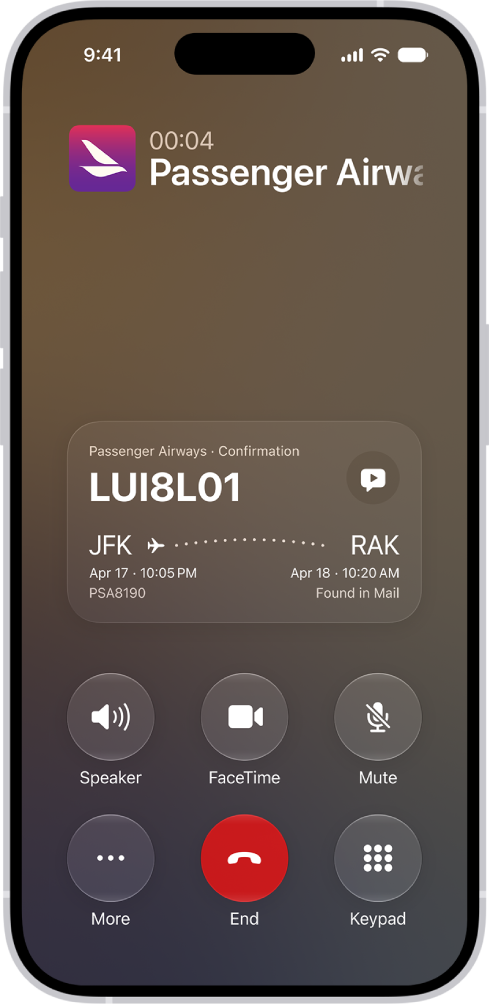
With Apple Intelligence,* a Call Context card with related information may appear when you start a call. This can include an upcoming or recent birthday when you call a contact, or it can include tickets, orders, or confirmation numbers when you call certain businesses. Tap the card to view the information in the related app, such as Mail or Wallet. To turn Call Context on or off, do the following:

  1. Open Settings, then tap Apps.
  2. Tap Phone, then tap Apple Intelligence & Siri.
  3. Turn Show When Calling on or off.

The call screen, showing a Call Context card with a flight confirmation.

Note: Call Context identifies the business from the phone number you dial. Then it searches Mail, Messages, Wallet, and Calendar for related information, such as confirmation codes or reservation numbers.

Note: Apple Intelligence on iOS 27 or later is available on an Apple Intelligence-enabled iPhone 15 Pro, iPhone 15 Pro Max, or iPhone 16 model or later. Apple Intelligence is not available in all languages or regions. Usage limits may apply.*

Add or remove contacts from your Favorites

  1. Start the Phone app on your iPhone.
  2. Do one of the following, depending on which Phone app layout you’re using:
    • Unified layout: Tap Calls, tap Edit, and then tap Add Favorite. If you’ve already added a Favorite, tap Edit, tap Edit Favorites, and then tap the Add button.
    • Classic layout: Tap Favorites and tap the Add button.
  3. Tap a contact and choose the default method of communication (for example, message, call, or video) and the preferred number. Tap the Done button.
  4. To remove a contact from your Favorites, do one of the following:
    • Unified layout: Tap Calls, tap Edit, tap Edit Favorites, tap the Remove button in the upper-left corner of the contact you want to remove, and then tap the Done button.
    • Classic layout: Tap Favorites. Then swipe their name all the way to the left.

To contact someone in your Favorites, tap their name.

Redial or return a recent call

  1. Start the Phone app on your iPhone.
  2. Do one of the following, depending on which Phone app layout you’re using:
    • Unified layout: Tap Calls, tap the name or number you want to call, tap the Call button, and tap the number you want to call. Note: To start a call as soon as you tap a name or number in the Recents list, go to Settings > Apps > Phone, then turn on Tap Recents to Call.
    • Classic layout: Tap Recents and then tap the name or number you want to call.
  3. To get more info about a call and the caller, do one of the following:
    • Unified layout: Tap the name or number in the Recents list.
    • Classic layout: Tap the Info button next to the name or phone number in Recents.

Call someone on your contacts list

Siri: Ask Siri something like, “Call Eliza’s mobile.” Or without using Siri:

  1. Start the Phone app on your iPhone.
  2. Tap Contacts. Then tap the contact you want to call.
  3. Tap the Call button, then tap the phone number you want to call.

Unless you set a preferred line for this contact, the call uses the default voice line on models with Dual SIM.

WARNING: For important information about avoiding distractions that could lead to dangerous situations, see Important safety information for iPhone.

*Apple Intelligence is available with Siri and device language set to Chinese (Simplified), Chinese (Traditional), Danish, Dutch, English, French, German, Italian, Japanese, Korean, Norwegian, Portuguese, Spanish, Swedish, Turkish, or Vietnamese. Some features may not be available in all regions or languages. Some devices may not be available in all regions. Siri AI is available in beta in iOS 27, iPadOS 27, macOS 27, watchOS 27, and visionOS 27 and requires an Apple Intelligence–enabled device set to a supported language. Available in English to start. Siri AI will not be initially available in the EU on iOS, iPadOS, and watchOS. Certain Apple Intelligence features that rely on server-side models are subject to daily usage limits, including but not limited to Siri AI, Intelligent Photo Editing Tools, Image Playground, and AFM 3 Cloud models in Shortcuts. Daily limits may vary by feature, request complexity, system demand, system policies, and other factors. Expanded access to such features will be available for a fee in the future. Use of these features is subject to the Apple Intelligence Terms and Conditions.


Tag: Phone

With Apple Intelligence in the Home app, you can automatically generate video descriptions for recorded clips from compatible Home cameras. You can then search your recordings using natural language.

It cuts down on alerts, too. Related notifications are grouped together, so you get fewer alerts from the Home app, and you’ll need a home hub, such as HomePod or Apple TV 4K, to use it.

Here’s how to use Apple Intelligence with Home cameras and notifications on iPhone.

Note: Requires a home hub such as HomePod (2nd generation), HomePod mini, or Apple TV 4K with the latest operating system software. The owner of the home must have an Apple Intelligence–enabled iPhone,* have Apple Intelligence enabled in the Home app, and subscribe to a 2TB iCloud+ plan. Apple Intelligence on iOS 27 or later is available on an Apple Intelligence-enabled iPhone 15 Pro, iPhone 15 Pro Max, or iPhone 16 model or later. Apple Intelligence is not available in all languages or regions. Usage limits may apply.*

Generate Home camera video descriptions on iPhone

By analyzing your Home camera footage, Apple Intelligence can generate searchable video descriptions.

  1. Start the Home app on your iPhone.
  2. On the Home tab, tap the More button and then tap Home Settings.
  3. Turn on Apple Intelligence. Enable or disable video descriptions for each camera.

Reduce notifications from the Home app

To reduce notifications, Apple Intelligence can bundle similar Home notifications, such as a door locking and unlocking repeatedly.

  1. Start the Home app on your iPhone.
  2. On the Home tab, tap the More button and then tap Home Settings.
  3. Tap Apple Intelligence, then enable or disable Reduce Notifications.

*Apple Intelligence is available with Siri and device language set to Chinese (Simplified), Chinese (Traditional), Danish, Dutch, English, French, German, Italian, Japanese, Korean, Norwegian, Portuguese, Spanish, Swedish, Turkish, or Vietnamese. Some features may not be available in all regions or languages. Some devices may not be available in all regions. Siri AI is available in beta in iOS 27, iPadOS 27, macOS 27, watchOS 27, and visionOS 27 and requires an Apple Intelligence–enabled device set to a supported language. Available in English to start. Siri AI will not be initially available in the EU on iOS, iPadOS, and watchOS. Certain Apple Intelligence features that rely on server-side models are subject to daily usage limits, including but not limited to Siri AI, Intelligent Photo Editing Tools, Image Playground, and AFM 3 Cloud models in Shortcuts. Daily limits may vary by feature, request complexity, system demand, system policies, and other factors. Expanded access to such features will be available for a fee in the future. Use of these features is subject to the Apple Intelligence Terms and Conditions.

On supported models, iPhone has an Action button in place of the Ring/Silent switch. You can choose which function you want the Action button to perform when you press it.

Because the button is so accessible, it’s useful for actions you perform often. And it’s easy to change the Action button to perform a different function, right in Settings.

Here’s how to use and customize the Action button on iPhone.

A screen showing that the Action button is located on the left edge of the iPhone 15 Pro. You can customize the function of the button in Settings > Action Button.

Use the Action button

To perform the action assigned to the Action button, press and hold the Action button.

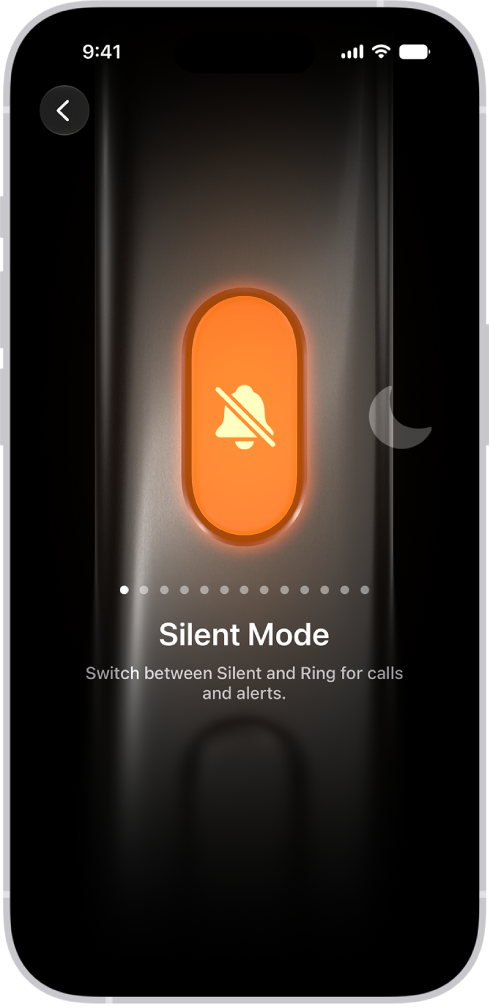
For many functions, the Action button can be used to turn a setting on or off. For example, if the selected action is Silent Mode (the default), you can press and hold the Action button to put iPhone in Silent mode. If you press and hold the Action button again, it turns off Silent mode.

Customize the Action button

  1. Start the Settings app on your iPhone.
  2. Tap Action Button.
  3. To choose an action (like Silent Mode), swipe to the action you want to use—its name appears below the dots.

    The screen for customizing the Action button. The Camera is the selected action. Other features appear to the right and left of the camera, including Do Not Disturb and Flashlight. Below the actions are dots you can tap to switch to another action. Below the selected action, Camera, is a menu of Camera options you can tap to assign to the Action button.

  4. If there are additional options for the selected action, the Menu button appears below the action; tap it to see the list of options.

For the Controls, Shortcut, and Accessibility actions, you need to tap the button below the action and select a specific option—otherwise the Action button does nothing.

Icon Action
the Silent Mode button Silent Mode: Switch between Silent and Ring for calls and alerts.
the Focus button Focus: Turn on a Focus to silence notifications and filter out distractions.
the Camera button Camera: Open the Camera app to capture a moment.
the Visual Intelligence button Visual Intelligence: Use Visual Intelligence to learn more about the places and objects around you (Requires Apple Intelligence).

Note: Apple Intelligence on iOS 27 or later is available on an Apple Intelligence-enabled iPhone 15 Pro, iPhone 15 Pro Max, or iPhone 16 model or later. Apple Intelligence is not available in all languages or regions. Usage limits may apply.*

the Flashlight button Flashlight: Turn on extra light when you need it.
the Voice Memo button Voice Memo: Record personal notes, musical ideas, and more.
the Recognize Music button Recognize Music: Find out what song is playing nearby or on your iPhone with Shazam.
the Translate button Translate: Translate phrases or have a conversation with someone in another language.
the Magnifier button Magnifier: Turn your iPhone into a magnifying glass to zoom in on and detect objects near you.
the Controls button Controls: Quickly access your favorite control.
the Shortcut button Shortcut: Open an app or run your favorite shortcut.
the Accessibility button Accessibility: Quickly use an accessibility feature.
No Action Do nothing.

*Apple Intelligence is available with Siri and device language set to Chinese (Simplified), Chinese (Traditional), Danish, Dutch, English, French, German, Italian, Japanese, Korean, Norwegian, Portuguese, Spanish, Swedish, Turkish, or Vietnamese. Some features may not be available in all regions or languages. Some devices may not be available in all regions. Siri AI is available in beta in iOS 27, iPadOS 27, macOS 27, watchOS 27, and visionOS 27 and requires an Apple Intelligence–enabled device set to a supported language. Available in English to start. Siri AI will not be initially available in the EU on iOS, iPadOS, and watchOS. Certain Apple Intelligence features that rely on server-side models are subject to daily usage limits, including but not limited to Siri AI, Intelligent Photo Editing Tools, Image Playground, and AFM 3 Cloud models in Shortcuts. Daily limits may vary by feature, request complexity, system demand, system policies, and other factors. Expanded access to such features will be available for a fee in the future. Use of these features is subject to the Apple Intelligence Terms and Conditions.

With Vocal Shortcuts, you can teach iPhone to perform an action when you speak a word or another sound of your choosing. Vocal Shortcuts can be useful if you have moderate to severe atypical speech but can reliably vocalize certain utterances. Audio is processed on device.

You can add a Vocal Shortcut, use it, and delete it when you no longer need it.

Here’s how to use Vocal Shortcuts on iPhone.

Set up Vocal Shortcuts

  1. Open Settings, tap Accessibility, and then tap Vocal Shortcuts.
  2. Tap Set Up, then tap Continue.
  3. Choose an action for iPhone to perform when you say the shortcut. If you want the action to be a request to Siri, tap Siri Request. Enter the request.
  4. Enter the phrase you’ll say when you want iPhone to perform the action and then follow the onscreen instructions to repeat the phrase out loud so that iPhone can recognize it.

After you set up Vocal Shortcuts, the Microphone In Use icon is shown in the status bar to indicate that Vocal Shortcuts is using the iPhone microphone to listen for shortcuts. When you don’t want Vocal Shortcuts to use the microphone, go to Settings > Accessibility > Vocal Shortcuts, then turn off Vocal Shortcuts.

Add a Vocal Shortcut

  1. Open Settings, tap Accessibility, and then tap Vocal Shortcuts.
  2. Tap Add Action, then tap Continue.
  3. Choose an action for iPhone to perform when you say the shortcut. If you want the action to be a request to Siri, tap Siri Request. Enter the request.
  4. Enter the phrase you’ll say when you want iPhone to perform the action and then follow the onscreen instructions to repeat the phrase out loud so that iPhone can recognize it.

Use a Vocal Shortcut

Once Vocal Shortcuts is set up, say the phrase for one of the shortcuts you’ve created.

Delete a Vocal Shortcut

  1. Open Settings, tap Accessibility, and then tap Vocal Shortcuts.
  2. Tap Edit, tap the Remove button next to the shortcut you want to delete, and tap Delete.

Quick tip: If you have an acquired or progressive condition that affects speech, you can have Siri listen for and recognize a wider range of atypical speech patterns.