Got a tip for us?

iPhone

The iPhone is a smartphone from Apple that runs the iOS mobile operating system. Between its apps, communication features, the camera, mobile internet access, and other functionalities, the iPhone has quickly become an integral part of many peoples tech lives.

When you subscribe to iCloud+, you can add up to five custom email domains and create email addresses for those domains on your iPhone. You can then send and receive email in the Mail app on your iPhone, iPad, and Mac, in your Mail account on iCloud.com, and in an email app on a Windows device.

You can add a domain you already own or buy a new one. Either way, you need to have a primary iCloud Mail address first. You can also import existing email messages, and create and delete email addresses.

Here’s how to set up a custom email domain with iCloud Mail on iPhone.

Note: Sign in to the same Apple Account on each device.

On devices where you’re not signed in to your Apple Account, or where the Mail feature is turned off, your custom email domains and mail won’t be visible.

Add a custom email domain to iCloud Mail

In iCloud Mail, you can set up a custom email domain you already own, or buy a new one.

Note: Before you can add a custom email domain on iPhone, you need a primary iCloud Mail address.

  1. Open Settings, tap [your name], tap iCloud and tap Mail (under Saved to iCloud). Then make sure Use on this iPhone is turned on.
  2. Tap Custom Email Domain and tap one of the following: Buy a Domain: Choose this option if you don’t yet have a custom domain.

    After you purchase it, you can create custom email addresses.

  3. Use a Domain You Own: Choose this option if you already have a domain, and you want to use it with iCloud Mail.

    You can configure email addresses you already have at that domain, and create more.

    Follow the onscreen instructions.

    If you’re adding a domain you already own, some registrars require you to change DNS records to set up your domain.

Import existing email messages

Once someone in your Family Sharing group, or you, sets up a custom email domain for iCloud Mail, iCloud.com lets you import existing email messages from your previous email provider. This isn’t available for all email providers.

Create and delete email addresses

After you set up a custom email domain, you can create and delete email addresses for that domain easily.

  1. Open Settings, tap [your name], tap iCloud and tap Mail (under Saved to iCloud). Then make sure Use on this iPhone is turned on.
  2. Tap Custom Email Domain. Then tap the domain you want to make changes to.
  3. Tap Manage Email Addresses. Then do one of the following: Add a new email address: Tap Create Email Address, enter the new address, then tap Continue.
    • Delete an email address: Swipe left on an email address, tap Delete, and tap Remove.
    • Add People: Tap to invite someone to your custom email domain.

Remove a custom email domain

If you’re done with a custom email domain, remove it using your iPhone.

Once you remove a custom email domain, Mail can’t send or receive email for any addresses at that domain.

  1. Open Settings, tap [your name], tap iCloud, and then tap Mail (under Saved to iCloud).
  2. Tap Custom Email Domain. Then tap Edit next to Your Domains.
  3. Tap the Delete button and tap Delete.

    If you’re moving your domain to a new provider, make sure to do the following: Go to your domain registrar to update the domain records to your new email provider and remove iCloud-related records.

  4. Set up any email addresses you want to continue using with your new provider.

    Note: When you remove a custom email domain, you can still send and receive email from your primary @icloud.com address.

Allow all incoming messages to your domain

Your iCloud Mail email address can work as a catch-all address.

This way, you receive all the messages sent to your custom email domain, even when the exact address they were sent to hasn’t already been created.

  1. Open Settings, tap [your name], tap iCloud, and then tap Mail (under Saved to iCloud).
  2. Tap Custom Email Domain and tap your custom domain.
  3. Turn on Allow All Incoming Messages.

    If the domain owner allows all incoming messages, any messages that aren’t sent to an active email address go to the domain owner’s inbox.

    If this setting isn’t turned on, those messages are returned to the sender.

    Note: Messages sent to deleted email addresses are automatically returned to the sender.
Tags: iCloud, Mail

With iPhone Handoff, you can use the same phone number on two iPhone devices and switch between them whenever you like. Your calls, voicemail, messages, Find My location, and other data synced with iCloud follow whichever iPhone you’re using.

There’s a catch, though: only one iPhone is active on the network at a time. When you unlock an iPhone, it becomes the active device, and the other one becomes inactive automatically. Both iPhone devices must be signed in to the same Apple Account, and iPhone Handoff works with participating carriers in supported countries and regions.

Note: The two iPhone devices must be signed in to the same Apple Account. iPhone Handoff is available with participating carriers in supported countries and regions; contact your carrier to confirm availability. Some features may not be available when using iPhone Handoff.

Before you can use iPhone Handoff, you need to set up iPhone Handoff on the second iPhone you plan to use. That adds the eSIM for your phone number to that iPhone.

  1. Open the Settings app on your iPhone.
  2. Tap Cellular and tap Set Up Cellular or Add eSIM.
  3. Select Use Number on This iPhone and Another and tap Continue. Then follow the onscreen instructions.

After setup, unlocking either iPhone makes it the active device for calls, voicemail, and messages.

You can convert length, weight, currencies, and more while using the basic or scientific calculator. You just choose which units or currencies you want to convert from and to. Conversions appear as you type, with categories like Speed, Time, and Weight, and you can also convert units and currencies in Math Notes.

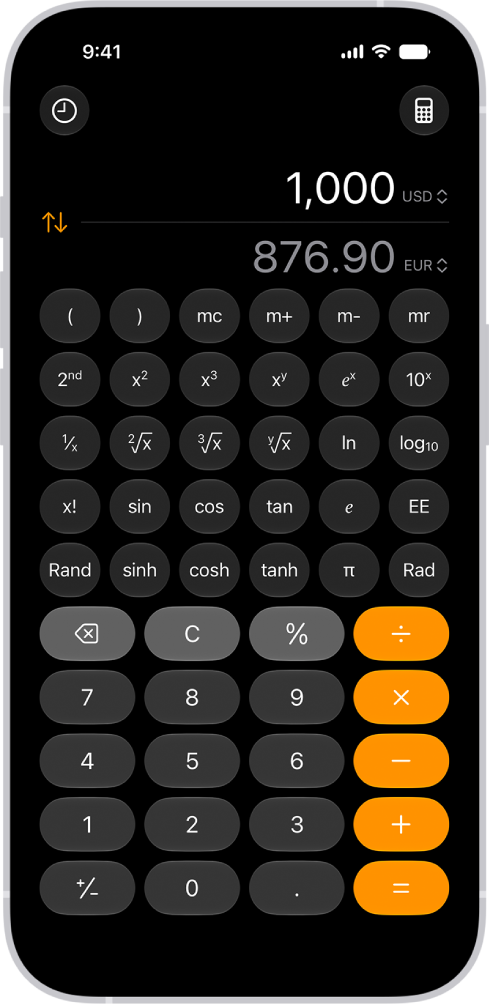
The basic calculator with a currency conversion.

  1. Open the Calculator app on your iPhone.
  2. While using the basic or scientific calculator, tap the Change Mode button. Tap Convert.
  3. Tap the Unit button and choose the units or currencies you want to convert from and to.

    Swipe the categories at the top of the list to see others, such as Speed, Time, and Weight.

  4. Enter a value in either field to see conversions as you type.
  5. To reverse how the units are converted, tap the Swap Units button.

In Math Notes, you can also convert units and currencies. Type or write “50 m in feet =” in a note, for example.

You control whether iPhone and apps have information about your location. To figure out where you are when getting directions, setting up meetings, and more, Location Services uses information, when available, from GPS networks, your Bluetooth® connections, your local Wi-Fi networks, and your cellular network.

When you set up iPhone, you’re asked if you want to turn on Location Services, and you can turn it on or off at any time after that. When an app is using Location Services, the Location Services icon appears in the status bar.

The first time an app wants location data from your iPhone, you receive a request with an explanation. Some apps may make a one-time only request for your location, while others may ask you to share your location now and in the future. Whether you grant or deny ongoing access, you can change an app’s access later.

Turn on Location Services

If you didn’t turn on Location Services when you first set up iPhone, go to Settings > Privacy & Security > Location Services, then turn on Location Services.

Important: If you turn off Location Services, many important iPhone features stop working.

View apps using your location information

  1. Open Settings, tap Privacy & Security, and then tap Location Services.
  2. To review or change access settings for an app or to see its explanation for requesting Location Services, tap the app.

If you want an app to use your specific location, keep Precise Location turned on. Turn it off to share only your approximate location, which may be enough for an app that doesn’t need your exact location.

Note: Set an app’s access to Ask Next Time, and you’ll be asked to turn on Location Services again whenever an app next tries to use it.

Review a third-party app’s terms and privacy policy to understand how it uses the information it’s requesting.

Hide the map in Location Services alerts

Once an app has permission to always use your location in the background, you may get alerts about how the app is using that information, which let you change your permission if you want. The alerts include a map of locations the app accessed recently.

To hide the map, go to Settings > Privacy & Security > Location Services > Location Alerts, then turn off Show Map in Location Alerts.

If the setting is off, you’ll continue to receive location alerts, but the map isn’t shown.

Review or change Location Services settings for system services

Several system services rely on Location Services, including location-based suggestions and location-based ads.

To see the status for each service, to turn Location Services on or off for each service, or to show the Location Services icon in the status bar when enabled system services use your location, go to Settings > Privacy & Security > Location Services > System Services.

In the Home app, you can invite other people to control all your smart accessories, or invite a guest to control some or all of your doors, locks, and security system accessories during specific times.

There’s a difference between the two. Home Residents get local and optional remote access to all accessories, at any time. Home Guests get local-only access to specific doors, locks, and security system accessories, but only during set times. You can also allow others to access your AirPlay-enabled speakers and TVs.

Note: You’ll need a home hub, like a HomePod speaker or Apple TV 4K, for remote access and guest access.

Invite residents to control accessories

At any time, Home Residents have access to all accessories in the home, locally and optionally remotely.

  1. Start the Home app on your iPhone.
  2. On the Home tab, tap the Add button, tap Add People, and then tap Resident.
  3. Tap the Add button to choose people with an Apple Account from your contacts list, or enter their Apple Account email addresses in the To field.
  4. Tap Invite.
  5. Ask the invitee to do one of the following:
    • In the notification: (iPhone or iPad) Tap Accept.
    • In the Home app: (iPhone or iPad) On the Home tab, tap the More button, tap Home Settings and then tap the invitee’s name.
    • On Apple TV 4K: Tap Show Me on Apple TV and turn on one or more Apple TVs.

Invite guests to control accessories

On a set schedule, Home Guests can access specific doors, locks, and security system accessories, but only locally.

Note: Home Guests access requires iOS 18, iPadOS 18, or later.

  1. Start the Home app on your iPhone.
  2. On the Home tab, tap the Add button and tap Add People. Then tap Guest.
  3. Tap the Add button to choose people with an Apple Account from your contacts list, or enter their Apple Account email addresses in the To field.
  4. Select any of the following for the guest schedule:
    • Anytime: The guest can access the selected accessories anytime.
    • Specific Dates: The guest can only access the selected accessories on the dates specified.
    • Specific Days & Times: The guest can only access the selected accessories on the days and during the times specified.
  5. Select which doors, locks, and security system accessories the guest can access.
  6. Tap Invite.
  7. Ask the invitee to do one of the following:
    • In the notification: (iPhone or iPad) Tap Accept.
    • In the Home app: (iPhone or iPad) Tap the More button, tap Home Settings, and then tap the invitee’s name.

Allow others to access your AirPlay-enabled speakers and TVs

  1. Start the Home app on your iPhone.
  2. On the Home tab, tap the More button and then tap Home Settings.
  3. Tap Speaker & TV and choose an option.

You can allow only people you’ve invited to share the home, anyone on the same network, or everyone. And you can require a password for speaker access, too.

Allow Resident and Guest Attribution

With Attribution, when you arrive, leave, or interact with accessories, your name can appear in notifications and activity history.

Note: Home members who use Face Recognition to identify people based on their photo library will still see your name.

  1. Start the Home app on your iPhone.
  2. On the Home tab, tap the More button and then tap Home Settings.
  3. Tap a person and then enable Attribution.
Tag: Home

Separation alerts in the Find My app let you know when you’ve left a device behind. You can set them up for your iPhone, iPad, Mac, or AirPods, and add Trusted Locations, where you can leave a device without getting an alert.

If you have an iPhone Wallet with MagSafe and Find My support, you can get an alert when it detaches from your iPhone, too.

Here’s how to set separation alerts in case you leave a device behind in Find My on iPhone.

Important: In order to receive separation alerts, make sure you allow notifications for the Find My app.

Set up alerts for your iPhone, iPad, Mac, or AirPods

Separation alerts work for an iPad, iPhone, or iPod touch with iOS 15, iPadOS 15, or later, a Mac with Apple silicon and macOS 12 or later, and AirPods with the Find My network turned on. You can set up a separation alert only from the device sharing your location, and you’ll get an alert every time it separates from the device you set the alert for.

  1. Open the Find My app on your iPhone.
  2. Tap Devices, tap the name of the device you want to set up an alert for, and then tap the More button.
  3. Below Notify Me, tap Notify When Left Behind.
  4. Turn on Notify When Left Behind and then follow the onscreen instructions.
  5. If you want to add a Trusted Location, you can choose a suggested location, or tap New Location, select a location on the map, and then tap Done.
  6. Tap the Done button.

Get notified when your iPhone Wallet with MagSafe detaches from your iPhone

If your iPhone Wallet with MagSafe and Find My support gets separated from your iPhone, you can get an alert one minute later. The Find My app then shows its last known location on a map.

  1. Open the Find My app on your iPhone.
  2. Tap Devices, tap the name of your iPhone Wallet with MagSafe, and tap the More button.
  3. Tap Notify When Detached.
  4. Turn off or on Notify When Detached and tap the Done button.
Tag: Find My

You can send messages with drawings, doodles, or Digital Touch gestures and effects. You can also use Image Playground to create and send images.

Digital Touch even lets you draw on a black background. And with Apple Intelligence, you can use Image Playground to create images directly in the Messages app, so there’s no need to switch to another app to make one.

Here’s how to draw and create images in Messages on iPhone.

Send a drawing or doodle

  1. Open the Messages app on your iPhone.
  2. In a conversation, tap the Add button.
  3. Swipe up, then tap Drawing.
  4. Draw using the tools, tap the Done button and tap the Send button to send your image.

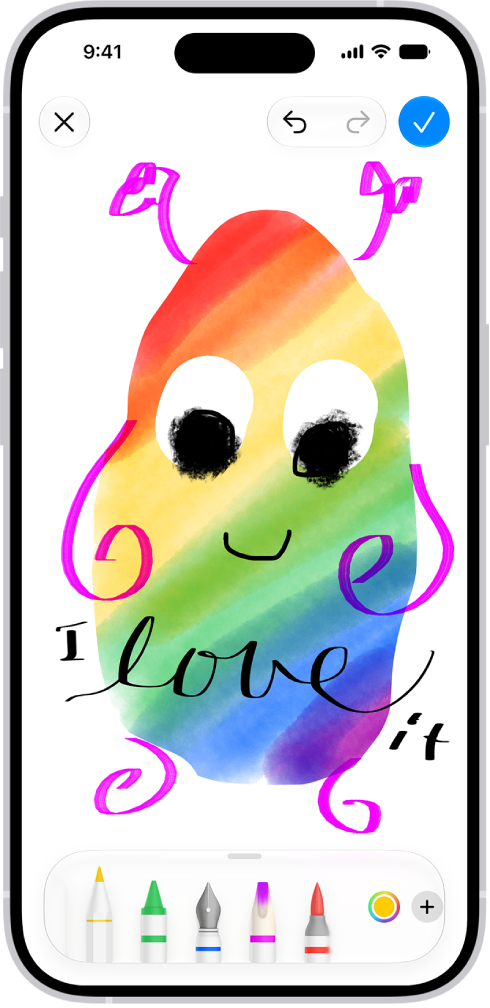
    The canvas for drawing in Messages.

To draw on a black background, you’ll use Digital Touch, described below.

Create and send original images

To create images directly in the Messages app, use Apple Intelligence with Image Playground.

Note: Apple Intelligence on iOS 27 or later is available on an Apple Intelligence-enabled iPhone 15 Pro, iPhone 15 Pro Max, or iPhone 16 model or later. Apple Intelligence is not available in all languages or regions. Usage limits may apply.*

  1. Open the Messages app on your iPhone.
  2. Start a new message or open a conversation.
  3. Tap the Add button, then tap Image Playground.
  4. Do one of the following:
    • Create a new image: Tap Create at the top, follow instructions to create an image. Tap the Done button.
    • Select an image you previously created: Tap Gallery at the top and select your image. Tap the Done button.
  5. Tap the Send button to send your image.

Screen Time settings include a way to block access to image creation features, like Image Playground.

Send a Digital Touch gesture, animation, or effect

With Digital Touch, you can send animated sketches, taps, kisses, heartbeats, and more, on their own or as an effect on a photo or video. You need iMessage to use Digital Touch.

  1. Open the Messages app on your iPhone.
  2. In a conversation, tap the Add button.
  3. Swipe up, tap Digital Touch, and then do one of the following:

    • Send an animated gesture: Tap or touch and hold with one or two fingers.

      Your gesture is sent automatically when you finish it. Touch and hold the color dot to choose a color for the one-finger taps.

      Note: If you have Apple Watch or another sensor that records heartbeat data, Messages may use the recorded data when you touch and hold with two fingers to send a heartbeat.

    • Send an animated drawing: Draw with one finger.

      You can change the color, then start drawing again.

    • Add an effect to a new image: Tap the Camera button. Then tap the Take Picture button to take a photo or the Record Video button to record a video.

      To take a new photo or video, or to erase anything you draw on your preview, tap the Back to Preview button.

  4. Tap the Send button to send your drawing or image, or tap the Close button to delete it.

*Apple Intelligence is available with Siri and device language set to Chinese (Simplified), Chinese (Traditional), Danish, Dutch, English, French, German, Italian, Japanese, Korean, Norwegian, Portuguese, Spanish, Swedish, Turkish, or Vietnamese. Some features may not be available in all regions or languages. Some devices may not be available in all regions. Siri AI is available in beta in iOS 27, iPadOS 27, macOS 27, watchOS 27, and visionOS 27 and requires an Apple Intelligence–enabled device set to a supported language. Available in English to start. Siri AI will not be initially available in the EU on iOS, iPadOS, and watchOS. Certain Apple Intelligence features that rely on server-side models are subject to daily usage limits, including but not limited to Siri AI, Intelligent Photo Editing Tools, Image Playground, and AFM 3 Cloud models in Shortcuts. Daily limits may vary by feature, request complexity, system demand, system policies, and other factors. Expanded access to such features will be available for a fee in the future. Use of these features is subject to the Apple Intelligence Terms and Conditions.

You can change how app icons and widgets look on your Home Screen—adjust their size, apply a color tint, or switch between light and dark appearances. Auto gives icons and widgets a dark look at night, and a light appearance during the day.

In large size, the app names disappear, and a clear look makes the icons translucent. You can resize a widget, too. Some apps don’t offer every widget size, though, while others offer sizes up to extra large.

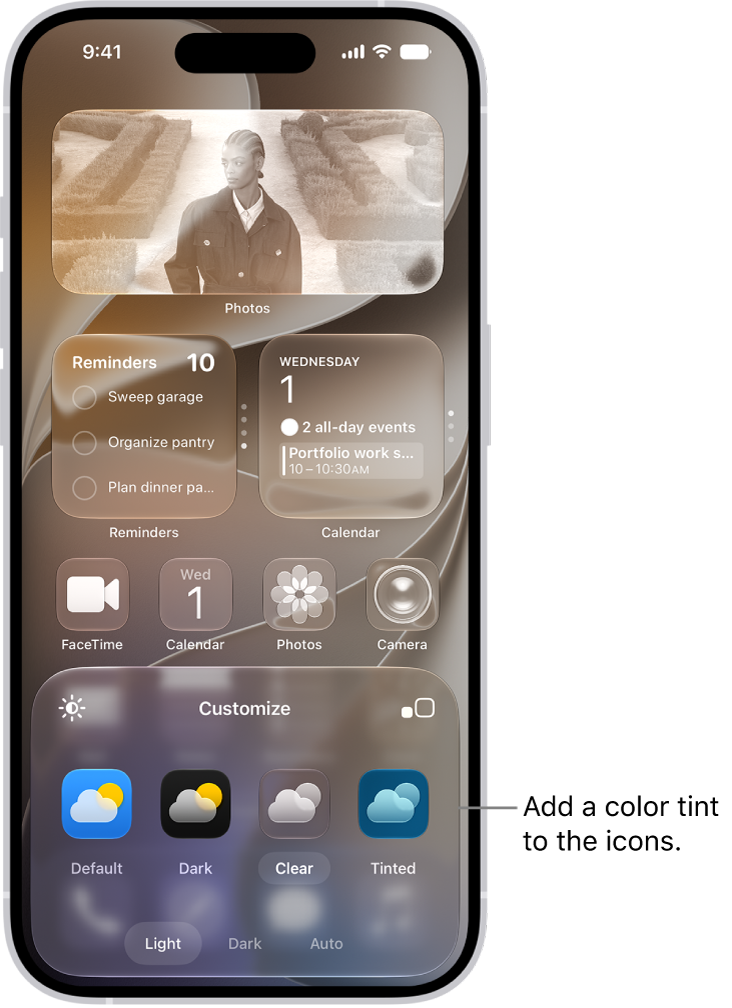
A customized Home Screen clear icons tinted blue and arranged to frame the photo, and controls at the bottom of the screen for customizing icons. Options include Automatic, Dark, Light, and Tinted buttons, options for choosing color and saturation, and Small and Large buttons for setting the icons’ size.

Customize the look of app icons

  1. Go to the Home Screen.
  2. Touch and hold the Home Screen background until the icons begin to jiggle.
  3. Tap the Edit button, then choose Customize.
  4. Do any of the following:
    • Make the icons larger: Tap the Large App Icon button. In large size, the names of the apps disappear.
    • Choose a dark appearance: Tap Dark. To show icons and widgets with a dark appearance at night and a light appearance during the day, tap Auto.
    • Give the icons a clear look: Tap Clear to make the icons translucent, then choose Light, Dark, or Auto.
    • Add a color tint: Tap Tinted. Use the sliders to choose the color and saturation (or use the eyedropper to select a color in your wallpaper). Then choose Light, Dark, or Auto.

Resize a widget

  1. Go to the Home Screen.
  2. Touch and hold the app icon or widget on your Home Screen.
  3. Choose a widget size.

Note: Widget sizes vary by app. Some provide only small and medium widgets, while others go up to extra large.

To change the widget back to an app icon, touch and hold it, then tap the App Icon button.

Switch Control is an assistive technology for anyone with limited mobility. It enables you to interact with iPhone by activating a switch, such as pressing an external adaptive button, performing a head movement, or making a voiced or voiceless sound. You can even use the iPhone screen itself as a switch, with no extra hardware.

Using one or more switches, you can move a cursor around the screen and use the Scanner menu to choose an action, like tap, zoom in, or zoom out. A switch can be an external hardware device, or even a feature on your iPhone, like Back Tap or simple sounds.

What is a switch?

Your switch might be a feature on your iPhone or an external hardware device.

Switches on iPhone work without any additional hardware, such as:

  • Screen: Use a tap or long press anywhere on the iPhone screen. You can set up tap and long press as two different switches with separate actions.
  • Camera: While in view of the front-facing iPhone camera, move your head to the left or right, or pinch your left or right index finger and thumb. You can set up each gesture as a different switch with a separate action.
  • Back Tap: Double-tap or triple-tap the back of iPhone. You can set up double tap and triple tap as two different switches with separate actions.
  • Sound: Make simple voiced sounds (such as “Oo”) or voiceless sounds (such as a pop). You can set up each sound as a different switch with a separate action.
  • AirPods: Nod or shake your head while wearing supported AirPods that are paired with your iPhone. You can set up nod and shake as two different switches with separate actions.
  • Gaming: Turn any switch into a virtual game controller to play your favorite games on iPhone.

External switches connect to iPhone instead, through Bluetooth® or the Lightning or USB-C connector, and they include:

  • Adaptive accessory
  • Joystick
  • Game controller
  • MFi switch or switch interface

How does Switch Control work?

Each switch in Switch Control performs a specific action. Move To Next Item, for example, moves the cursor to the next item on the screen. You perform the switch’s action by activating the switch, like making a sound, moving your head, or pressing the adaptive button.

Depending on how you like to work, you can use just one switch or multiple switches for different actions. You might move the cursor from one item to the next with your Move to Next Item switch, for example, then activate your Select Item switch once the cursor highlights the item you want.