Got a tip for us?

iPhone

The iPhone is a smartphone from Apple that runs the iOS mobile operating system. Between its apps, communication features, the camera, mobile internet access, and other functionalities, the iPhone has quickly become an integral part of many peoples tech lives.

Cycle Tracking in the Health app can provide notifications when your logged cycle patterns are suggestive of perimenopause. You can track related symptoms and find support with educational resources.

You can log stages of perimenopause or menopause, and after logging, you can log related symptoms like hot flashes, night sweats, and sleep changes. When you track menopause, your perimenopause history is saved, and cycle deviation detection, predictions, and fertile window estimates are turned off.

Important: Cycle Tracking in the Health app should not be used for birth control or to diagnose a health condition. Cycle deviation notifications are based solely on the user’s logged cycle history. Cycle deviation notifications inclusive of perimenopause are for ages 40 and above. These notifications are not intended to replace traditional methods of diagnosis, monitoring, or treatment of perimenopause or menopause.

Log stages of perimenopause or menopause

  1. Start the Health app on your iPhone.
  2. Tap Browse, then tap Cycle Tracking.
  3. Scroll down, then tap Menopause Stages.
  4. Tap the Add button and tap Next.
  5. Do one of the following:
    • Log perimenopause: Tap I’m in perimenopause.
    • Log menopause: Tap I’ve reached menopause.

To learn more, tap Learn About Perimenopause and Menopause.

  1. Follow the onscreen instructions.

To track menopause after perimenopause, tap Menopause Stages, tap the Add button, then follow the onscreen instructions. Your perimenopause history is saved and all cycle deviation detection, predictions, and fertile window estimates are turned off.

Once you’ve logged perimenopause and menopause, you can log related symptoms, such as night sweats, hot flashes, sleep changes, and more.

Log bleeding after menopause

  1. Start the Health app on your iPhone.
  2. Tap Browse, then tap Cycle Tracking.
  3. Swipe to select a day and tap Bleeding After Menopause.
  4. Tap Had Bleeding and tap a bleeding level. Tap Done.

Note: When you log bleeding after menopause, you receive a notification recommending that you contact your doctor.

About your health data and privacy

The information you add about yourself in Health is yours to use and share. You can decide what information is stored in Health as well as who can access your data.

Apple says when your iPhone is locked with Face ID, Touch ID, or a passcode, all of your health and fitness data in Health, other than your Medical ID, is encrypted. Any health data synced to iCloud is encrypted both in transit and on Apple servers. And if you have a version of iOS, iPadOS, and watchOS (if you’re using iPad and Apple Watch for cycle tracking) with default two-factor authentication and a passcode, your health and activity data is stored in a way that Apple can’t read it.

This means that when you use the Cycle Tracking feature and two-factor authentication, your health data synced to iCloud is encrypted end-to-end, and Apple doesn’t have the key to decrypt the data and therefore cannot read it.
Tag: Health

You can get detailed walking directions to your destination. You can preview the elevation for your walk and choose a route that best avoids hills, stairs, or busy roads.

Maps speaks walking-specific directions for turns and other maneuvers, like walking up stairs, and Siri can give you walking directions home, too. Immersive walking instructions aren’t available in all countries or regions, though.

Here’s how to get walking directions in Maps on iPhone.

Note: Turn-by-turn spoken directions and immersive walking instructions aren’t available in all countries or regions.

Get walking directions

  1. Start the Maps app on your iPhone.
  2. Touch and hold anywhere on the map or enter an address in the search field and then tap the directions button.
  3. Tap Go or Steps for the route you want to take.

If you tap Go, as you walk along your route, Maps speaks walking-specific directions for turns and maneuvers like walking up stairs.

Siri: You can also ask Siri something like, “Give me walking directions home.” For thousands of trails in parks across the U.S., you can find out their length, preview elevation information, see photos, and more.

Avoid hills, busy roads, or stairs

  1. Start the Maps app on your iPhone.
  2. Touch and hold anywhere on the map or enter an address in the search field and then tap the directions button.
  3. Tap Options (below Directions), make your choices (below Avoid) and then tap the Done button.

Automatically see directions in augmented reality

Immersive walking instructions show you where to turn using augmented reality and the iPhone camera.

  1. Start the Settings app on your iPhone.
  2. Tap Apps, then tap Maps.

Below Directions, tap Walking, then turn on Raise to View.

Get walking directions, as above.

Raise iPhone, tap the Pedestrian AR button, then follow the onscreen instructions.

  1. To return to the map, tap the Close button.

Improve how accurately iPhone determines your location while walking

To improve how accurately your iPhone determines your location, and which direction you’re facing as you walk, you can use the camera and motion sensors.

  1. Start the Settings app on your iPhone.
  2. Tap Apps, then tap Maps.

Below Directions, tap Walking, then turn on Enhanced.

To decrease battery usage, you can turn off this feature.

Tag: Maps

On an iPhone with Face ID, you can adjust Face ID and attention settings if you have physical or vision limitations. If you can’t move your head in a full circle during setup, you can use Accessibility Options. Face ID is attention-aware, too, and you can turn that check off.

Set up Face ID with Accessibility Options

Face ID setup usually asks you to gently move your head in a circle so it can see all the angles of your face. If the full range of head motion isn’t possible for you, you can still set up Face ID without moving your head.

  1. Open Settings and then tap Face ID & Passcode.
  2. Tap Set Up Face ID and then tap Get Started.
  3. Position your face within the frame and tap Accessibility Options.

It’s still secure, but Face ID requires more consistency when you unlock iPhone.

Change attention settings

Face ID is attention-aware for additional security, so iPhone only unlocks when your eyes are open and looking at the screen. Attention-aware features also let iPhone lower the volume of alerts, reveal notifications and messages, or keep the screen lit when you’re reading.

If you don’t want iPhone to check for your attention, do the following:

  1. Open Settings, tap Accessibility, and then tap Face ID & Attention.
  2. Turn on or off any of the following:
    • Require Attention for Face ID: Provide an additional level of security by unlocking iPhone only when you’re looking at it.
    • Attention Aware Features: iPhone checks for attention before dimming the display, expanding a notification when locked, or lowering the volume of some alerts.
    • Haptic on Successful Authentication: Play a haptic when Face ID successfully unlocks iPhone, authorizes Apple Pay, or verifies iTunes and App Store purchases.

If you turn on VoiceOver when you first set up iPhone, these settings are off by default.

Note: Requiring attention makes Face ID more secure.

Tag: face id

When your iPhone has a low cellular signal, use Wi-Fi Calling to make and receive calls through a Wi-Fi network. When it’s available, you’ll see “Wi-Fi” after your carrier name in the status bar, and your calls go through Wi-Fi. Emergency calls go through cellular service when it’s available, though.

  1. Open the Settings app on your iPhone.
  2. Tap Cellular, then—if your iPhone has Dual SIM—choose a line (below SIMs).
  3. Tap Wi-Fi Calling, then turn on Wi-Fi Calling on This iPhone.
  4. Tap Enable and then follow the onscreen instructions.

Note: Emergency calls on your iPhone are routed through cellular service when available. In the event that cellular service isn’t available, and you have enabled Wi-Fi Calling, emergency calls may be made over Wi-Fi, and your device’s location information may be used for emergency calls to aid response efforts, regardless of whether you enable Location Services. Some carriers may use the address you registered with the carrier when signing up for Wi-Fi Calling as your location. When connected to Wi-Fi calling, your iPhone may not receive emergency alerts.

Note: Wi-Fi calling isn’t available with all carriers or in all countries or regions. Contact your carrier for feature availability. When Wi-Fi Calling is available, “Wi-Fi” is displayed after your carrier name in the status bar, and all your calls go through Wi-Fi. If the Wi-Fi connection is lost when you make calls, calls switch automatically to your carrier’s cellular network using VoLTE (Voice over LTE), if available and turned on. (VoLTE calls also switch to Wi-Fi when a Wi-Fi connection becomes available.)

Tag: Wi-Fi

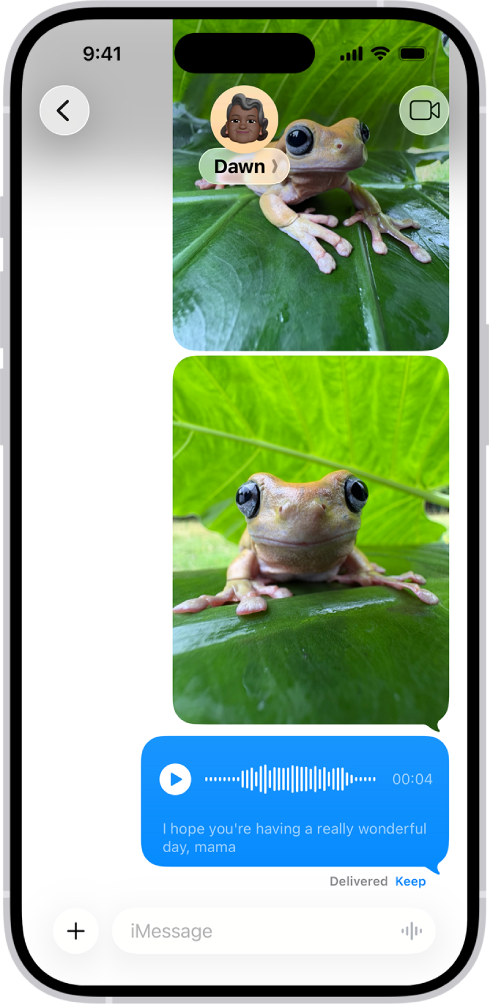
You can record and send audio messages, along with transcripts of what’s said in the message. Audio messages are automatically deleted to save space on your iPhone, but if you want to save them, you can.

With Raise to Listen, you can play and reply to an audio message just by moving your iPhone. It’s quick. You can also listen to or reply to a recorded audio message, and switch to FaceTime from Messages.

Note: Audio message transcription is available in select languages.

A Messages conversation with an audio message.

Record and send an audio message

Instead of writing a text message, record an audio message, which can be played right in the Messages conversation.

  1. Start the Messages app on your iPhone.
  2. In a conversation, tap the Add button.
  3. Tap Audio, then begin speaking.
  4. Tap the Stop button to pause or end your recording. Then do any of the following to your message:

    • Send it: Tap the Send button.
    • Listen to review it: Tap the Play button.
    • Add to the end of it: Tap the Continue Recording button (with the message duration).
    • Cancel it: Tap the Close button.
  5. Tap Keep to save an incoming or outgoing audio message on your iPhone.

    Otherwise, the recording is deleted from the conversation—on your iPhone only—2 minutes after you send or listen to it. Recipients can play your recording any time after they receive it. To save it, they need to tap Keep within 2 minutes after listening to it.

Quick tip: For quicker follow-up audio messages, touch and hold the Record Audio button in the text field.

Audio messages are transcribed automatically in the language set in the sender’s Settings.

Always keep audio messages

  1. Start the Settings app on your iPhone.
  2. Tap Apps, then tap Messages.
  3. Tap Expire (below Audio Messages) and tap Never.

Listen to or reply to a recorded audio message

  1. Start the Messages app on your iPhone.
  2. Open a conversation with an audio message and tap the Play button to play it.
  3. Do any of the following:
    • Slide right and left on the audio message to fast-forward or rewind.
    • Touch and hold the Play button or the Pause button to adjust the playback speed.
  4. Tap Keep to save an audio message in the conversation.

To save the message in the Voice Memos app , touch and hold the audio message, then tap Save to Voice Memos.

Use Raise to Listen

When you receive an audio message, moving your iPhone lets you play and reply to it. Do either of these:

  • Play an audio message: Raise your iPhone to your ear.
  • Reply to an audio message: Lower your iPhone and raise it to your ear again, then speak after you hear a tone. Tap the Send button to send your reply.

Turn off Raise to Listen

You can turn the feature off if you’d rather audio messages didn’t play when you raise your iPhone to your ear.

  1. Start the Settings app on your iPhone.
  2. Tap Apps, then tap Messages.
  3. Turn off Raise to Listen.

Switch to FaceTime from Messages

You can quickly make an audio or video call instead of sending a message by switching to FaceTime. In a Messages conversation, tap the FaceTime button.

To keep tabs organized and make them easier to find again later, you can have Safari organize tabs into related topics, or create your own Tab Groups.

With Apple Intelligence, Safari can sort your tabs into suggested topics on its own, based on your browsing history. You can also reorder tabs, pin a tab at the top of a Tab Group, or move a tab to another Tab Group.

Here’s how to organize your tabs in Safari on iPhone.

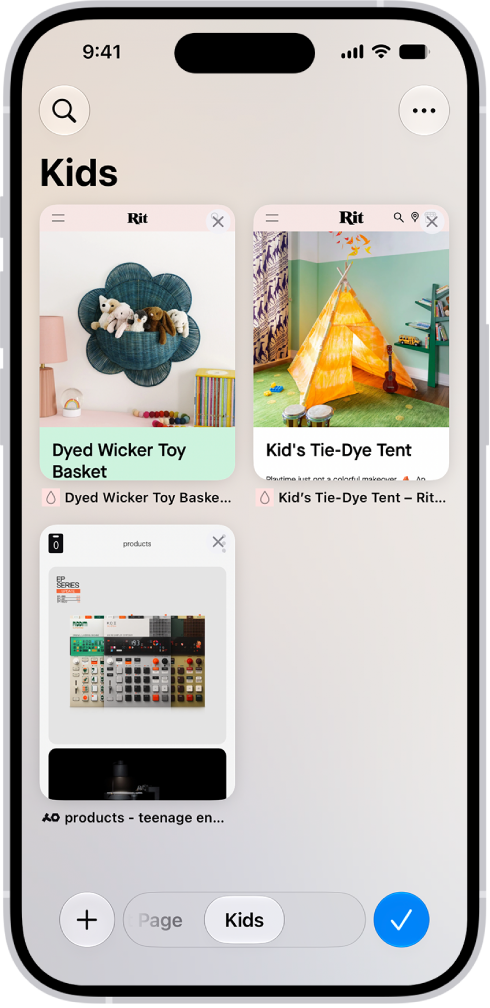
Previews of three open tabs in a Tab Group called Kids are visible on the screen.

Use Apple Intelligence to organize tabs into topics

Apple Intelligence can automatically organize your tabs into suggested topics based on your browsing history.

Note: Apple Intelligence on iOS 27 or later is available on an Apple Intelligence-enabled iPhone 15 Pro, iPhone 15 Pro Max, or iPhone 16 model or later. Apple Intelligence is not available in all languages or regions. Usage limits may apply.*

  1. Open the Safari app on your iPhone.
  2. To set whether Safari automatically organizes tabs, tap the Tabs button and tap the Organize button. Tap Automatically Create Topics.
  3. On the Tab screen, tap the New Tab button to open new tabs as you browse multiple websites. When you have two or more tabs that can be organized together by topic (for example, news), a suggested topic appears on the Tab screen with related tabs grouped together into thumbnails.
  4. Do any of the following:
    • Preview tabs in a topic: Tap a topic to see thumbnails of each tab. Tap a thumbnail to open it.
    • Open or close all tabs in a topic: Tap a topic to view all tabs within the topic. Tap the Back button to close the topic.
    • See more options: Tap a topic to view all its tabs and tap the More button. Do any of the following:
      • Copy links: Tap Copy Links.
      • Move tabs to a Tab Group: Tap Move Tabs, then select a Tab Group to move them to.
      • Close all tabs in this topic: Tap Close Tabs.
      • Provide feedback on the suggested topic: Tap Looks Good or Something Isn’t Right.

To turn this feature off, tap the Organize button on the Tab screen, then tap Never.

Reorder tabs

  1. Open the Safari app on your iPhone.
  2. Tap the Tabs button.
  3. Tap the More button, tap Arrange Tabs By, and choose an option.

Or touch and hold the tab, then drag it to a new position.

Create a new Tab Group

  1. Open the Safari app on your iPhone.
  2. Tap the Tabs button.
  3. Touch and hold a tab, tap Move Tab, and then tap New Tab Group.
  4. Enter a name, then tap the Done button.

Quick tip: Switching between your Tab Groups is easy: Tap the tab groups in the bottom center of the screen.

Rename a Tab Group

  1. Open the Safari app on your iPhone.
  2. Tap the Tabs button.
  3. Tap the More button and then tap Rename Tab Group.
  4. Enter a name, then tap the Done button.

Pin a tab at the top of a Tab Group

Your Tab Groups can have pinned tabs in each group, and a pinned tab stays at the top of the Tab Group.

  1. Open the Safari app on your iPhone.
  2. Tap the Tabs button.
  3. Touch and hold the tab you want to pin, then tap Pin Tab.

Move a tab to another Tab Group

  1. Open the Safari app on your iPhone.
  2. Tap the Tabs button.
  3. Touch and hold a tab and then tap Move Tab.
  4. Choose one of the Tab Groups you created previously, or create a new group.

*Apple Intelligence is available with Siri and device language set to Chinese (Simplified), Chinese (Traditional), Danish, Dutch, English, French, German, Italian, Japanese, Korean, Norwegian, Portuguese, Spanish, Swedish, Turkish, or Vietnamese. Some features may not be available in all regions or languages. Some devices may not be available in all regions. Siri AI is available in beta in iOS 27, iPadOS 27, macOS 27, watchOS 27, and visionOS 27 and requires an Apple Intelligence–enabled device set to a supported language. Available in English to start. Siri AI will not be initially available in the EU on iOS, iPadOS, and watchOS. Certain Apple Intelligence features that rely on server-side models are subject to daily usage limits, including but not limited to Siri AI, Intelligent Photo Editing Tools, Image Playground, and AFM 3 Cloud models in Shortcuts. Daily limits may vary by feature, request complexity, system demand, system policies, and other factors. Expanded access to such features will be available for a fee in the future. Use of these features is subject to the Apple Intelligence Terms and Conditions.

Tag: Safari

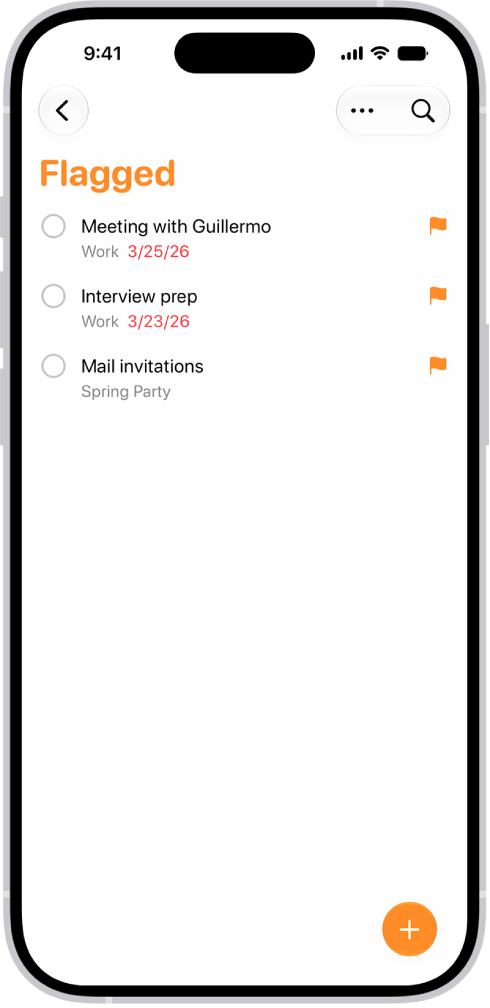
In the Reminders app, you can easily filter items across all your lists using Smart Lists. You can create custom Smart Lists to automatically include items filtered by tags, dates, times, locations, flags, and priority, and you can choose more than one tag and combine them with other filters.

There are default Smart Lists, too, and you can convert a list to a Smart List.

Here’s how to use Smart Lists in Reminders on iPhone.

The Flagged Smart List in the Reminders app, which automatically collects all reminders marked with a flag into a single, consolidated list.

Note: Updated reminders in iCloud give you all the Reminders features described in this guide. Some aren’t available when using other accounts.

Automatically organize items using the default Smart Lists

  1. Start the Reminders app on your iPhone.
  2. Tap the More button and then tap Edit Lists.
  3. Turn on or off the following Smart Lists:
    • Today: Items scheduled for today and overdue items
    • Scheduled: Items scheduled by date or time
    • All: All items across all your lists
    • Flagged: Items with a flag
    • Completed: Items with a checkmark
    • Assigned to Me: Items assigned to you in shared lists
    • Groceries: Grocery items
    • Siri Suggestions: Suggested items detected in Mail

Make a custom Smart List

  1. Start the Reminders app on your iPhone.
  2. Tap the Add List button.
  3. Enter a name for the list, tap List Type, and then choose Smart List.
  4. Tap Edit Filters, choose one or more filters, and choose to include items matching any or all of the selected filters. You can filter by tags, dates, locations, and more. Tap the Done button.
  5. Choose a color and symbol for the list (optional).
  6. Tap the Done button.

Convert a list to a Smart List

Converting a list moves its items to the top level of the default list and tags them with the name of the Smart List.

Note: You can’t convert a shared list.

  1. Start the Reminders app on your iPhone.
  2. View the list you want to convert.
  3. Tap the More button, tap Show List Info and scroll to the bottom. Tap Convert to Smart List.

You can design your own personalized Memoji: choose skin tone, glasses, body, and more. You can create multiple Memoji to use in different contexts, and each one automatically generates a range of poses and expressions.

On supported models, you can send animated Memoji messages that record your voice and mirror your facial expressions. And if you want a new Memoji that’s only slightly different from one you already have, you can duplicate it and edit the copy.

Create Memoji

  1. Start the Messages app on your iPhone.
  2. In a conversation, tap the Add button.
  3. Tap Memoji. (You may have to swipe up.)
  4. Tap the Add Memoji button.

    Tip: To make a new Memoji whose outfit or appearance differs slightly from one you already have, tap to select it, tap the Edit button, then tap Duplicate.

  5. Tap each feature (Skin, Hairstyle, and others to the right) and choose the options you want.
  6. Tap the Done button to save the Memoji to your collection.

Send animated Memoji or Memoji recordings

If you have a supported model, you can send Memoji messages that mirror your facial expressions and record your voice.

  1. Start the Messages app on your iPhone.
  2. In a conversation, tap the Add button.
  3. Tap Memoji, then swipe and tap to choose a Memoji.
  4. Tap the Record button to record your facial expressions and voice and tap the Stop button to stop.

    Tap Replay to review your message.

  5. Tap the Send Recording button to send your message or the Discard Recording button to cancel.

Memoji can also capture your movements, facial expressions, and voice when you use video effects in a video call.

You can change your voicemail greeting, password, and alert sounds.

How you change your voicemail greeting depends on which Phone app layout you’re using, Unified or Classic, and recording a custom one is not supported by all carriers or in all countries and regions. You can also change your voicemail password, and change your voicemail alert sound to a new alert sound from the list, or one you purchase from the Tone Store.

Change your voicemail greeting

  1. Open the Phone app on your iPhone.
  2. Do one of the following, depending on which Phone app layout you’re using:
    • Unified layout: Tap Calls, tap Edit, and tap Edit Voicemail Greeting.
    • Classic layout: Tap Voicemail, then tap Greeting.
  3. Tap Custom and tap Record (not supported by all carriers or in all countries and regions).

Change your voicemail password

  1. Open the Settings app on your iPhone.
  2. Tap Apps, then tap Phone.
  3. Tap Change Voicemail Password, then enter the new password.

Change your voicemail alert sound

  1. Open the Settings app on your iPhone.
  2. Tap Sounds & Haptics and then tap New Voicemail.
  3. Tap a new alert sound from the list, or tap Tone Store to purchase one.
Tag: Mail

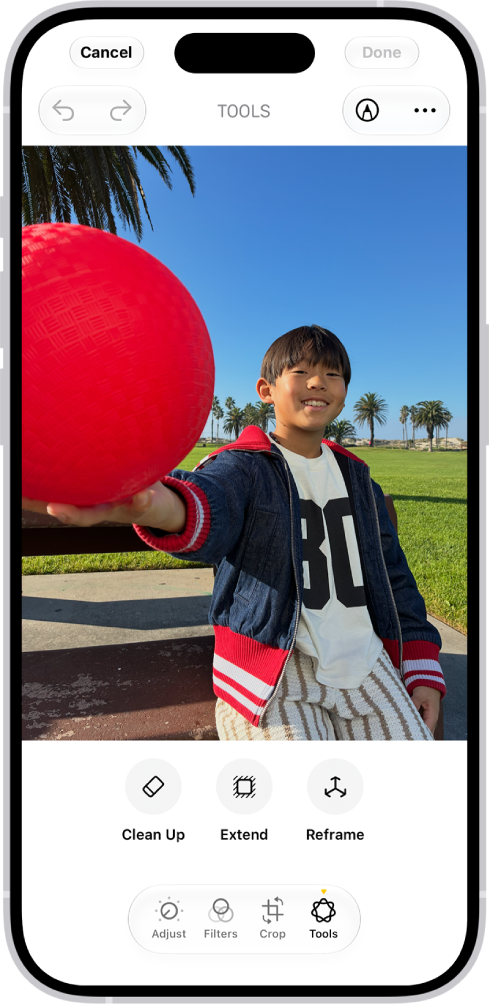
With Apple Intelligence, you can remove distracting objects, extend a photo beyond its original frame, and adjust its perspective.

The Clean Up tool removes distracting objects from a photo, and it may even highlight some items for you to remove. You can also extend the background or reframe the perspective, though Clean Up isn’t available in all languages or regions.

Here’s how to clean up, extend, and reframe photos on iPhone.

Note: Apple Intelligence on iOS 27 or later is available on an Apple Intelligence-enabled iPhone 15 Pro, iPhone 15 Pro Max, or iPhone 16 model or later. Apple Intelligence is not available in all languages or regions. Usage limits may apply.*

The buttons for Clean Up, Extend, and Reframe are displayed below a photo.

Clean up distractions

To remove distracting objects from a photo, use the Clean Up tool.

Note: Clean Up is not available in all languages or regions.

  1. Start the Photos app on your iPhone.
  2. Open a photo and then tap the Edit button.
  3. Tap Tools, then tap Clean Up.
  4. Tap, brush, or circle what you want to remove.
    • Some items may be highlighted automatically so you can quickly tap to remove them.
    • You can use two fingers to pinch, zoom, or pan the image.
    • Tap the Undo button if you want to restore something you removed
  5. Tap Clean Up (if you’re using High Quality processing).
  6. Tap the Done button. Then tap Done to close the photo.

To undo Clean Up changes after saving, follow steps 1 through 3 above, then tap Reset.

You can choose the processing type Photos uses for Clean Up—Auto, Fast, or High Quality. Tap Auto during the Clean Up process, then choose an option.

Extend the background

To expand the edges of the original photo frame, use the Extend tool.

  1. Start the Photos app on your iPhone.
  2. Open a photo and then tap the Edit button.
  3. Tap Tools, then tap Extend.
  4. Pinch or drag the photo to extend the background; drag the edge of the frame to crop.
  5. Tap Extend.
  6. Tap the Done button. Then tap Done to close the photo.

After you save, you can undo the changes you made with the Extend tool. Follow steps 1 through 3 above, then tap Reset.

Reframe the perspective

After you take a photo, the Reframe tool changes its point of capture.

  1. Start the Photos app on your iPhone.
  2. Open a photo and then tap the Edit button.
  3. Tap Tools, then tap Reframe.
  4. Touch and drag the photo to adjust the perspective or use two fingers to pan, zoom, and rotate.
  5. Tap Reframe.

    Tap the photo to compare the reframed version to the original.

  6. Tap the Done button. Then tap Done to close the photo.

After you save, you can undo the changes you made with the Reframe tool. Follow steps 1 through 3 above, then tap Reset.

*Apple Intelligence is available with Siri and device language set to Chinese (Simplified), Chinese (Traditional), Danish, Dutch, English, French, German, Italian, Japanese, Korean, Norwegian, Portuguese, Spanish, Swedish, Turkish, or Vietnamese. Some features may not be available in all regions or languages. Some devices may not be available in all regions. Siri AI is available in beta in iOS 27, iPadOS 27, macOS 27, watchOS 27, and visionOS 27 and requires an Apple Intelligence–enabled device set to a supported language. Available in English to start. Siri AI will not be initially available in the EU on iOS, iPadOS, and watchOS. Certain Apple Intelligence features that rely on server-side models are subject to daily usage limits, including but not limited to Siri AI, Intelligent Photo Editing Tools, Image Playground, and AFM 3 Cloud models in Shortcuts. Daily limits may vary by feature, request complexity, system demand, system policies, and other factors. Expanded access to such features will be available for a fee in the future. Use of these features is subject to the Apple Intelligence Terms and Conditions.