Got a tip for us?

iPhone

The iPhone is a smartphone from Apple that runs the iOS mobile operating system. Between its apps, communication features, the camera, mobile internet access, and other functionalities, the iPhone has quickly become an integral part of many peoples tech lives.

In the Podcasts app, you can view and search episode transcripts. You’ll find them in an episode’s information or on the Now Playing screen. When you view a transcript while watching a video podcast, the transcript view replaces the video, and audio continues to play while you read. You can also play or share from any point, copy text, or jump to that point in the podcast. Transcript availability may vary by language, and by country or region.

Note: Transcript availability may vary by language, and by country or region.

View transcripts

  1. Open the Podcasts app on your iPhone.
  2. Do any of the following:
    • While viewing episode information: Scroll down to the Transcripts section. You can also tap the More button and tap View Transcript.
    • From the Now Playing screen: Tap the View Transcript button below the volume slider. You can also tap the More button and tap View Transcript.

To hide the transcript from the Now Playing screen, swipe down, then tap the Hide Transcript button below the volume slider. When you view a transcript while watching a video podcast, the video is replaced by the transcript view. Audio continues to play while you read the transcript. To watch with subtitles, tap the video to open it in full screen, tap the More button, then tap Subtitles.

Interact with transcripts

  1. Open the Podcasts app on your iPhone.
  2. While viewing a transcript, do any of the following:
    • From the Now Playing screen: Touch and hold text. Choose to play from that point, share from that point, or select text. You can also tap a paragraph to jump to that point in the podcast.
    • From episode details: Select text and choose to play from that point, copy text, or share from that point. Tap the Right arrow for additional options such as Look Up or Translate.

Search transcripts

  1. Open the Podcasts app on your iPhone.
  2. While viewing a transcript, do one of the following:
    • From the Now Playing screen: Swipe up on the transcript and then tap Search.
    • From episode details: Tap the Search Transcript button.
  3. Optionally, tap the Search Options button in the search field to specify whether the whole word or the capitalization needs to match in the search results.
You can express yourself in the messages you send by formatting and animating text, or by adding effects to message bubbles or the entire screen. You can also search #images to find trending GIFs to send, and save GIFs others send to you (not available in all countries or regions).

Bold, italics, and underlining can format your text, and playful effects like explode or shake can go on a single word, emoji, sentence, or your entire message. Bubble and screen effects play when your recipient gets your message.

Note: You and your recipients must use iMessage to send and receive messages with formatting or effects. To see text formatting and text effects, recipients also need a device with iOS 18, iPadOS 18, macOS 15, watchOS 11, or visionOS 2 or later. If they don’t have one, your messages appear in plain text.

Format and animate words

In texts you send using iMessage, you can format the text in your messages with bold, italics, and underlining. You can also add playful effects like explode or shake to any sentence, word, or letter, and even to emoji.

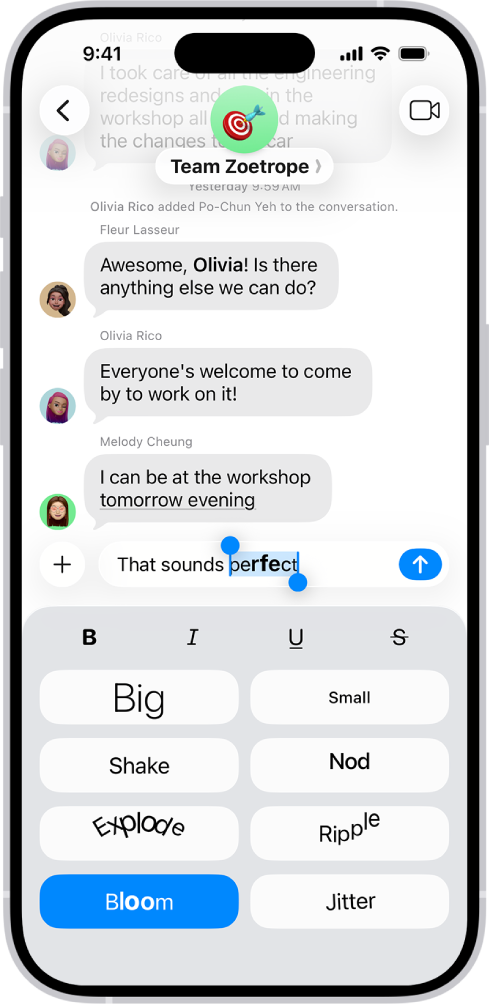
A Messages conversation with a new message selected in the text field, and formatting and effects options shown below it. The selected text appears with a preview of the effect.

  1. Open the Messages app on your iPhone.
  2. In a conversation, enter a message and then select the text you want to format or animate.
  3. Tap the Text Format button above the keyboard and then select your preferred formatting (bold, italic, underline, or strikethrough) or text effect (big, small, shake, nod, explode, ripple, bloom, or jitter).
  4. Tap the Send button.

You can format or apply effects to a single word, emoji, single word, sentence, or your entire message. Tap the Text Format button before entering the text you want to format or apply effects to.

Add effects to the message bubble or the full screen

Add special effects that play when your recipient gets your message, such as these:

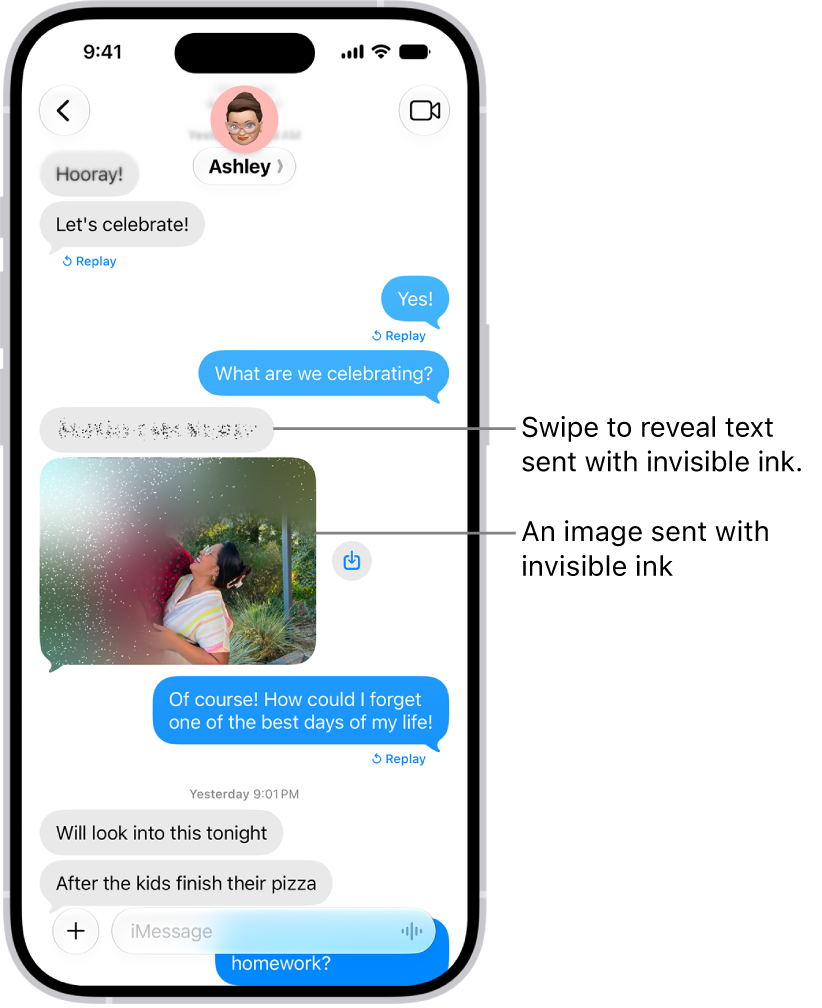
  • Bubble effects that change how the message appears—Slam or Loud make it pop out, Gentle makes it arrive softly, and Invisible Ink blurs the bubble until your recipient swipes to reveal it
  • Full-screen animations like fireworks, balloons, confetti, lively lasers, a moving spotlight, or the echo effect, which fills the conversation with copies of your message bubble

A conversation in Messages including a text message and a photo sent with the Invisible Ink effect.

  1. Open the Messages app on your iPhone.
  2. In a conversation, enter a message or insert an image or link.
  3. Touch and hold the Send button and then do one of the following:
    • Tap a gray dot to preview a bubble effect.
    • Tap Screen, then swipe left to preview different screen effects.
  4. Tap the Send button to send the message with the effect or the Close button to cancel the effect and return to your message.

Messages automatically uses the following screen effects for specific text strings:

  • Balloons for “Happy birthday”
  • Confetti for “Congratulations”
  • Fireworks for “Happy New Year”

Add an animated GIF

  1. Open the Messages app on your iPhone.
  2. In a conversation, tap the Add button and then tap #images. (You may have to swipe up.)
  3. To search for a specific GIF, tap “Find images,” enter a keyword (like “birthday”). Then tap a suggestion or tap the Search key on the keyboard.
  4. Tap a GIF to add it to your message. Then tap the Send button.

To save a GIF that you receive in a message to the Photos app so you can use it again later, touch and hold the GIF, then tap Save.

Note: Only the Messages app on Apple devices animates GIFs from #images.

The Shortcuts app lets you automate tasks you do often with just a tap or by asking Siri. You can create shortcuts to get directions to the next event in your Calendar, move text from one app to another, and more.

You don’t have to start from scratch, either. You can choose ready-made shortcuts from the Gallery, or build your own using different apps to run multiple steps in a task.

You can attach photos, videos, and documents to an email message. You can also scan a paper document and send it as a PDF attachment, or draw directly in a message and send the drawing as an attachment.

Depending on the file size, the attachment might appear inline with the text in the message or as the Attach File button at the end of the message. And if a file is too big for your email account, Mail can send it using Mail Drop instead.

Here’s how to add email attachments in Mail on iPhone.

Attach a photo, video, or document to an email

When you attach documents, videos, or photos to your email messages, recipients can easily download and save them.

  1. Start the Mail app on your iPhone.
  2. Tap in the message where you want to insert the attachment. Then tap the Insert Attachment Actions button above the keyboard.

    Do one of the following: Attach a document: Tap Attach File, then locate the document in Files.

    In Files, tap Recent , Shared , or Browse , then tap a file, location, or folder to open it.

    Attach a saved photo or video: Tap Photo Library, then choose a photo or video.

  3. Tap the Done button to return to the message.

    Take a new photo or video and attach it to the message: Tap Take Photo or Video, then take a new photo or video.

  4. Tap Use Photo or Use Video to insert it into your message, or tap Retake if you want to reshoot it.

    Note: If your file exceeds the maximum size allowed by your email account, follow the onscreen instructions to send it using Mail Drop.

Scan and attach a document to an email

Scanning a paper document lets you send it as a PDF.

  1. Start the Mail app on your iPhone.
  2. Tap in the message where you want to insert the scanned document and tap the Insert Attachment Actions button above the keyboard.
  3. Tap Scan Document.
  4. Position iPhone so that the document page appears on the screen—iPhone automatically captures the page.
  5. To capture the page manually, tap the Take Picture button or press a volume button.
  6. To turn the flash on or off, tap the Show Flash Settings button.
  7. Tap Retake or Keep Scan, scan additional pages and then tap Save when you’re done.
  8. To make changes to the saved scan, tap it. Do any of the following: Crop the image: Tap the Crop button.
    • Apply a filter: Tap the Show Filters button.
    • Rotate the image: Tap the Rotate button.
    • Delete the scan: Tap the Delete Scan button.

Create and attach a drawing to your email

For ideas that are hard to put into words, you can draw right in an email message. The drawing is added as an attachment that recipients can view and download.

  1. Start the Mail app on your iPhone.
  2. Tap in the message where you want to insert a drawing. Then tap the Insert Drawing button above the keyboard.
  3. Choose a drawing tool and color. Write or draw with your finger.

    When you’re finished, tap the Done button, then tap Insert Drawing.

  4. To resume work on a drawing, tap the drawing in the message and tap the Disclosure arrow in the menu that appears. Then tap Markup.
Tag: Mail

After you set up your first sleep schedule, you can set additional schedules. For example, you can create separate schedules for weekdays and the weekend. You can modify any schedule, too, for example, to change its wake up time.

You can also change sleep options like the duration of your wind-down period, how many hours of sleep you want to get, and more. It’s all in the Sleep section of the Health app, under Full Schedule & Options.

Here’s how to edit sleep schedules in Health on iPhone.

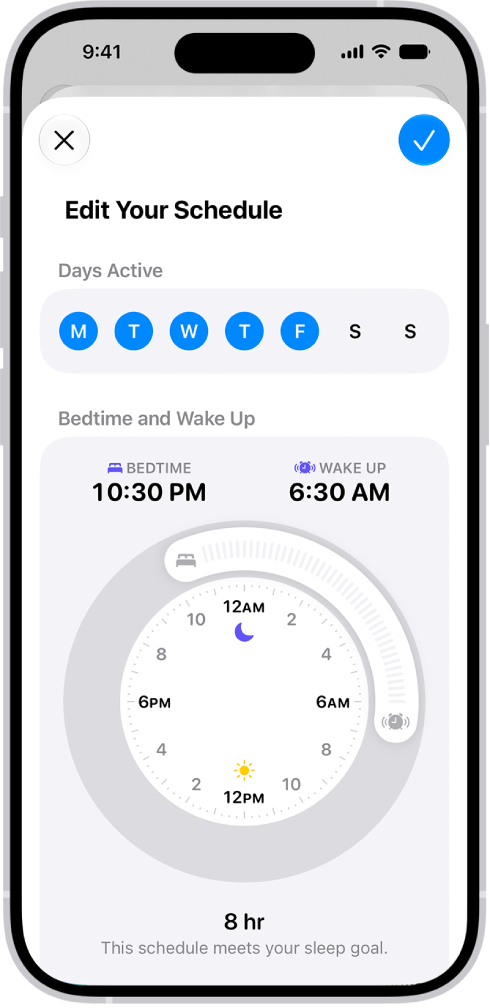
The edit your sleep schedule screen in Health, with a Days Active section and a Bedtime and Wake Up clock.

Add or change a sleep schedule

  1. Open the Health app on your iPhone.
  2. Tap Browse and tap Sleep. Tap Sleep again.
  3. Scroll down to Your Schedule, then tap Full Schedule & Options.
  4. Do one of the following:
    • Add a sleep schedule: Tap Add Schedule.
    • Change a sleep schedule: Tap Edit for the schedule you want to change.
  5. Do any of the following:
    • Set the days for your schedule: Tap a day or remove it from your schedule. The schedule applies only to days shown with solid-color circles.
    • Adjust your bedtime and wake up schedule: Drag the Bedtime button to change your bedtime, the Ringing Alarm button to change your wake up time, or the semicircle between the icons to shift both times simultaneously.
    • Set the alarm options: Turn Alarm on or off.

When Alarm is turned on, you can choose a sound, its volume, a vibration, and the snooze option.

Note: There’s no way to select a song for a sleep schedule alarm, but you can select one for an alarm with the Clock app.

  1. When you’re finished, tap Add or the Done button.

When you tap the Done button, the changes apply to every day in the schedule.

Change only your next schedule

Need a temporary change to a sleep schedule? You can make one.

  1. Open the Health app on your iPhone.
  2. Tap Browse and tap Sleep. Tap Sleep again.
  3. Scroll down to Your Schedule and tap Edit (below Next).
  4. Drag the Bedtime button to change your bedtime, the Ringing Alarm button to change your wake up time, or the semicircle between the icons to shift both times simultaneously.
  5. Choose alarm options.

When Alarm is turned on, you can choose a sound, its volume, a vibration, and the snooze option.

  1. When you’re finished, tap the Done button.

Note: To change your next sleep schedule alarm, you can also use the Clock app.

Your normal schedule resumes after your next wake up time.

Change your wind-down period, sleep goal, and more

  1. Open the Health app on your iPhone.
  2. Tap Browse and tap Sleep. Tap Sleep again.
  3. Scroll down to Your Schedule, then tap Full Schedule & Options.
  4. Scroll down to Additional Details. Then make any of the following changes:
    • Wind-down period: Tap Wind Down and then select how many minutes or hours to give yourself to wind down before your scheduled bedtime. Your Sleep Focus turns on at the beginning of the wind down period.
    • Sleep goal: Tap Sleep Goal and select a time. Any new schedules you set up reflect your new goal.
    • Sleep notifications: Turn Sleep Reminders on or off.
Tag: Health

In the iTunes Store app, you can purchase ringtones, text tones, and other alert tones for clock alarms and more.

You can browse by category or search for a specific song or artist, and play a preview before you buy. Tones you bought on another device can be downloaded again on your iPhone, too.

Here’s how to get ringtones, text tones, and alert tones in the iTunes Store on iPhone.

Buy new tones

  1. Open the iTunes Store app on your iPhone.
  2. Tap Tones.
  3. Browse by category or tap Search to find a specific song or artist.
  4. Tap a tone to see more information or play a preview.
  5. To buy a tone, tap the price.

Redownload tones purchased with your Apple Account

When you’ve bought tones on another device, you can download them again.

  1. Open the Settings app on your iPhone.
  2. Tap Sounds & Haptics (on supported models) or Sounds (on other iPhone models).
  3. Below Ringtone, tap any item.
  4. Tap Download All Purchased Tones. You might not see this option if you already downloaded all the tones that you purchased or if you haven’t purchased any tones.

When you purchase access to movies, TV shows, music, music videos, ebooks, audiobooks, or ringtones from Apple, you also have the option to permanently download these items to a compatible iPhone, iPad, Mac, or PC. Apple cannot revoke your downloaded content, and you can always access your downloaded content without an internet connection.

If it’s too late at night or too important to forget, you can schedule a text message to be sent at a later time.

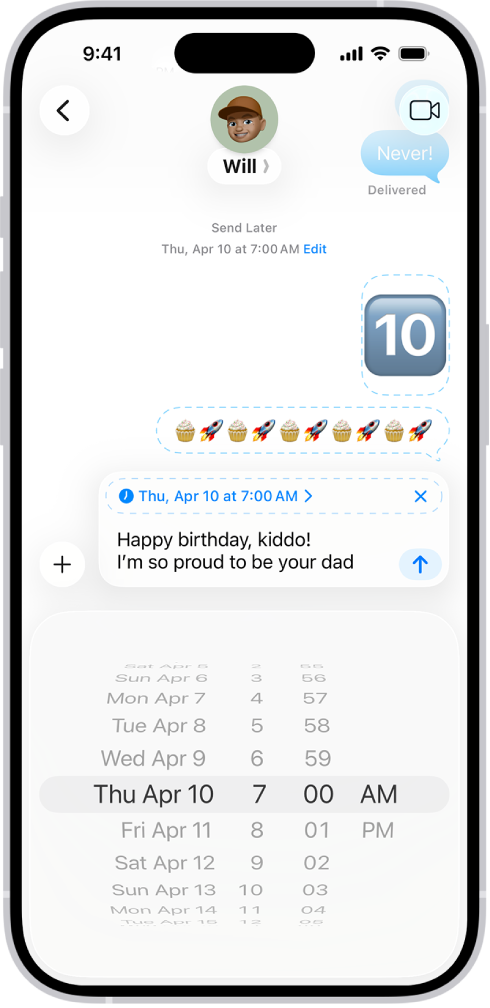
Messages can be scheduled as far as 14 days ahead, and your recipient won’t know the message was scheduled. It shows a dashed line until it’s time to send, and it’s delivered even if all your devices are offline. You can also change the send time, edit the message, or delete it.

Note: Scheduling requires iMessage, but your recipient can use any device, and they won’t know the message was scheduled. To reschedule, edit, or delete a scheduled message, you need to be online.

A Messages conversation with messages scheduled to be sent later.

Schedule a message

You can schedule a message up to 14 days into the future.

  1. Open the Messages app on your iPhone.
  2. Go to the conversation where you want to schedule a message or start a conversation.
  3. Tap the Add button, then tap Send Later.
  4. Tap the time to open the scheduler and then choose when you want to send your message.

    The border of the text field turns into a dashed line, and the time your message will be sent appears at the top of the message.

  5. Enter a message, then tap the Send button.

    The message appears with a dashed line until it’s time to send it, and it’s delivered even if all your devices are offline.

Note: Scheduled messages are encrypted and stored on Apple servers only until they’re sent. When a message is sent, it’s removed from Apple servers, the balloon becomes a solid color, and its dashed line disappears.

Edit, delete, or reschedule a scheduled message

Before its delivery time, you can edit, delete, or reschedule a message at any time, or send it immediately.

  1. Open the Messages app on your iPhone.
  2. Go to the conversation with the scheduled message you want to edit.

    If you don’t see your message, scroll down to the bottom of the conversation. Scheduled messages may appear below sent messages.

  3. Do any of the following:

    • Edit it: Touch and hold the message bubble, tap Edit, make any changes, and tap the Send Edit button to resend with edits or the Cancel Edit button to revert.
    • Delete it: Touch and hold the message bubble, then tap Delete. When you delete a message before its scheduled time, it’s canceled and not delivered to the recipient.
    • Reschedule it: Tap Edit beside the date (above your scheduled message), tap Edit Time, choose a new time, and then tap away from the schedule to commit the new time.
    • Send it immediately: Tap Edit beside the date (above your scheduled message). Tap Send Message.

With Apple Intelligence, you can create custom emoji, called Genmoji. Simply describe what you want the Genmoji to look like, combine existing emoji with descriptions, or create one of friends and family based on their photos.

You can add Genmoji to messages, share them as a sticker or Tapback, and more. You make them right from the emoji keyboard, with the Genmoji button at the top right.

Here’s how to create your own emoji with Genmoji on iPhone.

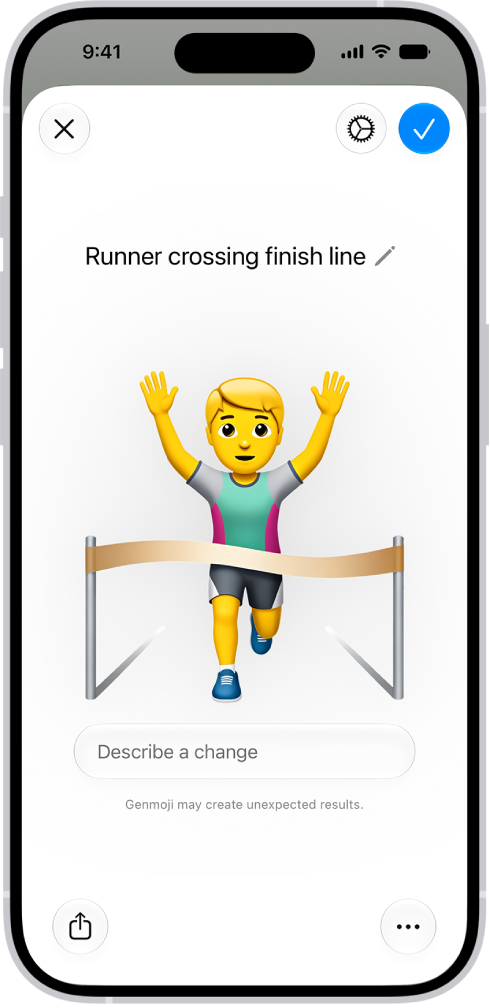
The Genmoji window showing a created Genmoji of a man running across a finish line.

Note: Apple Intelligence on iOS 27 or later is available on an Apple Intelligence-enabled iPhone 15 Pro, iPhone 15 Pro Max, or iPhone 16 model or later. Apple Intelligence is not available in all languages or regions. Usage limits may apply.*

Create Genmoji

  1. Tap a text field. Then tap the Emoji button or the Next Keyboard key to switch to the emoji keyboard.
  2. Tap Genmoji at the top right of the onscreen keyboard.
  3. Do any of the following:

    • Describe it: Enter a description.
    • Use existing emoji or Genmoji as a base: Tap the Emoji button to choose emoji or Genmoji.
    • Add a person from your Photos library: Tap the Choose Person button, then select a person. You can add up to three people. Note: If you provide a text description that doesn’t match the person you selected, your image is personalized based on the photo you selected rather than the text description.
    • Add a photo of something else, like a pet, nature, or food: Tap the Choose or Take Photo button. Then choose an option.
  4. Tap the Submit button to create your Genmoji.
  5. To refine your Genmoji, describe a change or add existing emoji or Genmoji to the one you created.

    Note: Scroll up or down to move between versions of your Genmoji. You can move to a different version at any time and keep refining from there.

  6. When you’re happy with your Genmoji, tap the Done button.

Each Genmoji you create is saved with your stickers. And you can create a Genmoji in Image Playground, too.

Delete Genmoji

  1. Tap a text field. Then tap the Emoji button or the Next Keyboard key to switch to the emoji keyboard.
  2. Swipe right or tap the Stickers button.
  3. Touch and hold a Genmoji, then tap Delete.

You can also tap the Add button in a Messages conversation, then tap Stickers. Tap the Stickers button, touch and hold a Genmoji, then tap Delete.

To block access to image creation features, like Genmoji, use Screen Time settings.

Apple notes that the recommended age for realistic images is 18+.

*Apple Intelligence is available with Siri and device language set to Chinese (Simplified), Chinese (Traditional), Danish, Dutch, English, French, German, Italian, Japanese, Korean, Norwegian, Portuguese, Spanish, Swedish, Turkish, or Vietnamese. Some features may not be available in all regions or languages. Some devices may not be available in all regions. Siri AI is available in beta in iOS 27, iPadOS 27, macOS 27, watchOS 27, and visionOS 27 and requires an Apple Intelligence–enabled device set to a supported language. Available in English to start. Siri AI will not be initially available in the EU on iOS, iPadOS, and watchOS. Certain Apple Intelligence features that rely on server-side models are subject to daily usage limits, including but not limited to Siri AI, Intelligent Photo Editing Tools, Image Playground, and AFM 3 Cloud models in Shortcuts. Daily limits may vary by feature, request complexity, system demand, system policies, and other factors. Expanded access to such features will be available for a fee in the future. Use of these features is subject to the Apple Intelligence Terms and Conditions.

With Hover Text on iPhone, you can move the pointer over text and other items on the screen, such as icons, to view a larger version of them. Or use Hover Typing to display a separate window with a larger version of text that you’re typing.

To use Hover Text, you need a pointing device, such as a trackpad or mouse. You can customize both Hover Text and Hover Typing.

Before you begin

Hover Text requires a pointing device, like a trackpad or mouse, connected to your iPhone.

You don’t need to connect a pointing device to use Hover Typing.

Show a larger version of text when you hover over it

  1. Start the Settings app on your iPhone.
  2. Tap Accessibility, tap Hover Text, and then turn on Hover Text.
  3. Move the pointer over text to display a larger version of it.
  4. If you have a connected keyboard, you need to press and hold the Control key to show the Hover Text window.

If you use iPhone with a connected keyboard, you can have the Hover Text window automatically displayed when you move the pointer over text, without needing to press and hold a key every time. Go to Settings > Accessibility > Hover Text, then turn on Activation Lock. To use activation lock, quickly press the Control key three times.

You can change the key you press to activate Hover Text and activation lock. Tap Activation Modifier, then choose another key.

Show a larger version of text you’re typing

  1. Start the Settings app on your iPhone.
  2. Tap Accessibility, tap Hover Text, tap Hover Typing, and turn on Hover Typing.
  3. As you type in a text entry field, a larger version of what you’re typing is displayed.

To temporarily hide the Hover Typing window, swipe on it. It reappears when you start typing again.

Customize Hover Text

  1. Start the Settings app on your iPhone.
  2. Tap Accessibility, then tap Hover Text.
  3. Customize any of the following:
    • Display mode: Choose where to show the Hover Text or Hover Typing window—inline (near the cursor), at the top of the screen, or directly above the onscreen keyboard.
    • Content: Choose to show Text, Color, or Text & Color.
    • Scrolling speed: Choose a faster or slower speed (for scrolling in the Hover Text window when viewing large blocks of text).
    • Font: Choose a custom font.
    • Size: Adjust the slider to change your preferred reading size.
    • Text Color: Choose a text color by Grid, Spectrum, or Sliders.
    • Background Color: Choose a background color by Grid, Spectrum, or Sliders.
    • Border color: Choose a border color by Grid, Spectrum, or Sliders.

Customize Hover Typing

  1. Start the Settings app on your iPhone.
  2. Tap Accessibility and tap Hover Text. Tap Hover Typing.
  3. Customize any of the following:
    • Display mode: Choose where to show the Hover Text or Hover Typing window—inline (near the cursor), at the top of the screen, or directly above the onscreen keyboard.
    • Font: Choose a custom font.
    • Size: Adjust the slider to change your preferred reading size.
    • Text Color: Choose a text color by Grid, Spectrum, or Sliders.
    • Insertion Point Color: Choose an insertion point color by Grid, Spectrum, or Sliders.
    • Background Color: Choose a background color by Grid, Spectrum, or Sliders.
    • Border color: Choose a border color by Grid, Spectrum, or Sliders.
    • Misspelled Word Color: Choose a color for misspelled words by Grid, Spectrum, or Sliders.
    • Autocorrected Word Color: Choose a color for autocorrected words by Grid, Spectrum, or Sliders.

You can set the onscreen keyboard on iPhone to show only uppercase letters, and if you use a physical keyboard with your iPhone, adjust key sensitivity and make it easier to press combinations of keys.

With Sticky Keys, for example, you can press the keys of a shortcut one at a time instead of all at once. You can also set typing options, such as auto-correction and slide to type, make it easier to type with one hand, and add keyboards for other languages or alternative layouts.

Here’s how to adjust the onscreen and external keyboard settings for accessibility on iPhone.

Set the onscreen keyboard to display only uppercase letters

If uppercase letters are easier to read, you can set the onscreen keyboard so it doesn’t display lowercase letters.

Go to Settings > Accessibility > Keyboards & Typing, then turn off Show Lowercase Keys.

Quick tip: In many apps, including Mail, Messages, Notes, and Safari, you get a larger keyboard for typing when you rotate iPhone to landscape orientation.

Change how the keys respond on an external keyboard

If you use Magic Keyboard or another physical keyboard with iPhone, you can adjust the sensitivity of keys and make it easier to press combinations of keys.

Go to Settings > Accessibility > Keyboards & Typing, then tap any of the following:

  • Key Repeat: You can set how long you must press and hold a key before it starts repeating and how fast it repeats once it starts. You can also prevent the key from repeating at all.
  • Sticky Keys: When you need to press multiple keys at the same time, you can press each key separately instead. For example, enter the keyboard shortcut Command-Z by pressing Command, then pressing Z.
  • Slow Keys: Adjust the time between when you press a key and when it’s activated.