Got a tip for us?

iPhone

The iPhone is a smartphone from Apple that runs the iOS mobile operating system. Between its apps, communication features, the camera, mobile internet access, and other functionalities, the iPhone has quickly become an integral part of many peoples tech lives.

You can change the name of your iPhone, which is used by iCloud, AirDrop, Bluetooth®, your Personal Hotspot, and your computer, so it’s the name you’ll see in all those places. You can enter a new name whenever you like.

  1. Open the Settings app on your iPhone.
  2. Tap General, tap About, and then tap Name.
  3. Tap the Clear Text button and enter a new name.
Tags: iCloud, iPhone

With Screen Time, you can use Time Allowances to set how long you use your apps each day, and Schedules to set when during the day you can use them.

For example, you can create schedules for weekdays and weekends with time windows for things like work, dinner, and the evening. You can also create Time Allowances for different categories like Entertainment, Games, or Social Media, and choose apps and contacts to allow at all times. You’ll need iOS 27 or later on all your Apple devices to use them.

Note: Screen Time Schedules and Time Allowances need iOS 27, iPadOS 27, macOS 27, watchOS 27, or visionOS 27 or later on all your Apple devices. And in a Family Sharing group, every device needs to be upgraded to iOS 27, iPadOS 27, macOS 27, watchOS 27, or visionOS 27 or later before you set these features up.

Set up a Screen Time Schedule for device use

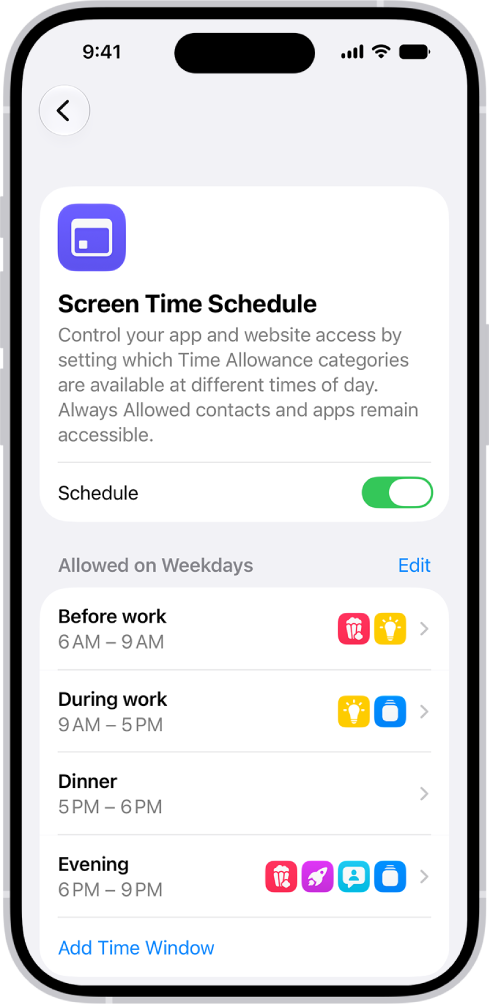
With a custom schedule for your iPhone, you can control which apps you can use at different times of day. Icons in each time window show which Time Allowance categories are available, so at a glance, you’ll know what types of apps you can use at that point in your day.

The Screen Time Schedule screen showing an overview of a schedule, including Before work, During work, Dinner, and Evening.

  1. Open the Settings app on your iPhone.
  2. Tap Screen Time, tap Screen Time Schedule, and then turn on Schedule.
  3. Tap Add Schedule, tap the days of the week you want to create a schedule for, and tap the Done button.
  4. Tap the Time Window and then do any of the following:
    • Create a new name: Tap the current name and then enter the new name.
    • Change the start or stop time: Tap the time, then select a new value.
    • Select Time Allowance categories: Tap a category. If you don’t see any categories, you can create some.
    • View the apps and contacts that are always allowed: Tap Always Allowed.
    • Delete the time window: Tap Delete this Time Window.

Set how long you can use apps and websites

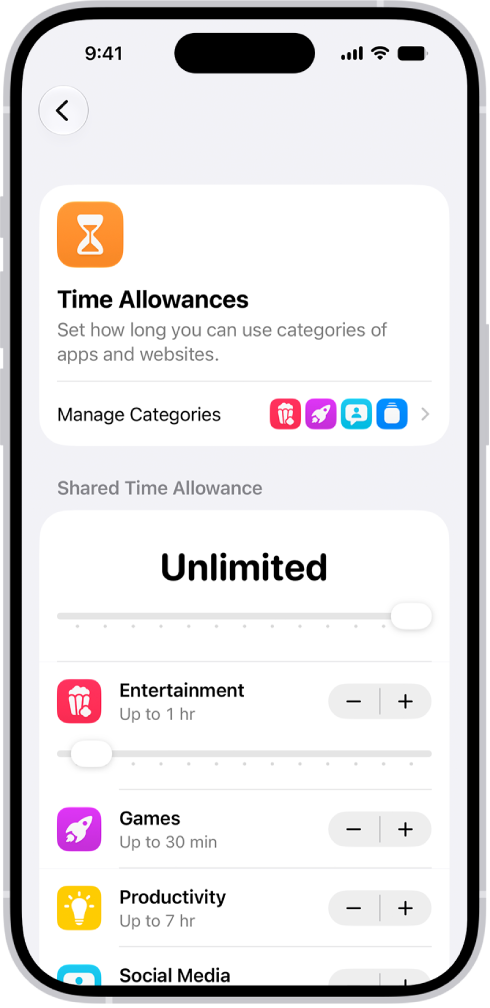
Time Allowances make it easier to manage the time you spend in apps across categories like Entertainment, Games, and Social Media. Apps in each category stay usable until they’ve reached either the category’s allowance or the daily total. And if an app declares an associated website, the Time Allowance applies to both.

A Time Allowances screen in Screen Time settings showing time allowed for categories like Games, Entertainment, and Productivity.

  1. Open the Settings app on your iPhone.
  2. Tap Screen Time, then tap Time Allowances.
  3. Do any of the following:
    • Use Time Allowances during certain times in your schedule: Turn on Match Screen Time Schedule.
    • View the Time Allowances you’ve set for different time windows: If you’ve added Time Allowances to windows in your Screen Time schedule, you can view them by tapping the name of the Time Window.
    • Increase or decrease the amount of time you can spend on your device: Drag the slider left or right or tap the Minus button or the Plus button.
    • Increase or decrease the amount of time you can spend in an app category: Under Time Allowances, tap a category and then drag the slider left or right or tap the Minus button or the Plus button.
    • Create a new Time Allowance category: Tap Manage Categories and tap the Add button, then select a category. If you have a Screen Time schedule, you can add the category to a time window.
    • View your average daily use of a category: Tap Manage Categories, then tap a category.
    • View your average daily use of apps within a category: Tap Manage Categories, tap a category, and then tap an app.

Choose apps and contacts to allow at all times

Apps and contacts you pick can stay available at all times, no matter which Screen Time schedules or Time Allowances you’ve set. You might add the Health app or family members to Always Allowed for emergencies, for example.

  1. Open the Settings app on your iPhone.
  2. Tap Screen Time, then tap Always Allowed.
  3. Do any of the following:
    • Add contacts or apps: Tap Add People or Add Apps.
    • Remove contacts or apps: Tap Edit. Tap the Remove button on the app or contact you want to remove.

You can change how quickly or when Siri responds, have Siri listen for atypical speech patterns, have Siri audibly share notifications, and more.

You can give yourself more time to finish speaking by setting a longer Siri Pause Time, change how fast Siri speaks, and choose whether Siri responds aloud or in text. Depending on your iPhone model, you may also be able to type to Siri instead of speaking.

Here’s how to change Siri accessibility settings on iPhone.

Tell Siri when and how to respond to requests

  1. Start the Settings app on your iPhone.
  2. Tap Accessibility, tap Siri, and do any of the following:
    • Set how long Siri waits for you to finish speaking: Below Siri Pause Time, choose Default, Longer, or Longest.
    • Change how fast Siri speaks: Adjust the slider below Speaking Rate.
    • Decide when Siri responds aloud or in text: Choose an option below Spoken Responses.
    • Use Siri even when iPhone is covered or facing down: When you set up Siri, Hey Siri or Siri activates Siri only when your iPhone faces up. To change this, turn on Always Listen for Siri.
    • Require “Siri” or “Hey Siri” in order to interrupt Siri: Turn on Require “Siri” for Interruptions. This can be useful if you use VoiceOver or Voice Control and don’t want VoiceOver speech or Voice Control commands to interrupt Siri.

Type instead of speak to Siri

Typing to Siri may be an option, depending on your iPhone model.

  1. Start the Settings app on your iPhone.
  2. Tap Accessibility and tap Siri. Turn on Type to Siri.

If you have an iPhone model that supports Apple Intelligence,* this option may not be shown.

  1. To make a request, activate Siri. Then interact with Siri using the keyboard and text field.

Have Siri recognize a wider range of speech patterns

If your primary language is set to English (U.S.), Siri can listen for atypical speech. That may help with an acquired or progressive condition that affects speech, like stroke, cerebral palsy, or amyotrophic lateral sclerosis (ALS).

Go to Settings > Accessibility > Siri, then turn on Listen for Atypical Speech.

If you speak a word or make a sound of your choosing, iPhone can perform an action you teach it.

Announce calls and notifications for specific apps

Siri can announce notifications and calls from apps like Messages through your iPhone speaker, on supported headphones and MFi hearing devices, and when you’re using CarPlay.

  1. Open Settings, tap Accessibility and tap Siri. Then turn on Announce Notifications on Speaker.
  2. Tap Announce Notifications and then for each app, choose whether to announce all notifications or only time-sensitive notifications.

*Apple Intelligence is available with Siri and device language set to Chinese (Simplified), Chinese (Traditional), Danish, Dutch, English, French, German, Italian, Japanese, Korean, Norwegian, Portuguese, Spanish, Swedish, Turkish, or Vietnamese. Some features may not be available in all regions or languages. Some devices may not be available in all regions. Siri AI is available in beta in iOS 27, iPadOS 27, macOS 27, watchOS 27, and visionOS 27 and requires an Apple Intelligence–enabled device set to a supported language. Available in English to start. Siri AI will not be initially available in the EU on iOS, iPadOS, and watchOS. Certain Apple Intelligence features that rely on server-side models are subject to daily usage limits, including but not limited to Siri AI, Intelligent Photo Editing Tools, Image Playground, and AFM 3 Cloud models in Shortcuts. Daily limits may vary by feature, request complexity, system demand, system policies, and other factors. Expanded access to such features will be available for a fee in the future. Use of these features is subject to the Apple Intelligence Terms and Conditions.


Tag: Siri

If you can’t see your screen and your content includes audio descriptions, you can listen to an audio description, a separate audio track that narrates or describes the visual content of a clip, show, or movie. You turn on Audio Descriptions in Accessibility settings.

  1. Open Settings, tap Accessibility, and then tap Audio Descriptions.
  2. Turn on Audio Descriptions.

Control Center on iPhone gives you instant access to useful controls, including Airplane Mode, Do Not Disturb, flashlight, volume, screen brightness, and more. It’s customizable. You can see more groups of controls, change them to suit you, and temporarily disconnect from a Wi-Fi network or Bluetooth devices.

Open Control Center

To open Control Center, use the method that matches your iPhone:

  • On an iPhone with Face ID: Swipe down from the top-right corner of the screen. If you continue swiping down, you see more groups of controls.
  • On an iPhone with a Home button: Swipe up from the bottom.

You can jump to specific groups of controls by swiping through the icons on the right edge of the screen. Swipe up through the icons to go back to the first group.

To close Control Center, swipe up from the bottom center of the screen (on an iPhone with Face ID), or press the Home button.

Access more controls in Control Center

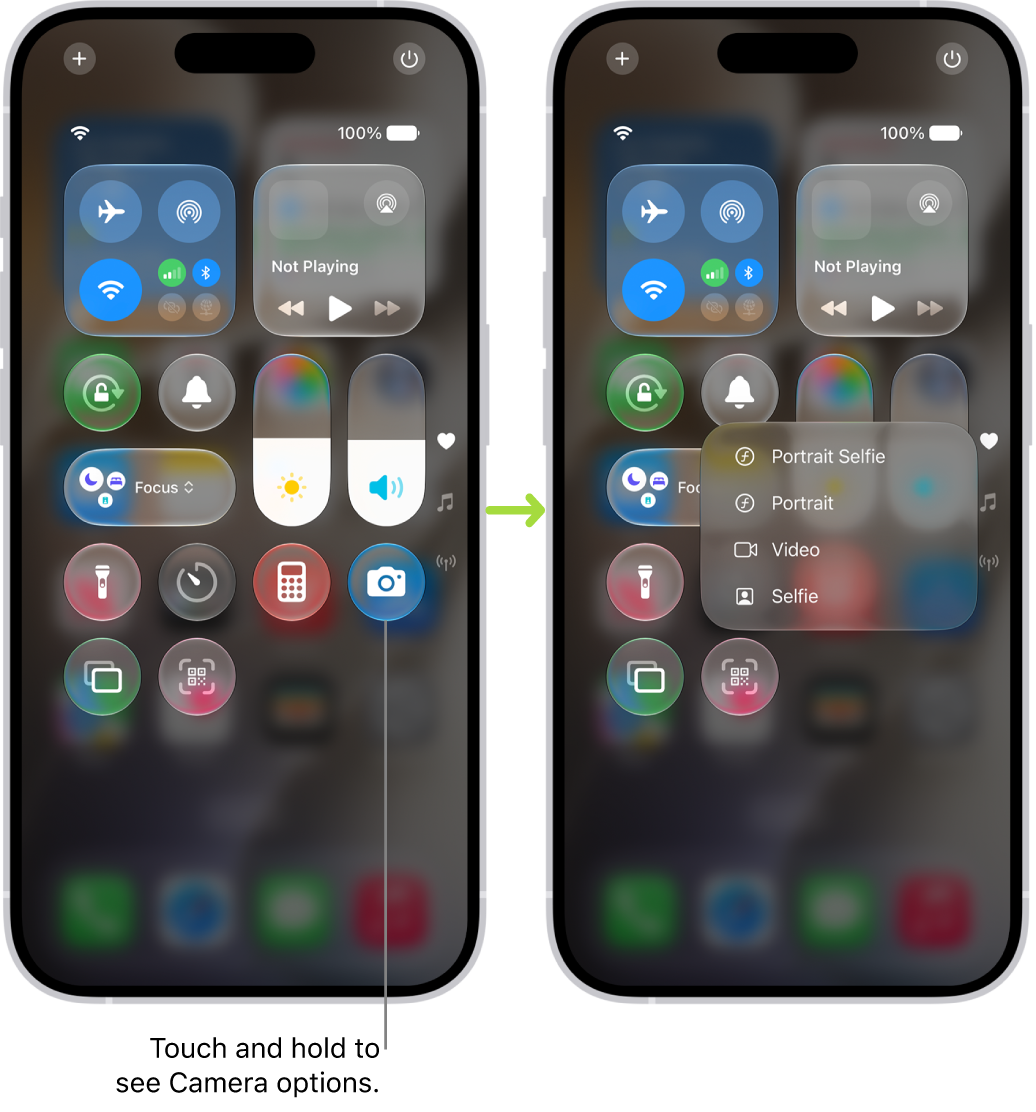
Many controls offer additional options. To see available options, touch and hold a control. For example, you can do the following in Control Center:

  • Touch and hold the top left group of controls, then tap the AirDrop button to open the AirDrop options.
  • Touch and hold the Camera button to take a selfie, record a video, or take a photo.
  • Touch and hold the Control Center Power button at the top right of the screen (while Control Center is open) until you feel a vibration. Then drag the slider to power off the iPhone.

Two Control Center screens side by side—the one on the left shows controls for Airplane Mode, cellular data, Wi-Fi, and Bluetooth in the top-left group. The Camera icon is shown at the bottom right. The screen on the right shows more options in the Quick Actions menu for Camera: Selfie, Video, Portrait, and Portrait Selfie.

Customize controls

You can rearrange, add, and remove controls in Control Center.

  1. Open Control Center.
  2. Tap the Add button of Control Center to begin editing the controls.

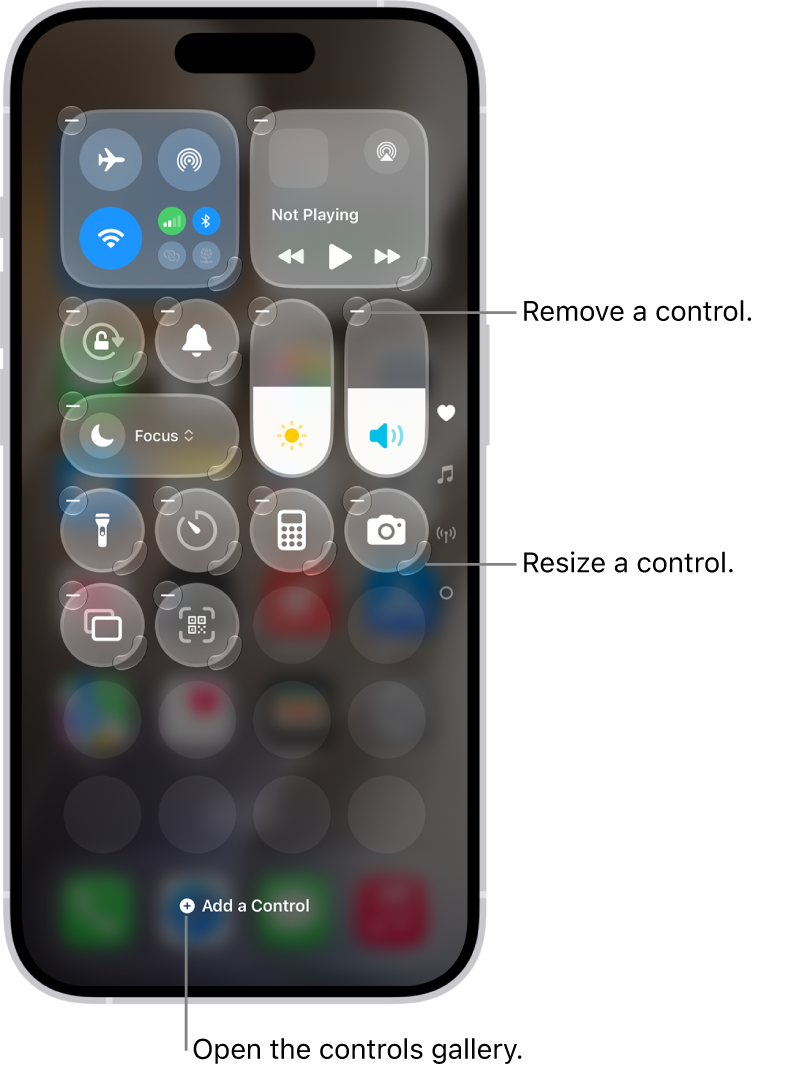
    Control Center being edited, with a Remove button and resize handle on every control.

  3. Do any of the following:

    • Rearrange controls: Drag a control to a new position.
    • Remove a control or a set of controls: Tap the Remove button at the upper left of the control.
    • Resize a control: Drag the handle at the lower right of the control.
    • Create a new section of controls: Tap the bottom most icon (the little circle) along the right edge of the screen and then tap Add a Control, and choose which controls to add to your custom group. Or you can drag a control off the bottom of the page to create a new section.
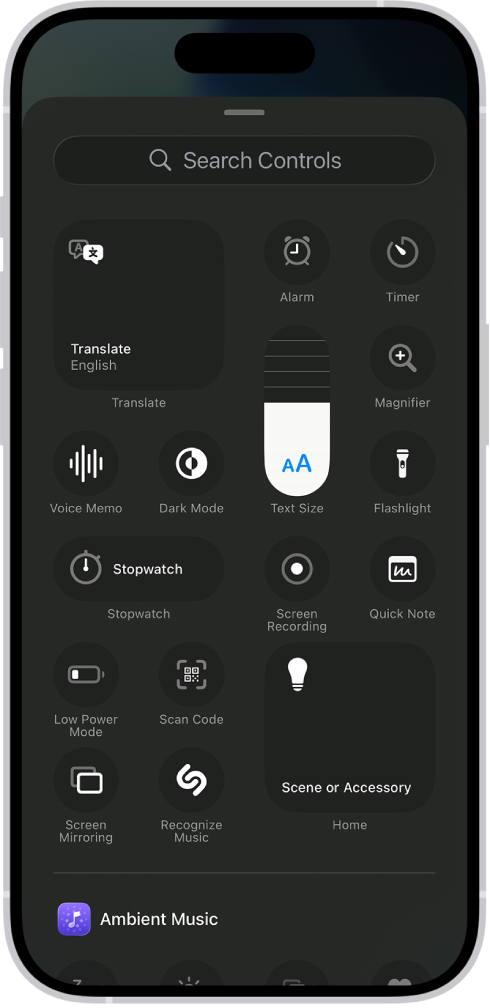
    • Add more controls: Tap Add a Control at the bottom of the screen to open the controls gallery. Tap a control to add it to Control Center.

    The controls gallery, showing the available Control Center controls.

  4. When you finish customizing, close Control Center by swiping up from the bottom center of the screen.

Temporarily disconnect from a Wi-Fi network

In Control Center, tap the Wi-Fi Switch button; to reconnect, tap it again.

To see the name of the connected Wi-Fi network, touch and hold the Wi-Fi Switch button.

Because Wi-Fi isn’t turned off when you disconnect from a network, AirPlay and AirDrop still work, and iPhone joins known networks when you change locations or restart iPhone. To turn off Wi-Fi, go to the Settings app, then tap Wi-Fi. (To turn on Wi-Fi again in Control Center, tap the Wi-Fi Switch button.)

Temporarily disconnect from Bluetooth devices

In Control Center, tap the Bluetooth Switch button; to allow connections, tap the button again.

Because Bluetooth® isn’t turned off when you disconnect from devices, location accuracy and other services are still enabled. To turn off Bluetooth, go to the Settings app, tap Bluetooth, then turn off Bluetooth. To turn on Bluetooth again in Control Center, tap the Bluetooth Switch button.

Turn off access to Control Center in apps

Go to the Settings app on your iPhone, tap Control Center, then turn off Access Within Apps.

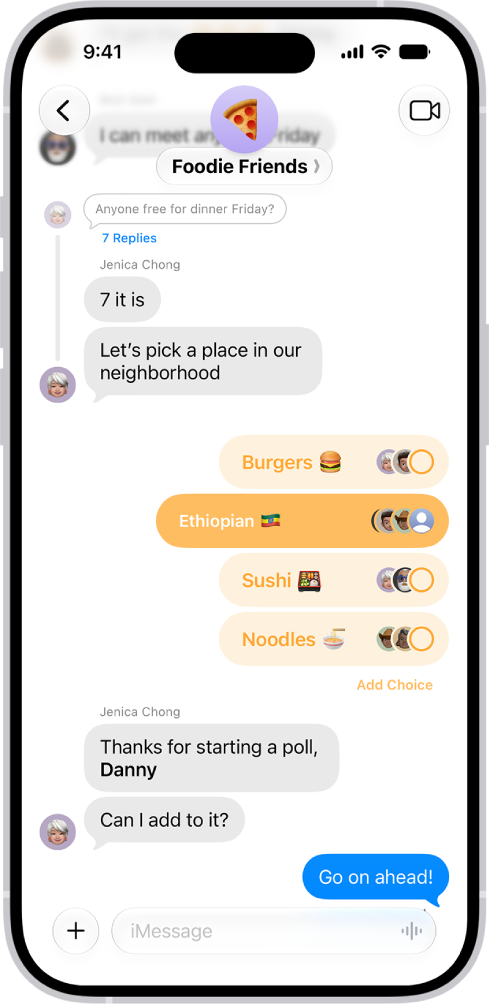
You can send a poll in any iMessage conversation to decide what to eat, which movie to see, where to travel, when to meet, and more. Everyone in the conversation can contribute options and watch as votes come in.

You start one from the Add button in a conversation, and with Apple Intelligence, you can even create a suggested poll quickly. You can also add an option to a poll, vote, and check on the results of a poll.

Note: Starting, seeing, or voting in a poll requires iMessage on iOS 26, iPadOS 26, macOS 26, watchOS 26, or visionOS 26 or later. Anyone who can’t see it gets a message saying a poll was sent to the group.

In a Messages conversation, a poll shows options and vote tallies in horizontal bars and.

Start a poll

  1. Start the Messages app on your iPhone.
  2. In a conversation, tap the Add button, then tap Polls.
  3. Tap each row to add options.

    A poll can have up to 12 options.

  4. Tap the Send button.

Quickly create a suggested poll with Apple Intelligence

  1. Start the Messages app on your iPhone.
  2. Open a conversation or start a new message.
  3. Mention several options in the conversation.
  4. When Apple Intelligence detects that a poll might come in handy, the Create a Poll button appears—tap it to create the suggested poll.

    Tap the Send button to send the poll to everyone in the conversation who can participate in the poll. Those who can’t participate receive a message that you sent a poll.

Note: Apple Intelligence on iOS 27 or later is available on an Apple Intelligence-enabled iPhone 15 Pro, iPhone 15 Pro Max, or iPhone 16 model or later. Apple Intelligence is not available in all languages or regions. Usage limits may apply.*

Vote in a poll

  1. Start the Messages app on your iPhone.
  2. Open a conversation with a poll in it.
  3. Tap an option to add your vote.

    Tap again to remove your vote. You can vote for none or all of the options.

Add an option to a poll

Regardless of who started the poll, anyone participating in it can add other options.

  1. Start the Messages app on your iPhone.
  2. Open a conversation with a poll in it.
  3. Tap Add Choice, then enter another option.
  4. Tap the Send button to add the option to the poll.

Note: Options are added without any votes, so tap to vote for any option you add.

Check on the results of a poll

You can see who hasn’t voted yet, or how people voted.

  1. Start the Messages app on your iPhone.
  2. Open a conversation with a poll in it.
  3. Touch and hold the poll and tap Poll Details.

*Apple Intelligence is available with Siri and device language set to Chinese (Simplified), Chinese (Traditional), Danish, Dutch, English, French, German, Italian, Japanese, Korean, Norwegian, Portuguese, Spanish, Swedish, Turkish, or Vietnamese. Some features may not be available in all regions or languages. Some devices may not be available in all regions. Siri AI is available in beta in iOS 27, iPadOS 27, macOS 27, watchOS 27, and visionOS 27 and requires an Apple Intelligence–enabled device set to a supported language. Available in English to start. Siri AI will not be initially available in the EU on iOS, iPadOS, and watchOS. Certain Apple Intelligence features that rely on server-side models are subject to daily usage limits, including but not limited to Siri AI, Intelligent Photo Editing Tools, Image Playground, and AFM 3 Cloud models in Shortcuts. Daily limits may vary by feature, request complexity, system demand, system policies, and other factors. Expanded access to such features will be available for a fee in the future. Use of these features is subject to the Apple Intelligence Terms and Conditions.

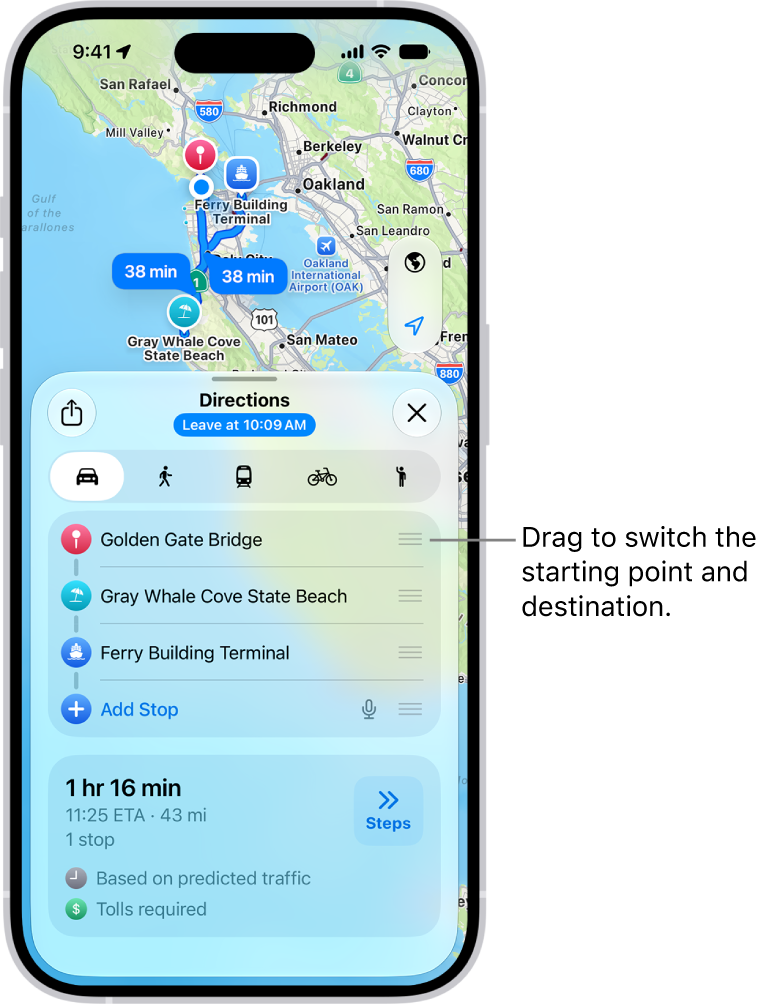
While you’re following driving or cycling directions, you can add stops along your route, and your route is updated right away. A multistop driving route can have up to 14 stops, and you can switch the starting point and destination, or choose a different one.

Note: Turn-by-turn spoken directions aren’t available in all countries or regions.

Change the starting point or destination

A map with several possible routes for driving directions between My Location and a destination.

  1. Open the Maps app on your iPhone.

Get directions.

Do one of the following: Switch the starting point and destination: Touch and hold the Reorder button for the starting location, then drag it below the destination.

  • Choose a different starting point or destination: Tap either the start or destination, then use the search field or a recent search result to find and select a different location.

Create a multistop driving route

Your route can include up to 14 stops.

  1. Open the Maps app on your iPhone.

    Get driving directions, then do one of the following: Tap Add Stop, then search for the place you want to stop.

    • Zoom in and move the map, tap a place (for example, a landmark or business), then tap Add Stop in the place card.

Your newly added stop appears as your final destination.

  1. To reorder the stops, touch and hold the Reorder button for the stop and drag it to a new position in the list before you tap Go.

Add a stop while following driving or cycling directions

  1. Open the Maps app on your iPhone.

Get driving or cycling directions, then tap Go.

  1. Tap the route card at the bottom of the screen.
  2. Tap Add Stop. Tap a category (or if you’re looking at driving directions, search for the place you want to stop).
  3. Select a place to stop. Tap Add or Add Stop.

The chosen destination is now the next stop, and your route updates.

If you’re cycling and you decide not to take the detour, tap Resume Route at the top of the screen.

Delete a stop from your driving directions

  1. Open the Maps app on your iPhone.

Create a multistop driving route, as above.

Do one of the following: Before you tap Go: Swipe left on any stops you want to delete, then tap Delete.

  • After you tap Go: Tap the route card at the bottom of the screen, then tap the Delete button next to the stop.

Stop getting directions before you arrive

Siri: Ask Siri something like, “Stop navigating.” Or without using Siri: Go to the Maps app on your iPhone.

  1. Tap the card at the bottom of the screen and tap End Route.
Tag: Maps

You can play audio from iPhone on wireless devices like HomePod, Apple TV 4K, AirPlay 2-enabled smart TVs, and Bluetooth® headphones and speakers. With AirPlay 2, you can play audio on multiple devices on the same Wi-Fi network, like a party playlist playing on HomePod speakers in the living room and kitchen.

Play audio from iPhone on a wireless device

  1. Open an audio app such as Podcasts or Music on your iPhone.
  2. Choose an item to play.
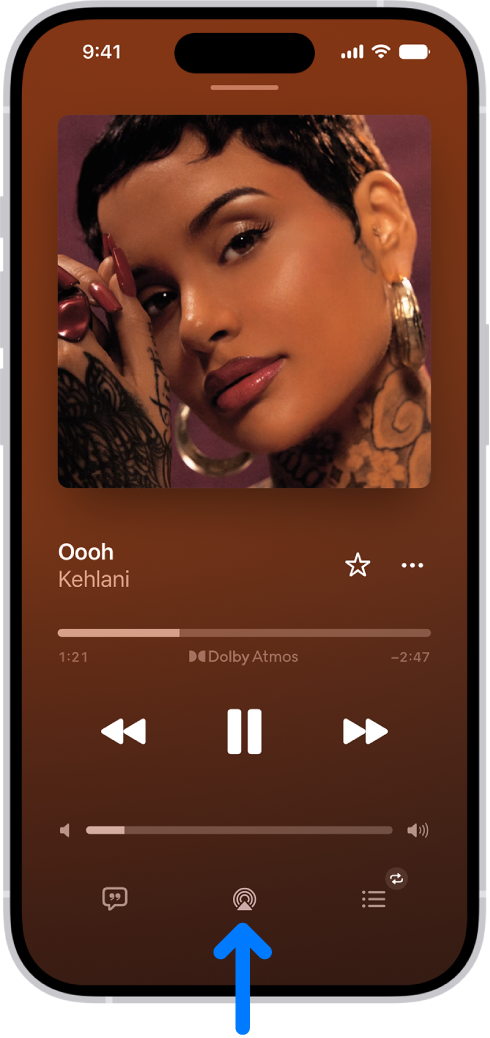
  3. Tap the Playback Destination button and then choose a playback destination.

    The playback controls for Music, including the Playback Destination button at the bottom of the screen.

Note: AirPlay 2-enabled devices need to be on the same Wi-Fi network to appear in the list of playback destinations. And with a Bluetooth device, moving it out of Bluetooth range sends the playback destination back to iPhone.

To select the playback destination, you can also tap the Playback Destination button on the Lock Screen or in Control Center.

Play audio on multiple AirPlay 2-enabled devices

Using AirPlay 2, iPhone can play audio on several AirPlay 2-enabled devices on the same Wi-Fi network. A party playlist could play on HomePod speakers in the kitchen and living room, for example, as well as on an AirPlay 2-enabled smart TV in the den and an Apple TV 4K in the bedroom.

Siri: Ask Siri something like:

  • “Stop playing music everywhere”
  • “Set the dining room volume to 10 percent”
  • “What’s playing in the kitchen?”
  • “Play a song I like in the kitchen”
  • “Add the living room speaker”
  • “Remove the music from the kitchen”
  • “Move the music to the den”

Playback destinations can also be chosen from the iPhone screen.

  1. Tap the Playback Destination button in Control Center, on the Lock Screen, or on the Now Playing screen for the app you’re listening to.
  2. Select each device you want to use.

Note: A stereo pair counts as a single audio device.

Hand off audio from iPhone to HomePod

While playing audio from Music, Podcasts, or another audio app, bring iPhone close to the top of HomePod.

For audio handoff to work, you need all of the following:

  • You must be signed in to the same Apple Account on both devices.
  • On your iPhone, you’ve turned on Wi-Fi and Handoff.
  • iPhone and HomePod must be in the same Apple Home and on the same Wi-Fi network.
  • Your devices must have Bluetooth turned on in Settings and be within Bluetooth range of one another (about 33 feet or 10 meters).

To disable Handoff between iPhone and HomePod and other devices, go to Settings > General > AirPlay & Continuity.

Tag: AirPlay

You can customize your preferences for the Translate app in Settings. Download languages, use on-device translation, or choose a different default translation app.

On-device translation keeps processing on your iPhone instead of Apple servers, even without an internet connection. With Automatic, translations may be processed on Apple servers when the languages aren’t downloaded. With Always, translations are always processed on your iPhone using your downloaded languages, which also work for Live Translation and offline use.

Here’s how to change your Translate settings on iPhone.

Download languages

For on-device translation, Live Translation, or offline use, download languages first.

  1. Open the Settings app on your iPhone.
  2. Tap Apps, tap Translate, and tap Languages.
  3. Tap the Download button next to the languages you want to download.

Choose when to use on-device translation

On-device translation processes your translations on your iPhone rather than on Apple servers, and it works even without an internet connection.

  1. Open the Settings app on your iPhone.
  2. Tap Apps and then tap Translate.
  3. Set On-Device Translation to one of the following options:
    • Automatic: Translations are processed on your device when the languages are downloaded; otherwise, translations may be processed on Apple servers.
    • Always: Translations are always processed on your device using your downloaded languages.

Choose a default translation app

You can change the default if you have multiple translation apps.

  1. Open the Settings app on your iPhone.
  2. Tap Apps and then tap Translate.
  3. Tap Default Translation App, then choose an app.

With Flash for Alerts, you can set the iPhone indicator light, the screen, or both to blink when you receive a notification. That’s useful if you can’t hear the sounds that announce incoming calls or other alerts, or if you might miss audible alerts in a noisy environment.

The indicator light is the LED on the back of iPhone, next to the camera lens. You can choose LED Flash, Screen, or Both, and the light can flash even when iPhone is unlocked or in Silent mode.

  1. Open the Settings app on your iPhone.
  2. Tap Accessibility, tap Audio & Visual and tap Flash for Alerts. Then turn on Flash for Alerts.
  3. Select any of the following:
    • LED Flash: The indicator light on the back of the iPhone flashes.
    • Screen: The iPhone screen flashes.
    • Both: Both the iPhone indicator light and the iPhone screen flash.
  4. Turn any of the following on or off:
    • Flash While Unlocked: The indicator light flashes even when iPhone is unlocked.
    • Flash in Silent Mode: The indicator light flashes even when iPhone is in Silent mode.