






Got a tip for us?

iOS 27

If Face ID malfunctions or stops working correctly, you won’t be able to unlock your iPhone 18 Pro Max, authorize Apple Pay transactions, autofill passwords, approve downloads, or sign in to apps with a gaze.

If you can’t set up Face ID or the facial recognition feature stops working randomly, becomes unavailable, won’t recognize your face anymore, or prompts you to enter a passcode instead, our troubleshooting tips will help you fix it.

When Does Face ID Become Unavailable?

Before going straight to the fixes, Face ID will temporarily stop working on your iPhone 18 Pro Max in these situations:

  • After five unsuccessful facial scans.
  • You just turned on or restarted the device.
  • The device wasn’t unlocked in more than 48 hours.
  • You initiated the shutdown or Emergency SOS screen.
  • The device was put in Lost Mode via the Find My app.
  • The passcode hasn’t been used to unlock the device in the last six and a half days and Face ID hasn’t unlocked the device in the last 4 hours.

And now, let’s check out our Face ID fixes.

1. Check Your Face ID Settings

As the first order of business, check if Face ID has been set up and configured correctly:

  1. Open the Settings app.
  2. Scroll down and tap on Face ID & Passcode.
  3. If you see the Reset Face ID option, Face ID is already set up on this device. Otherwise, choose Set up Face ID and follow the instructions.
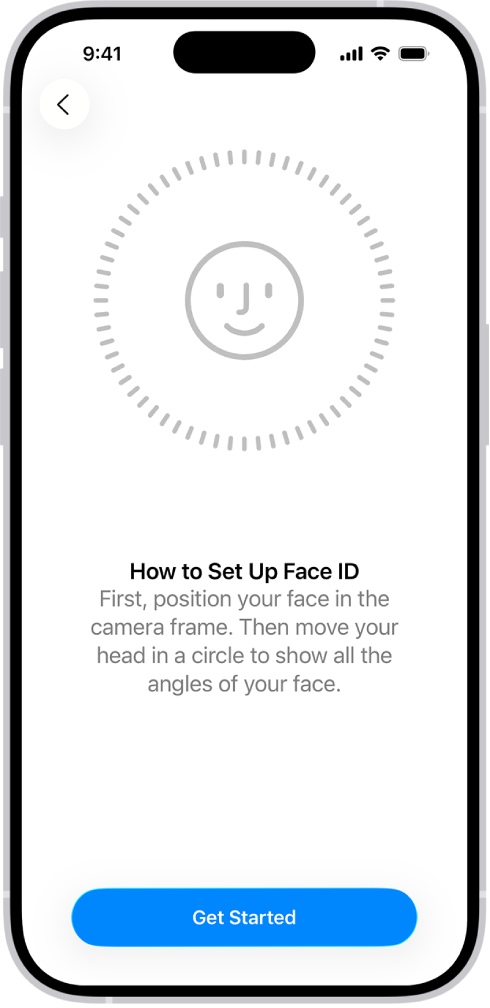
    The Face ID recognition setup screen. A smiley face is showing on the screen, enclosed in a circle. Text below instructs the user to move their head slowly to complete the circle. A button for Get Started appears near the bottom of the screen.

  4. With Face ID set up, turn on iPhone Unlock, iTunes & App Store, Contactless & Payments, Password AutoFill, and Other Apps underneath Use Face ID For.

2. Allow Face ID in Third-Party Apps

Your favorite third-party apps for banking, payment, instant messaging, etc., might use Face ID for login authentication. If you denied an app permission to use Face ID in the past, however, you’ll be prompted to enter your device’s passcode each time instead.

Here’s how to turn on Face ID for a compatible third-party app:

  1. Open the Settings app.
  2. Scroll down and tap on Face ID & Passcode.
  3. At the bottom of the Use Face ID For section, touch Other Apps.
  4. Ensure the switch for the concerned app, like WhatsApp, is set to ON.

Alternatively, tap the desired app in the root list of the Settings app (like Settings > Apps > WhatsApp) and verify whether Face ID has been switched on.

3. Clean the TrueDepth Camera Sensor

Over time, the TrueDepth camera lens could become dirty or greasy. Use a soft, dry cloth to wipe the sensor array at the top so nothing obscures it. On iPhone 18 Pro models, the TrueDepth camera is at the top of the device towards the left corner. Some rugged cases and thick screen protectors may slightly cover the sensors, throwing Face ID off, so consider removing them.

4. Avoid Blocking Your Face

For Face ID to perform smoothly, the TrueDepth camera needs a clear view of your eyes, nose, and mouth, so avoid obscuring this area with a veil or similar clothing. If you’ve set up Face ID with a mask, ensure your eyes aren’t blocked when using the feature.

“You might need to hold your iPhone higher or to try moving your iPhone higher and closer if you’re wearing a face mask,” Apple notes. Thankfully, Apple Watch owners can unlock an iPhone with their Apple Watch while wearing a mask.

5. Try Using Face ID Without Sunglasses

Face ID uses infrared light invisible to the human eye. Apple designed the feature to work with hats, scarves, glasses, contact lenses, and many sunglasses. Unfortunately, most polarized sunglasses and lenses interfere with infrared light. If your device doesn’t unlock with Face ID while wearing a pair of shades, take them off and try again.

6. Hold Your iPhone Correctly

To use Face ID properly, hold your iPhone 18 Pro or iPhone 18 Pro Max at a comfortable distance, not too far away or close to your face. Face ID works best at arm’s length or closer (10-20 inches or 25–50 centimeters). If you cover or obstruct the Face ID sensors with something like your finger, you’ll see a “Camera covered” message with an arrow pointing at the TrueDepth camera.

Face ID works in both portrait and landscape. As for the Face ID with a mask feature, it only works in portrait mode, as per Apple’s website.

7. Restart Your iPhone 18 Pro Max

A restart is the most basic fix for any issue. It involves two steps. Firstly, turn off your iPhone in Settings > General > Shut Down. And secondly, wait about a minute before turning the device back on. Press and hold the side button until the Apple logo appears.

The Face ID components that stopped functioning should now work perfectly. But for security reasons, you must enter your passcode to re-enable Face ID after a restart.

8. Update iOS to the Latest Version

Apple regularly updates iOS to fix bugs, patch vulnerabilities, and improve its software. If Face ID doesn’t work, the problem may be at a deeper software level. In that case, update your iPhone 18 Pro Max to the latest version of iOS by heading over to Settings > General > Software Update.

9. Set Up an Alternate Appearance

Setting up an additional Face ID appearance may help the facial recognition feature perform better, especially if you wear glasses or have facial hair that grows fast.

Follow these steps to set up an alternate Face ID appearance:

  1. Open Settings on your iPhone 18 Pro Max.
  2. Choose Face ID & Passcode from the root list.
  3. Choose the Set Up an Alternate Appearance option, then follow the onscreen prompts.

Face ID continuously learns and updates its mathematical representation of your face as your appearance changes and evolves. But if you suddenly look vastly different (i.e., after shaving a full beard), configuring an alternate appearance will ensure Face ID still recognizes you.

10. Reset Face ID

If you still need help, reset Face ID, then set it up again. Go to Settings, tap Face ID & Passcode, then tap Reset Face ID. Next tap Set up Face ID to set it up again.
Face ID is a fast and secure way to unlock your iPhone 18 Pro or iPhone 18 Pro Max, but you may not know that you can actually set up more than one face to use the feature.

This second face could belong to a loved one, enabling your partner or child to access your phone without requiring your smiling mug to unlock it. But it could also be a slightly different version of yourself: you with a beard, say, or sunglasses – but sadly not the must-have fashion accessory that broke on to the scene in 2020, the face mask.

Here’s how to set up an alternate appearance on Face ID.

Can I use a face mask for one of my Face ID appearances?

You can use Face ID to unlock your phone while you wear a face mask (or other covering that blocks your mouth and nose). Go to Settings > Face ID & Passcode, then turn on Face ID with a Mask.

How to set up an alternative appearance in iPhone 18 Pro Max

Setting up facial recognition for a second appearance or person is pretty much the same process as when you originally configured Face ID. Here are the steps you need to take.

  1. Open Settings and select Face ID & Passcode.
  2. Enter your passcode.
  3. Tap Set Up an Alternate Appearance.
  4. Read the instructions, then tap Get Started.

    The Face ID recognition setup screen. A smiley face is showing on the screen, enclosed in a circle. Text below instructs the user to move their head slowly to complete the circle. A button for Get Started appears near the bottom of the screen.

  5. Scan your face as normal, or have your partner scan theirs.
  6. When the first scan is complete, tap Continue.
  7. Scan your face a second time, then tap Done to complete the process.

Summary

  • The “SIM not provisioned” error occurs when your SIM card is no longer able to share information between your iPhone 18 Pro Max and your provider.
  • The “SIM not provisioned for voice” error means you cannot make voice calls. This is usually caused by your line becoming disconnected from your carrier account.
  • Toggling airplane mode, reinserting the SIM card, and updating carrier settings on your phone are usually effective in fixing this error.

Does your iPhone 18 Pro or iPhone 18 Pro Max show the “SIM not provisioned MM2” error suddenly or right after inserting a new SIM? Don’t fret; here’s what the error message means and what you can do to fix it for good.

What Does “SIM Not Provisioned” Mean?

The “SIM not provisioned” error typically indicates that your phone is unable to communicate with your carrier’s network. This particular error can occur for several reasons. If it’s a new SIM card, the carrier may not have activated it yet. If you recently switched phones or reinserted the SIM, it might not be seated correctly. This error can also appear if there’s a problem with your carrier’s server or your SIM is blocked.

If your phone displays the “SIM not provisioned for voice” error, it means you cannot make voice calls. The most common reason for this is that your line has become disconnected from your carrier account.

If you’re using a dual-SIM phone, this error may specify a number, such as “SIM 1 not provisioned” or “SIM 2 not provisioned.” Similarly, you might encounter an “eSIM not provisioned” error if you switched from a physical SIM to an eSIM that hasn’t been activated yet.

1. Enable and Disable Airplane Mode

One of the simplest ways to fix the “SIM not provisioned MM2” error is to toggle airplane mode on and off. This temporarily disables the mobile network and the internet, allowing your phone to reset its connections and potentially resolve the issue.

Head to Settings and use the Airplane Mode toggle to enable and disable it.

Wait for your phone to make a fresh connection with the mobile network. If all goes well, the “SIM not provisioned MM2” error should no longer appear.

2. Restart Your iPhone 18 Pro Max

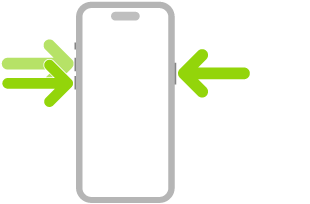
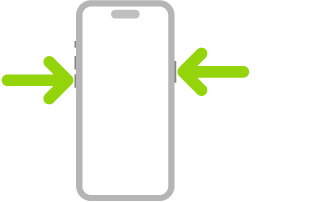
It may seem unlikely, but simply turning your phone off and back on can sometimes resolve the “SIM not provisioned” error. Hence, it’s worth a try. Simultaneously press and hold the side button and either volume button until the sliders appear, then drag the Power Off slider. Press and hold the side button until the Apple logo appears.

An illustration of iPhone with arrows pointing to the side button on the upper right and a volume button on the upper left.

Once your phone turns back on, check if the issue is resolved.

3. Correctly Insert the SIM Card

This step applies only to iPhone 18 Pro Max models with a SIM tray. Models sold in the US, Canada, Japan, Mexico and a few other countries use eSIM only, so if you have one of those, skip to the next step.

Have you recently switched to a new phone or reinserted the SIM card? If so, it’s possible that the SIM card isn’t seated properly, which could be causing the error.

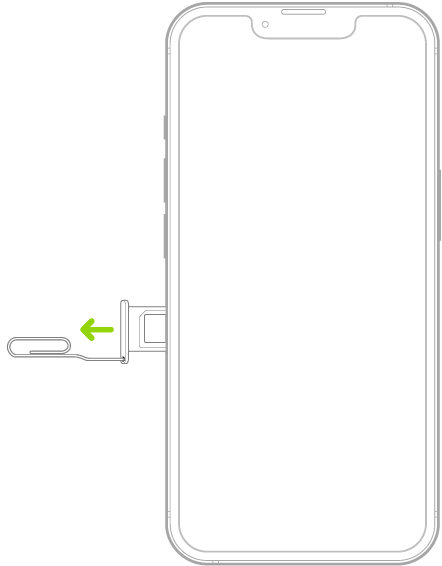
Power off your phone and use a SIM ejector tool to remove the SIM card. Insert the tool into the small hole next to the SIM tray to eject it. Once the SIM card is out, blow on it gently and wipe it with a lint-free cloth to remove any dust or debris.

A paper clip or SIM eject tool is inserted into the small hole of the tray on the left side of iPhone to eject and remove the tray.

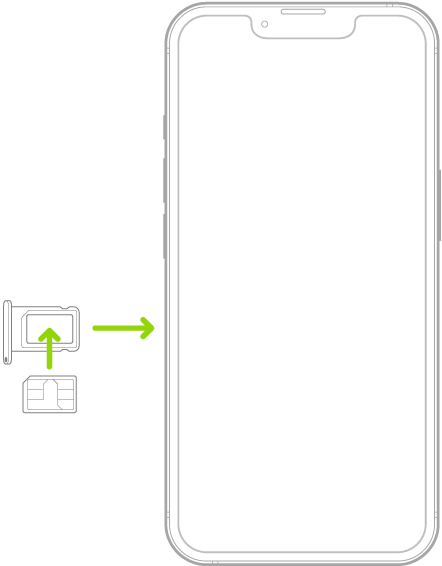
Carefully reseat the cleaned SIM card in the tray, ensuring it’s positioned correctly. The angled corner determines the correct orientation. After reinserting the SIM, turn your phone back on and check if you still get the “SIM not provisioned” error.

A SIM being inserted into the tray on iPhone; the angled corner is in the upper left.

4. Activate Your SIM Card

In most cases, your carrier should activate the SIM card within 24 hours of it being inserted into a new phone. However, if this doesn’t happen, there are usually three options available to enable activation:

  • Call an automated number.
  • Send an SMS.
  • Log in to the activation page on the carrier’s website.

All of these options are quick and straightforward, but their success depends on whether your carrier supports them. Once you activate the SIM, the error should disappear.

If your SIM was already active, there’s a chance that the problem lies with the SIM card itself. In that case, your best option is to get a new SIM from your carrier. You could call your network for assistance, but you’ll probably find it quicker to visit the carrier’s outlet in person.

5. Update Carrier Settings

You can check for carrier settings updates by heading to Settings > General > About. If an update is available, you’ll see a “Carrier Settings Update” prompt. Tap Update to begin the installation.

6. Contact Your Carrier or Network Provider

If nothing else works, you can consider contacting your carrier’s customer support team. Explain the error message and the steps you’ve taken so far to them. They should be able to guide you through the steps to identify any issues with your device, location, or account and suggest solutions for fixing the underlying problem.

Your phone’s primary function is to help you communicate with the world. However, errors like the “SIM not provisioned MM2” can sometimes interfere with that and cause problems. Fortunately, it’s nothing you can’t fix with the steps mentioned above.

Bluetooth is an indispensable part of any modern iPhone. The short-range wireless protocol allows an iPhone to communicate with a wide variety of different accessories—everything from the Apple Watch to wireless headphones and more.

But just like with any other modern technology, Bluetooth isn’t perfect. For whatever reason, you may have issues with a connection. Let’s take a look at some iPhone 18 Pro Max Bluetooth pairing tips and solutions when your connection isn’t working.

How to Connect Bluetooth Headphones to iPhone

Bluetooth headphones are a great way to enjoy music without the hassle of wires or dongles. They are especially useful when working out.

Before using most Bluetooth headphones, you need to pair them with your iPhone. The first step is to place the headphones into pairing mode. How to do that varies by model, so check the instruction manual if you’re not sure. Once in pairing mode, open Settings > Bluetooth on your iPhone.

From there, scroll down to the bottom of the page and find the Other Devices section. Tap the name of the headphones to complete the process. The headphones will move up into the My Devices section, which shows if a device has a current connection to your iPhone.

Pairing is a one-time process and you won’t have to do it again unless you change devices or specifically remove the device from the paired list.

Fortunately, with any model of Apple’s AirPods, you won’t need to go through this process. Just follow the on-screen instructions to follow the simplified pairing process.

How to Connect iPhone to Car Bluetooth

The process to connect a car entertainment system to your iPhone is similar. Make sure to start the pairing process on the car system first, which will vary based on model.

Then head to your phone’s Bluetooth settings as described above and select the car stereo. Many times, when pairing to car Bluetooth, you may need to enter or confirm a 4-digit code on the screen of the entertainment system. That’s an extra security precaution.

How to Change Bluetooth Name on iPhone

If you have many Bluetooth devices, changing the name of the accessories to something more recognizable can be a big help. Just note that only some accessories allow a name change.

The first step to changing a Bluetooth device name is making sure the device is powered on and paired with your iPhone. Then head to Settings > Bluetooth.

Select the More Info button at the far right of the device’s name. Scroll down to the Name section and enter a custom name.

It’s also possible to change the name of your iPhone that appears on other Bluetooth devices, like a car entertainment system. That comes in handy to minimize confusion when there are multiple iPhones paired to one system. Go to the Settings > General > About and then select Name to customize.

iPhone 18 Pro Max Bluetooth Not Working: Troubleshooting Tips

Bluetooth technology is mature and usually works well. But chances are you’ll have a hiccup eventually.

Here are some steps to fix a problematic iPhone Bluetooth connection.

1. Update iOS Software

Keeping your iPhone software up-to-date is important for a number of reasons. It’s vital for security and adds all the latest iOS features to your iPhone. If you’re having Bluetooth issues, the first place to head is Settings > General > Software Update.

You’ll either be prompted to update or see that your iPhone is using the most recent iOS software available.

2. Toggle Your iPhone Bluetooth and Restart iPhone

The next step for solving Bluetooth issues is to toggle your iPhone’s Bluetooth connection and then hard restart it. For Bluetooth, go to Settings > Bluetooth and then disable the switch at the top of the page. An even faster way is to simply say “Hey Siri, turn off Bluetooth.” Apple’s virtual assistant will take care of the rest.

Then you can hard restart your iPhone. Press and quickly release the volume up button. Press and quickly release the volume down button. Press and hold the side button. When the Apple logo appears, release the side button.

An illustration of iPhone with arrows pointing to the side button on the upper right and the volume up and volume down buttons on the upper left.

3. Disconnect From a Bluetooth Device

Another step to try is disconnecting and reconnecting to a problematic Bluetooth device. Once again, head to Settings > Bluetooth. Tap the More Info button next to the specific Bluetooth device and then choose Disconnect.

After that, it’s best to turn off the Bluetooth device and then turn it back on to see if it will reconnect.

4. Forget a Device and Pair Again

If that doesn’t help, a more advanced fix is to have your iPhone completely forget the Bluetooth device and then go through the pairing process once again.

In the Settings > Bluetooth menu, tap the More Info button next to the device. On the next page, choose Forget This Device. Tap Forget Device to confirm. Then go through the pairing process with the Bluetooth device again.

5. Try to Pair the Bluetooth Device to Another iPhone

A good way to determine whether your Bluetooth issue lies with the iPhone or the accessory is trying to pair the device to another iPhone. If that isn’t successful, it’s safe to assume that the issue lies with the Bluetooth device instead of your phone.

6. Reset Network Settings

If you suffer from continued Bluetooth issues, you can also try to reset network settings. Just to note, before taking this step, along with completely wiping all Bluetooth information on your iPhone, this will erase other network settings including known Wi-Fi networks and VPN configurations.

To start, select Settings > General > Transfer or Reset iPhone > Reset. On that page, select Reset Network Settings and enter your passcode. Your iPhone will automatically turn off and restart. After that, try to pair a Bluetooth device once more.

7. Restore as a New iPhone

A final step to take is restoring your device, which is essentially a factory reset of your iPhone. This will erase all content and settings to restore your iPhone like it was out of the box.

Go to Settings > General > Transfer or Reset iPhone and choose Erase All Content and Settings. Your iPhone passcode is required to start the process. Make sure you’ve backed up any important information to iCloud.

8. Time to Call Apple

If these steps don’t help your iPhone 18 Pro Max Bluetooth issues, it’s time to call Apple to discuss repair options.

If your device is within the usual one-year warranty period, or you’ve purchased AppleCare+, a fix should cost little to nothing. A great way to contact Apple for tech support is the Apple Support app.

The situation is murkier with an older device that is no longer covered by warranty, as a repair from Apple could be costly. Another option is a third-party repair center. Many times, they offer less expensive repairs for a variety of issues, including Bluetooth problems.

Wireless Bliss With iPhone Bluetooth

While it’s never fun to troubleshoot, hopefully these tips and tricks will help get your iPhone 18 Pro or iPhone 18 Pro Max Bluetooth connection back to working condition.

Smartphones like iPhones are designed to be an all-in-one device for your needs, even if those needs relate to the iPhone itself. So if you need help with your iPhone 18 Pro Max, you don’t need to go searching the internet for a solution, just open the Apple Support app instead.

Discover what the Apple Support app is below and how it can help you with your iPhone woes.

What Is the Apple Support App?

Apple Support is a dedicated app that provides all the support you might need for your Apple devices. If you need to download the Apple Support app, find it in the App Store.

The app lists all the devices registered to your Apple Account and keeps a record of your model, warranty, and OS for each of them. This can be beneficial for people who need to check their iOS version.

The devices you own are listed at the top, under My Devices.

You’ll also see personalized content based on the devices you own to make it easier to find the support you need. The app offers a wide range of guides on how to use various features and instructions on how to troubleshoot common problems.

How to Get Help With the Apple Support App on Your iPhone 18 Pro Max

You can use the Apple Support to help you with concerns like resetting your Apple Account password, fixing Bluetooth issues, or troubleshooting connectivity concerns. Open the Apple Support app, tap on your iPhone, and select from the listed topics.

If you find it difficult to find a helpful article for your concern, the app allows you to explain your problems in your own words. Just tap Describe Your Issue, then type your concern. It will list articles based on keywords from your description.

If you still can’t find the article you need to help resolve your issue, you can chat or call an Apple technician. Most topics give you the option to contact Support. You should see a Message or Call option under Contact.

When you tap Call, you’ll be asked to select a schedule by which an Apple technician will contact you. If you choose Message, you’ll be redirected to Messages, where you can instantly chat with an Apple technician.

Schedule a Repair

Apple Support might ask you to go in for a repair. This is often the case if your concern is related to hardware or if your software issues persist even after following the relevant instructions.

To schedule a repair:

  1. Select the topic that best describes your issue, then tap Find Authorized Locations.
  2. You might be asked to select your carrier from the available options.
  3. Tap Allow Location Access to turn on Location Services for the app so that it can find your location and suggest nearby service providers. Alternatively, you can type a location in the search bar.
  4. Select a provider from the list.
  5. Select a schedule and a time, then tap Reserve.

Seek Support for Your Apple Subscriptions

The Apple Support app also shows your Apple subscriptions for services like Apple Music, Apple TV, Apple Arcade, and iCloud. You can find articles on common issues and concerns about the services.

You can also update your payment method for any of these services. Just tap Update Payment Method, then follow the onscreen instructions to change your preferred payment method.

Get Instant Help for Your iPhone

It’s frustrating when you can’t use your iPhone 18 Pro or iPhone 18 Pro Max because of technical issues. Save yourself time and stress by using the Apple Support app to quickly find a helpful article or immediately connect with an Apple technician to fix it.

Most of what has been written about iOS 27 describes Siri AI. These are the iOS 27 tips that are easy to miss. Settings buried two panes deep, a gesture Apple removed quietly, and features with a catch worth knowing first.

Every tip here is new in iOS 27 release, and comes from my own testing rather than from Apple’s feature list.

1. Where Siri went

You can bring up Siri (by default), as in previous releases, by saying “Siri” or “Hey Siri,” or by pressing and holding the side button. However, the change introduced in iOS 26 that let you double-tap the bottom of the screen is gone. In iOS 27, you can swipe down on a Home screen to reveal the new combination of Spotlight and Siri: a field labeled Search or Ask. You can type into that field, or tap the Dictation icon and talk to Siri that way.

2. Set the Liquid Glass level

When you upgrade to iOS 27 or iPadOS 27, the last stages of the installation present a new screen that lets you choose to adjust Liquid Glass using a slider. If you don’t make the adjustment at that moment, you can do so later, or change your initial choice. Go to Settings > Appearance > Liquid Glass.

This new screen offers a slider you can drag from the left edge, which Apple describes as “More Clear” (most Liquid Glass effect) across a range to the right: “More Tinted” (most opaque). Apple makes it easy to visualize by providing a scrollable preview that shows Liquid Glass elements overlaid on a webpage with images and text.

3. Flatten Liquid Glass completely

Go to Settings > Accessibility > Display & Text Size and enable Reduce Transparency. This flattens Liquid Glass, removing transparency and providing an almost identical look to iOS 18/iPadOS 18. The level of Liquid Glass you have enabled doesn’t have an effect.

Use Settings > Accessibility > Display & Text Size > Increase Contrast to bump up the difference in tones. In iOS 27/iPadOS 27, the difference appears slight, where it was sharply distinct in the previous releases.

4. Why the slider is locked

You can’t change the Liquid Glass intensity when either of those two options is enabled. When you attempt to change the Liquid Glass setting, you’re told that Reduce Transparency and Increase Contrast must be disabled. You can tap Turn Off.

5. Give alarms their own volume

It took this long for Apple to let you set the volume of alarms and timers hitting zero seconds separately from your ringtone volume. Go to Settings > Sounds & Haptics and, under Alarms and Timers, disable Match Ringtone Volume.

6. Stop clinging to dead Wi-Fi

In iOS 27, Apple rebranded the Wi-Fi Assist feature as Connectivity Assist, and if you had Wi-Fi Assist enabled—it was by default—you’ll find the new feature already turned on in Settings > Wi-Fi.

7. Use both FaceTime cameras

After many, many years of FaceTime supporting a single camera view on iPhone, you can now use the front and back cameras simultaneously. The proviso? You need an iPhone 17, iPhone 17 Pro, iPhone 17 Pro Max, or iPhone Air and iOS 27. The other person or people can see your dual-camera feed only if they have iOS 27, iPadOS 27, or macOS 27. (This builds off the dual-capture mode in the Camera app on those models introduced in iOS 26.)

To use the dual-camera mode, in an active FaceTime session (or before someone has joined), tap the Flip Camera button in the inset selfie view. This shows both cameras by default.

8. Share location for any period

Previously, you could share your location for an hour, until the end of the day, or indefinitely. Now you can set a custom period of time.

9. Hide your location silently

If you’re sharing your location with someone, you can hide your location from your end until the next morning (at 4 a.m.), and they’re not notified. They’re also not told when you resume sharing, or “unhide” your location. They simply see you with a “location unavailable” label.

10. Photo keywords, at last

It took many years, but you can finally apply keywords to media in the Photos app on an iPhone and iPad. Huzzah? (Keywords are a useful way to link images for searching and organization.) However, you can still only apply keywords to items one at a time, as opposed to singly or in selections of two or more on a Mac. To add keywords, tap the info button, then tap Add Keywords.

11. See only what you selected

When you make a selection by tapping the Select button in the upper-right corner of any multiple-item view in Photos, a new Show Selected button appears at the bottom. Tap it, and it reveals just the items you chose. You can adjust the selection or view the images and videos in a carousel. Tap Deselect All to remove the current selection.

12. Two albums appear by themselves

Apple adds two new albums in Collections > Utilities. Captured by Me contains images or videos you created using any iPhone or iPad, such as via the Camera app or by taking a screenshot. The Identity Documents album uses machine learning (not Apple Intelligence) to collect scans or photos of personally identifying documents. (Identity Documents hasn’t yet appeared for me in iOS.)

13. Upgrade a Shared Album first

In iOS 27/iPadOS 27 (and on macOS 27 and at iCloud.com), you have access to several new features. However, you must first upgrade an album: select the album in Collections > Shared Albums, tap the More button, then tap Upgrade Shared Album. This may take some time—minutes or longer—depending on the size of the items in the library and your internet connection.

After upgrading, you have access to the following:

  • Full-resolution photos and videos are now supported across all common formats.
  • You can filter by photos or videos. Tap the Filter button, then tap Media Types.
  • There’s a Create Shared Album option for any existing album. Tap the More button, then tap Create Shared Album.
  • Albums can be set to expire after 30 days, but only when created. After creating a Shared Album from an existing album or by tapping the Add button in the Collections > Shared Albums view, enable Make Album Temporary.
  • You can create an upload link that allows anyone—not just people with access to the album—to upload images. With the album selected, tap the Share button, tap “Only invited people can join,” and choose Anyone with the Link. (This is similar to other kinds of sharing across iOS 27/iPadOS 27.)
  • A recent activity log lets you see changes made to the album, including emoji reactions. (This doesn’t yet appear to be in place.)

14. Save a video still

You can extract a frame from a paused video to save as an image. Tap the More button and choose Save Video Frame.

15. Make Photos sync now

Photos often decides to pause syncing to iCloud to avoid draining the battery, even when the battery is quite full. You can now go to Settings > Apps > Photos > Sync Immediately and choose For Today. This prioritizes syncing instead of preserving battery life for the remainder of the calendar day. If Low Power Mode or Low Data Mode are enabled, Photos will still pause until those modes are turned off, such as by recharging the phone for the former.

16. Slideshows without Memories

Slideshows can now be built from any album or even a selection of media, rather than relying on memories.

17. Search a podcast’s episode notes

If you navigate to a podcast’s view of all of its episodes by tapping the podcast and then tapping Episodes, you can now search against the title and show notes of all listed episodes.

This doesn’t search transcripts, which Podcasts generates for some shows. It searches only the per-episode notes published in the podcast feed.

18. Watch a page for changes

On any page, tap the Page Info button and choose Notify Me. Here’s the interesting part: You write in plain language what you want Safari to check for, then tap Next. Safari will check daily by default. You can tap Edit while creating the notification or afterward to switch to hourly, weekly, or monthly, and set the time of day.

19. Scan a card into Wallet

You can create entries for cards, membership cards, and other kinds of barcode/QR code-related proofs of entry or membership from scratch, a task formerly available only for third-party apps and websites.

Tap the Add button in Wallet, then tap Create a Pass. You’re guided through a few steps, one of which lets you scan the existing card, so that Wallet can pull in its number, barcode, or QR code. You can fill out details that aren’t present on the card or captured by Wallet.

20. Share details at the till

Entirely new is Tap to Share with merchants at the point of sale, such as in a store or at a fair. This makes in-person Apple Pay more akin to Apple Pay in Safari. Tap to Share lets an entire set of interactions occur before you pay. You start by approving a connection with a merchant’s iPhone that has a supported payment app. (Ostensibly, this may encompass not just companies like Square and Stripe, but in-house developer apps for retailers like Old Navy or Lowe’s.)

Once you begin, you can choose what you share with the business—like contact details, a shipping address, or your email. This also means you don’t have to state this information aloud or rely on the merchant typing it in correctly! A merchant can offer to sign you up for a membership or loyalty program. You can use a pass from the merchant, or they can issue one, related to discounts, credits, or other transaction-related purposes. Finally, you see the full cart as a digital receipt before completing payment with Apple Pay.

21. Read anything in Accessibility Reader

Accessibility Reader used to require a shortcut trigger. Now, you can use the share menu in any app to open content in the reader.

22. Captions for any video

Your iPhone and iPad now generate captions from any uncaptioned video you’re watching in Photos and other supported apps. (This isn’t related to tvOS or TV app captioning.) If captions already exist, you can have them automatically translated between supported languages.

23. iPad tips: the menu bar

In iPadOS 26, the menu bar had to be triggered either by swiping down from the top of the display or by hovering with a pointing device, at which point it would appear. It then hid, after a short delay, when it wasn’t in use or being hovered over.

In iPadOS 27, the default behavior appears similar, but there are two significant changes:

  • The app name always appears on the far-left side of the menu bar, at the upper-left corner of the screen.
  • To unfurl the menu bar, tap or drag over the app name.

Along with that new behavior, you can also opt to have the menu bar remain in place, persistent at all times. Go to Settings > Multitasking & Gestures, then disable Automatically Show and Hide Menu Bar.

24. React to a keyboard connecting

Apple previously didn’t offer a way to trigger an automation when a keyboard was connected to or removed from an iPad. This frustrated some users, who interact with their iPad differently when a keyboard is connected—such as in a dock-style environment—and when they are using only the touch screen or an Apple Pencil.

Now, you can use Shortcuts to create automations based on whether a keyboard was connected, disconnected, or the keyboard connection state changed. This includes the “Set multitasking mode to” item. You might want to switch between Full Screen Apps and Windowed Apps when using your iPad without a keyboard. You’d have to set up two shortcuts: one would trigger when the keyboard was attached; the other when detached.

For more iOS 27 tips and tricks, see the complete guide to every iOS 27 feature. There are also 36 changes that owe nothing to AI that I recommend you to check out.

Siri AI is the flagship of the version 27 releases. Most of what has been written about it describes what it can do. These are the Siri AI tips and tricks that are easy to miss. Settings that are not obvious, shortcuts Apple has not documented, and two limits that explain most failures. I tested these Siri AI tips on my iPhone, iPad and Mac rather than reprinting Apple’s feature list.

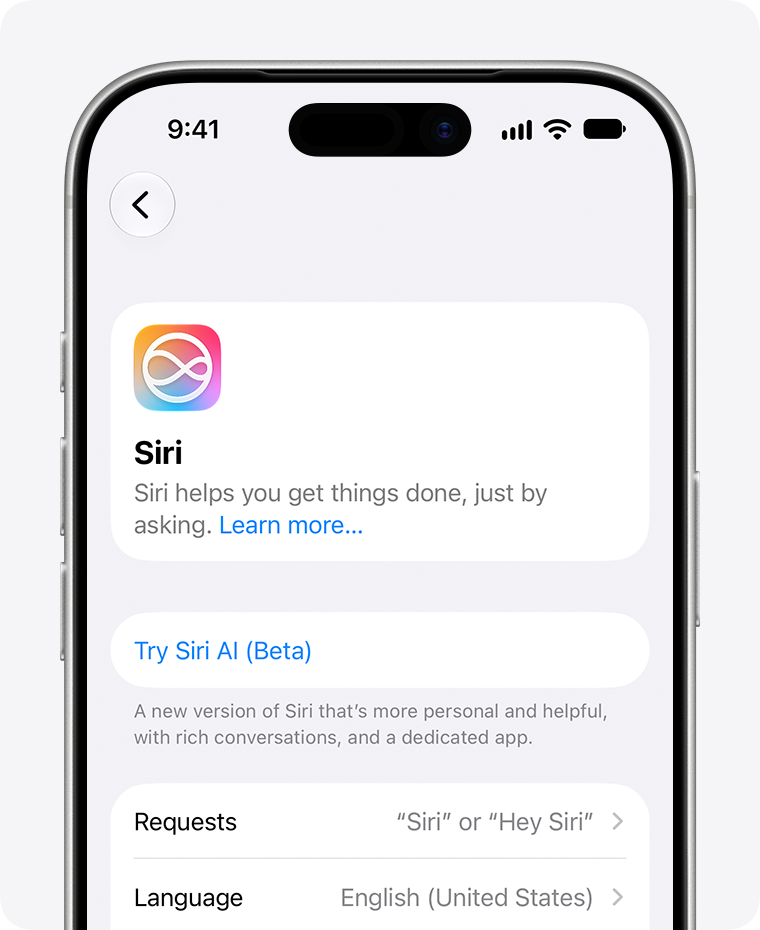
iPhone showing the Try Siri AI \(Beta\) option.

1. Which Siri are you running?

Open the Siri pane of Settings on an iPhone or iPad, or System Settings on a Mac. It tells you whether Siri AI is currently engaged, which is not always the case:

  • If you see the new monochrome Siri icon, that means your device is currently configured to use Siri AI.
  • If you see the old, colorful Siri icon, that means it’s not.

Among the reasons the old icon might appear are that your device, or Siri, is set to an incompatible language, that the two language settings described below don’t match, or that you have turned off Siri.

2. The silent language trap

Initially, only English is supported for Siri AI, though Apple plans to add more languages over time. As a result, if you set language to anything other than English, your device reverts to the old Siri—with the old icon—rather than Siri AI, with the new one.

In addition, both your Siri language and your system language (in Settings > General > Language & Region > Preferred Languages) must be identical—including the dialect, if applicable on your device. For example, if one is set to English (United States) and the other is set to English (Canada) on a Mac, you’ll get the old version of Siri. Make sure the two match—and note that switching your system language may require a restart.

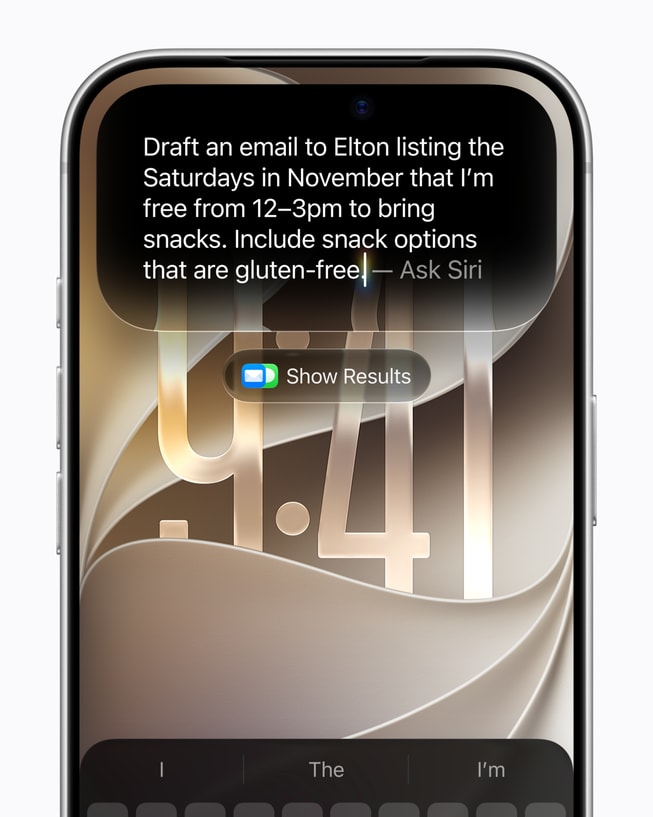
3. Just type what you want

This automatic recognition of your query type means you don’t have to think about how you formulate a search or question: type what you want and let Siri figure it out. If the results list for a search doesn’t suffice, elaborate on what you’re asking.

Using Siri AI to draft an email.

4. Send one question to ChatGPT

You can also explicitly add “ChatGPT” to a request—for example, “Ask ChatGPT the best way to fry an egg.” This works with spoken requests, too!

To route a single question to ChatGPT from the Search or Ask field:

  1. Activate Siri using a method where you can type to it.
  2. Touch and hold in the Search or Ask field on an iPhone or iPad, or Control-click/right-click that field on a Mac.
  3. From the menu that appears, choose Ask > Use ChatGPT.
  4. The text in the field changes to ChatGPT. Enter your query.

5. Plain Spotlight, on a Mac

What if you just want a plain Spotlight search, without Siri’s involvement at all? You can still have it, with some extra effort.

On a Mac, activate Siri and type a search term, then press ⌘-2 to search for that term only within files and folders. You can also press ⌘-1 to look for apps, ⌘-3 to look for actions, or ⌘-4 to search your clipboard history.

Siri AI is shown on a user's Mac.

On any device, you can also specify as part of your search term where Spotlight should look—for example, “Files about cats”, “Contacts named John” or “Emails about Apple”.

6. Keep talking, don’t restart

However you navigate to activate Siri, you can immediately type or speak something after its response to whatever your first question or requested action was.

This can be useful if Siri’s first response or action wasn’t sufficient, or if it provided information or succeeded and you want to follow up by using context. You don’t have to define your scenario once again, which Siri often required before Siri AI.

7. Slow Siri down

It has long been possible to choose among various male- and female-sounding voices and even different dialects, and Siri AI adds even more choices. But now, you can also adjust Siri’s speed and expressiveness. If you want a zippy, flat, “just the facts” response; a relaxed, cheerful response; or anything in between, you can go to Settings > Siri on an iPhone or iPad, or System Settings > Siri on a Mac, and click or tap Voice. On this pane, you can select a base voice and then drag the Pace and Expressivity sliders as sample responses are played to dial in exactly the tone you prefer.

This feature requires more advanced chips than are needed for Apple Intelligence. See which devices support Siri AI.

8. Stop Siri talking back

You have two choices as to how Siri responds to requests:

  • Spoken Response: Siri speaks responses when you speak to Siri, but provides textual responses when you type to Siri.
  • Silent Response: Siri almost always provides textual responses. But note that even with this setting, Siri speaks responses if you’re driving or wearing headphones—and possibly in other limited situations.

9. Pin, share, or speak

You can pin a selected conversation, which anchors it at the top of the list. To pin on a Mac, choose Conversation > Pin Conversation, or right-click or Control-click and choose Pin from the contextual menu. On an iPhone or iPad, you can swipe left and tap the Pin icon, or touch and hold and choose Pin.

To share a specific response—not a conversation as a whole—as a PDF, you can click the Share icon on a Mac, or touch and hold the response on an iPhone or iPad and choose Share.

In any conversation in the Siri app, you can click or tap the microphone button to speak your request rather than type it.

10. Control what Siri keeps

Your device can store all your Siri conversations indefinitely, or it can delete them after 30 days or a year. To configure this, go to Settings on an iPhone or iPad, or System Settings on a Mac, then Your Name > iCloud > See All > Siri, and choose 30 Days, 1 Year, or Forever from the Keep Conversations pop-up menu.

The same pane controls syncing. You can disable Sync this Device, which is enabled by default. The Keep Conversations setting is synced with the main Siri retention setting: change it here, and it’s changed globally, not just for iCloud.

11. Summaries did not disappear

Options that were formerly part of Writing Tools, such as Summary, Key Points, List, and Table, no longer explicitly appear in the Write/Edit with Siri interface, but you can still use them. In the Edit with Siri field, you can type “Summarize this” or “Make this into a list”, for example, and Siri does just that.

12. When the Siri icon is missing

If the Siri icon doesn’t appear (as is the case in Messages, for example), you can right-click or Control-click (on a Mac) and choose Ask Siri, or tap once to bring up the text menu (on an iPhone or iPad) and then tap the Siri icon to display an “Ask Siri about this” field.

13. Turning Siri off changes less

Unlike in the previous two generations of Apple’s operating systems, you can no longer disable Apple Intelligence completely, and if you want to disable Siri (along with portions of Apple Intelligence), you must scroll to the bottom of the pane, click or tap the red Turn Off Siri button, read a long description of all the things that will stop working if you do, and then click or tap Turn Off Siri.

Even if you turn off Siri, “Visual Intelligence will continue to work but with more limited capabilities,” though Apple doesn’t spell out what those limitations are, and other Apple Intelligence features such as Write/Edit with Siri, Image Playground, and Shortcuts continue to work. All this is Apple’s heavy-handed way of pushing these new features, even if you actively dislike them and don’t ever want to use them.

14. The shortcut you cannot change

One thing you might be surprised not to see in the Siri settings pane is a setting for the keyboard shortcut that invokes Siri on a Mac. Although you can change the Spotlight keyboard shortcut and the shortcuts used for Siri screenshots (in System Settings > Keyboard > Keyboard Shortcuts > Spotlight and Screenshots, respectively), there’s no evident way to change the Siri shortcut to anything else.

15. Two limits worth knowing

Remember that the data has to exist for Siri to answer. I rely on a third-party email client, so Siri seems to have limited access to my email stores for now. But nearly everything else i do is stored in and synced by iCloud.

The second limit is music. Siri only knows about locally stored music from its metadata, as far as i can tell, or at least without asking further questions. For additional Siri AI tricks, see the complete guide to Siri AI.

Apple tends to release operating system changes as a two-beat sequence, like our heart going LUB-dub: The LUB beat is a major flex, like the introduction of Liquid Glass across all their operating systems in 2025. This year is a “dub,” a building-or-rebuilding year, in which Apple largely tweaks the previous cycle and offers incremental improvements, though some may feel quite large. If you have just upgraded, ten of them are worth trying first.

The 2026 set of releases, numbered 27—like car models are numbered in fall for the following year—is a “dub.” We see the rollout of the long-promised Siri upgrade, called Siri AI. Along with its improved performance, Siri AI and Apple Intelligence both extend much more deeply into apps and system functions across nearly all platforms. That’s the flagship feature.

This includes significant improvements to on-device searching. When you use Spotlight in iOS 27 or iPadOS 27 on devices with Apple Intelligence support, the Spotlight field has changed from Search to Search or Ask. You can perform searches or ask Siri questions via the same entry field, which expands Spotlight’s reach and Siri’s scope.

Starting in iOS 27 and iPadOS 27 (as well as macOS 27 Golden Gate), Apple has leaned very heavily into so-called artificial intelligence to enhance the overall operating system experience and many apps. They rebranded Siri as Siri AI on devices with the minimum required hardware. (Check whether your device qualifies.)

Apple also offered four additional areas of focus:

  • Interface tweaks: Apple devoted significant time during their Worldwide Developer Conference presentation in June 2026 to stepping way back from interface overreaches with the Liquid Glass interface. Apple made a number of worthwhile improvements in macOS 27, but far fewer in iOS 27 and iPadOS 27. The key change is a Liquid Glass slider—also in macOS—that lets you choose a degree of translucency. In iOS 26.1/iPadOS 26.1, Apple added a binary choice of Clear (original flavor) and Tinted (somewhat less translucent). In iOS 27/iPadOS 27, that choice is now a slider.

The company also provided minor improvements to iPadOS 27, following the significant overhaul and improvements introduced in iPadOS 26, which were generally well received. See what’s new for iPad.

  • Child safety and Screen Time: Nobody loves Screen Time, because it works erratically and doesn’t always map to what parents want to limit. Apple has regrouped and reworked Screen Time to better allot time. Let’s see if it works better, too! Child safety enhancements include intervening for gore and violence, and better oversight of new connections in FaceTime, Messages, and Phone.
  • Accessibility: A cornucopia of individual improvements in Accessibility adds up. Among them: on-device subtitles for any video across all platforms, developer access to FaceTime that will let sign language interpreters join a call, and greater use of Apple Intelligence to describe things in images and in Magnifier.
  • Communications: While Apple didn’t perform the same kind of huge overhaul to FaceTime, Messages, and Phone in iOS 27 and iPadOS 27 as they did in the previous releases, I’ve provided a one-stop shop for changes affecting those apps, as well as cellular and Wi-Fi.

Apple also discussed in the lead-up to the release of the new operating system how much faster everything would be, but a list of those promises doesn’t help you get more familiar with iOS 27 and iPadOS 27! Because this book doesn’t benchmark these sorts of changes, I can only say: you should be pleased.

I don’t want to say everything else is miscellaneous, as there are hundreds—maybe thousands—of other changes. (You can find extensive rundowns.) Instead, let me say that Apple’s extensive work means many apps and system features have been modified, matured, or enhanced, as you will see in the rest of the book.

How Apple numbers its operating systems

Apple began their current numbering system in 2025, with the releases of iOS, iPadOS, macOS, tvOS, and watchOS all with a base number of 26 for 2026. This continued in 2026 with the release of all operating systems numbered 27.

Before this, Apple incremented their operating systems differently depending on whether they were initial or subsequent releases. A change described as coming from an older version will therefore show an 8- or 9-number leap—say, from iOS 18 to 26 or 27—even though “26” is the very next version after “18.”

Apple Intelligence reaches into a dozen apps. Where to find it in each one is set out separately. For the upgrade itself, start with which iPhones and iPads can install iOS 27, then how to install it.

Apple released Siri AI in 2026: a digital assistant that works with voice recognition and typing, and represents a major expansion of the previous Apple Intelligence system woven throughout their operating systems. Siri AI marks the biggest step forward in this area the company has ever taken.

This comprehensive guide rounds up all of our Siri AI and Apple Intelligence coverage, making it a useful resource for casual users who haven’t had a chance to test out the new Siri and those who might not remember all of the new Siri features. It’s also a great resource to send to friends and family members who have questions about Siri AI features.

How Apple got here

Apple started deploying what’s loosely called “artificial intelligence” over a decade ago, when they silently switched the original Siri voice-assistant system to use a neural network—a software model that mimics neurons in the brain—in 2014. Unfortunately, even then, Siri was always somewhat frustrating to use unless you learned exactly the set of words you should use for particular kinds of instructions, and were patient when it got it wrong—repeatedly. Other voice assistants, like Amazon’s Alexa and Google Assistant, offered more natural interactions.

Meet Siri AI

Siri AI is the latest evolution of Apple’s original voice-only assistant. On supported devices, you can trigger Siri AI by voice, through a button press, or by swiping and typing, among other methods. Then you can ask it questions, or just search stuff that’s on your device.

Chatting with it

For the first time in Siri history, you can ask Siri questions or ask it to do something and almost always get a satisfactory outcome. Revolutionary! Even better, Siri retains context: you can have an ongoing conversation in the Siri app, and the vastly upgraded chatbot feature now doesn’t lose the thread.

Accessibility features

Apple devices have long offered a wide range of features intended to make them easier to use for people who have difficulties with some aspect of the default interface—which doesn’t necessarily imply a disability, but also encompasses personal preference and a limited tolerance for Apple’s Liquid Glass shenanigans, for example.

Visual Intelligence

Visual Intelligence’s remit has grown substantially since it originally let your iPhone describe what it saw via the Camera in iOS 18.2. Generally, Visual Intelligence lets you query what it “sees” in a screenshot or through the camera, or take action on what appears. Swipe your finger around something to prompt a visual search that can explain what you’ve highlighted.

Inside the apps

Apple Intelligence has its own role in Apple’s operating systems, starting iOS 18, iPadOS 18, and macOS 15. The company expanded Apple Intelligence offerings in the version 26 operating systems, and then added many more features across apps in version 27. These are the Apple Intelligence features built into Apple’s own apps.

The bits we don’t recommend

As writers and technologists with combined experience in the tech industry of well over six decades—much of it focused on Apple—we have fairly well-developed opinions about which features are genuinely useful to a wide range of people and which ones lack practical utility and are more effective as marketing tools. That’s especially true for people in our age range (Gen X) and older, who constitute the vast majority of our readers.

Even though we want to be thorough and describe all the Apple Intelligence capabilities, there are a few that we think most people are better off avoiding because they may waste your time or may negatively impact your life. Those are the Image Playground app, Genmoji, and Write with Siri (formerly known as Writing Tools); you can make up your own mind as to whether they’re worth your time.

Settings worth changing

The Siri pane of Settings/System Settings lets you configure numerous aspects of Siri AI. You can use this pane to understand whether Siri AI is currently engaged, which is not always the case.

Apple tends to release operating system changes as a two-beat sequence, like our heart going LUB-dub: The LUB beat is a major flex, like the introduction of Liquid Glass across all their operating systems in 2025. This year is a "dub," a building-or-rebuilding year, in which Apple largely tweaks the previous cycle and offers incremental improvements, though some may feel quite large.

The 2026 set of releases, numbered 27–like car models are numbered in fall for the following year–is a "dub." We see the rollout of the long-promised Siri upgrade, called Siri AI. Along with its improved performance, Siri AI and Apple Intelligence both extend much more deeply into apps and system functions across nearly all platforms. That’s the flagship feature.

Our iOS 27 guide follows the order you will actually meet those changes: the upgrade itself, then Siri AI, then Apple Intelligence inside the apps, then the interface that changed under you, and so on through to the apps and Apple Pay. Two further sections cover what comes after — keeping the phone safe, and finding it again if it goes missing.

This is a comprehensive guide with all of our coverage, and it’s a useful resource for iPhone and iPad users new to iOS 27 or those who might want a recap on what’s new.

Before you upgrade

Upgrading your device should be a cinch. But iOS 27 and iPadOS 27 have minimum hardware requirements. You won’t be able to upgrade any iPhone or iPad that isn’t a supported model. There are further limitations to using Apple Intelligence, which requires certain processor features and applies only to a subset of iPhones and iPads that can install iOS 27 and iPadOS 27.

The Siri AI guide

Siri AI is the flagship of this release, and it has a complete guide of its own. Siri spent years seeming like it didn’t quite fit the level of quality Apple aspires to. Worse, the company announced capabilities it wasn’t able to release, and features that have disappointed. You can tell this wasn’t just users carping: more than one head of the Siri effort has left the company altogether.

Apple Intelligence was more of a success, if limited. The company, making use of mostly on-device computation, focused their use of Apple Intelligence on specific tasks within apps or systemwide. I think many of these attempts were boring or unnecessary: generating custom emojis, Image Playground for slightly icky picture generation, and the global Writing Tools, which were worse than many previous generations of non-AI-based assistants.

Apple Intelligence inside the apps

In the iOS 27 and iPadOS 27 updates, Apple expanded the use of Apple Intelligence across more apps and added features to apps that already had some Apple Intelligence support. Apple Intelligence is designed to synthesize information, like creating summaries, as well as generate stuff, such as text or images. Some of the elements are distinctly more useful than others.

The interface changed under you

Few interface changes Apple has made have been more criticized than their introduction of Liquid Glass in their version 26 operating system releases; few have been more praised than bringing a full-featured windowing environment to iPadOS 26.

Apple has learned from both changes and added maturity to them. Liquid Glass can now be practically disabled—almost turned off with Reduce Transparency—while the iPad received many more minor changes that are welcome, but not critical.

Setting it up for children

Over the last few years, Apple has released a number of features that parents can use for children that are aimed at reducing two categories of risk: use of apps parents disapprove of, activities parents want to discourage or limit, and spending money online; and exposure to unwanted contact, images, and videos, as well as preventing children from being able to make unfettered connections or send material to arbitrary people.

Accessibility

Accessibility is a catch-all term for a large number of features, apps, and adjustments that Apple designs to improve access to kinds of things that may be harder for some people, whether due to motor limitations, eyesight or hearing, or the language they speak.

Many of these features can benefit a much larger group of people than any narrowly defined as “disabled”; automatic, high-quality captioning of video content is a great example, as is having a voice read text aloud from webpages or describe images.

Communications

Following significant overhauls to their three communications apps in iOS 26, iPadOS 26, and macOS 26—FaceTime, Messages, and Phone—Apple has relaxed a bit with changes in the 27 series of releases. Here’s what you should pay attention to.

The apps, one by one

Beyond the big changes, many apps in iOS 27 and iPadOS 27 received smaller tweaks or modest new features.

Apple Pay and Wallet

Apple also made one systemwide change so far that I can tell you about, with big updates to Apple Pay and point-of-sale payments.

Keeping it safe

An upgrade is a good moment to check the settings you set once and then forget. These come from a separate guide to securing Apple devices rather than from the iOS 27 release notes, so they apply whichever version you are running.

Finding your things

Find My changed in iOS 27, and the AirTag hardware changed with it. This section covers the whole system: devices, people, and the trackers you attach to your things.