Got a tip for us?

iPhone

The iPhone is a smartphone from Apple that runs the iOS mobile operating system. Between its apps, communication features, the camera, mobile internet access, and other functionalities, the iPhone has quickly become an integral part of many peoples tech lives.

If your iPhone Wallet with MagSafe has Find My support, you can connect it to your Apple Account so you can see its last known location in the Find My app. You can allow someone who finds it to see your contact information to help them return it to you.

When you add your iPhone Wallet with MagSafe to Find My, you can get notified if it detaches from your iPhone. You can add it the first time you attach it to your iPhone, or later from the Find My app.

Here’s how to add your iPhone Wallet with MagSafe to Find My on iPhone.

Note: iPhone Wallet with MagSafe and Find My support needs a compatible iPhone model.

Add iPhone Wallet with MagSafe when you first attach it to your iPhone

  1. Go to the Home Screen on your iPhone.
  2. Attach your iPhone Wallet with MagSafe and Find My support to your iPhone.
  3. Tap Continue on your iPhone screen. Follow the onscreen instructions.

Add iPhone Wallet with MagSafe later

You can still add your iPhone Wallet with MagSafe and Find My support later from the Find My app, even if you decide not to when you first attach it to your iPhone.

  1. Open the Find My app on your iPhone.
  2. Attach your iPhone Wallet with MagSafe and Find My support to your iPhone.
  3. Tap the Add button and choose Add MagSafe Accessory. Follow the onscreen instructions.

Is the iPhone Wallet with MagSafe and Find My support associated with someone else’s Apple Account? Then they need to remove it before you can add it.

Tag: Find My

Use your iPhone camera to take a panoramic photo of your surroundings in Pano mode. It’s all about the arrow. The panorama comes together as you move slowly in the arrow’s direction, keeping it on the center line. You can pan in the opposite direction, too, and you can reverse the direction of a vertical pan.

  1. Open Camera on your iPhone.
  2. Swipe left to select Pano mode.
  3. Tap the Shutter button or click the Camera Control on (supported models).
  4. Pan slowly in the direction of the arrow, keeping it on the center line.
  5. To finish, tap the Shutter button again or click the Camera Control on (supported models).

Tap the arrow to pan in the opposite direction. To pan vertically, rotate iPhone to landscape orientation. You can reverse the direction of a vertical pan, too.

Tag: Photos

You can set timers to count down from specified times.

You can give a timer a name, like “Egg timer,” and choose a sound to play when the timer ends. You can also set multiple timers, or set a timer to stop playing audio or video, and a timer keeps going even when iPhone goes to sleep. Siri can set a timer for you, too.

Here’s how to set timers in Clock on iPhone.

Siri: Ask Siri something like: “Set the timer for 3 minutes.”

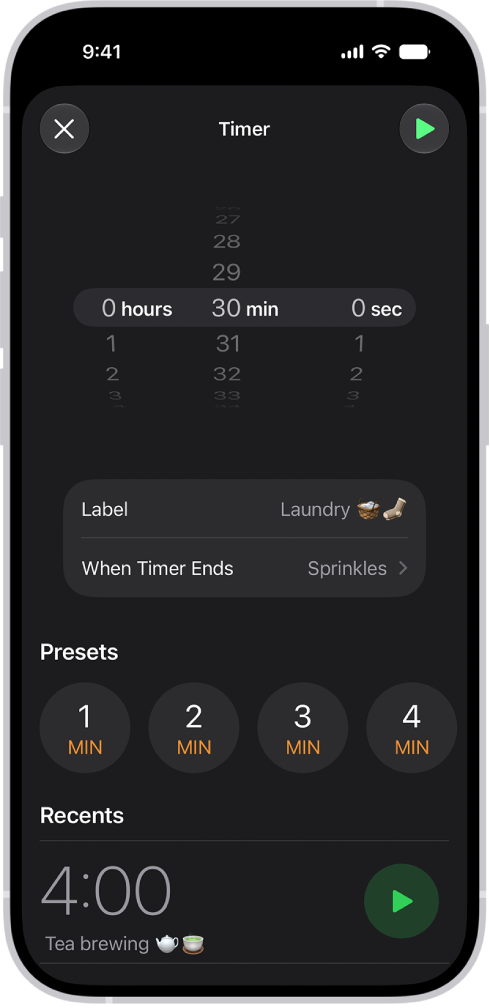
A screen for adding a timer, with settings to set a timer, and a button to start a recently created timer.

Set a custom timer

  1. Open the Clock app on your iPhone.
  2. Tap Timers and then set a duration of time.
  3. Choose any of the following options:
    • Label: Give the timer a name, like “Egg timer.”
    • When Timer Ends: Choose a sound to play when the timer ends.
  4. Tap Start.

Note: Even if you open another app or iPhone goes to sleep, the timer continues.

Set a custom timer, and it appears below Recent, so you can start the same timer again later.

Set a timer to stop playing audio or video

Want audio or video to stop playing after a specific amount of time, like when you fall asleep listening to the radio? Set the timer to stop the playback.

  1. Open the Clock app on your iPhone.
  2. Set a custom timer, as above.
  3. Tap When Timer Ends and tap Stop Playing at the bottom of the list of sounds.
  4. Tap Set, then tap Start.

Set multiple timers

Once you’ve started a custom timer, you can add more timers, keeping track of different tasks at the same time.

  1. Open the Clock app on your iPhone.
  2. Tap Timers, then start a timer.
  3. Tap the Add button. Do one of the following:
    • Add a custom timer: Set a duration of time, add a label or sound and tap the Start button.
    • Add a preset timer: Swipe left below Presets. Tap a preset duration of time (like 1, 5, or 10 minutes).
    • Add a recent timer: Tap the Start button next to a timer you’ve recently set.

If you select a preset or recent timer, tap the timer to edit the label and sound.

Stop, pause, or remove a timer

When a timer ends, you get a notification at the top of your screen, no matter which app you’re using. Tap the Cancel button to clear the notification, or tap the Reset button if you want the timer to run again. You can also tap Repeat or Stop from the Lock Screen.

You can also turn off a timer before it ends.

  1. Open the Clock app on your iPhone.
  2. Tap Timers and then do any of the following:
    • Pause a timer: Tap the Pause button next to the timer to stop it momentarily. Tap the Resume button to continue counting down.
    • Remove a timer: Swipe left, then tap the Trash button.
    • Remove several timers: Tap Edit and tap the Remove button. Then tap the Trash button.

From your Lock Screen, you can swipe left on a timer, then tap Clear.

Tag: Clock

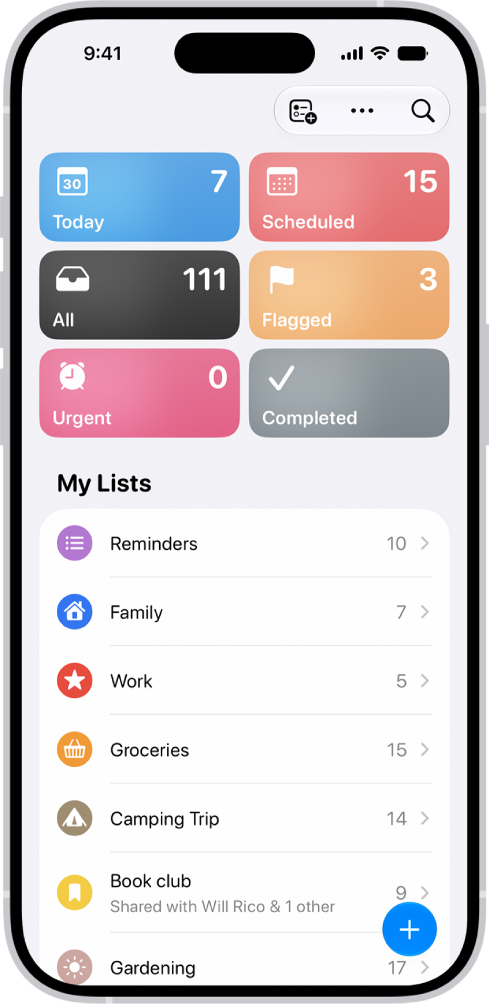
In the Reminders app, you can create new lists, organize the lists into groups, and pin lists for quick access.

Each new list gets a name, a color, and a symbol, and you choose its type: Standard, Groceries, or Smart Lists. You can also edit and rearrange lists and groups, or delete them, and pin an important list above the other lists for easy access.

Here’s how to organize multiple lists in Reminders on iPhone.

A Reminders screen showing a grid of Smart Lists, such as Today, Scheduled, and Flagged, each showing the number of items. Under the heading ‘My Lists,' shows a list of custom reminder categories like Family, Work, and Camping Trip.

Note: If you use updated reminders in iCloud, every Reminders feature described in this guide is available. With other accounts, some features aren’t.

Make a new list

  1. Open the Reminders app on your iPhone.
  2. Tap the Add List button.
  3. Enter a name and choose a color and symbol for the list.
  4. Tap List Type and choose Standard, Groceries, or Smart Lists.
  5. Tap the Done button.

Pin an important list above the other lists for easy access

  1. Open the Reminders app on your iPhone.
  2. Touch and hold a list and then tap Pin. You can also swipe right on the list and then tap the Pin button.

You can have a maximum of nine pinned lists. To change the position of a pinned list, tap the More button, tap Edit Lists, drag the Reorder button to a new position, then tap the Done button.

Create a group of lists

Groups such as work, school, or shopping can organize your lists.

To create a group, simply drag a list onto another list. You can also do the following:

  1. Open the Reminders app on your iPhone.
  2. Tap the More button and then tap Edit Lists.
  3. Tap Add Group, enter a name and select the lists to include in the group (optional). Then tap the Done button.

Edit and rearrange lists and groups

  1. Open the Reminders app on your iPhone.
  2. Tap the More button and tap Edit Lists. Do any of the following:
    • Rearrange lists and groups: Drag the Reorder button a list or group to a new location. You can even move a list to a different group.
    • Change the name and appearance of a list or group: Tap the Edit Details button.

Delete a list or group

  1. Open the Reminders app on your iPhone.
  2. Swipe left on the list or group. Then tap the Delete button.

If you delete a group, you can choose to keep its lists. Deleted lists or groups move to Recently Deleted, where you can recover them within 30 days. They’re permanently deleted after 30 days.

iPhone 16 or later uses Spatial Audio to record video, which captures more realistic and immersive audio recordings that you can edit later in the Photos app. You can also choose to record in Stereo or Mono. Earlier iPhone models record in Stereo.

Spatial Audio playback is immersive from all directions on supported playback devices, while Stereo separates the sound between your left and right ears. You’ll find the choice in Camera settings, under Record Sound.

  1. Start the Settings app on your iPhone.
  2. Tap Camera, tap Record Sound, and then choose one of the following:
    • Spatial Audio: Audio playback is immersive from all directions on supported playback devices.
    • Stereo: Audio playback is separated between left and right ears.
    • Mono: Audio playback is the same in both ears.

Note: Record video with either Spatial Audio or Stereo on iPhone 16 or later, and iPhone reduces wind noise automatically. If you’d rather change that, turn off Wind Noise Reduction.

When you record video, supported models of AirPods and AirPods Pro can work as a microphone.

Tag: camera

You can share places with others. For example, you can send a message or email to show people where to meet you. A place on the map or a search result can be shared from the top of its place card, and you can even send your current location without opening Maps.

Quick tip: Sharing your current location doesn’t require opening Maps. Touch and hold the Maps icon on the Home Screen and tap Send My Location.

  1. Open the Maps app on your iPhone.
  2. Tap a place on the map or a search result.
  3. Tap the Share button (at the top of the place card) and choose an option.

You can also touch and hold the place, then tap Share Location.

Tag: Maps

You can keep adding photos and videos after you set up or join an iCloud Shared Photo Library in the Photos app. Keep in mind that content you move there leaves your personal library and becomes visible to all participants. There are several ways to add more:

  • Manually move photos from your personal library
  • Save photos and videos you take directly to the shared library from Camera
  • Share photos you take when other members of the shared library are nearby
  • Share photos and videos you take at home

Note: iCloud Shared Photo Library needs iOS 16.1, iPadOS 16.1, macOS 13, or later. If a device runs an earlier version of the software, it won’t have the photos and videos added to a shared library.

Manually add photos and videos to an iCloud Shared Photo Library

From your personal library, you can add individual photos and videos to the iCloud Shared Photo Library.

  1. Open the Photos app on your iPhone.
  2. Tap the photo or video you want to add. Or to add multiple photos and videos at the same time, tap Select. Tap the thumbnails you want to add.
  3. Tap the More button. Then tap Move to Shared Library.

Quick tip: The Photos app can suggest photos and videos for your Shared Library. To see them, tap Collections , tap your account in the top-right corner, and then tap For Your Shared Library.

After content is moved to the shared library, it’s no longer in your personal library and it’s visible to all of the shared library participants. To move content from the shared library back to your personal library, follow the steps above, but tap Move to Personal Library instead of Move to Shared Library.

Add photos and videos to an iCloud Shared Photo Library directly from Camera

Camera saves to your personal library by default. Once you set up or join an iCloud Shared Photo Library, though, a Shared Library button appears at the top of the screen when you open Camera, so you can switch between saving photos and videos to your personal library or to the shared library.

To switch, tap the Personal Library button to save to the shared library; tap the Shared Library button to switch back to your personal library.

To turn the feature on or off after you complete the setup process, go to Settings > Apps > Photos > Shared Library > Sharing from Camera, then turn Sharing from Camera on or off.

Add photos and videos to an iCloud Shared Photo Library when participants are nearby

There’s an option to automatically add photos you take when you’re near other shared library participants. You can choose it when you set up or join an iCloud Shared Photo Library.

To allow iPhone to detect when participants of your shared library are nearby, participants need to be signed in to their Apple Account on their device, and have Bluetooth® turned on in Settings > Bluetooth.

To turn the feature on or off after you complete the setup process, do the following:

  1. Open the Photos app on your iPhone.
  2. Tap Collections.
  3. Tap your account in the top-right corner.
  4. Tap Shared Library, then tap Sharing from Camera.
  5. Tap Share Automatically.

Automatically add photos and videos taken at home to an iCloud Shared Photo Library

Photos and videos you take at home can land in the shared library automatically, too. Choose that option when you set up or join an iCloud Shared Photo Library.

To turn the feature on or off after you complete the setup process, do the following:

  1. Open the Photos app on your iPhone.
  2. Tap Collections.
  3. Tap your account in the top-right corner.
  4. Tap Shared Library, then tap Sharing from Camera.
  5. Turn Share When At Home on or off.

Turn iCloud Shared Photo Library sharing suggestions on or off

Sharing suggestions recommends photos you might want to add to your iCloud Shared Photo Library, such as photos you took when participants of the shared library were nearby, or photos of people you indicated interest in during the setup process. iPhone sends a notification to review sharing suggestions. To turn suggestions on or off, follow these steps:

  1. Open the Photos app on your iPhone.
  2. Tap Collections.
  3. Tap your account in the top-right corner.
  4. Tap Shared Library, then turn Shared Library Suggestions on or off.

If you want to get sharing suggestions for additional people, tap Add People, tap a person, then tap Add. The person doesn’t have to be a member of the shared library.


Tags: iCloud, Photos

In the Freeform app, you can organize your boards into folders. You can create a subfolder, move a folder inside another folder, and rename a folder. You can also move boards into or out of a folder, several at the same time if you like.

Create a folder

  1. Open the Freeform app on your iPhone.
  2. Tap the Back button until you see a list of categories (All Boards, Recents, Shared, and Favorites).
  3. Tap the New Folder button, name your folder and tap OK.
  4. Do any of the following:

    • Create a subfolder: Tap a folder to open it, tap the Folder Actions button, and tap New Folder.

      You can also move a folder inside another folder.

    • Rename a folder: Touch and hold a folder, tap Rename, enter a new name, and then tap OK.

Move boards into or out of a folder

  1. Open the Freeform app on your iPhone.
  2. While browsing All Boards or the folder list, do one of the following:
    • Move several boards at the same time: Tap the Folder Actions button, tap Select, and tap each board you want to move. Tap Move and then choose a folder to move them to.
    • Move a board or subfolder to another folder: Touch and hold a board or subfolder, tap Move, and then choose a folder to move it to.
    • Remove a board or subfolder from a folder: Touch and hold a board or subfolder and tap Move. Choose Move to Top Level.

A removed board moves to All Boards, while a removed subfolder moves to the top level of the folder list.

In a Family Sharing group, the organizer can remove members or disband the group, and family members (other than teens with parental controls or children) can remove themselves. A removed family member immediately loses access to shared subscriptions and content purchased by other members.

Remove a member from a family group

In a Family Sharing group, the organizer can remove other members, and anyone who’s removed immediately loses access to shared subscriptions and to content other members purchased.

  1. Open Settings and then tap Family.
  2. Tap [member’s name], then tap Remove [member’s name] from Sharing Group.

Children under 13 can’t be removed from your Family Sharing group. Instead, you can delete their Apple Account or move them to another group.

Transferring a child under 13 from a family group affects the parental controls previously set. And removing a teen under 18 removes your previously set parental controls.

Leave a Family Sharing group

Leaving a Family Sharing group means you stop sharing your purchases and subscriptions with family members, and you immediately lose access to any content they’ve shared.

Note: The organizer can’t leave the Family Sharing group, so if you want to change the organizer, you’ll need to disband the group and have another adult create a new one.

  1. Open Settings and then tap Family.
  2. Tap [your name] and tap Stop Using Family Sharing.

Stop Family Sharing

When the family organizer turns off Family Sharing, it removes all family members from the group at the same time. With Family Sharing turned off, every member immediately loses access to the shared content and subscriptions.

Note: If a child under 13 is in the Family Sharing group, the organizer must move them to another group or delete their Apple Account before disbanding the group. Transferring a child under 13 from a family group will affect the parental controls previously set, and removing a teen under 18 will remove your previously set parental controls.

  1. Open Settings and then tap Family.
  2. Tap [your name] and tap Stop Using Family Sharing.

If you use Magic Keyboard with iPhone, you can use keyboard shortcuts to activate VoiceOver commands.

You can also use VoiceOver Help to learn the keyboard layout and the actions associated with various key combinations. It speaks keys and keyboard commands as you type them, without performing the associated action. And Quick Nav lets you use the arrow keys.

Here’s how to use VoiceOver on iPhone with an Apple external keyboard.

Choose the VoiceOver modifier

The modifier is a key or set of keys you press with one or more other keys to enter VoiceOver commands. You can set the modifier to be the Caps Lock key or the Control and Option keys pressed at the same time.

  1. Open Settings, tap Accessibility, tap VoiceOver, tap Typing, and then tap Modifier Keys.
  2. Choose the modifier for VoiceOver commands: the Caps Lock key or the Control and Option keys.

This modifier is abbreviated as “VO” below.

VoiceOver keyboard commands

You can control VoiceOver using key combinations.

(VO = modifier keys)

Action Shortcut
Turn on VoiceOver Help VO-K
Turn off VoiceOver Help Esc (Escape)
Select the next or previous item VO-Right Arrow or VO-Left Arrow
Activate the selected item VO-Space bar
Touch and hold the selected item VO-Shift-M
Read from the current position VO-A
Read from the top VO-B
Pause or resume reading Control
Copy the last spoken text to the clipboard VO-Shift-C
Search for text VO-F
Mute or unmute VoiceOver VO-S
Go to the Home Screen VO-H
Move to the status bar VO-M
Open the notifications screen Move to the status bar (VO-M), then Option-Up Arrow
Open Control Center Move to the status bar (VO-M), then Option-Down Arrow
Open Search Option-Up Arrow
Open the App Switcher VO-H-H
Open the Item Chooser VO-I
Change the label of the selected item VO-Slash
Start, stop, or pause an action VO-Hyphen
Swipe up or down VO-Up Arrow or VO-Down Arrow
Turn the rotor left or right VO-Command-Left Arrow or VO-Command-Right Arrow
Adjust the setting specified by the rotor VO-Command-Up Arrow or VO-Command-Down Arrow
Turn the screen curtain on or off VO-Fn-Hyphen (or VO-Globe key-Hyphen, depending on your keyboard)
Return to the previous screen Esc

Quick Nav using the arrow keys

Turn on Quick Nav to control VoiceOver using the arrow keys.

Action Shortcut
Turn Quick Nav on or off Left Arrow-Right Arrow
Select the next or previous item Right Arrow or Left Arrow
Select the next or previous item specified by the rotor Up Arrow or Down Arrow
Select the first or last item Control-Up Arrow or Control-Down Arrow
Tap an item Up Arrow-Down Arrow
Scroll up, down, left, or right Option-Up Arrow, Option-Down Arrow, Option-Left Arrow, or Option-Right Arrow
Adjust the rotor Up Arrow-Left Arrow or Up Arrow-Right Arrow

Single-key Quick Nav for web browsing

To navigate a webpage quickly, turn on Quick Nav (VO-Q), then press keys on the keyboard to navigate to specific item types, such as headings or links. To move to the previous item, hold the Shift key as you press a key for the item type.

Item type Shortcut
Heading H
Link L
Text field R
Button B
Form control C
Image I
Table T
Static text S
ARIA landmark W
List X
Item of the same type M
Level 1 heading 1
Level 2 heading 2
Level 3 heading 3
Level 4 heading 4
Level 5 heading 5
Level 6 heading 6

Text editing

Use these commands (with Quick Nav turned off) to work with text. VoiceOver reads the text as you move the insertion point.

Action Shortcut
Go forward or back one character Right Arrow or Left Arrow
Go forward or back one word Option-Right Arrow or Option-Left Arrow
Go up or down one line Up Arrow or Down Arrow
Go to the beginning or end of the line Command-Left Arrow or Command-Down Arrow
Go to the beginning or end of the paragraph Option-Up Arrow or Option-Down Arrow
Go to the previous or next paragraph Option-Up Arrow or Option-Down Arrow
Go to the top or bottom of the text field Command-Up Arrow or Command-Down Arrow
Select text as you move Shift + any of the insertion point movement commands above
Select all text Command-A
Copy, cut, or paste the selected text Command-C, Command-X, or Command-V
Undo or redo last change Command-Z or Shift-Command-Z