Got a tip for us?

iPad

The iPad is a tablet computer from Apple that runs the iOS mobile operating system. Similar in functionality to the iPhone, the iPads purpose is often quite different, sometimes even serving as a general desktop computer replacement.

You can use the Freeform app to create boards for brainstorming and collaborating. For example, propose a trip with friends and let everyone take part in the planning.

You can add text, sticky notes, photos, videos, and other types of files, and the canvas expands as you add content, so you’re never constrained by space limits or page formatting. You can also start a board from another app, like Notes or Safari.
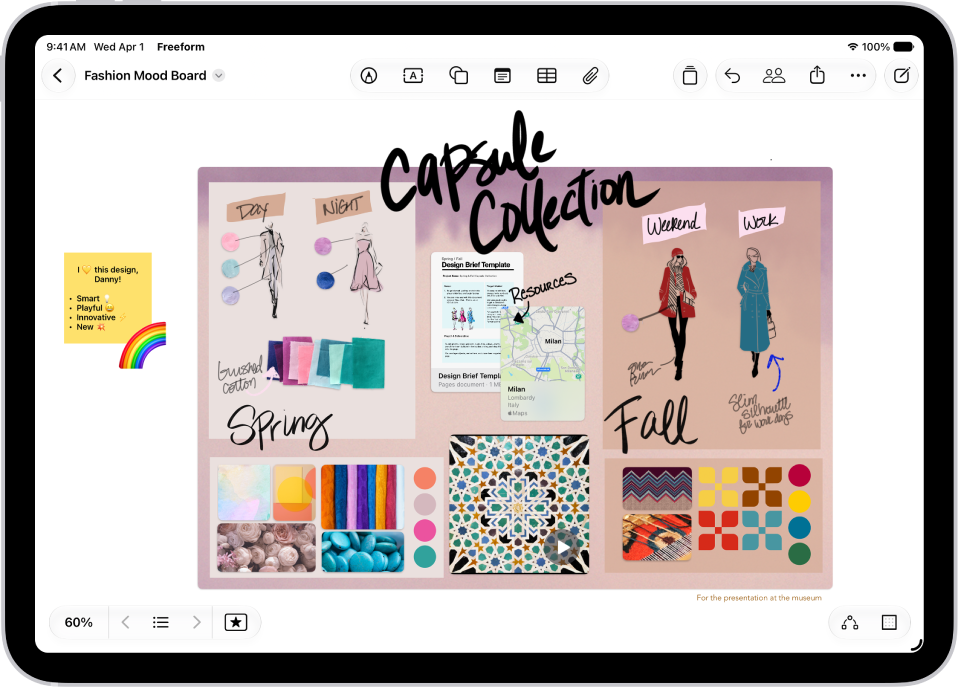
An iPad with the Freeform app open. The board includes handwriting, text, drawings, shapes, sticky notes, links, and other files.

Create a new board

  1. Start the Freeform app on your iPad.
  2. Tap the New Board button.
  3. Tap one of the options at the top of the screen, such as the Add Text Box button or the Insert button, to start building your board.
  4. Move around your board by dragging your finger, and zoom in or out by pinching open or closed.

    Tip: To magnify more precisely, tap the current percentage in the bottom-left corner, then tap a percent.

  5. Your board is saved automatically as you work. To name it, tap Untitled in the top left. Tap Rename.

    If you’re working in a window that isn’t full-screen, you may have to tap the More button, then tap Rename.

Create a board from another app

You can start a new Freeform board using content from another supported app, such as Notes, Maps, Safari, Files, Photos, and more.

  1. On your iPad, go to the app whose content you want to use on a new Freeform board.
  2. Open the item you want to place on the Freeform board (for example, a note, map, webpage, PDF, or screenshot).

    To share just one part of a file to a board (rather than the entire webpage or note), select what you want to share. If your selection includes text, only the text is shared.

  3. Tap Share or the Share button and then tap the Freeform app icon.
  4. Tap New Board or the name of an existing board.

    Either a link or the item appears in the board.

Open a board

  1. Start the Freeform app on your iPad.
  2. Tap a category in the sidebar, or do one of the following:

    • If you don’t see the sidebar: Tap the Show Sidebar button.
    • If you’re in a board: Tap the Back button in the top-left corner.

      Note: Any collaborations you get invited to in the Messages app appear in an Invitations section on the Shared Boards screen until you accept them.

  3. Tap the board you want to open.

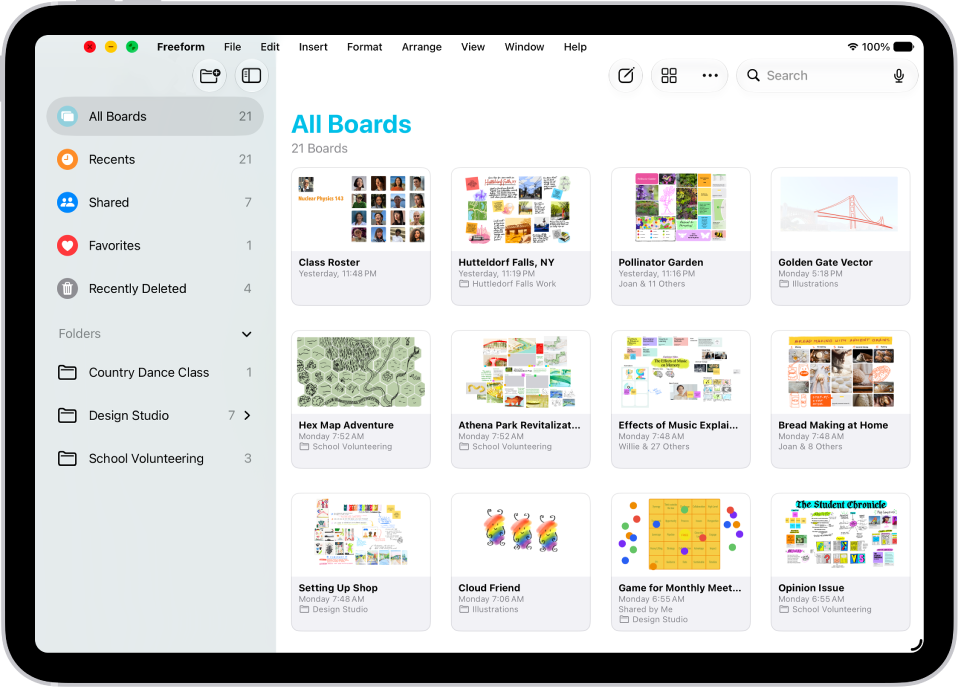
Freeform is open on iPad. All Boards is selected in the sidebar, and board thumbnails appear on the right.

Duplicate a board

  1. Start the Freeform app on your iPad.
  2. While browsing All Boards, tap the More button at the top and then tap Select.

    If you’re in a board, tap the Back button to browse All Boards.

  3. Tap the boards you want to copy. Then tap Duplicate.

Or touch and hold the thumbnail or name of the board, then tap Duplicate.

Note: A duplicate of a shared board isn’t shared, so to send someone a snapshot of the board, see our guide, Send a copy of a board, or to reshare the board, see our article, Invite others to collaborate on a board.

Add a board to Favorites

  1. Start the Freeform app on your iPad.
  2. Do one of the following:
    • While browsing All Boards: Touch and hold the thumbnail or name of the board, then tap Favorite.
    • If you’re in a board: Tap the Actions Menu button and tap Favorite.

See also

In the FaceTime app, you can block FaceTime calls from unknown callers and report the calls as spam or junk. You can block a caller while the call is ringing, during a call, or after a call has ended, and report the call to Apple. Apple then receives the caller’s information.

Block unknown callers

To block an unknown caller, you can do one of the following:

  • While the call is ringing: Tap the left side of the notification to expand the window, tap the contact information or people count at the top of the window, then tap Block Caller or Block All Participants.
  • During a call: Tap the contact information at the top of the window, then tap Block Caller.
  • While in a Group FaceTime call: Tap the people count at the top of the window, then tap Block Unknown Participants or Block All Participants.
  • After a call has ended: Tap the call in the call history, then tap Block Contact.
  • After a Group FaceTime call has ended: To block an individual caller, tap the call in the call history, tap the caller’s contact information, then tap Block Contact. To block all unknown callers, tap the call in the call history, then tap Block Unknown Participants or Block All Participants.

After you end a call from an unknown caller, if you see a screen with Call Ended at the top, you can tap Block Caller to prevent further contact from that caller, or tap Create Contact to add the caller to your contacts.

Blocking a caller also lets you report the call to Apple as spam or junk, and Apple then receives the caller’s information.

Report a FaceTime call as spam

  1. Start the FaceTime app on your iPad.
  2. Touch and hold the tile in your call history. Then tap Report Spam.

Unblock a caller

If you’ve changed your mind, you can unblock a caller in either of these places:

  • In the FaceTime app: Tap the call in the call history. Tap the caller’s contact information (if the call was a Group FaceTime call), then tap Unblock Contact.
  • In the Settings app: Tap Apps, tap FaceTime, then tap Blocked Contacts. Swipe left on the contact information, then tap Unblock.

See also

After you take a photo or video, use the tools in the Photos app to edit it on your iPad. You can adjust the light and color, add a filter, and more, and when you use iCloud Photos, any edits you make are saved across all your devices.

Enhance can automatically improve light and color, and if you took a photo with iPhone 16 or later, you can change its Photographic Style.

Quick tip: If you want to choose the background color of Edit mode (for example, so it’s always dark), see Set the background color of Edit mode, below.

Adjust light and color

  1. Open the Photos app on your iPad.
  2. Tap a photo or video to open it, then tap the Edit button.

    The Edit screen of the Photos app showing a photo in the center. To the left of the photo are the Adjust, Filters, and Crop buttons; Adjust is selected. To the right of the photo are buttons for editing effects and a slider to adjust each effect level.

  3. Tap Adjust.
  4. Swipe left under the photo to view the lighting adjustments you can make—for example, Exposure, Brilliance, Highlights, and Shadows.
  5. Tap the lighting setting you want to edit. Then drag the slider to make precise adjustments.

    The level of adjustment you make for each lighting setting is indicated by the outline around the button, so you can see at a glance which lighting settings have been increased or decreased. Tap the lighting button to switch between the edited photo or video and the original so you can see the difference your edits made.

  6. Tap Done to save your edits, or if you don’t like your changes, tap Cancel, and then tap Discard Changes.

Quick tip: To automatically enhance light and color in a photo or video, tap the Enhance button.

Change the Photographic Style of photos captured on iPhone 16 or later

If you take a photo with an iPhone 16 or later, open the Photos app to change or edit its Photographic Style.

  1. Open the Photos app on your iPad.
  2. Open a photo taken with an iPhone 16 or later, then tap the Edit button.
  3. Make sure Styles is selected on the left side of the screen. Do one of the following:

    • Choose a style: Tap a style or slide to select one of the style options on the right side of the screen.
    • Adjust the tone and color: Tap the Styles Chooser. Then slide your finger on the Styles Chooser to simultaneously adjust the tone and color. Drag your finger on the slider below to adjust the intensity level.

      As you make adjustments, the values for tone, color, and intensity are shown at the top of the screen. Tap the round arrow to reset these values.

  4. Tap Done.

Apply filter effects

  1. Open the Photos app on your iPad.
  2. Open a photo or video, then tap the Edit button.
  3. Tap the Filters button on the left side of the screen to apply filter effects such as Vivid or Dramatic.

    To remove a filter that was applied when you took the photo, choose Original.

  4. Tap a filter on the right side of the screen and drag the slider to adjust the effect.

    To compare the edited photo to the original, tap the photo.

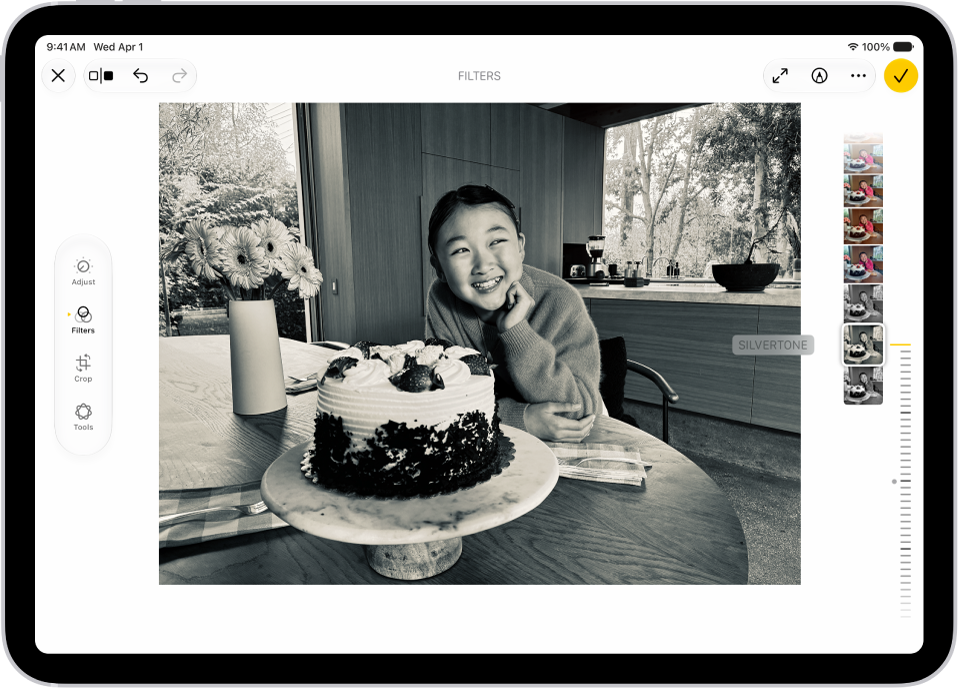
    The Edit screen in the Photos app with a photo in the center. On the left side of the screen are the Adjust, Filters, and Crop buttons; Filters is selected. On the right side of the screen are the filter options and a slider to adjust the level of the filter effect.

  5. Tap Done to save your edits, or if you don’t like your changes, tap Cancel, and then tap Discard Changes.

Note: For photos taken with an iPhone 16 or later, use Photographic Styles instead of filters to give your photos a customized look. See Change the Photographic Style of photos captured on iPhone 16 or later.

Copy and paste edits to multiple photos

Copy the edits you made to one photo (or video), and you can paste them onto another photo, or a batch of photos, all at once.

  1. Open the Photos app on your iPad.
  2. Open the photo or video that contains the edits you want to copy.
  3. Tap the More button, then tap Copy Edits.
  4. Review and turn off any edits you don’t want to copy. Tap Copy.
  5. Tap the Back button to return to your library.
  6. Tap Select and tap the thumbnails of the photos you want to paste the edits onto, or open a single photo or video.
  7. Tap the More button and then tap Paste Edits.

Note: Photos automatically adjusts the white balance and exposure of edited photos so they’re a better match and look even more similar.

Add stickers, text, and more

  1. Open the Photos app on your iPad.
  2. Tap a photo to open it.
  3. Tap the Edit button, then tap the Markup button.
  4. Tap the Add Annotations button to add stickers, captions, text, shapes, or even your signature.
  5. Tap the Done button to save your edits.

Set the background color of Edit mode

Edit mode’s background matches the light or dark appearance of your iPad by default, but you can change its color. Prefer to edit photos against a dark background? Set it to always appear dark.

  1. Open the Photos app on your iPad.
  2. Tap a photo or video to open it, then tap the Edit button.
  3. Tap the More button, tap Appearance, and then do one of the following:
    • Match edit mode to the light or dark appearance of your iPad: Tap System.
    • Make Edit mode always appear dark: Tap Dark.
    • Make Edit mode always appear light: Tap Light.

Use Apple Intelligence editing tools

Apple Intelligence gives you the Clean Up, Extend, and Reframe tools for editing your photos. See our article, Clean up, extend, and reframe photos on iPad.

Apple Intelligence on iPadOS 27 or later is available on an Apple Intelligence-enabled iPad mini (A17 Pro) and iPad models with M1 or later, according to Apple. Apple Intelligence is not available in all languages or regions. Usage limits may apply.

*Apple Intelligence is available with Siri and device language set to Chinese (Simplified), Chinese (Traditional), Danish, Dutch, English, French, German, Italian, Japanese, Korean, Norwegian, Portuguese, Spanish, Swedish, Turkish, or Vietnamese. Some features may not be available in all regions or languages. Some devices may not be available in all regions. Siri AI is available in beta in iOS 27, iPadOS 27, macOS 27, watchOS 27, and visionOS 27 and requires an Apple Intelligence–enabled device set to a supported language. Available in English to start. Siri AI will not be initially available in the EU on iOS, iPadOS, and watchOS. Certain Apple Intelligence features that rely on server-side models are subject to daily usage limits, including but not limited to Siri AI, Intelligent Photo Editing Tools, Image Playground, and AFM 3 Cloud models in Shortcuts. Daily limits may vary by feature, request complexity, system demand, system policies, and other factors. Expanded access to such features will be available for a fee in the future. Use of these features is subject to the Apple Intelligence Terms and Conditions.

See also

You can use iCloud Photos to keep your photos and videos securely stored in iCloud. If you turn on iCloud Photos on all your devices, you can see the photos and videos you took on iPad on any device, and you can also access them in a web browser.

When it’s on, the photos and videos you take are uploaded automatically and stored in their original format at full resolution. Changes you make on one device show up on your other devices, too.

Note: Make sure that you’re signed in to the same Apple Account on all your devices, and that your devices meet these minimum system requirements: iOS 8.3, iPadOS 13.1, macOS 10.10.3, or later, or a Windows device with iCloud for Windows 7.x or later.

Turn on iCloud Photos

  1. Open the Settings app on your iPad.
  2. Tap your name, then tap iCloud.
  3. Tap Photos, then turn on Sync this iPad.

iCloud uploads every photo and video you take automatically, keeping your photos backed up and in sync. Your library is then available from any device, anytime.

Check if your photos and videos are backed up to iCloud

To make sure you’ll have copies if something happens to your iPad, check that iCloud Photos is syncing your photos to iCloud. Paused syncing means your photos aren’t being backed up to iCloud.

  1. Open the Photos app on your iPad.
  2. Tap Collections.
  3. In the top-right corner of the screen, you can see a preview of your syncing status. You may see any of the following:
    • Yellow badge: iCloud syncing is paused. Tap your account icon to see the details.
    • Yellow warning icon: Your iCloud storage is almost full. Tap your account icon to see the details.
    • Red exclamation mark: Your iCloud storage is full. See Get more iCloud storage.
    • Blue badge: You have notifications from a shared library or shared album. Tap your account icon to see the details.
    • Partially filled blue circle around your account icon: Photos are actively uploading to iCloud. Tap your account icon to see the details.
    • Partially filled gray outline around your account icon: Uploads are paused. Tap your account icon to see the details.
  4. Tap your account to see more details. The last time your iPad synced with iCloud appears below the account profile.

Sync iCloud Photos immediately

iCloud Photos prioritizes syncing items that are added to your library after Sync Immediately is turned on.

  1. Open the Photos app on your iPad.
  2. Tap Collections. Tap your iCloud account profile at the top of the screen.
  3. Tap Sync Immediately, then tap For Today.

    To turn off syncing, tap Off. Sync Immediately automatically turns off after one day.

Note: Sync Immediately may affect battery and cellular usage and will pause if Low Power Mode or Low Data Mode are turned on.

Turn off Optimize Storage on your iPad

iCloud Photos can help you get the most from the storage space on your iPad. With Optimize iPad Storage on, your full-resolution photos and videos stay in iCloud in their original formats, while your iPad keeps storage-saving versions. Optimize iPad Storage starts out on, though you can turn it off.

  1. Open the Settings app on your iPad.
  2. Tap your name, then tap iCloud.
  3. Tap Photos and tap iPad Storage. Tap Download and Keep Originals.

Get more iCloud storage

If your uploaded photos and videos exceed your storage plan, you can upgrade to iCloud+ for more storage and additional features. See Subscribe to iCloud+.

See also

Tags: iCloud, Photos

Save interesting items in your Reading List so you can revisit them later. You can even download the items in your Reading List and read them when you’re not connected to the internet.

A linked page can be added without opening it, too. You can view your Reading List in the sidebar, and have Safari save items automatically for offline reading. With Apple Intelligence, the items you add can be organized into suggested topics, too.

In Safari, the Reading List is open in the sidebar on the left and displays a list of websites saved to the Reading List.

Add the current webpage to your Reading List

  1. Go to the Safari app on your iPad.
  2. Tap the Share button and tap Add to Reading List.

Quick tip: You can add a linked page without opening it. Just touch and hold the link, and then tap Add to Reading List.

View your Reading List

  1. Start the Safari app on your iPad.
  2. Tap the Show Sidebar button and tap Reading List (below Saved).

    If you don’t see Reading List, tap the Back button at the top of the sidebar.

    Recently saved reading list items appear at the top of the sidebar. The newest is on the left, and you can scroll through the others. Touch and hold a reading list item to copy, open, mark it as read, or delete it.

    Tip: With Apple Intelligence, bookmarks and items you add to your Reading List are automatically organized into suggested topics if three or more of them are related. Tap a topic to view thumbnails, then tap a thumbnail to open it.

To delete an item from your Reading List, touch and hold the item, then tap Delete.

Note: Apple Intelligence on iPadOS 27 or later is available on an Apple Intelligence-enabled iPad mini (A17 Pro) and iPad models with M1 or later. Apple Intelligence is not available in all languages or regions. Usage limits may apply.*

Automatically save all Reading List items for offline reading

  1. Start the Settings app on your iPad.
  2. Tap Apps, then tap Safari.
  3. Turn on Automatically Save Offline (below Reading List).

*Apple Intelligence is available with Siri and device language set to Chinese (Simplified), Chinese (Traditional), Danish, Dutch, English, French, German, Italian, Japanese, Korean, Norwegian, Portuguese, Spanish, Swedish, Turkish, or Vietnamese. Some features may not be available in all regions or languages. Some devices may not be available in all regions. Siri AI is available in beta in iOS 27, iPadOS 27, macOS 27, watchOS 27, and visionOS 27 and requires an Apple Intelligence–enabled device set to a supported language. Available in English to start. Siri AI will not be initially available in the EU on iOS, iPadOS, and watchOS. Certain Apple Intelligence features that rely on server-side models are subject to daily usage limits, including but not limited to Siri AI, Intelligent Photo Editing Tools, Image Playground, and AFM 3 Cloud models in Shortcuts. Daily limits may vary by feature, request complexity, system demand, system policies, and other factors. Expanded access to such features will be available for a fee in the future. Use of these features is subject to the Apple Intelligence Terms and Conditions.

See also

Tag: Safari

If you lose an AirTag or third-party item registered to your Apple Account, you can use the Find My app to mark it as lost and show your contact information along with a message.

Anyone who finds your item can use a supported device to see a website with your Lost Mode message. You can include your phone number or email address in it, and turn on Show Contact Info for a lost item.

Learn how to register an AirTag or third-party item.

What happens when you mark an item as lost?

  • You can add a message saying that the item is lost and include your phone number or email address.
  • If someone else finds your item, they can use a supported device to see a website with the Lost Mode message.

Turn on Show Contact Info for a lost item

To turn on Show Contact Info for a lost item, do the following:

  1. Open the Find My app on your iPad.
  2. Tap Items at the bottom-left side of the screen and tap the name of the lost item. Tap the more button.
  3. Below Lost AirTag, tap Show Contact Info.
  4. Follow the onscreen instructions to enter a phone number where you can be reached. To enter an email address instead, tap “Use an email address.”

    Important: Make sure you allow notifications for the Find My app. See Change notification settings on iPad.

  5. Tap the Done button.

Change the contact information in the Lost Mode message

  1. Open the Find My app on your iPad.
  2. Tap Items at the bottom-left side of the screen and tap the name of the lost item. Tap the more button.
  3. Below Lost AirTag, tap Show Contact Info.
  4. Edit the phone number or message. Then tap the Done button.

Turn off Show Contact Info for a lost item

After you find your lost item, turn off Show Contact Info.

  1. Open the Find My app on your iPad.
  2. Tap Items at the bottom-left side of the screen and tap the name of the item. Then tap the more button.
  3. Below Lost AirTag, tap Show Contact Info.
  4. Tap Stop Showing Information.

See also

Tag: Find My

When you travel with iPad, choose settings that comply with airline requirements. Some airlines let you keep your iPad turned on if you switch to Airplane Mode.

Turning on Airplane Mode switches off Wi-Fi, Bluetooth®, and cellular networks at first, but you can turn them back on even while it’s on. That way, you can make or receive FaceTime calls or use features and accessories that require wireless communication. When Airplane Mode is on, its icon shows up in the status bar at the top of your screen.

To choose settings that minimize cellular charges when you travel (Wi-Fi + Cellular models), see View or change cellular data settings on iPad (Wi-Fi + Cellular models).

When you travel abroad, you may be able to sign up for cellular service with a carrier in the region you’re visiting, right from your iPad (available on Wi-Fi + Cellular models with Touch ID or Face ID). See Connect to a cellular network if Wi-Fi isn’t available.

Turn on Airplane Mode

Open Control Center, then tap the Airplane Mode Switch button.

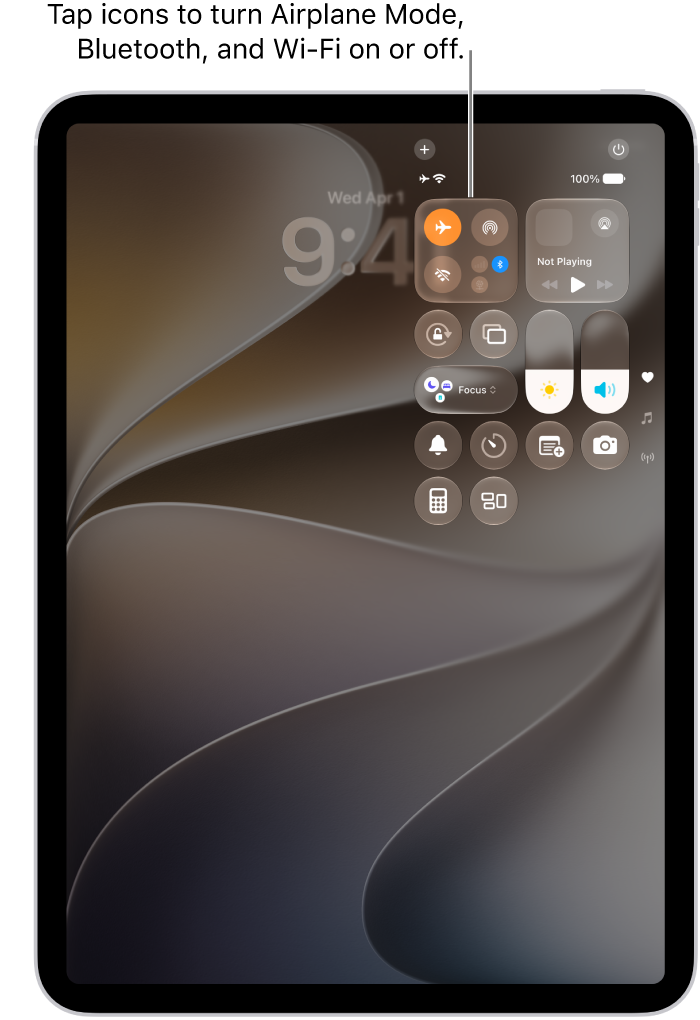
The Control Center screen showing that tapping the top-left button turns on Airplane Mode.

If you’d rather, turn Airplane Mode on or off in Settings. When it’s on, you’ll see its icon in the status bar at the top of the screen.

Turn on Wi-Fi or Bluetooth while in Airplane Mode

If your airline allows it, you can use Wi-Fi or Bluetooth while in Airplane Mode.

  1. Open Control Center, then turn on Airplane Mode.
  2. Tap the Wi-Fi Switch button to turn on Wi-Fi or the Bluetooth Switch button to turn on Bluetooth.

    If you turn on Wi-Fi or Bluetooth while in Airplane Mode, it may still be on the next time you return to Airplane Mode. To turn off Wi-Fi or Bluetooth while in Airplane Mode, open Control Center, then tap the Wi-Fi Switch button or the Bluetooth Switch button.

See also

You can customize your preferences for the Translate app in Settings. Download languages, use on-device translation, or choose a different default translation app.

On-device translation keeps processing on your iPad instead of Apple servers, even without an internet connection. With Automatic, translations may be processed on Apple servers when the languages aren’t downloaded. With Always, translations are always processed on your iPad using your downloaded languages, which also work for Live Translation and offline use.

Here’s how to change your Translate settings on iPad.

Download languages

Download languages for on-device translation, Live Translation, or offline use.

  1. Open the Settings app on your iPad.
  2. Tap Apps, tap Translate, and tap Languages.
  3. Tap the Download button next to the languages you want to download.

Choose when to use on-device translation

Your translations are processed on your iPad, not on Apple servers, when you use on-device translation, even without an internet connection.

  1. Open the Settings app on your iPad.
  2. Tap Apps and then tap Translate.
  3. Set On-Device Translation to one of the following options:
    • Automatic: Translations are processed on your device when the languages are downloaded; otherwise, translations may be processed on Apple servers.
    • Always: Translations are always processed on your device using your downloaded languages.

Choose a default translation app

If you have multiple translation apps, you can change the default.

  1. Open the Settings app on your iPad.
  2. Tap Apps and then tap Translate.
  3. Tap Default Translation App, then choose an app.

See also

You can isolate the subject of a photo or video frame from its background, then copy or share it in other documents and apps. You can use this feature in Photos, Safari, Quick Look, and more.

Once the subject is lifted, you can paste it into an email, text message, or note, look it up to learn more about it, or add it as a sticker to use in Markup and Messages. You can also share it with AirDrop or Mail.

Note: This feature isn’t supported on iPad (8th generation).

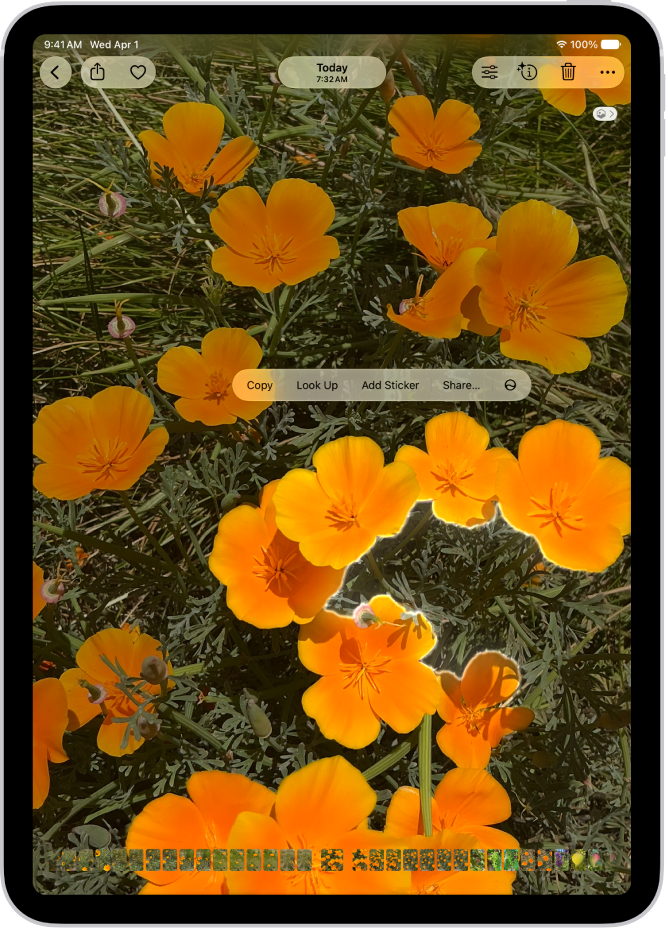
A photo is open in the Photos app library. The subject in the center of the photo is outlined and the Copy, Look Up, Add Sticker, and Share buttons appear above it.

  1. Open a photo in full screen, or pause a video on any frame.
  2. Touch and hold the subject. When an outline appears around the subject, do one of the following:
    • Tap Copy or Copy Subject, then paste the subject into an email, text message, or note.
    • Continue to hold, then drag the subject into another document.
    • Tap Look Up to learn more about the subject.
    • Tap Add Sticker, then save the sticker to use in Markup, Messages, and more.
    • Tap Share, then choose a sharing option, such as AirDrop or Mail.

See also

Tag: Photos

You can use the onscreen keyboard to enter and edit text. You can also use Dictation, an external keyboard, and Apple Pencil to enter text.

You can type one key at a time, or slide from letter to letter without lifting your finger, and you can even switch methods in the middle of a sentence. With the onscreen keyboard, you can type uppercase letters, turn on Caps Lock, enter numbers, punctuation, or symbols, and hear clicks as you type.

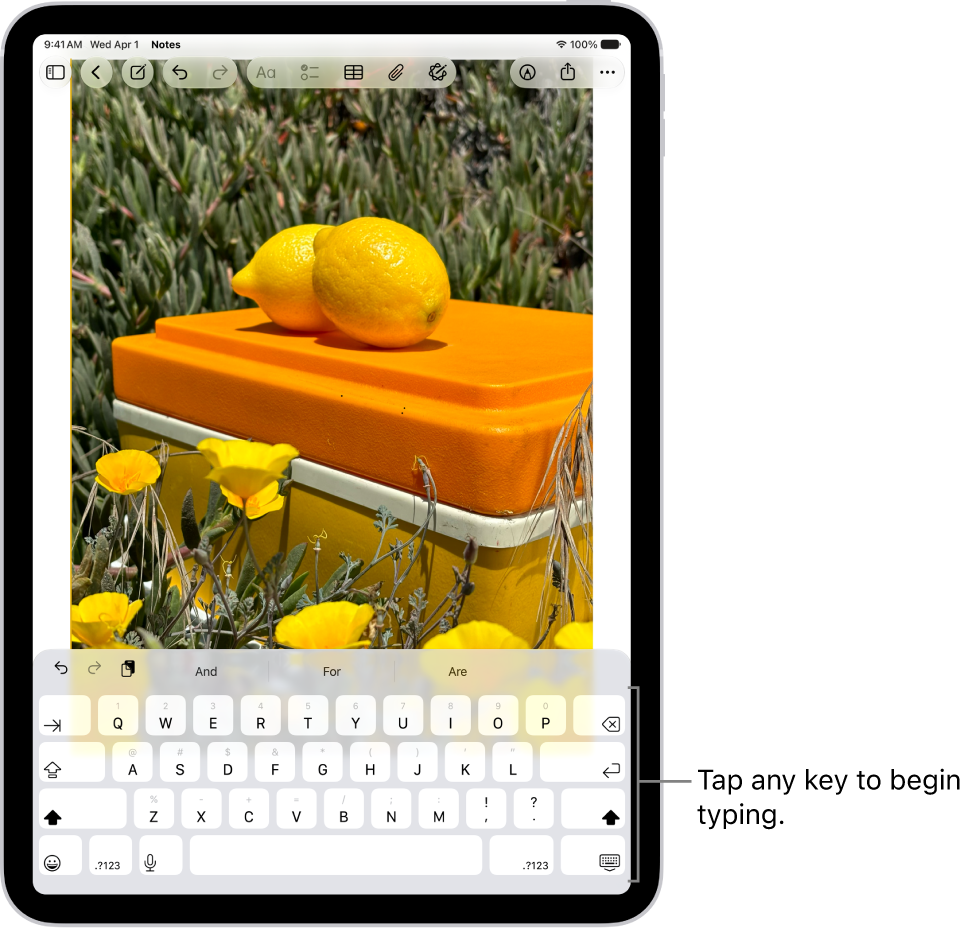
A document is open in the Notes app. The onscreen keyboard is in the bottom half of the screen.

Enter text using the onscreen keyboard

You can tap individual keys to type, or slide from one letter to the next without lifting your finger (QuickPath isn’t available for all languages).

  1. In any app where you can enter text, tap a text field. The onscreen keyboard opens.

    Tip: For easy one-handed typing, drag the keyboard from the bottom of the screen, then move it. To return to the full-size keyboard, pinch open.

  2. Tap individual keys to type, or touch and hold the first letter, slide to the next letters. Lift your finger at the end of a word. You can use either method as you type, and even switch in the middle of a sentence.
  3. While entering text, you can do any of the following:

    • Type an uppercase letter: Tap the Shift key, or touch the Shift key. Then slide to a letter.
    • Turn on Caps Lock: Double-tap the Shift key.
    • Quickly end a sentence with a period and a space: Double-tap the Space bar.
    • Enter numbers, punctuation, or symbols: Tap the Numbers key or the Symbols key.
    • Hide the onscreen keyboard: Tap the Hide Keyboard key.

For more on editing text, read our article, Select, cut, copy, and paste text.

Hear clicks as you type

Keyboard settings let you turn keyboard sounds on or off.

  1. Start the Settings app on your iPad.
  2. Tap Sounds.
  3. Turn on Keyboard Clicks.

Enter accents, diacritics, and other special characters

While using the keyboard, touch and hold the letter, number, or symbol related to the character.

For example, to enter é, touch and hold the e key, then slide your finger and release it on the option you want.

On a keyboard for another language, you can also do any of the following:

  • On a Thai keyboard: To choose native numbers, touch and hold the related Arabic number.
  • On a Chinese, Japanese, or Arabic keyboard: Tap a suggested character or candidate at the top of the keyboard to enter it, or swipe left to see more candidates.

    Note: To view the full candidate list, tap the up arrow on the right. To return to the short list, tap the down arrow.

Using the emoji keyboard, you can add other characters.

Change keyboard settings

You can turn special typing features—such as predictive text and auto-correction—off and on.

  1. Start the Settings app on your iPad.
  2. Tap General, then tap Keyboard.
  3. Turn the typing features (below All Keyboards) on or off.

Quick tip: While you’re using the onscreen keyboard, you can change your keyboard settings: Touch and hold the Switch Keyboard key or the Emoji button, then tap Keyboard Settings.

See also