Got a tip for us?

iPad

The iPad is a tablet computer from Apple that runs the iOS mobile operating system. Similar in functionality to the iPhone, the iPads purpose is often quite different, sometimes even serving as a general desktop computer replacement.

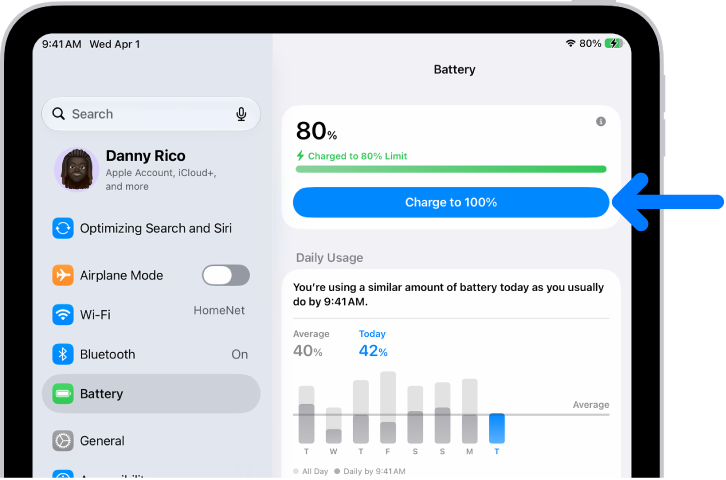
On supported models, you can set a maximum battery level of 80% to help reduce battery wear, especially if you charge your iPad frequently or keep it connected for long periods. iPad still charges to 100% now and then to keep the battery percentage accurate, and you can turn the limit off anytime, or override it until tomorrow.

That can happen more often when your iPad isn’t regularly able to complete a full charge. You can also check your battery usage and health, and use Low Power Mode to save battery life.

The charging information card in iPad Battery settings. The card shows the battery at 80% with the message “Charged to 80% Limit.” A button provides the option to “Charge to 100%.

What to expect

  • Your iPad will occasionally charge to 100%—even with the limit set to 80%—to keep the battery percentage display accurate. This may happen more often if your iPad isn’t regularly able to complete a full charge.

Set a Charge Limit

  1. Open the Settings app on your iPad.
  2. Tap Battery, then tap Battery Health.
  3. Turn on 80% Limit. You can remove the limit anytime.

Change the Charge Limit

  1. Open the Settings app on your iPad.
  2. Tap Battery, then tap Battery Health.
  3. Turn off 80% Limit. Then do any of the following:
    • Temporarily override 80% charge limit: Tap Allow Until Tomorrow. The charge limit will return to 80% at 6:00 a.m.
    • Set a new charge limit: Tap Set Limit to 100%. The charge limit will remain at 100% until you change it again.

If you need to temporarily override your charge limit and charge your iPad to full sooner than scheduled, go to the Settings app, tap Battery, then tap “Charge to 100%.”

See also

Tag: Battery

When you set up a Focus, you can select people and apps you want to receive notifications from. For example, set up a Work Focus and allow only notifications from your coworkers and the apps you use for work.

You can also silence specific people or apps, and allow repeated calls, which are two or more calls from the same person within 3 minutes.

Here’s how to allow or silence notifications for a Focus on iPad.

Allow or silence notifications from specific people during a Focus

  1. Open the Settings app on your iPad.
  2. Tap Focus. Then choose a Focus—for example, Do Not Disturb, Personal, Sleep, or Work.
  3. Tap People (or Choose People) and then do any of the following:

    • Allow specific people: Tap Allow Notifications From, tap the Add People button, and then select from your contacts.

      You can also turn on options to allow calls from certain groups of people and allow repeated calls (two or more calls from the same person within 3 minutes).

    • Silence specific people: Tap Silence Notifications From and tap the Add People button. Select from your contacts.

      You can also turn on Allow Calls From Silenced People.

Note: Regardless of your Focus settings, you can allow calls from your emergency contacts to come through. See Allow calls from emergency contacts when notifications are silenced, below.

When Intelligent Breakthrough & Silencing is on, Apple Intelligence lets important notifications interrupt you and silences those it decides aren’t important. See our article, Summarize notifications and reduce interruptions with Apple Intelligence.

Note: Apple Intelligence on iPadOS 27 or later is available on an Apple Intelligence-enabled iPad mini (A17 Pro) and iPad models with M1 or later. Apple Intelligence is not available in all languages or regions. Usage limits may apply.

Allow or silence notifications from specific apps during a Focus

  1. Open the Settings app on your iPad.
  2. Tap Focus. Then choose a Focus—for example, Do Not Disturb, Personal, Sleep, or Work.
  3. Tap Apps (or tap Choose Apps) and then do one of the following:

    • Allow specific apps: Tap Allow Notifications From and tap the Add Apps button. Select apps.
    • Silence specific apps: Tap Silence Notifications From, tap the Add Apps button, and select apps.

    Note: You can allow or silence notifications from specific web apps you’ve added to your Home Screen. (See Add a website icon to your Home Screen.)

There’s also Time Sensitive Notifications, which you can turn on so all apps can send time-sensitive notifications immediately.

Share your Focus status

A Focus limits the notifications you get from people and apps, based on the settings you chose when you set up the Focus.

If others try to contact you while you’re using a Focus with Focus Status turned on, they may see that your notifications are silenced. But the name of your Focus stays hidden.

  1. Open the Settings app on your iPad.
  2. Tap Focus and tap Focus Status.
  3. Turn on Share Focus Status. Then select the Focus options you want to share your Focus status from.

Control what Focus Status you share

You can decide whether to share your Focus status for each Focus option you set up (Personal, Work, Do Not Disturb, and so on). If Focus status is on for the Focus you’re using, people who try to reach you (in Messages, for example) may see that you have “notifications silenced.”

You can prevent messages about your Focus status from appearing in apps.

  1. Open the Settings app on your iPad.
  2. Tap Focus, then Focus Status.
  3. Turn off Share Focus Status.

    Alternatively, you can turn off the Focus options you don’t want to share your Focus status from (below Share From).

Allow calls from emergency contacts when notifications are silenced

Sounds from emergency contacts can still come through when your iPad or notifications are silenced, if you allow it.

  1. Open Contacts.
  2. Select a contact, then tap Edit.
  3. Tap Ringtone or Text Tone. Then turn on Emergency Bypass.

*Apple Intelligence is available with Siri and device language set to Chinese (Simplified), Chinese (Traditional), Danish, Dutch, English, French, German, Italian, Japanese, Korean, Norwegian, Portuguese, Spanish, Swedish, Turkish, or Vietnamese. Some features may not be available in all regions or languages. Some devices may not be available in all regions. Siri AI is available in beta in iOS 27, iPadOS 27, macOS 27, watchOS 27, and visionOS 27 and requires an Apple Intelligence–enabled device set to a supported language. Available in English to start. Siri AI will not be initially available in the EU on iOS, iPadOS, and watchOS. Certain Apple Intelligence features that rely on server-side models are subject to daily usage limits, including but not limited to Siri AI, Intelligent Photo Editing Tools, Image Playground, and AFM 3 Cloud models in Shortcuts. Daily limits may vary by feature, request complexity, system demand, system policies, and other factors. Expanded access to such features will be available for a fee in the future. Use of these features is subject to the Apple Intelligence Terms and Conditions.

See also

When you have contacts from multiple sources, you might have multiple entries for the same person. In the Contacts app, you link contact cards for the same person in different accounts so they appear only once in your All Contacts list, as a single unified contact.

If you have more than one card with the same first and last name, Contacts can merge them for you, and you can link contacts manually, too.

Resolve duplicate contacts

If more than one contact card shares the same first and last name, the Contacts app can combine those duplicate contacts for you.

  1. Start the Contacts app on your iPad.
  2. Below My Card, tap View Duplicates.
  3. Tap individual contacts to review and merge them, or tap Merge All to merge all duplicate contacts.

Link contacts manually

If two entries for the same person aren’t linked automatically, you can unify them manually.

  1. Start the Contacts app on your iPad.
  2. Tap one of the contacts, tap Edit, and then tap Link Contacts.
  3. Choose the other contact entry to link to and tap Link.

When you link contacts with different first or last names, the names on the individual cards don’t change, but only one name appears on the unified card. To choose which name appears on the unified card, tap one of the linked cards, tap the contact’s name on that card, then tap Use This Name For Unified Card.

Note: Linking contacts doesn’t merge those contacts. If you change or add information in a unified contact, the update goes to each source account where that information already exists.

See also

In the Photos app on iPad, you can duplicate a photo or video while preserving the original version. You can also copy a photo and then paste it into another document such as an email, text message, or presentation.

A duplicate appears next to the original in your library, and you can copy several photos or videos at once.

Here’s how to duplicate and copy photos and videos on iPad.

Duplicate a photo or video

  1. Start the Photos app on your iPad.
  2. Open a photo or video and then tap the More button.
  3. Tap Duplicate.

    A duplicate copy appears next to the original in your library.

Copy a photo

  1. Start the Photos app on your iPad.
  2. Open a photo, then tap the More button.
  3. Tap Copy and then paste the photo into another document.

Copy multiple photos or videos

  1. Start the Photos app on your iPad.
  2. Tap Library, tap Select, and tap the thumbnails you want to copy.
  3. Tap the More button, then tap Copy.
  4. Paste the copies into another document.

See also

Tag: Photos

The Photos app identifies duplicate photos and videos in your photo library in Duplicates. You can merge duplicate photos and videos to save space and clean up your library, and if you don’t have any, Duplicates doesn’t appear. You can also delete or hide photos and videos on iPad.

  1. Open the Photos app on your iPad.
  2. Tap Collections.
  3. Tap Utilities and tap Duplicates.
  4. Tap Merge to combine the duplicates and then tap Merge [number] Exact Copies.

Duplicates doesn’t appear if your library doesn’t have any duplicate photos or videos.

See also

Tag: Photos

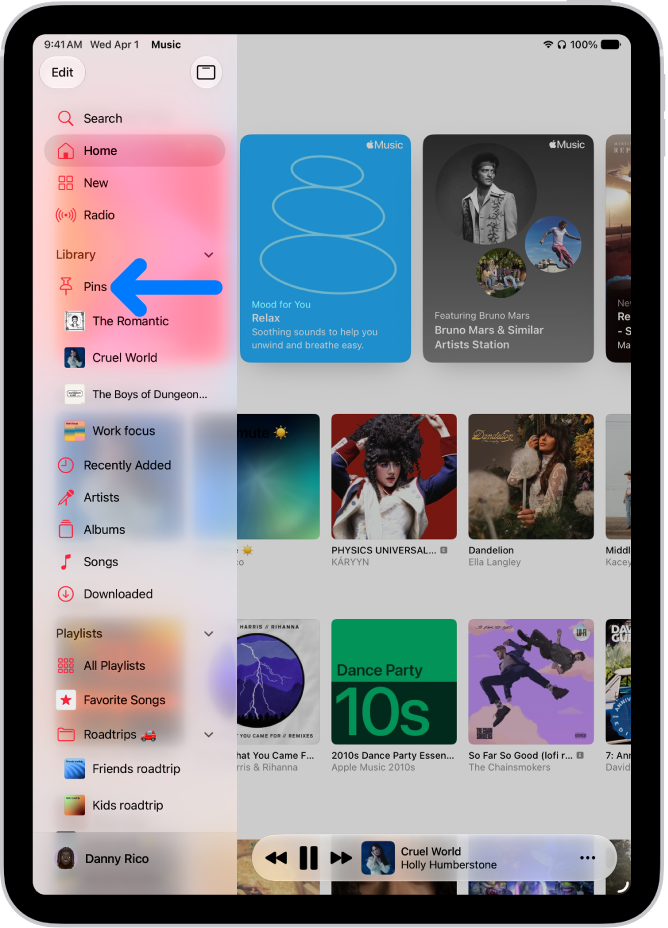
After you subscribe to Apple Music, you can pin your favorite music (including music videos) to the top of your library so it’s easily accessible. You can pin a playlist, an artist, an album, or a song, and unpin an item later. You can only pin content that’s in your library, though.

The sidebar on the left with an arrow pointing out pinned items, such as an album and a playlist, with albums appearing on the right. The MiniPlayer is at the bottom.

Pin music to the top of your library

  1. Start the Music app on your iPad.
  2. Tap the Show Sidebar button and tap a category under Library. Do any of the following:
    • Pin a playlist: Touch and hold a playlist or tap the More button when viewing a playlist. Tap Pin Playlist.
    • Pin an artist: Go to an artist page, tap the More button at the top of the screen, and then tap Pin Artist.
    • Pin an album: Touch and hold an album, then choose Pin Album. Or tap an album, tap the More button, and tap Pin Album.
    • Pin a song or music video: Touch and hold a song or video or tap the More button next to a song or video and then tap Pin [item]. Or on the Now Playing screen, tap the More button and then tap Pin [item].

Only content that’s in your library can be pinned, so pinning an artist requires at least some content by that artist in your library. Anything pinned sits at the top of your library.

Quick tip: To reorder your pins, drag them in the sidebar.

Unpin an item in your library

  1. Start the Music app on your iPad.
  2. Tap the Show Sidebar button, touch and hold a pinned item (below the Pins section), and tap Unpin [item].

Quick tip: If you’d like pinned items to download to your library automatically, go to Settings > Apps > Music and turn on Download Pins.

See also

Tag: Music

Your iPad can generate a password to use on a website or app. In the Passwords app, you just add the details for the website or app and a user name, and a strong password is suggested for you, though you can enter one of your own.

  1. Go to the Passwords app on your iPad.
  2. Tap All and then tap the New Password button at the bottom of the list of accounts.
  3. Enter details about the website or app, and a user name for your account.
  4. Tap password.
  5. Tap the suggested password (or enter one).
  6. Tap the Save button.

When you sign up for services on websites and in apps, you can create a password then, too. Read our article, Create a strong password for a new account.

See also

You can work with several tabs at the same time in the sidebar in Safari. After you select the tabs you want to work with, you can copy the tabs to paste somewhere else, duplicate the tabs in the same location, move the tabs to another window or a Tab Group, or close the tabs.

  1. Go to the Safari app on your iPad.
  2. Tap the Show Sidebar button to open the sidebar, then tap the More button.
  3. Tap Select Tabs and select the tabs you want to work with.
  4. Touch and hold one of the selected tabs and then do any of the following:
    • Copy the tabs to paste somewhere else: Tap Copy [x] Links.
    • Duplicate the tabs in the same location: Tap Duplicate [x] Tabs.
    • Move the tabs to another window: Tap Move [x] Tabs to New Window.
    • Move the tabs to a Tab Group: Tap Move to Tab Group and tap a Tab Group.
    • Close the tabs: Tap Close [x] Tabs.
  5. Tap the Done button.

See also

Tag: Safari

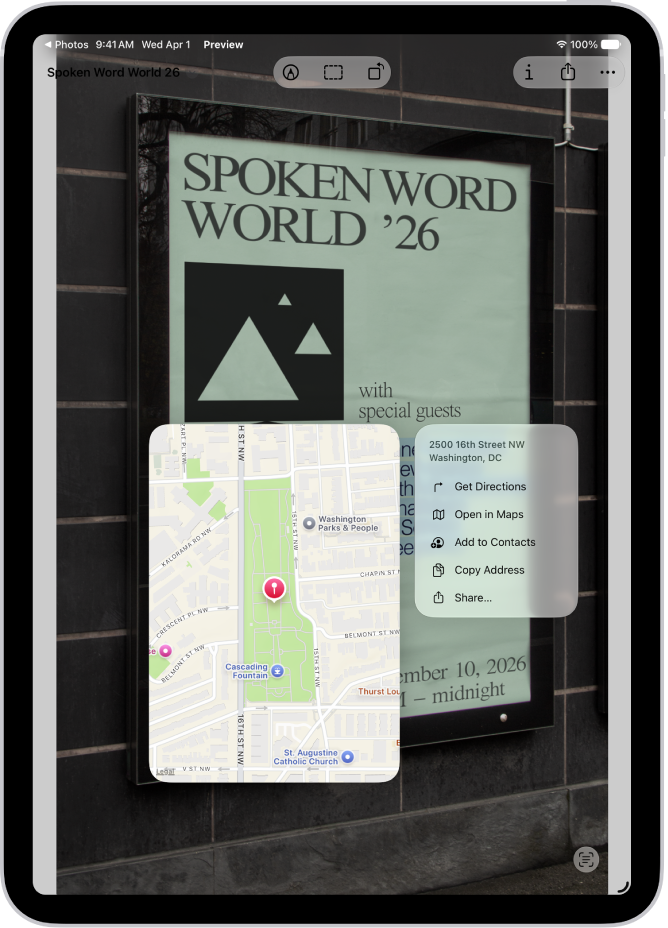
You can use Live Text in Preview to copy or translate text within an image, make a call, open a website, or start an email. You can also look up the meaning of text, search the web for it, or save a phone number or email address to Contacts.

A photo of a real estate sign, with the phone number highlighted. Above the phone number are the Call, Message, Add to Contacts, and Copy options.

  1. Start the Preview app on your iPad.
  2. Open an image that shows text. Select the text. See Select, cut, copy, and paste text.
  3. Do any of the following:

    • Copy text: Tap Copy. You can then paste the text into another document or app.
    • Look up the meaning of text: Tap Look Up.
    • Translate text: Tap Translate and choose a language.

      Note: Translation isn’t available in all languages and may not be available in some countries or regions.

    • Search the web for the text: Tap the Forward button and tap Search Web.
    • Call or text a phone number: Tap Call or Message.
    • Save a phone number or email address: Tap the Forward button and then tap Add to Contacts.
    • Send an email or message to an email address: Tap Email or Message.
    • Go to a website: Tap Open Link.

See also

Tag: Preview

There are a number of ways you can make a phone call on your iPad: dial the number on the keypad, choose a favorite or recent call, or choose a number in your contacts list.

You can also redial or return a recent call, add or remove contacts from your Favorites, and view information when you make a call. And Siri can call or dial a number for you, if you speak each digit separately.

Note: If the Phone app isn’t on your iPad, you can download it from the App Store.

The Phone app, with Favorite contacts on the left side of the screen. Below the Favorites is a list of recent calls and voicemail. The contact information appears on the right side of the screen, with the Keypad button in the top right of the screen.

Dial a number

Siri: Ask Siri to call or dial a number. Speak each digit separately—for example, “four one five, five five five….” For the 800 area code in the U.S., you can say “eight hundred.” Learn how to use Siri.

Or without using Siri:

  1. Open the Phone app on your iPad.
  2. Tap the Circle Grid button in the top-right corner. Then do any of the following:
    • Enter the number using the keypad: If you make a mistake, tap the Delete button.
    • Redial the last number: Tap the Call button to see the last number you dialed and then tap the Call button to call that number.
    • Paste a number you’ve copied: Tap the phone number field above the keypad and tap Paste.
    • Enter a soft (2-second) pause: Touch and hold the star (*) key until a comma appears.
    • Enter a hard pause (to pause dialing until you tap the Dial button): Touch and hold the pound (#) key until a semicolon appears.
    • Enter a “+” for international calls: Touch and hold the “0” key until “+” appears.
  3. Tap the Call button to start the call.

To end the call, tap the End Call button.

View information when you make a call

With Apple Intelligence, a Call Context card with related information may appear when you start a call. This can include an upcoming or recent birthday when you call a contact, or it can include tickets, orders, or confirmation numbers when you call certain businesses. Tap the card to view the information in the related app, such as Mail or Wallet.

To turn Call Context on or off, do the following:

  1. Open Settings, then tap Apps.
  2. Tap Phone, then tap Siri.
  3. Turn Show When Calling on or off.

To find related information like confirmation codes or reservation numbers, Call Context identifies the business from the phone number you dial and then searches Mail, Messages, Wallet, and Calendar.

Note: Apple Intelligence on iPadOS 27 or later is available on an Apple Intelligence-enabled iPad mini (A17 Pro) and iPad models with M1 or later. Apple Intelligence is not available in all languages or regions. Usage limits may apply.*

Add or remove contacts from your Favorites

  1. Open the Phone app on your iPad.
  2. Tap the Filter button, then tap Calls.
  3. To add a contact to your Favorites, tap Edit in the top-left corner of the screen. Then do one of the following:
    • If you’re adding your first Favorite: Tap Add Favorite.
    • If you’ve already added a Favorite: Tap Edit Favorites and then tap the Add button.
  4. Tap a contact and choose the default method of communication (for example, message, call, or video) and the preferred number. Tap the Done button.
  5. To remove a contact from your Favorites, tap Edit, tap Edit Favorites, tap the Remove button in the upper-left corner of the contact you want to remove, and tap the Done button.

To contact someone in your Favorites, tap their name.

Redial or return a recent call

  1. Open the Phone app on your iPad.
  2. Tap the Filter button, then tap Calls.
  3. In the Recents list on the left side of your screen, tap a name or number.

    Information about the call or caller appears on the right side of the screen.

  4. To redial or return a call, tap the Call button below the caller’s name or number on the right side of the screen.

Call someone on your contacts list

Siri: Ask Siri something like “Call Eliza’s mobile.” Learn how to use Siri.

Or do the following:

  1. Open the Phone app on your iPad.
  2. Tap the search field in the top-right corner of the screen, type the name of the contact you want to call. Tap their name when it appears in the search results.
  3. In the contact card on the right side of the screen, tap the Phone button. Then tap the number you want to call.

WARNING: For important information about avoiding distractions that could lead to dangerous situations, see Important safety information for iPad.

*Apple Intelligence is available with Siri and device language set to Chinese (Simplified), Chinese (Traditional), Danish, Dutch, English, French, German, Italian, Japanese, Korean, Norwegian, Portuguese, Spanish, Swedish, Turkish, or Vietnamese. Some features may not be available in all regions or languages. Some devices may not be available in all regions. Siri AI is available in beta in iOS 27, iPadOS 27, macOS 27, watchOS 27, and visionOS 27 and requires an Apple Intelligence–enabled device set to a supported language. Available in English to start. Siri AI will not be initially available in the EU on iOS, iPadOS, and watchOS. Certain Apple Intelligence features that rely on server-side models are subject to daily usage limits, including but not limited to Siri AI, Intelligent Photo Editing Tools, Image Playground, and AFM 3 Cloud models in Shortcuts. Daily limits may vary by feature, request complexity, system demand, system policies, and other factors. Expanded access to such features will be available for a fee in the future. Use of these features is subject to the Apple Intelligence Terms and Conditions.

See also

Tag: Phone