Got a tip for us?

iPad

The iPad is a tablet computer from Apple that runs the iOS mobile operating system. Similar in functionality to the iPhone, the iPads purpose is often quite different, sometimes even serving as a general desktop computer replacement.

You can see the previous versions of a password for a website or app, along with the dates they were changed. You can also clear the history of changes.

In the Passwords app, the history of changes also shows if you shared the password with anyone using AirDrop, and if you shared or unshared the password with a shared password group. You can change the password for a website or app, too.

  1. Go to the Passwords app on your iPad.
  2. Tap All in the sidebar.
  3. Locate and tap the website or app account.
  4. Tap View History.

To show the password, tap the Password Changed button.

To remove the list of changes, tap Clear.

See also

When you first start using the Home app, a setup assistant helps you create a home. You can then add accessories, control them remotely, share access to your home devices with others, and more.

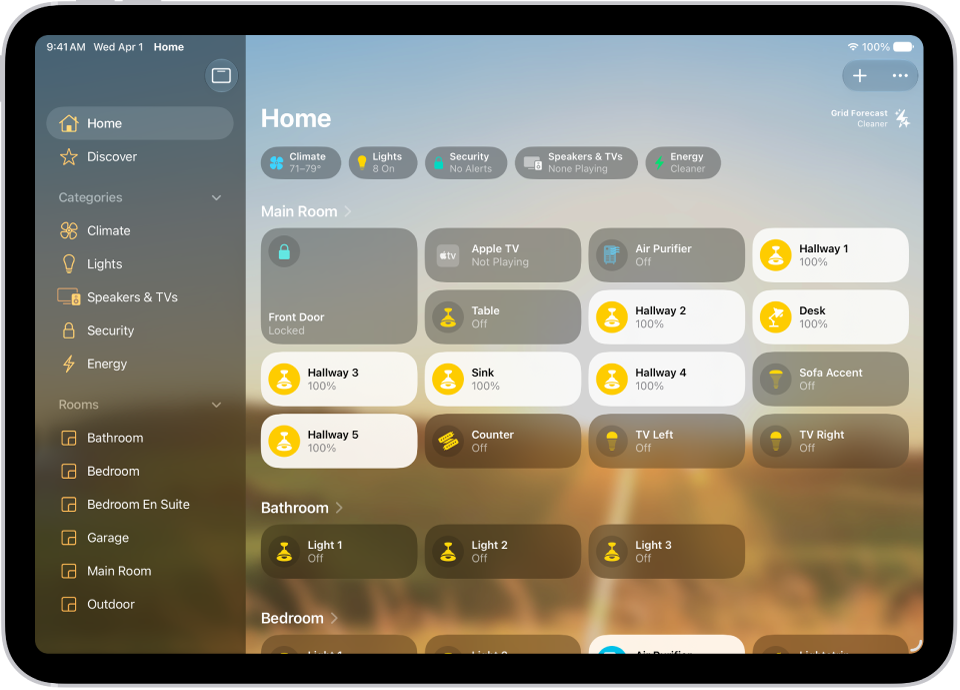
You can add compatible accessories throughout your home, like locks, lights, cameras, and thermostats. With a home hub, you can share full resident access with family and friends, or limited guest access with pet-sitters and other temporary visitors. And with a participating utility provider, you can view how much electricity your home uses.

A screenshot of the Home app showing different devices that can be controlled.

Add accessories

You can add compatible accessories throughout your home—such as locks, lights, cameras, and thermostats. Tap the Add button in the top right, tap Add Accessory, then follow the onscreen instructions.

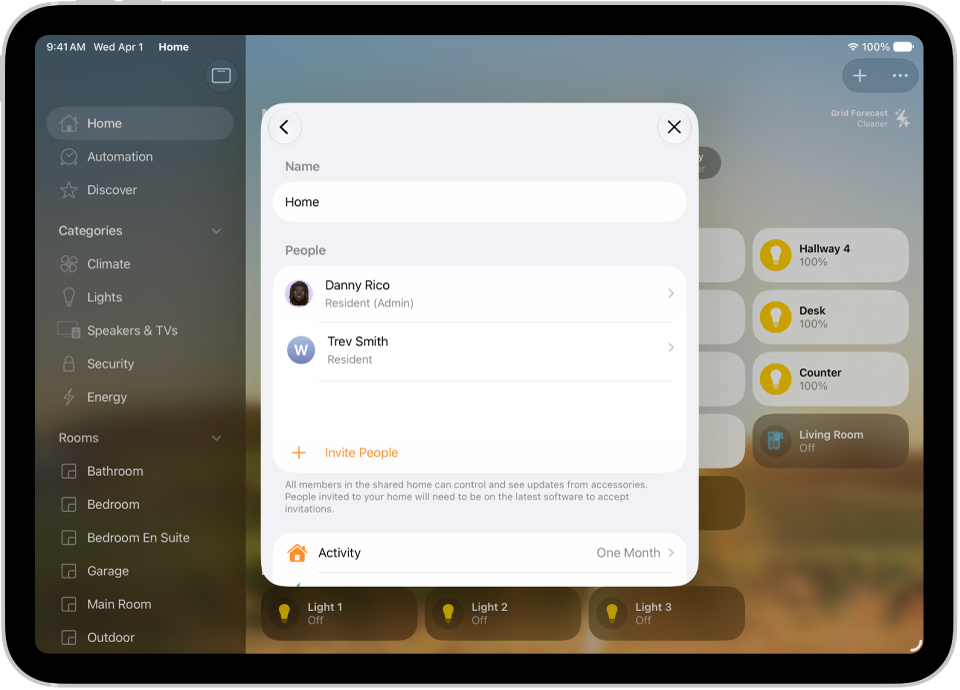
A view of the Home app showing multiple residents.

Allow guest access

With a home hub—you can share full resident access to your Home app devices with family and friends, or limited guest access to pet-sitters, service workers, or other temporary visitors. Tap the Add button, tap Add People, then choose Resident or Guest. Enter your recipient, then tap Send Invite.

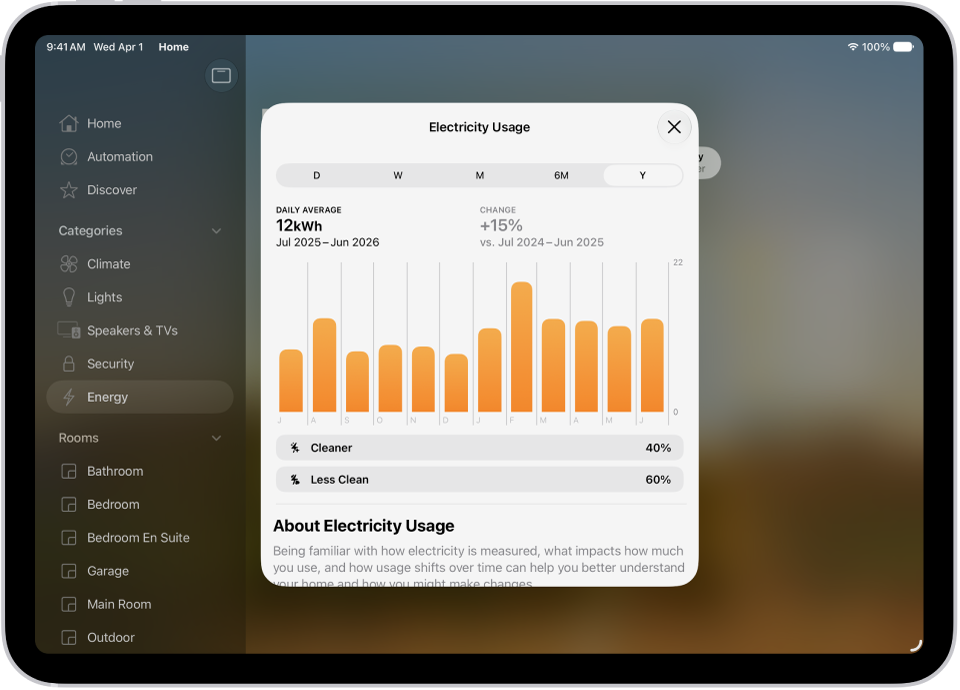
A view of the Home app showing energy usage.

Monitor your energy usage

If you have a participating residential utility provider, you can view how much electricity your home uses, track your usage over time, and view your electricity rate plan information. To add a provider, tap the More button, tap Home Settings, tap Energy, then tap Connect Account.

These guides go deeper into setting up and controlling your home:

Tag: Home

Print your photos directly from the Photos app on your iPad with any AirPrint-enabled device. You can print a photo, or print multiple photos at once. You can also print from iPad in other apps, import and export photos and videos, and share photos and videos on iPad.

Print a photo

  1. Start the Photos app on your iPad.
  2. Open a photo, then tap the Share button.
  3. Tap Print.

Print multiple photos at once

  1. Start the Photos app on your iPad.
  2. Tap Library or open a collection, then tap Select.
  3. Select each photo you want to print. Then tap the Share button.
  4. Tap Print.

See also

Tag: Photos

Lockdown Mode is an extreme protection feature for iPad, with safer wireless connectivity defaults, media handling, media sharing defaults, sandboxing, and network security optimizations. It’s optional, and should be used only if you believe you might be targeted by a highly sophisticated cyberattack, such as one by a private company developing state-sponsored mercenary spyware.

Important: Most people are never targeted by attacks of this nature.

Lockdown Mode changes how iPad typically works. For security, apps, websites, and features are strictly limited, and some functionality isn’t available.

Learn about Lockdown Mode

Go to Settings > Privacy & Security > Lockdown Mode, then tap Learn More.

Turn on Lockdown Mode

Go to Settings > Privacy & Security > Lockdown Mode, then turn on Lockdown Mode.

See also

You can have your iPad (or your family member’s iPad) check for sensitive images and warn you before you view them. You’ll see a warning before receiving or sending sexually explicit photos, and Screen Time can also block inappropriate content and set restrictions on purchases.

Turn on Sensitive Content Warning

  1. Open Settings and then tap Privacy & Security.
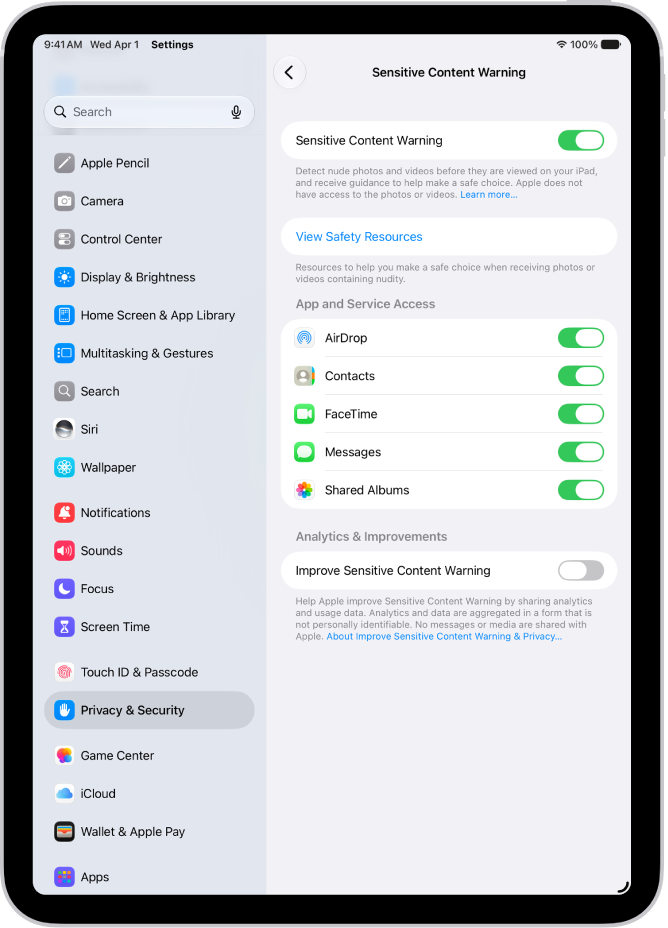
  2. Tap Sensitive Content Warning. Then turn on Sensitive Content Warning.

    The settings for Sensitive Content Warning, with a button labeled View Safety Resources and a button labeled Improve Sensitive Content Warning for sharing analytics and usage data with Apple.

    You (or your family member) will receive a warning before receiving or sending sexually explicit photos.

    Note: Sensitive Content Warning is turned on automatically if you set up Screen Time and turn on Communication Safety. See Set up Screen Time for yourself.

You can also block inappropriate content and set restrictions on purchases in Screen Time. See our article, Block features or content with Screen Time.

See also

With Continuity Camera, you can use your iPad as a webcam or microphone for your Apple TV 4K. That way, you get the powerful iPad camera and video effects for apps and FaceTime calls on the big screen, and you can hand off a FaceTime call from your iPad, too.

Here’s some of what you can do with Continuity Camera on Apple TV 4K:

  • Use your iPad as a webcam in FaceTime.
  • Sing along to Apple Music and appear onscreen with visual effects.

See also

You can import contacts from a vCard and from a directory. You can import a contact from a .vcf attachment in an email or message, and you can also add a contact from a directory. You can export contacts on iPad, too.

Import contacts from a vCard

Tap a .vcf attachment in an email or message.

Add a contact from a directory

  1. Go to the Contacts app on your iPad.
  2. Tap the Lists button and tap the GAL, CardDAV, or LDAP directory you want to search.
  3. Enter your search.
  4. Tap the person’s name to save their information to your contacts.

See also

The Visited Places feature helps you keep track of places you’ve been, so you can easily revisit or share them later. It shows you where you’ve been with your iPad (Wi-Fi + Cellular) and any iPhone that’s signed in to the same Apple Account.

You can use Visited Places to find locations—like restaurants from a recent trip—and organize them into guides or share them with others. Visited Places are end-to-end encrypted, can’t be read by Apple, and appear on all your synced devices. You can also remove them automatically, or clear them all.

Note: Visited Places isn’t available in all countries or regions.

View a visited place

To see Visited Places in the Maps app, you first need to turn it on and visit at least one place; read our article, Allow Maps to use your location.

  1. Start the Maps app on your iPad.
  2. Tap Places, tap Visited Places, and then do any of the following:
    • Search: Search a place by name, category, address, or notes.
    • Filter: Search using a filter for date, category, or city.
    • Show all visits: Tap All Visits.
  3. Next to a place, tap the More button (on the right side of the place card). Do any of the following:
    • Add to your Places: Tap Add to Places.
    • Share a visited place: Tap Share.
    • Add a personal note: Tap Add a Note.
    • Correct a visited place: Tap Wrong Location.
    • Remove a visited place: Tap Remove.

Automatically remove your visited places

  1. Start the Maps app on your iPad.
  2. Tap Places and tap Visited Places.
  3. Scroll to the bottom, tap Keep Visits, and choose how long you keep them, or choose Forever if you don’t want them to be removed.

Clear all your visited places

  1. Start the Maps app on your iPad.
  2. Tap Places and tap Visited Places.
  3. Scroll to the bottom and then tap Clear History.

See also

Tag: Maps

Apple Reference Image lets you capture, view, and share reference images, which are like digital negatives, so you can verify exactly what the camera originally captured. On iPhone 18 Pro or iPhone 18 Pro Max, photos taken in Reference mode include reference data.

If a photo includes a reference image, you can develop, view, and share it in Photos to verify whether the photo has been altered or edited. You need an internet connection to develop a reference image, and you can include it when you share a photo or transfer photos to a Mac or PC.

Note: Apple Reference Image is not available in all countries or regions.

Develop a reference image

You need to develop a reference image before you can view or share it, and only photos taken in Reference mode on an iPhone 18 Pro or iPhone 18 Pro Max qualify.

Note: You need an internet connection to develop a reference image, and if you’re offline, it’s developed the next time you’re online.

  1. Open the Photos app on your iPad.
  2. Open a photo taken in Reference mode.

    Tip: You can find all photos captured with reference images in the Reference album: tap Collections, tap Media Types, then tap Reference.

  3. Tap Reference at the top of the photo.

    The reference image is developed automatically.

View the reference information

Do either of the following after a reference image is developed:

  • Tap Reference to view the unedited image, then compare it with the photo to verify whether the photo has been altered or edited.
  • Tap Reference, then tap the View Reference Image Data button to view the Reference Image Data.

An iPhone, iPad, or Mac running iOS 27, iPadOS 27, macOS 27, or later can show a reference image. For viewing one in the Preview app, see our guide, Open and view PDFs and images in Preview on iPad.

Share a reference image

You can choose whether to include the reference image when you share or export a photo that has one. Turn on Share Reference Image to include it every time you share.

  1. Open the Settings app on your iPad.
  2. Tap Apps, tap Photos, and turn on Share Reference Image.

To include or leave out the reference image for a single share, select the photo you want to share, then tap the Share button. Tap Options in the Share window, then turn Reference on or off. Then share the photo—for example, with AirDrop or Messages—or export it to an external device.

Note: You can only view a reference image on an iPhone, iPad, or Mac that has iOS 27, iPadOS 27, macOS 27, or later.

Share a reference image when you transfer photos

When you transfer photos to a Mac or PC, you can include the reference image.

  1. Open the Settings app on your iPad.
  2. Tap Apps and tap Photos.
  3. Tap Transfer to Mac or PC, then turn on Transfer Reference Image.

Transferring includes the reference image data, though you can view a reference image only on a Mac, iPhone, or iPad with macOS 27, iOS 27, iPadOS 27, or later.


Tag: Photos