Got a tip for us?

Are you getting this error when you try to reset your Apple ID security questions:

  • We don’t have sufficient information to reset your security questions.

If you cannot reset Apple ID security questions, this troubleshooting guide will show you how you can fix the issue. This problem can be very frustrating since you may not be able to buy Apps, Music, books etc until you can answer your security questions correctly. If you cannot remember, you can reset security questions for Apple ID.
To start off, it’s worth noting that you need to verify your identity successfully before you can reset your Apple ID security questions.

Apple
takes security very seriously, as any reputable company should. Apple uses security questions as an measure to provide an additional security layer, so that your data is secure.

How to reset security questions for Apple ID

Please follow these steps to reset security questions for Apple ID:

  1. Head over to iforgot.apple.com page
  2. Type in your Apple ID
  3. Hit Continue
  4. You will be asked some questions to verify your identity. Apple wants to prove that it is really you.
  5. Now, provide the answers to the questions
  6. Next, select “I need to reset my security questions”
  7. If you cannot verify your account, you may not be able to reset your Apple ID security questions and you may get the “Cannot reset security questions. We don’t have sufficient information to reset your security questions” message.

We don’t have sufficient information to reset your security questions. Apple ID

Please do the following if you get “We don’t have sufficient information to reset your security questions” message. Ask Apples’ Account Security team to reset your security questions for you. Simply follow these steps:

  1. Head over to the Apple ID support page. (Please note, Apple also offers
    live chat support)
  2. Click “Forgot Security Questions”
  3. Various help options will appear. Please note, these help options may vary depending on your region.

Please note, if you do not remember your answers, and if Apple team may authenticate your identity (they will ask you a number of questions), they may not be
able to help you. Because they also may not access your account. They may offer you a new Apple ID but it’s worth noting that you will lose all your previous purchases.

Also, you can change Apple ID security questions any time, if you think that your security questions are challenging to remember. If you want to do this, please follow these steps:

Change Apple ID security questions

  1. Head over to Apple ID account page
  2. Navigate to the Security section
  3. Now, click Edit
  4. Lastly, click Change questions

A couple of users have stated that they are unable to send and /or receive text messages and iMessages on Mac. In this article, I’ll explain exactly how you can troubleshoot this issue.

Users have reported that when they attempt to send a message, they see a little red exclamation mark symbol next to my message, and they cannot resent it.

Using the Messages app on the
Mac,
you can easily send and/or receive SMS text messages (normal text messages) and iMessages (Apple’s messaging service).

Cannot send or receive messages on Mac? Fix

If you cannot send or receive messages on your Mac, here is how you can fix it:

1. Restart your Mac

To restart your Mac, click the Apple menu and select Restart.

2. Sign out and then sign back in

Simply launch Messages, then select Messages and Preferences from the Menu bar. The click Sign out. Then open the Messages app and sign in with your Apple ID.

3. Re-enable the iMessage in the message preferences

Launch the Messages preferences window and select the Accounts tab (Messages > Preferences), select iMessage (left list), Ensure that the checkbox “Enable this account” is checked, if not checked, check the box.

4. Ensure that your Mac is connected to the Internet.

Try to load a page on Safari to check your Internet connection. If you do not have an Internet connection, Consider trying some basic Wi-Fi troubleshooting tips such as restarting your Mac, Router, Wi-Fi spot and much more.

5. Check the date and time settings

You may not be able to send or receive messages on Mac because of your date and time settings. Here is how to fix this. Click Apple menu > System Preferences > and then Date & Time; select the Time Zone tab and the “Set date and time automatically” checkbox, if it is already selected, unselect and wait about 20 seconds and then reselect again. You may need to type in the admin password if the checkbox is dimmed.

6. Check your messages setting

On your Mac, Messages > Preferences > Accounts > iMessages Account; and on your iOS or iPadOS device > Settings > Messages > Send and Receive the account should be same.

7. Lock and unlock the Keychain on your Mac

If you still cannot send or receive messages on Mac, there could be a Keychain problem. Here is how you can fix this problem:

  • Open Keychain Access (Launchpad > Keychain Access) then click File and Lock Keychain “Login” and then head over to File > Unlock Keychain “Login”, if asked, type in your admin password. This will rebuild your Keychain Access which may fix the problem when Mac cannot send messages.

8. Force quit Messages app and then reopen it

To force quit Messages app on your Mac, simply follow these steps: Choose Force Quit from the Apple menu () in the upper-left corner of your screen.And then select Messages and click Force Quit. The re-open the Messages app.

9. Contact Apple support

If you still cannot send or receive messages on your Mac, please
contact Apple support.

We get a vast number of questions from our readers wondering how two-factor authentication can be turned off. Apparently, two-factor authentication is annoying to some users. As such, they may have various concerns about wanting to turn off two-factor authentication on iPhone ; even though it helps enhance your account’s security by making it a lot more difficult for someone else to sign in to your Apple account.

In this article, I’ll explain exactly how to turn off two-factor authentication on iPhone. The main purpose of this article is simply to answer this question: Is it possible to disable two-factor authentication on apple devices? and if so, how can you do that?

See also:
Cannot Reset Apple ID Security Questions?

So, is there a way to turn off two factor authentication? The short answer is maybe but there is high possibility that you cannot. If you  already turned on this, you may turn it off within two weeks. Then you would be able to head over to the apple.com website and navigate to manage my account. You would be able to turn it off there, if it shows. To do this, please follow these steps:

  • Head over to
    appleid.apple.com
  • Now, type in your Apple ID and password and log in
  • Next, go to the Security section
  • Next on, click Edit
  • Finally, click “Turn off two-factor authentication” (if you do not see this, then you cannot turn this off).  Once you click, you will be asked to confirm: “If you turn off two-factor authentication on your iPhone, your account will be protected with only your password and security questions”. Hit Continue.

But if you cannot find the option to disable two-factor authentication on Apple ID, then it means it cannot be disabled.  As we mentioned above, it cannot be turned off after it has been on for two weeks or longer.  If this is the case, you cannot turn off this security feature. Apple does not allow it due to the following reason:
Your account is more secure when you use Two-factor authentication so that no-one else can access your account even if someone else knows your Apple ID password. And a lot of iOS and macOS features (iCloud Keychain, iCloud Messages etc) require this additional level of security.

Apple introduced the two-factor authentication feature in 2015 with iOS 9 and OS X 10.11 El Capitan.

Keep in mind, two-factor authentication and two-step verification  is NOT the same thing. They are different. Two-step verification is an older security method than two-factor authentication.

If you are using two-step verification, you CAN turn this off. Here’s how to turn off two-step verification on iPhone:

  • Head over to
    https://appleid.apple.com/
  • Now, type in your Apple ID and password to login
  • Next, find the “Security” section
  • Next on, click Edit
  • Finally, click “Two-Step Verification…” and then you will be asked to confirm. You’ll see a notification saying Turning-off two-step verification will make your account less secure. Are you sure you want to proceed? Click to confirm your decision and you are done.

Keep in mind, if your device is using
iOS 11
(or later) or
macOS High Sierra,
you will be automatically switched from two-step to two-factor.
And that covers everything on how to turn off two factor authentication on apple devices.

Getting an Apple ID is easy but creating an Apple ID without a credit card or any defined payment method is a little tricky. In this article, I’ll explain exactly how you can create an Apple ID without an Apple device. In addition, I’ll show you how to create an Apple ID without credit card.

Ever wonder how to download apps without credit card info? Apple provides an all-in-one account for all devices, emails, iCloud, to purchase songs, movies and TV Shows from the iTunes or Music/TV/Books Stores and to download and purchase all types of apps from the App Store on iPhone, iPod Touch, iPad and even on your Mac. You can create an Apple ID on your Mac, iPhone, iPad, or iPod touch and your Apple ID will let you use and access all Apple services. But, can you create an Apple ID without an iPhone? The short answer is yes. You can set up Apple ID without iPhone. You just need a web browser. Also, note that you can set up an Apple ID without a credit card. This Apple ID will give you access to Pages, Numbers, and Keynote for iCloud.

Your new Apple ID will be your current email address. Unfortunately, it’s not possible to create an @icloud email address. For the @icloud email address, you need to create an Apple ID on a Mac, an iOS or iPadOS device.

How to create an Apple ID without an Apple device

Here’s how to create an Apple ID without an Apple device. Note, these steps will also apply if you want to set up an Apple Id without a credit card.

  1. On your PC computer, Android device, or non-Apple tablet; launch your favorite web browser (Chrome, Safari, Firefox etc).
  2. Now, head over to the Apple ID page: https://appleid.apple.com/.
  3. Next, click the “Create Your Apple ID” link.
  4. In the sign-up form, type in your name and password. Please provide all the necessary information that is required by Apple.
  • Your name, location and birthday in the correct fields.
  • type in your current email. This will be your Apple ID. Please provide a valid email. Apple will send a verification code to ensure that his email address belongs to you. It’s not possible to create an Apple ID without this code.
  • Password. Apple ID passwords are required to be at least 8 characters. Do not use easily guessed password such as 12345678. A strong password will prevent you from Apple ID scams.
  • Also, Apple will ask you to choose three security questions.  You will be asked to choose and answer 3 questions. Your answers will be used for password reset. You may be able to
    reset your security questions.
  • When finished, solve the captcha and hit Continue.
<li>After you click Continue, a popup will appear asking you to enter a verification code that Apple just sent to the email address you provided in the form. Check your email and enter the code. It’s worth noting, you have three hours to enter this code. The&nbsp;code will expire 3 hours after it was sent.</li>And there you go. Congratulations! You have successfully created an Apple ID without an Apple device and credit card.

You have now an Apple ID. You will be redirected to a page. This page allows you to manage your Apple ID.

If you want to use Pages, Numbers or Keynote, head over to icloud.com and sign in with your newly created Apple ID. This will let you create and open these type of documents. iCloud Drive will store your documents. This is similar to Google drive.

Since you do not have an Apple device (iPhone, iPad, iPod Touch, or Mac), your Apple ID account cannot be used to access Apple services such as
iMessage,
FaceTime,
App Store, Apple Music, and other Apple services.
And that covers everything on how to create an Apple ID without an Apple device and payment method. Now take time to share this article with your friends to teach them how to create an Apple ID without payment method and an Apple device.

Apple makes it pretty easy to remove a device from your Apple ID device list. Your Apple ID device list comprises your Apple devices; iPhone, iPad, Mac, Apple Watch, etc; that are signed in with the same Apple ID. This is also called the trusted device list. In this article, I’ll explain exactly how you can delete a device from the devices connected to your Apple account list.

It’s a good idea to remove device from Apple ID if you do not own or use it. When you do this, the removed device will lose its access to any iCloud/Apple services. This, however, does not erase the device. When you remove a device from Apple ID account, you will no longer be signed in to the device. Here is how to remove device from Apple ID account

How To Remove A Device From Your Apple ID Device List using iPhone, iPad, or iPod Touch

  1. On your iPhone, iPad or iPod touch, Launch the Settings app and tap Your Name.
  2. Now, scroll down and you will find a list of your Apple ID devices. You will see every device that is connected to your Apple account.
  3. Next, tap on any device name that you want to remove.
  4. Next on, tap Remove from Account. Then tap again to confirm your decision.

How To Remove A Device From Your Apple ID Device List Using a Mac

You can use your Mac to remove a device. Here is how to remove device from Apple ID list:

  1. Click the Apple menu on your Mac.
  2. Now, go to System Preferences.
  3. Next, click Apple ID.
  4. You will see all of your Apple ID devices from the left menu.
  5. Next on, click the device you want to remove.
  6. Finally, click the Remove from Account link.

How To Remove A Device From Your Apple ID Device List using the Apple ID account page on the Web

If you do not have access to your iOS device, then you can use the web to delete a device from Apple ID:

  1. Launch a browser and visit the Apple ID account page (
    https://appleid.apple.com/)
  2. Now, type in your Apple ID and password to sign in.
  3. Next, scroll down until you see the Devices section.
  4. Next on, select a device to remove.
  5. Finally, click the Remove from Account link.

Side notes:

  • You cannot delete a device from Apple ID on the same device you are using to remove on your iOS device.
  • As mentioned above, this does not wipe the device. To wipe the device and completely remove the device, please head over to Settings > General > Reset > Erase All Content and Settings.
  • It’s a good idea to check this list from time to time, if you see a device that you do not recognize, remove the device and then change your Apple ID password.

See also:
How To Create an Apple ID Without an Apple Device & Credit Card

I’m certain virtually everybody uses their iPhone while on the toilet.
It’s possible you are reading this on the porcelain throne at the moment. If that’s the case, never mind. (I cannot judge you… in any way.) in this step-by-step guide, I’ll give you tips on how to break your iPhone addiction and check your phone less.

I’ve spent a disconcerting amount of time on my iPhone over the past 10 years. I do virtually everything on my phone. My iPhone has become an extension of whom I am. I use it as my wallet, my notepad, my calendar, My diary, my connection to work, and yes, the device that connects me to the world. Even when I lay down to sleep, my digital personal assistant is resting beside me, counting down the minutes until its alarm can go off shoving me to arise. However, though my iPhone has made my life convenient, many a times I’ve found myself blinking into its screen late at night, causing me to feel bleary-eyed and unproductive in the next day.

Nonetheless, everything feels urgent and significant on my iPhone. I barely notice how time flies by when I’m performing tasks such as surfing the internet, composing emails, chatting on social media, playing addicting iOS games and more.
My iPhone connects me to the world, but it’s also my personal anchor.

It’s difficult to estimate the number of hours the average person passes on their smartphone, however, the consensus is approximated to be somewhere between three and five hours daily. Cumulatively, that’s approximately 45 to 75 complete days each year. Or, say differently, those are essentially two whopping months.

To cab my iPhone usage, I’ve taken serious steps towards customizing my iPhone, making my home screen as basic as possible. Honestly, it’s quite an extreme route to take, however, it has transformed my iPhone into a tool. Currently, my apps are customed to my needs as opposed to my longings, and I’m glad to admit that, my eyes can now rest easy. If you need to break iPhone addiction, there are a few simple steps which you need to follow.
here is the step by step guide which can help you break iPhone addiction and make your iPhone support your life, not the opposite.

How to break your iPhone addiction

If you are looking for iPhone addiction help, here are the step-by-step instructions which can help you to break iPhone addiction and check your phone less.

Blow up your home screen

The most important step to breaking your iPhone addiction is to get rid of all the stuff that makes your iPhone quite sidetracking. Bid farewell to iPhone addiction apps such as
Snapchat,
TikTok,
and
Instagram.
The infinite stream of social media takes away most of your precious time.
Facebook
and
Twitter?
If not they’re essential to your job, they should not be distructive either. (Netflix should not disrupt you as well.) The key point is to Eliminate all the stuff that isn’t totally significant, cutting your apps down to the least amount. Try instead to access these services on your computer, where you can consume and produce content in a more efficient manner.

To Delete an app on your iPhone, tap and hold down its icon. Then tap “Delete App.”

Keep in mind, in case this is your very first iPhone detox, it could be quite difficult to stop the harbit completely. I suggest you keep a few apps for leisure to prevent you from reverting back to the old lifestyles.
Keep apps such as “cheat meals,” something to pick you up, as opposed to viewing apps as a bulk of your digital diet. This will help you overcome iPhone addiction.

Rearrange your apps

If you don’t want to delete some of your apps, no worries. You can use other techniques to cut back. You can
Rearrange apps Like your desk, think about how to optimize your iPhone for your needs. You can place apps into folders, you create a slight enclosure to opening them—two taps instead of one. Instead of launching them without a second thought, you are compelled to think for a minute : “What do I want to do?” And in most cases, that will suffice to hold you back from the trance of iPhone usage. If you are consciously deciding which app to launch and at what time, you are closer to breaking iPhone addiction.
To create a folder on your iPhone, tap and hold on an app’s icon. Then, drag the app over another . The iOS will create a folder with a default title. Through this trick, you can keep or change the folder name or even drag additional apps to the folder

Be cautious about the apps you place on your home screen and dock. You’ll see them each time you unlock your iPhone, therefore, be extra careful with that. Personally, I’ve placed Messages and Waze apps on my dock. I’ve transferred the Phone app because I barely use it.

Set time limits

Internet browsers, particularly Google Chrome and Safari are my weakness. Though I’ve successfully eliminated social media apps from my system, it’s unfortunate that I find ways to evade my own restrictions. By making it very hard to use my browsers, it raises the bar for when I go online. I’ve applied a number of privacy restrictions to hide Safari) and app limits (to cap how much time I spend on the internet), this has helped me limit the amount of time I spend on the web on my iPhone.

To block an app on your iPhone, head over to Settings and tap on Screen Time. Then, under Content & Privacy Restrictions, tap on Allowed Apps. You can control which apps are available on your device from this screen. Moreover, you can set limits on the amount of time you can use individual app under App Limits section.

A colleague found it quite challenging to control his iPhone usage that he requested me to set up a Screen Time Passcode for him. consequently, I’m the only person who can change the settings on his device. In most cases, this feature is used by parents to control their children’s devices. Read

Make iPhone safe for kids: guide to iOS parental control

Turn on grayscale

Besides hiding or deleting individual apps, you can make your iPhone to appear less attractive by Getting rid of its colors. It’s possible to make your iPhone appear like something out of the 1930s through a simple hack of enabling grayscale,.
To enable grayscale on your iPhone, head over to Settings > Accessibility > Display & Text Size. now, scroll down to find Color Filters and enable it. Tap Grayscale and you are all set.

You can also enable Grayscale quicklyby setting up Accessibility Shortcut. You will then be required to triple-click the home button to switch modes.
In the Accessibility Menu, scroll down to find Accessibility Shortcut, then tap on Color Filters.

Turn off notifications

To be successful in breaking iPhone addiction, it is critical to turn off notifications. Obviously, this is immensely determined by individuals, Therefore, I cannot provide absolute guidance here. What I can say is this—most people pick up their iPhone enough already (dozens if not hundreds of times every day). You seldom require extra reminders to check on an app or play a game.
To adjust your notifications preferences, head over to Settings > Notifications and choose the apps you want to send you notifications. Make sure the notifications you allow are essential and meaningful. For myself, I lean towards the side with smaller number of notifications, by just allowing Phone, Messages, Calendar and Slack to send me notifications. I’ve also enabled banner notifications for navigation apps Such as Waze and Maps.

Closing thoughts on how to break your iPhone addiction

That’s pretty much it on how to break your iPhone addiction. In a world that’s always on, these tricks have really helped me to overcome iPhone addictions. Despite the fact that my iPhone is close to me at all times, I should not allow it to consume my life. Taking control of my iPhone usage has made me feel more calm and focused on stuff that actually matter to me.
My iPhone may be less exhilarating than it should, however, it’s helping me get in touch with the world directly, as opposed to living with a screen flashing in my face.
Now, readers, which Tricks do you use to stop iPhone addiction? Let us know in the comments section below. We also have plenty of other articles that I suggest you check right now.

So, today I’ll give you tips on how to spot a fake iPhone 11, iPhone 11 Pro or iPhone 11 Pro Max.

iPhone 11 Pro Max clone: Image source: Slashleaks

With such a enormous market share, the “fake iPhone” business has become extremely profitable for devious phone manufacturers. Some of the previous iPhone knock-offs are so poorly done that it is very easy to differentiate a fake iPhone from a real one. But, over time, some fake iPhones are cloned very well that they are physically very identical to a real iPhone. From the size of the device, the buttons placement, the Apple logo, and other physical features of a genuine iPhone, some fake iPhones are indeed good imitations.

How to spot fake iPhone 11

How to spot fake iPhone 11

How to spot fake iPhone 11

So in case you are concerned that you may have a Fake iPhone 11, iPhone 11 Pro or iPhone 11 Pro Max, then this article is for you. This article will help you to spot a fake iPhone 11, iPhone 11 Pro or iPhone 11 Pro Max and distinguish it from a genuine iPhone.

Fake iPhone 11 Pro Max  

The iPhone 11 offers much improved cameras, a more durable design and excellent battery life for an affordable price, making it the iPhone for most people.

There are so many of fake iPhone 11 in the market that looks just like the real ones. You should be careful when buying iPhones from unfamiliar sources. In case you are buying iPhone from used market, a classified ad, or some other dealer that is not an Apple authorized dealer, use this guide to determine if the phone you are buying is actually a genuine iPhone.

See also: How to Spot a Fake iPhone 12
Most fake iPhones run an android operating system however, any settings or feature that exposes it as an android is concealed. In addition, be very careful when buying iPhone on sites such as eBay and Rakuten! You don’t want to end up with fake iPhone 11 Pro Max in your pocket.

This article gives you 17 tips that’ll tell you the difference between the real and the fake iPhone 11, iPhone 11 Pro and iPhone 11 Pro Max.

See also: How to Spot a Fake iPhone 12 Pro or iPhone 12 Pro Max

Spotting a Fake iPhone 11, iPhone 11 Pro and iPhone 11 Pro Max

Be cautioned that there are numerous fake iPhones out there and while clones or fakes are progressively becoming more prevalent you can still tell the difference between a fake and a real iPhone 11.

A little knowledge goes a long way with these devices and you always have to keep in mind that there is no one single give away when looking at a fake iPhone as they are manufactured by various companies that don’t subscribe to a single design philosophy.

There goal is typically to make a undoubted replica for as cheap as possible that are similar to a genuine iPhone. Fakes are occasionally manufactured before a official Launch based on rumors or after the official launch.

What to look out for when looking for a Fake iPhone 11, 11 Pro or 11 Pro Max?

You need to check out on the following signs to make sure that your iPhone 11, iPhone 11 Pro or iPhone 11 Pro Max is a genuine one:

Sign 1: Packaging

Always look for irregularities in packaging to the official retail packaging from Apple. In case you see a unofficial color of box art then in all probability, you have a fake iPhone 11.

Keep in mind to scrutinize accessories, as well as incorrect information that may be on the box.

Sign 2: Button Placement

One physical characteristic to watch out for is the button placement. On the genuine iPhone, the sleep/wake button is located on the top right corner of the device, while the volume buttons Are located on the upper left hand side. In case either of the buttons are not placed where they should, then you have a fake iPhone 11. Some fake iPhones have the buttons in the correct locations, but, feel the buttons by running your fingers on them. Press the buttons frequently to find out if they are not loose and are improperly fitted.

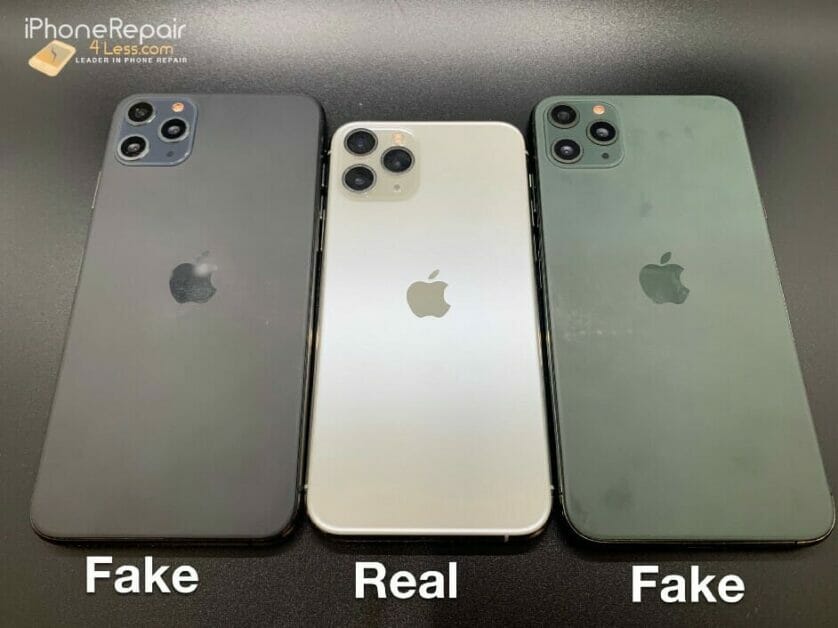
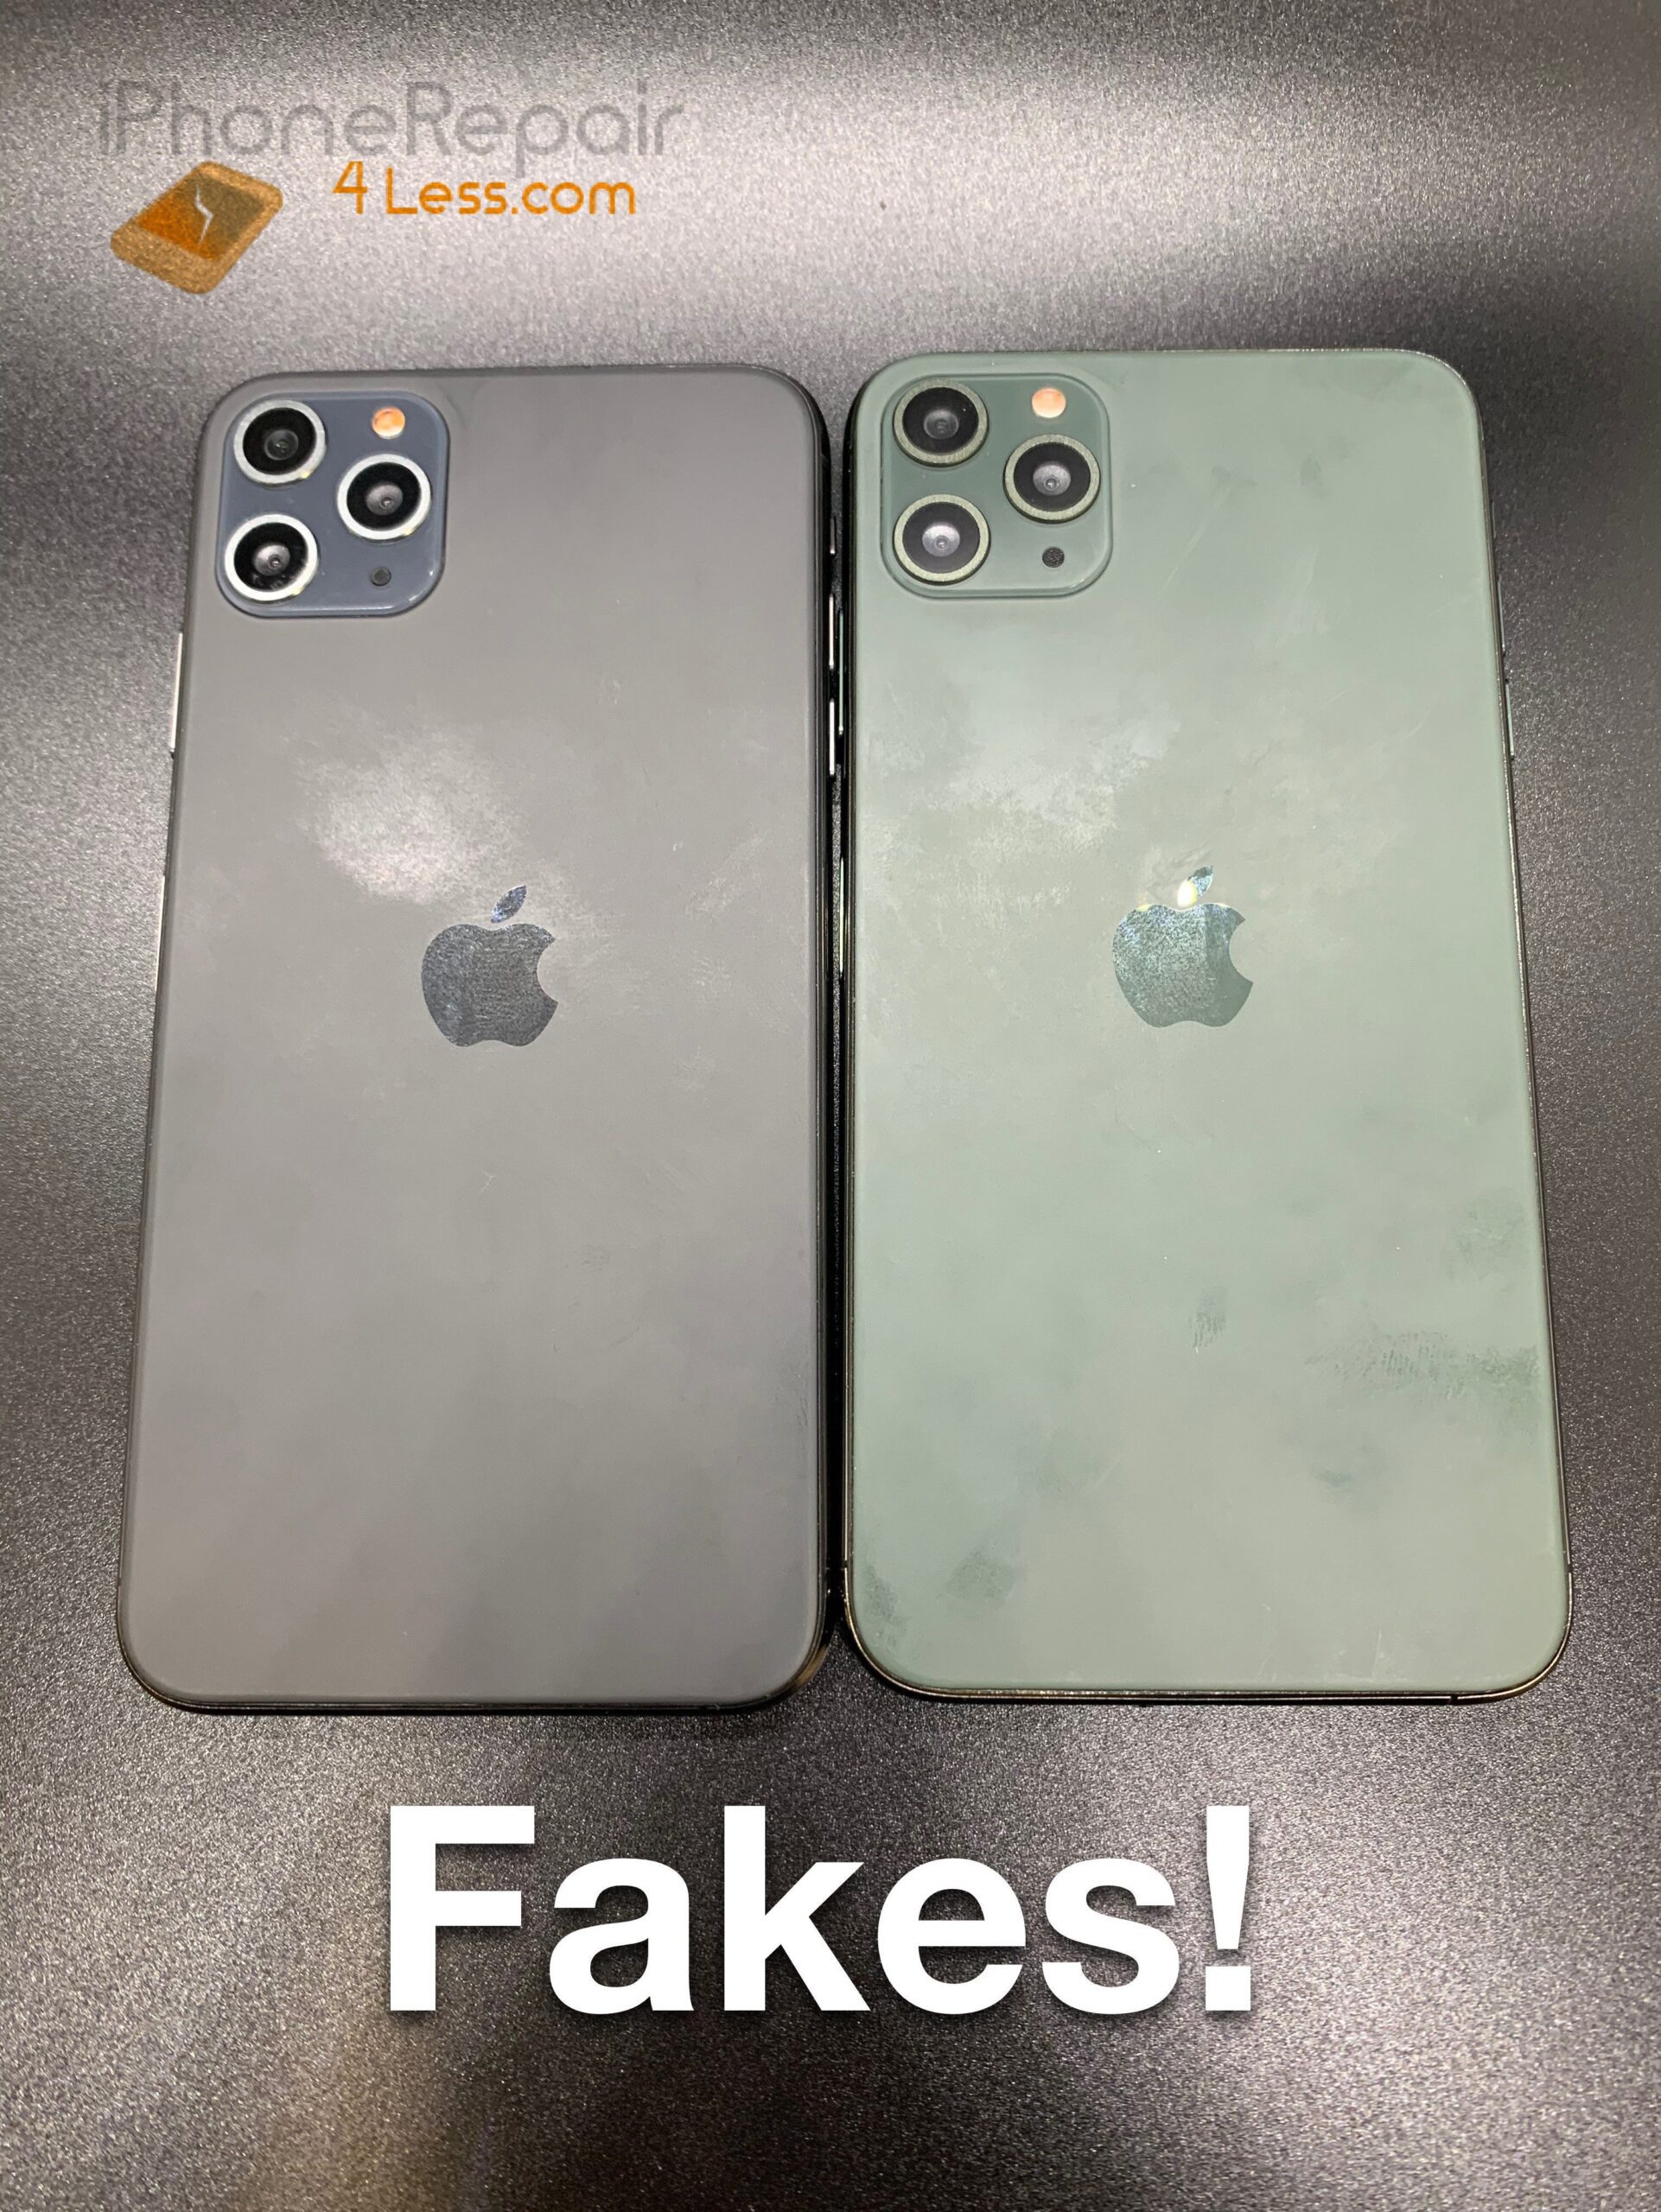
Sign 3: Check the logo

Fake iPhones have logos that are often off in placement being too high or lower than they should be. In addition, On the rear of the phone, you should find an Apple logo. In case you can’t see the Apple logo, then it’s a fake iPhone. Some fake iPhones are so convincing that they also have the Apple logo on the rear. Conversely, you can just brush your finger over the logo. If you feel a transition from the phone cover to the Apple logo, you have a fake.

Sign 4: Check the welcome screen

Typically the operating system on the clones is Android engineered to appear like Apples iOS. If at boot up for instance you are greeted with unusual welcome screen that usually on android rather than the logo of the iPhone, its certainly a clone.

In spite of the finest determinations, from time to time clones try to conceal Android features , however,they still show up and as you may understand, there are no Android OS features on Apple devices.

Sign 5: Font type

Look for the font type being used, every so often the font is off on the fakes compared to the Font used on an original Apple device. For instance, if you check for the font on your emails, you are often presented with Chinese character, causing you to first set up your iPhone to English

Sign 6: Missing Features

Check out for missing features such as Dark Mode and other unique iPhone features. In most cases, gesture controls do not function on fake iPhones.

Sign 7: Fake Settings

Look out for Fake settings that don’t open or work as they should. Some settings wont respond when you tap on them therefore, pay attention to that in settings.

Sign 8: Face ID

face ID does not function or its Fake. Typically, it may pretend to scan your face weather or not you move it. In addition, it might not function when you try to unlock your device.

Sign 9: Camera Quality

Genuine iPhones have superior camera quality while the fake ones take low quality photos and videos. A physically convincing iPhone with poor camera, irrespective of the lighting conditions, is a direct fake iPhone. Try recording a video and find out how bad does a fake iPhone shoot photos and videos.

Sign 10: Look for the serial number

You can dial the code “*#06#” on your keypad to show you your iPhone’s serial number. Alternatively, you can simply open setting > tap general > select about. This will give you the serial number. Now, you can head over to the Apple website, where you can enter your iPhone serial number to find out if it is a genuine iPhone. On the website, enter your iPhone serial number. If the site says that the code is invalid, you have a fake iPhone.

Sign 11: Check the storage capacity

Genuine iPhone has a fixed memory capacity and its not expandable. Fake iPhones require a micro SD card to increase its storage capacity. In case you spot a Micro SD card slot either on the rear or the side of the phone, then start backing out because it a fake iPhone.

Sign 12: Check for Siri

Siri application can only work on an original iPhone. Siri doesn’t function whatsoever on a fake iPhone.

Sign 13: Try to check the operating system.

If you see any application other than iOS, it is certainly fake. Apple uses proprietary iOS as its official operating system.

Sign 14. Try to connect to iTunes.

Connect your phone to a Mac or windows PC using a lightening to USB cable then try to run it with iTunes. In case you get an error, then it means iTunes does not recognize your device; therefore it is undetectable and fake.

Sign 15: Check the built-in applications.

The Original iPhone should have the built-in Apple native applications, including Podcast, Calender, Settings, Calculator, Mail, and Photos. Should you Miss any of the inbuilt apps, the phone may be jailbroken. To be certain you have an original iPhone, try to restore the original firmware. Should you miss some built-in native applications after restoring the original firmware, then you know what it is — a fake iPhone.

Sign 16: Pricing

If the price is too good to be real then its certainly or in all probability a fake iPhone. For instance, a fake iPhone 11 Pro Max costs as low as $135, which is almost 10 times cheaper than the original one. so exercise common sense.

Sign 17: Open it Up

If you can manage to Open it up, the internals are off and this is usually a sure bet way to 100% differentiate the Fake iPhone from the genuine one. The Internals are all erroneous.

Bonus

Here are couple of other ways on how we can differentiate between the real and the fake iPhone 11 Pro Max.

  • Ask about the warranty. Dealers of fake iPhones will not issue you a warranty to a certified iPhone service center.
  • Take it to an iPhone store. If your phone passes all the tests stated above, but you still have some uncertainties, head over to the nearest Apple store. Ask for the
    AppleGenius barto inspect your iPhone. They can run a diagnostic test to check for the legitimacy of your iPhone.

Where to buy Fake iPhone 11 Pro Max

It goes without saying, the fake iPhone 11 Pro Max comes with inferior specifications and I can’t recommend anyone to buy it.
However, if you wish to buy the fake iPhone 11 Pro Max and experience it on yourself, you can get it from Amazon.
As always please share this article on real vs fake iphone 11 with a friend and comment below.

We think you might also like:

30+ Best iOS 16 Tips and Tricks to Try First

Apple EarPods have a lot of use. You can use them to talk on the phone, launch Siri, fast-forward music and more. You can easily
Control phone calls, music and podcast playback, Siri, and more using the centre button. If you want to master how to use EarPods, this complete guide is for you.
Here is the step-by-step guide which will show you how to use EarPods controls like a pro.
Apple EarPods with remote control  
Apple provides it’s customers with wired AirPods for free in every iPhone, iPad, or iPod they buy.
Apple wired headphones are white in color and they are also referred to as EarPods.
Apple EarPods are not as stylish as travel headphones however, you do not have to worry about charging them and they can pretty much do everything you would need to control audio on your iPhone.
Apple EarPods are of two types:
EarPods with lightning connector
and
EarPods with 3.5 mm Headphone PlugThe
EarPods controls are attached to the wire beneath the right EarPod.
Apple EarPods have 3 buttons on the front of the controls:

  1. Volume up button
  2. Centre button
  3. Volume down button

You can use the volume buttons to increase or lower the audio level of music, podcasts and more. On the other hand,
the centre button can accomplish various tasks depending on the number of times you click it and the app you’re in.
In case you are not aware where the microphone is located on Apple EarPods, it’s positioned on the back of the control section. The microphone is placed around mouth height, where it can detect sounds during phone calls, recording memos, or commanding Siri without reaching for your
iPhone.

How to use apple EarPods

Follow these steps to use apple earbuds on your iPhone, iPad or iPod:

1. Use apple AirPods to control phone calls

When your Apple headphones are connected to your iPhone, you can talk
hands-free without having to hold your iPhone next to your mouth. Thanks to the EarPods in-built Mic.
Here is how to use Apple EarPods to talk on a phone call

  • While your iPhone is ringing, Click the centre button to answer a call.
  • While talking on your iPhone, click the centre button to end a call.
  • While your iPhone is ringing, hold the centre button to decline a call and send it to voicemail. Don’t release the centre button till you hear
    two beeps.
  • In case you get an incoming call while you’re already on the phone, click the centre button to answer the incoming call and place your present one on
    hold.
  • Switch between calls: Should you get multiple active calls, click the centre button to place your present call on hold and switch to the next one.
  • End multiple calls: Should you find yourself in multiple active calls, end your present call and switch to the next one by holding the centre button.

2. use Apple EarPods to control Music

You can control playback while listening to music, podcasts, audiobooks, or videos on your device through the centre button on your wired earphones.
Here’s how to use Apple EarPods to control audio on your iPhone, iPad or iPod:

  • To play or pause the music, podcast, audiobook, or video, click the centre button once.
  • To skip to the next song, jump 15 seconds forward on your podcast or audiobook, or skip to the next chapter
    in a movie, click the centre button twice.
  • To fast forward your song, podcast, audiobook, or video, click the centre button twice and hold.
  • To skip back to the previous song, jump 15 seconds backward on your podcast or audiobook, or go back to the
    previous chapter in a movie, click the centre button 3 times.
  • To rewind your song, podcast, audiobook, or video, click the centre buttons 3 times and hold.

3. Use apple EarPods to activate Siri

You can launch Siri with the wired headphones that comes with
your device. Moreover, you can issue hands-free commands to Siri through the use of the microphone attached to the controls of the EarPods.
Alternatively,
You can use Voice Control rather than Siri,
depending on the settings you have enabled on your device.
Here is how you can use Apple EarPods to talk to Siri:

  • Click and hold the centre button till you hear 2 beeps to launch Siri.
  • Click the centre button to exit Siri.

4. use apple EarPods to control the Camera

You can control the camera on your iPhone, iPad, or iPod touch through the centre button on your EarPods. It’s now easier to
Capture great photos on your iPhone
Since it is possible to take a photo without touching the device.
Apple got rid of this feature in subsequent iOS updates. Should the company reenable the feature, here is how you can use Apple EarPods to control the camera on your iPhone, iPad or iPod:

  • Launch the camera app on your device and click the centre button to snap a photo.
  • Launch the video camera app on your device and click the centre button to begin/end recording.

thats pretty much it on how to use Apple EarPods.

Audio Quality on Apple’s Headphones

Over the years, Apple’s wired EarPods have been extremely criticized for poor sound quality. They are not bad given that they are offered for free when you purchase new iPhone, iPad or iPod.
They come with an in-built Mic and you are able to control audio effectively with them.
In case you are considering purchasing wireless headphones, check this
.tomsguide.
Apple wireless AirPods are a bit pricy and do not offer numerous controls as Apple’s wired EarPods however, they are impressive.

Use Your Headphone Controls With Other Devices

You can connect Apple wired EarPods into any laptop, smartphone, or tablet
and most of the controls will work perfectly. You can increase/lower the volume, play/pause audio, rewind/forward, ETC.
Keep in mind , if your headphones have a Lightning connector you can only connect them into iPhone, iPad or iPod.
Questions?
Let us know in the comments section below.
As always share this article on how to Use EarPods with a friend or social media. We also have plenty of other articles that I suggest you check out right now.

In a perfect world, you wouldn’t even need third-party X formally Twitter apps for iPhone or iPad. The default X app would offer an optimal experience, and that would be pretty much it.

However, we don’t live in that world. Actually, there’s a legion of developers somewhere who feel it’ their obligation to not only improve X But also design it to their vision.

The developers of X apps for iPhone and iPad are focused on improving your experience as well as offering a glimpse at the potential of the platform through the eyes of a different creative vision. Not only do These apps improve Twitter, they also redefine it.

With that in mind, the following are the best X apps for iPhone and iPad in 2025:

Best Twitter apps for iPhone and iPad

Our best picks:

#1. Twitter

It’s a fact that most people browse social platform using the default Twitter app. As you may understand, it’s not the best options on the market. There are a bunch of other Twitter apps that offer so much more in terms of features, options, and customizability.

Having said that, the app excels In terms of reliability, performance, and overall design. It’s not the absolute best Twitter app, but that’s kind of its appeal. The app offers an easy and reliable way to browse one of the most popular social media platforms on the world.

#2. Circleboom Twitter

Tweeting is just one side of using Twitter. You need to manage and control your Twitter account and Circleboom Twitter has the most comprehensive Twitter management tool serves users with amazing features to manage their Twitter followers and connections in a variety of ways. You can track the growth of your followers and followings at the same time thanks to its user analytics tool. You can also get demographic information about your audience as well as detailed statistics. Your Twitter circle can be filtered by language and gender. Circleboom also allows you to see the optimal time to tweet and the interest areas of your Twitter followers with nice, cloud-like graphs.

Circleboom Twitter allows you to see detailed insights about your followers. In a few seconds, you can find followers who aren’t following you back on its simple interface. One of the other benefits of this multi-purpose application is the ability to filter inactive, bot, spam, and verified Twitter followers. If you want, you can look at the unfollowers, visit their profiles, and unfollow them.

Circleboom can also be used to search on Twitter. It allows you to locate and follow your target audience. Twitter’s user-friendly, intelligent search tool enables you to search for Twitter accounts that utilize keywords and hashtags related to your interests in their tweets, bios, profiles, and names. Then, if you want, you can go to their profile and follow them.

Moreover, you can delete all your tweets, retweets, likes, replies, and your Twitter archive in just one click on Circleboom Twitter. You can do everything mentioned above on your mobile devices.

#3. Twitterrific

If you want a well-designed Twitter app that is not mean with options, then Twitterific
might be what you are looking for.

Twitterific presents your Twitter feed free or promoted tweets and customized to ignore certain words, trends, and other qualifiers. Even better, the app allows you to customize your feed’s timeline to help focus on tweets that fall into a particular chronological criteria.

Again, however, the thing that really separates this from the other Twitter apps is its clean design. This is one of the oldest independent Twitter apps, and you can see how its design and functionality have been polished over the years.

#4. Tweetbot

Most Twitter apps are focused on achieving two things: expand Twitter’s features and make existing Twitter features a breeze to use. Few achieve those things better than Tweetbot.

For those not looking for too much, Tweetbot can prove to be a better way to use Twitter. The app makes it easy to schedule tweets, offers better filters, and it also allows you to sync your feed between multiple devices.

One great thing about this app, though, is its ability to allow you to create multiple, personalized timelines. Advanced features such as that make it easy to recommend this exceptional app despite a range of free alternatives.

#5. TweetLogix

If you want a Twitter app that better capitalizes on the capabilities of the mobile format, then TweetLogix might just be exactly what you are looking for.

In its simplest form, TweetLogix makes it easier to perform almost every Twitter task. Tasks such as muting, following, and composing can easily Be executed on TweetLogix than via the standard mobile app.

If you really want to explore the features this app has to offer, though, you’ll find so much to love. We’re particularly impressed with this app’s custom theme options, and its search functionality is one of the best among the apps of its nature. Experts and newbies will be impressed with everything this app can do.

#6. Crowdfire

As a matter of fact, Crowdfire isn’t the best Twitter app available today. However, that’s only because it’s not just a Twitter app.

Crowdfire is compatible with multiple social media apps and lets you carry out a range of tasks across them. Besides performing simple tasks such as scheduling posts, the app also recommends articles and content for your various social media feeds.

Only a small number of apps focus on curating content for various platforms, and that alone makes Crowdfire one of the best Twitter apps on the market.

#7. Echofon for Twitter

One thing you should know about Echofon for Twitter is that it features more ads than some of the other free Twitter apps on this list. However, that’s totally understood because it rocks a range of otherwise premium features.

As outlined on the app’s homepage, Echofon is one of the only free apps that offers in-line photo previews and push notifications. Those features alone make it a striking alternative however, one thing we love about this app is its uniformly smooth user interface.

Echofon might be one of the better options on the market for anyone who need premium features without the premium price tag.

#8 . UberSocial

Do you feel like Twitter could be a more “social” social media platform that presents you with expanded interaction options? Well, that’s one of the many functionalities that UberSocial offers.

UberSocial is popular for its social features such as an “inner circle” friends list that makes it easy to see what certain users are up to. Even better, it grants you access to an advanced tweet composer that lets you compose longer, more targeted tweets.

Put it all together and you have a Twitter app that offers more control over how you interact with people and various ways to see what others are up to. It’s definitely a unique style that will be valuable to some.

#9. Hootsuite

At times, you need a Twitter app that’s more than just a companion. Quite candidly, there are times when you need a Twitter app that is essentially a social media manager Hootsuite has a solution for the latter times. Frankly, it’s not the richest of the mobile Twitter apps when it comes to features. The app allows you to schedule Tweets, manage multiple accounts, and accomplish other premium tasks, but that’s all there is to it.

One area where Hootsuite really excels is through a series of advanced analytics that lets you better understand who is reading your tweets and why. For the people who manage a more professional Twitter account, that’s certainly useful information you don’t want to miss out on.

#10. Fenix

There’s certainly no shortage of relatively similar Twitter apps on the planet. As such, the difference between good and great ones is the matter of details.

What makes Fenix app to stand out from the rest is the details. It offers support for multiple accounts, media previews, as well as multiple social media and media clients.

Notably, this app truly sets itself apart via a fantastic interface that is rich and user-friendly. If you love your standard Twitter app but just Want something that offers a little more features, then this may certainly be one of the best Twitter apps for you.

#11. Janetter

Janetter is another free Twitter app that’s worth a mention. Its primary focus seems to be offering a more smooth mobile Twitter experience. It achieves that goal quite excellently.

Just like other free and premium Twitter apps, Janetter allows users to schedule tweets, manage multiple accounts, and enjoy expanded timelines. However, this app goes a little further by offering features such as customized touch controls that take advantage of the mobile medium.

Janetter is just one of those fantastic free Twitter apps that offers a modest upgrade without a lot of commitment.

#12. Listomatic

Has your Twitter account grown wild and unwieldy? Is it time to clean things up a bit and get things back in order? If that’s the case, then Listomatic has a solution for you.

Listomatic browse through your Twitter feed with the purpose of finding similarities. This could be your IRL friends, people who focus on music, or even just GIF posters. It then groups those similar accounts into categorized lists that gives you a better understanding of where your content is originating from.

Should you want to re-examine your Twitter feed or just want to better understand it, Listomatic will help you do so perfectly.

#13. Nighthawk

As you may already know, one of the most requested features for premium Twitter apps is advanced filters. In any case, even the most well-managed Twitter feeds can turn out to be a total mess over the course of just one busy day. Nighthawk is a relatively new Twitter app whose main aim is to simplify your Twitter experience. It lets you filter everything from spoilers to politics and even make a custom timeline that only features tweets from your friends.

This app offers one of the smartest suite of filters that we’ve seen in the apps of this nature. It’s definitely worth downloading if that’s what you need.

#14. Tweetings

Tweetings is a powerful Twitter client for iPhone, iPad and Apple Watch. The app offers an extensive feature list which includes lists, push, geolocation and syncs your timeline with your Mac or iPad!

The app allows you to follow your friends tweets, share your photos & videos, view conversations, who’s nearby and find out what’s trending at the moment.

Designed with users in mind, Tweetings is a worthwhile buy if you’re looking to try out another Twitter client for iPhone or iPad with some decent design.

And that covers pretty much everything about Best Twitter Apps for iPhone and iPad in 2023
We also have plenty of other articles below that I suggest you check right now.

In this article, I’ll tell you exactly why the Macbook Air is becoming the most unnecessary piece of hardware in Apple’s lineup.
Apple first released the Macbook Air in 2008 and claimed by Steve Jobs as the world’s thinnest notebook. It replaced the ‘Macbook’ range of laptops and was a Machine targeting the users who we’re vying for the more powerful MacBook Pro and simply wanted a laptop that could do Basic tasks such as run office apps and do some web browsing. Haters labeled the MacBook Air as “the most expensive Machine to browse twitter on” whilst MacBook Pro users disregarded their little siblings as casual users.
After remaining relevant for many years, the changes in the Apple product line up and hardware progression began to blur the lines of the MacBook Air’s place.

It Lost its Spot in the Lineup

The MacBook line up was very straight forward at the beginning. It was part of Job’s plan to simplify the lineup with Consumer and Pro users as his segregation. As per his famous grid, he was going to make a product which meets the needs of each user type.
If you were a simple “consumer” user that needed a portable Computer that ran Mac OS you would simply purchase the
MacBook Air.
If you were a “power” user that needed a portable laptop that could run heavier software such as Adobe’s Creative Suite you would go for the more powerful
MacBook Pro.
Over time the Macbook Air received the upgrades that all MacBooks did in the lineup like Retina displays, Solid State Drives and faster connectivity ports making it a good contender against the MacBook Pro. Later versions of the Macbook Air could run resource-heavy software, the hardware itself wasn’t designed for it with less cooling facilities and weaker chipsets but you could still make do.

Today’s price difference between MacBooks.
The pricing of both items also played a significant role. Initially, there was a much larger difference in the price between the Air and the Pro. Now for just USD300 more, you can get the MacBook Pro which is faster, more powerful and will have an increased longevity compared to a MacBook Air. So when you are purchasing a Macbook the option of choosing a Pro over an Air is much easier. To counteract this, Apple is doing what Apple rarely does and is offering a discount on the Air to encourage people to buy it.

Apple is Apple’s Biggest Competitor

The iPod was the most revolutionary piece of technology created by Apple and it changed the world. In 2001 I still remember seeing Steve Jobs on stage exhibiting a box that could store thousands of songs, that fit in his hand. It single-handedly killed the cd industry and changed music distribution and later pushed forth streaming.

Fast forward a few years later and all the features of the iPod are being slowly assimilated into the iPhone. Soon the iPod is considered redundant with the amount of hard drive space that phones come in. A basic level iPhone has more hard drive space than an iPod.
Later Apple changes the game again with the launch of it’s streaming service. Apple Music. This was the final nail to the coffin to the iPod. Why walk around with a device that can store downloaded songs when you’re phone with the help of omnipotent data can stream any song of your choice? In fact, they have replaced iPod from the menu of Apple.com for “Music”

The Rise of the iPad Pro

Apple announced the first generation of the iPad Pro in 2015. It was meant to be a more powerful iPad targeting the professional market (like they did with the Mac Pro). Apple saw a world of illustrators and designers using iPad Pros in their day to day work, but the first generation didn’t catch on. Its hardware wasn’t too powerful and people were still used to computers and drawing tablets. It, however, caught the attention of students who purchased it as an alternative to carrying a laptop around campus and was much easier to read notes in.

The second generation of the iPad Pro was more powerful and introduced the world to a magnetic connectivity port at the back allowing you to strap on a multi-purpose keyboard cover. When I got my hands on one at the Apple store it dawned on me; they’re going to cannibalise their own MacBook Air.
The next generation of the iPad and thereafter keeps drawing closer and closer to defeating the MacBook Air. It has a better display which is a touch screen, the same hard disk space, support for a pen and runs iPad OS which with every update gets very close to operating as a computer OS.

All its apps are optimised to run in harmony with the hardware with a lot of preference to design and illustration apps that pair well with the Apple Pencil, that magnetically attaches (and charges) itself to the top.
The iPad Pro is also the first iPad to support the full Adobe Photoshop software instead of the watered-down version. Note-taking apps such as Microsoft Words, Evernote and Apple Notes has been updated to attract the journalist and student market. The other apps are present too if you still want to watch a video or play a game.
The accessories that come with the iPad Pro also mean that it is a more versatile product for different needs. The Apple Pencil for graphic designers and illustrator and Magic Keyboard for anyone from journalists to students who want the keyboard experience.
Where do we see the MacBook Air in the future? Since professional users are becoming Apple’s primary target they will be catered to with MacBook Pros and Mac Pros and optimised software and hardware. Consumer users won’t be left in the dust, they will be rewarded with an even more portable, yet powerful iPad Pro that will give them the ability to do everything that they want plus more with accessories to fit their needs.
Whether category you fall into the iPad Pro brings better software optimisation, cooler accessories and a computing experience like no other at the same cost as the Macbook Air.
Apple is right: Your next computer isn’t a computer.