Got a tip for us?

iPad

The iPad is a tablet computer from Apple that runs the iOS mobile operating system. Similar in functionality to the iPhone, the iPads purpose is often quite different, sometimes even serving as a general desktop computer replacement.

Use the Find My app to locate and play a sound on a missing iPhone, iPad, iPod touch, Mac, Apple Watch, AirPods, or Beats headphones (supported models). In order to locate a device, you must turn on Find My [device] before it’s lost.

If the device is online, you see its location on a map. AirPods and supported Beats headphones can be located when they’re near your device and connected to Bluetooth®.

Note: To see how far away your devices are from you, turn on Precise Location for the Find My app. For details, see our guide, Control the location information you share. And if you lose your iPad without access to the Find My app, Find Devices on iCloud.com can still locate your device or play a sound on it.
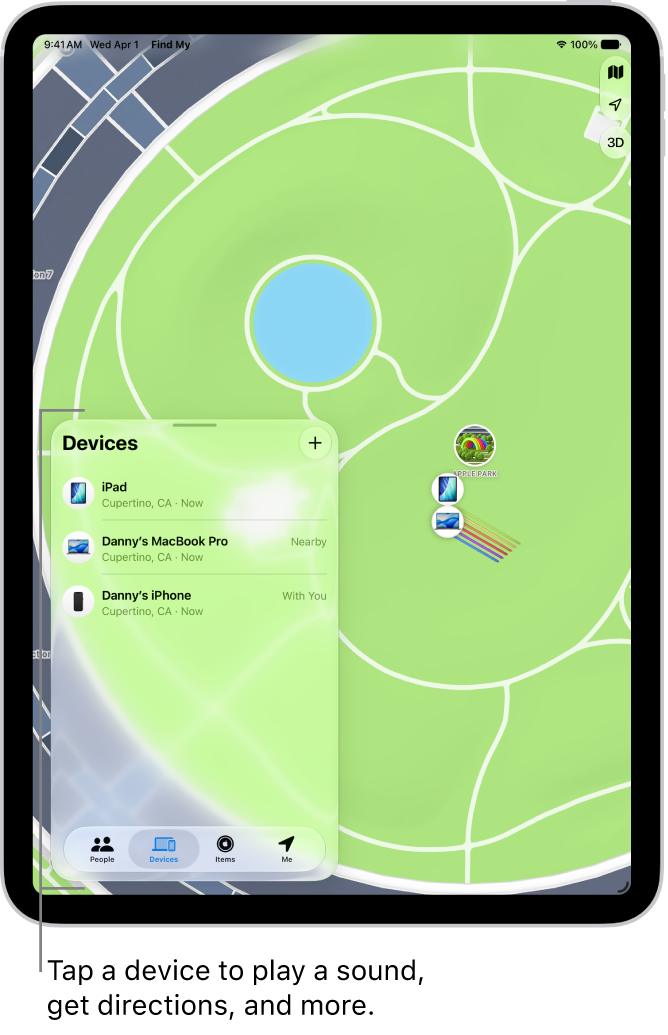
The Find My screen open to the Devices list. The devices listed include Danny’s iPad, Danny’s iPhone, Danny’s Apple Watch, and Danny’s AirPods Pro. Their locations are shown on a map near Santa Cruz.

About locating a device

  • You can use Find My on your iPad to see the location of your device on a map. If the device is online, you see its location, and it plays a sound to help you find it. If the device is offline, you see its location, but it doesn’t play a sound.
  • For AirPods and supported Beats headphones, you can locate them when they’re near your device and connected to Bluetooth®. For supported AirPods, you can also see their location via the Find My network for up to 24 hours after they last connected to your device, even if they’re not nearby.
  • For iPhone Wallet with MagSafe and Find My support, you can see its location when it’s attached to your iPhone and its last known location if it detaches from your iPhone.

See the location of your device on a map

Your device’s current or last known location appears in the Find My app.

Tap Devices at the bottom-left side of the screen, then tap the name of the device you want to locate.

  • If the device can be located: It appears on the map so you can see where it is.
  • If the device can’t be located: You see “No location found” below the device’s name. Below Notifications, turn on Notify When Found. You receive a notification when it’s located.

    Important: Make sure you allow notifications for the Find My app. See Change notification settings on iPad.

Play a sound on your device

  1. Open the Find My app on your iPad.
  2. Tap Devices at the bottom-left side of the screen. Tap the name of the device you want to play a sound on.
  3. Tap Play.

    • If the device is online: A sound starts after a short delay and gradually increases in volume. Then plays for about two minutes. If applicable, a Find My [device] alert appears on the device’s screen.

      A confirmation email is also sent to your Apple Account email address.

    • If the device is offline: You see Sound Pending. The sound plays the next time the device connects to a Wi-Fi or cellular network. For AirPods and Beats headphones, you receive a notification the next time your device is in range of your iPhone or iPad.

Separated AirPods give you additional options to play a sound.

Stop playing a sound on a device

Once you find your device, do one of the following to turn off the sound before it stops automatically:

  • iPhone, iPad, or iPod touch: Press the power button or a volume button, or flip the Ring/Silent switch. If the device is locked, you can also unlock it, or swipe to dismiss the Find My [device] alert. If the device is unlocked, you can also tap OK in the Find My [device] alert.
  • Apple Watch: Tap Dismiss in the Find My Watch alert, or press the Digital Crown or side button.
  • Mac: Click OK in the Find My Mac alert.
  • AirPods or Beats headphones: Tap Stop in Find My.

Get directions to a device

The Maps app gives directions to a device’s location.

  1. Open the Find My app on your iPad.
  2. Tap Devices at the bottom-left side of the screen. Tap the name of the device you want to get directions to.
  3. Tap Directions to open Maps.

To get there with Maps, see our article, Get directions.

Locate or play a sound on a friend’s device

If your friend loses a device, they can sign in to their Apple Account at Find Devices on iCloud.com and locate it or play a sound on it.

Find My can also help you locate a family member’s missing device if you set up Family Sharing.

Locate your Apple Pencil Pro

If your Apple Pencil Pro goes missing, the Find My app on your iPad or iPhone can locate it.

  1. Open the Find My app on your iPad.
  2. Tap Devices at the bottom of the screen. Then tap Apple Pencil Pro.
  3. Follow the prompts to locate your Apple Pencil Pro.

    The onscreen circle grows and the text changes from “far,” to “near,” to “within reach” as you get closer.

Note: You can add Apple Pencil Pro to Find My for only one Apple Account at a time.

See also
Tag: Find My

You can sign up for a monthly or annual subscription to Apple Creator Studio using your Apple Account. To begin your free trial, you just sign up, and you can cancel your subscription at any time. You can also share your subscription with up to five other family members.

In Freeform, you can subscribe when you use an Apple Creator Studio feature, such as Auto Crop, or remove the watermarks from a premium image. If you cancel, premium content and features stay available until your billing period ends.

Available with subscription: These features require a subscription to Apple Creator Studio.

Subscribe to Apple Creator Studio from Freeform

  1. Go to the Freeform app on your iPad.
  2. Do one of the following:

    • Use an Apple Creator Studio feature, such as Auto Crop.
    • Tap the Content Hub button, tap a premium image to add it to the board, then tap Remove Watermarks.

      Note: If you currently subscribe to Apple Creator Studio but still see an option to subscribe, scroll down, click Already Subscribed? and follow the onscreen instructions.

  3. Follow the onscreen instructions.

Cancel or change your Apple Creator Studio subscription

  1. Open the Settings app on your iPad.
  2. Tap your name, tap Subscriptions, and tap Apple Creator Studio.

    Note: If you don’t see your subscriptions, make sure you’re signed in to your Apple Account in the App Store.

  3. Do one of the following:

    • Modify your subscription plan: Tap See All Plans and select a new plan. Tap Subscribe.
    • Cancel your subscription: Tap Cancel Subscription and then follow the onscreen instructions.

Even after you cancel your subscription, you still have full access to premium content and features until your billing period ends.

Since some Apple Creator Studio apps use iCloud to sync projects, documents, and content between devices, it’s best to subscribe to Apple Creator Studio with the same Apple Account you use for iCloud.

See also

If you subscribe to Apple Music and you join a collaborative playlist, you can react to songs in the playlist with emoji. You just choose a reaction on the Now Playing screen. That might be a thumbs up emoji, for example, or you can find a specific emoji you’d rather use.

Note: Apple Music isn’t available in all countries or regions.

  1. Open the Music app on your iPad.
  2. Tap a collaborative playlist. Tap the MiniPlayer to open the Now Playing screen.
  3. Tap the Reaction button and choose a reaction (for example, a thumbs up emoji) or tap the Add button to find a specific emoji.

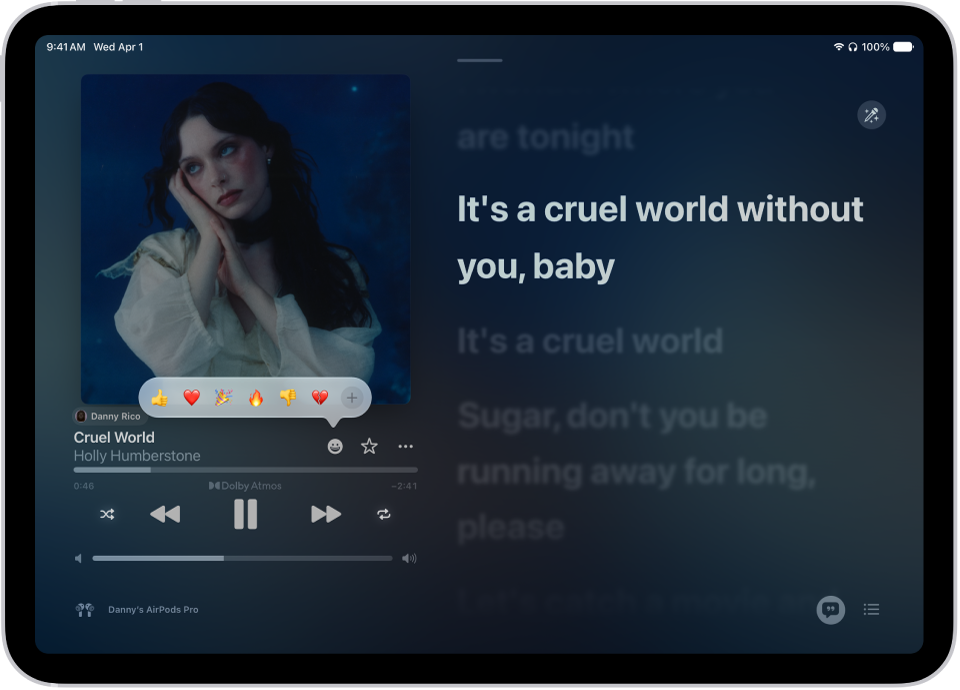
    The Now Playing screen with the Reactions button showing several emoji and an Add button that you can click to find more emoji.

See also

Tag: Music

You can search for recordings or rename any recording in Voice Memos. A new recording is first named New Recording or the name of your location, and you can even search a transcript for a word or phrase.

Here’s how to search for or rename a recording in Voice Memos on iPad.

Search for a recording

  1. Go to the Voice Memos app on your iPad.
  2. Swipe down from the middle of the list of recordings to reveal the search field.
  3. Tap the search field, enter part or all of the recording name, and then tap Search.

Note: This field can also search transcripts for a word or phrase you enter.

Rename a recording

A recording is initially saved with the name New Recording or the name of your location, if Location Services is turned on in Settings > Privacy & Security.

To change the name, tap the recording, tap the name, then type a new one.

See also

You can share your Accessibility settings with another iPhone or iPad temporarily. Say you’re borrowing a friend’s iPhone or using a public iPad: You can share your settings with that device, then remove them once you’re done. Here are some of the settings you can share with another device:

  • Zoom
  • Hover Text and Hover Typing
  • Display & Text
  • VoiceOver
  • Touch Accommodations
  • Read & Speak
  • Full Keyboard Access
  • Live Speech
  • Music Haptics
  • Audio & Visual
  • Top Button and Home Button

Note: Your Accessibility settings are the only thing shared with the other device during the sharing session.

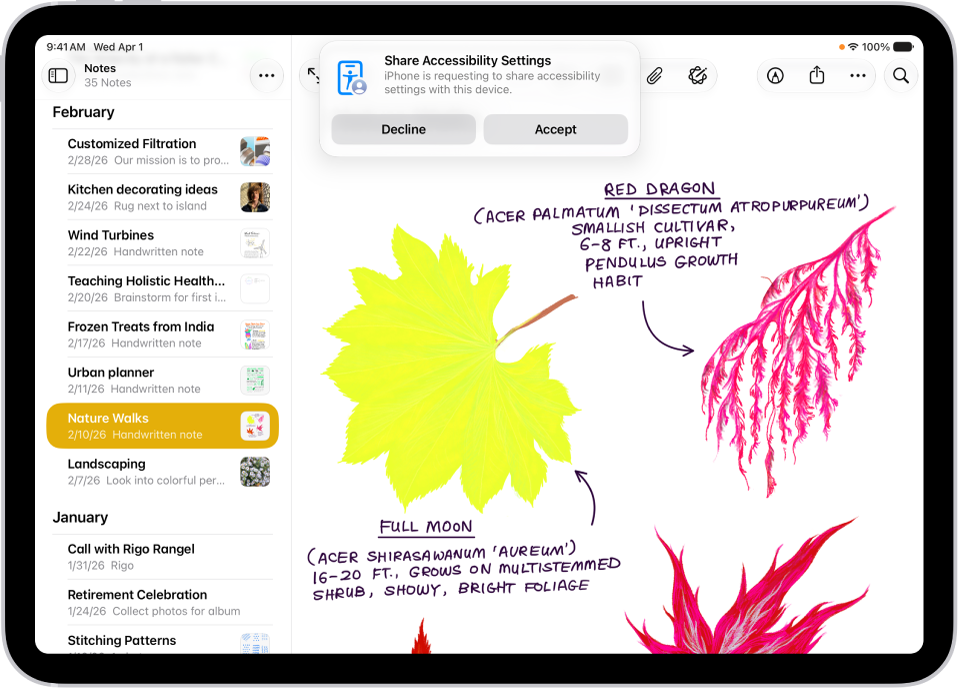
An iPad showing a notification that Danny’s iPhone is requesting to share accessibility settings.

Share your Accessibility settings with another device

  1. Start the Settings app on your iPad.
  2. Tap Accessibility, then tap Share Accessibility Settings. (You may need to scroll down.)
  3. Tap Share Accessibility Settings, then tap Continue.
  4. Make sure both devices have Bluetooth and Wi-Fi turned on and then do one of the following:

    • Select a device: Tap a device in your contacts or a device signed in to your iCloud account.
    • Bring your iPad to another device: Tap Search People Nearby and tap and hold the screen on the other device with three fingers to create a six-digit code. Enter the code on your device and select the name of the device.

      Note: To hear the six-digit code spoken aloud, continue to tap and hold the screen on the other device with three fingers.

  5. Do either of the following on the other device to accept your request to share your accessibility settings:

    • Tap Accept.
    • Tap and hold the screen on the other device with three fingers.
  6. Start using the other device with your Accessibility settings.
  7. When you’re finished using the device, do any of the following:

    • Tap the Share Accessibility Settings button in the Status Bar, then tap Stop Sharing.
    • Lock your device and let it go to sleep.
    • Triple-click the top button or Home button.

      Note: If you move more than 30 feet away from the device you’re sharing your Accessibility settings with, the session automatically ends.

Adding Share Accessibility settings to your Control Center lets you start sharing directly from Control Center; see our guide, Customize controls.

Sync your Share Accessibility Settings to iCloud

Syncing your preferences to iCloud helps if you use different Accessibility settings on different devices, since they’re then available when you share Accessibility settings between devices. For example, after you sync your iPad settings, you could later use your iPhone to share with another iPad, and your iPad accessibility preferences can be used.

  1. Start the Settings app on your iPad.
  2. Tap Accessibility, then tap Share Accessibility Settings. (You may need to scroll down.)
  3. Turn Sync to iCloud on or off.

See also

In the Photos app, you can edit Live Photos, change the key photo, and add fun effects like Bounce and Loop.

In addition to the photo editing tools, you can trim a Live Photo’s length and mute the sound. You can even turn a Live Photo into a still of its key photo. Effects like Loop repeat the action in a continuous looping video.

Here’s how to edit Live Photos on iPad.

Make Live Photo edits

Beyond the photo editing tools, you can mute the sound, trim its length, change a Live Photo’s key photo, or turn it into a still photo.

  1. Start the Photos app on your iPad.
  2. Open a Live Photo, then tap the Edit button.
  3. Tap the Live Photo button. Do any of the following:

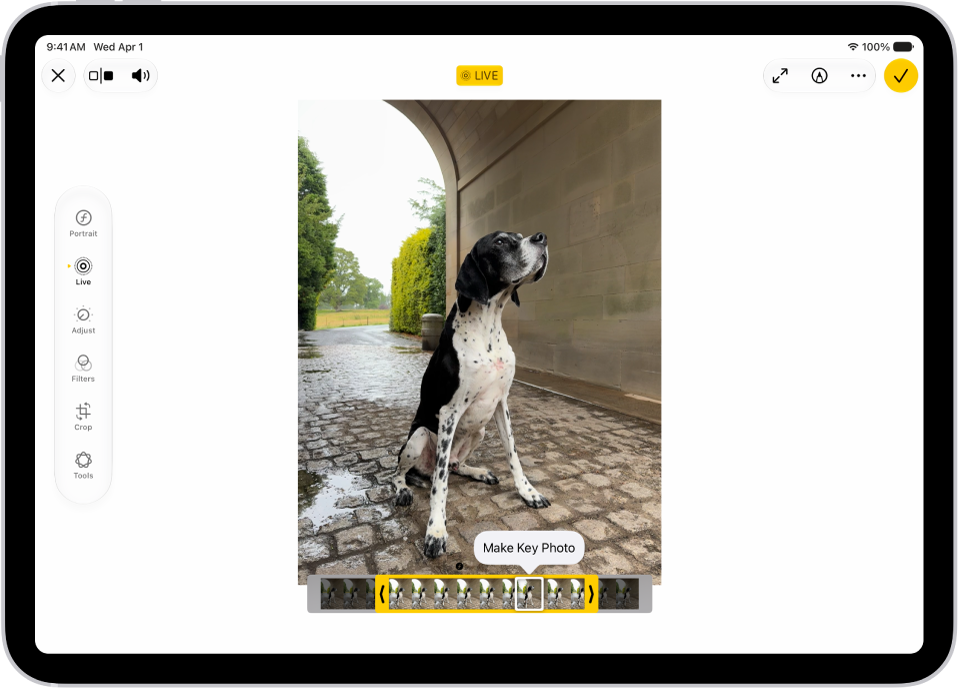
    • Set a key photo: Move the white frame on the frame viewer, tap Make Key Photo, and tap Done.
    • Trim a Live Photo: Drag either end of the frame viewer to choose the frames the Live Photo plays.
    • Make a still photo: Tap the Live button at the top of the screen to turn off the Live feature. The Live Photo becomes a still of its key photo.
    • Mute a Live Photo: Tap the Mute button at the top of the screen. Tap again to unmute.

    A Live Photo is in the center of the Edit screen in the Photos app. The frame viewer is across the bottom of the video and a yellow outline is around the selected frames to include in the edited Live Photo; a single frame is selected to make key photo. The editing tools are on the left side of the screen: from the top to bottom, Live Photo, Adjust, Filters, and Crop. Live Photo is selected.

Add effects to a Live Photo

You can add effects to Live Photos to turn them into fun videos.

  1. Start the Photos app on your iPad.
  2. Open a Live Photo.
  3. Tap Live in the top-left corner. Choose one of the following:
    • Live: Applies the Live video playback feature.
    • Loop: Repeats the action in a continuous looping video.
    • Bounce: Rewinds the action backward and forward.
    • Long Exposure: Simulates a DSLR-like long exposure effect by blurring motion.
    • Off: Turns off the Live video playback feature or applied effect.

Turn a Live Photo into a video

You can turn a Live Photo into a short video to save or share—for example, to share with people not on Apple devices.

  1. Start the Photos app on your iPad.
  2. Open a Live Photo and then tap the More button in the top-right corner.
  3. Tap Save as Video.

See also

Tag: Photos

In the Podcasts app, you can view and search episode transcripts. In the static transcript view, you can select text and play, copy, or share from that point, and in the scrolling transcript on the Now Playing screen, any paragraph can take you to that point in the episode.

Note: Transcript availability may vary by language, and by country or region.

View transcripts

  1. Start the Podcasts app on your iPad.
  2. Do any of the following:
    • While viewing episode information: Scroll down to the Transcripts section. You can also tap the More button and tap View Transcript.
    • From the MiniPlayer or the Now Playing screen: Tap the View Transcript button.

Transcripts aren’t available when watching in full-screen video mode. Instead, you can tap the Captions button to turn on subtitles (if available). You can also tap the Close button to return to the Now Playing screen, then tap the View Transcript button to view the video and transcript side by side in landscape orientation.

You can interact with transcripts in multiple ways. In the static transcript view, you can select text and choose whether to play, copy, or share from that point. In the scrolling transcript on the Now Playing screen, you can tap any paragraph to jump to that point in the episode, or touch and hold a paragraph to share from that point.

To hide the transcript on the Now Playing screen, tap the Hide Transcript button.

Search transcripts

  1. Start the Podcasts app on your iPad.
  2. While viewing a transcript, do one of the following:
    • While viewing the scrolling transcript: Tap Search.
    • While viewing the static transcript: Tap the Search Transcript button at the top right of the screen.
  3. Optionally, tap the Search Options button in the search field to specify whether the capitalization or the entire word needs to match in the search results.

See also

Safari lets you mute audio in any open tabs—helpful when you’re listening to audio from one website, and unwanted audio starts playing from another.

You can mute audio in the tab you’re viewing, mute audio in other tabs, mute all audio, or mute any tab in the tab bar. You can also see which websites are playing audio, and unmute a tab later.

Here’s how to mute audio in tabs in Safari on iPad.

Mute audio

  1. Go to the Safari app on your iPad.
  2. Do any of the following:
    • Mute audio in the tab you’re viewing: Tap the Mute button in the search field.
    • Mute audio in other tabs: If you’re viewing several websites that are playing audio, touch and hold the Mute button in the search field and tap Mute Other Tabs to let audio play in the tab you’re currently viewing and to mute the audio in other tabs.
    • Mute all audio: If you’re viewing a website that’s not playing audio and other tabs are playing audio, tap the Mute button in the search field to quickly mute all audio in other tabs.
    • Mute any tab: Tap the Mute button on the right side of the tab in the tab bar.

See websites that are playing audio

  1. Open the Safari app on your iPad.
  2. Touch and hold the Mute button in the search field to see a list of websites that are playing audio.
  3. Choose a website to go to the tab where the audio is playing.

    If you’re viewing a website that’s not playing audio, the list of open websites also includes the Mute All Tabs option. If the website you’re viewing is playing audio, it includes the Mute This Tab or Mute Other Tabs option.

Unmute audio

  1. Open the Safari app on your iPad.
  2. Tap the Mute button in the search field, or on the right side of the tab in the tab bar.

Note: You can mute and unmute audio in tabs in the active Safari window, and also in tabs in other Safari windows behind it.

See also

Tag: Safari

With Eye Tracking, you can control iPad using just your eyes. An onscreen pointer follows the movement of your eyes, and when you hold your gaze steady on an item—or dwell—you perform an action, such as a tap. All data used to set up and control Eye Tracking is processed on device.

It uses the built-in, front-facing camera, and you need to calibrate it every time you turn it on.

Before you begin

Eye Tracking works through the built-in, front-facing camera on iPad. You’ll get the best results when your face is adequately lit and clearly visible to the camera, with iPad on a stable surface roughly a foot and a half from your face.

Eye Tracking is available with supported iPad models.

Turn on Eye Tracking

  1. Open Settings, tap Accessibility, tap Eye Tracking, and then turn on Eye Tracking.
  2. Follow the onscreen instructions to calibrate Eye Tracking. As a dot appears in different locations around the screen, follow its movement with your eyes.

    Note: You need to calibrate Eye Tracking every time you turn it on.

Use Eye Tracking

When Eye Tracking is on and calibrated, an onscreen pointer follows the movement of your eyes. And by default, an outline appears around whatever item on the screen you’re looking at.

If Snap to Item is turned off, when you hold your gaze steady at a location on the screen, the dwell pointer appears where you’re looking and the dwell timer begins (the dwell pointer circle starts to fill). When the dwell timer finishes, an action—tap, by default—is performed.

Use the AssistiveTouch menu for additional onscreen gestures or physical button presses. For details, check out our guide, Use AssistiveTouch.

Recalibrate Eye Tracking

If you move your face or your iPad and recalibration is needed, Eye Tracking calibration starts automatically. You can also start Eye Tracking calibration manually.

  1. Look at the top-left corner of your screen and hold your gaze steady.

    The dwell pointer appears and the dwell timer begins (the dwell pointer circle starts to fill). When the dwell timer finishes, Eye Tracking calibration starts.

  2. Follow the onscreen instructions to calibrate Eye Tracking. As a dot appears in different locations around the screen, follow its movement with your eyes.

You can change which corner of the screen you look at to start recalibration, and you can assign actions to other corners, too. Read our article, Set up Dwell Control.

Set options for Eye Tracking

You can set options for how the Eye Tracking pointer responds to your gaze.

  1. Open Settings, tap Accessibility and tap Eye Tracking. Adjust any of the following:
    • Smoothing: Increase this value to make the movement of the pointer smoother. Or decrease this value to make the pointer more responsive.
    • Snap to Item: Have the Eye Tracking pointer automatically move to the item on the screen that’s closest to where you’re looking.
    • Zoom on Keyboard Keys: When you dwell on the keyboard, zoom in on the section of the keyboard you’re looking at. Dwell again on a key to tap it.
    • Auto-Hide: Show the Eye Tracking pointer when you hold your gaze steady for the amount of time specified. When your eyes are moving, the pointer automatically fades.
    • Dwell Control: Turn Dwell Control on or off. To adjust settings for Dwell Control, such as the default dwell action and the duration of the dwell timer, see Set up Dwell Control.
    • Show Face Guidance: Turn Show Face Guidance on or off to get help adjusting how you’re positioned.

To change the size or color of the Eye Tracking pointer, go to Settings > Accessibility > Pointer Control. See Make the pointer easier to see.

Use an external eye-tracking device with iPad

You can also use a Made for iPad (MFi) eye-tracking device to control iPad.

  1. Follow the eye-tracking device manufacturer’s instructions to connect your device to iPad with a Lightning or USB-C connector (depending on your iPad model).
  2. Set up your eye-tracking device using the device’s companion app.
  3. Open Settings, tap Accessibility, tap Touch, tap AssistiveTouch, and turn on AssistiveTouch.
  4. If you want to be able to interact with an item on the screen when you hold your gaze steady on the item, turn on Dwell Control.

    To adjust settings for Dwell Control, such as the default dwell action and the duration of the dwell timer, see Set up Dwell Control.

  5. To set additional options for your eye-tracking device, tap Devices (below Pointer Devices), tap the name of the device, and adjust any of the following:

    • Customize Additional Buttons: Perform actions using a physical switch (if supported by your eye-tracking device).
    • Snap to Item: Have the pointer automatically move to the item on the screen that’s closest to where you’re looking.
    • Auto-Hide: Show the pointer when you hold your gaze steady for the amount of time specified. When your eyes are moving, the pointer automatically fades.

To change the color and size of the pointer, go to Settings > Accessibility > Pointer Control. See Make the pointer easier to see when using a mouse or trackpad with iPad.

See also

In the Calendar app, the Holidays calendar displays holidays based on the region set on your iPad.

You can show or hide holidays, and add a holiday calendar from a different region. Since the Holidays calendar is a subscription calendar, though, you can’t add or delete holidays, because it can be modified only by the calendar provider. Notification alerts and the color for a holiday calendar can be changed, too.

Note: The Holidays calendar is a subscription calendar, so you can’t add or delete holidays; only the calendar provider can modify it.

Show or hide holidays

  1. Open the Calendar app on your iPad.
  2. Tap the Calendars button at the top left.
  3. Select or deselect US Holidays (or the holiday calendar for your country or region).

Add a holiday calendar from a different region

  1. Open the Calendar app on your iPad.
  2. Tap the Calendars button at the top left.
  3. Tap Add Calendar at the bottom of the screen. Then tap Add Holiday Calendar.
  4. Tap the holiday calendar you want to subscribe to and then tap the Done button.

For settings like notification alerts or the color of a holiday calendar, read our guide, Set up multiple calendars.

See also