Got a tip for us?

iPad

The iPad is a tablet computer from Apple that runs the iOS mobile operating system. Similar in functionality to the iPhone, the iPads purpose is often quite different, sometimes even serving as a general desktop computer replacement.

You can use the Home app to make your smart home more secure by allowing a compatible router to control which services your Apple Home accessories can communicate with on your home Wi-Fi network and on the internet.

Apple Home-enabled routers require that you have an Apple TV 4K or HomePod set up as a home hub. You can restrict accessories to your home hub, or choose Automatic or No Restriction.

Configure your router’s settings

  1. Open the Home app on your iPad.
  2. Set up the router with the manufacturer’s app on an iPhone or iPad.
  3. Tap the More button, then tap Home Settings.
  4. Tap Wi-Fi Network & Routers.
  5. Turn on Apple Home Accessory Security and tap an accessory. Choose one of these settings:

    • Restrict to Home: The router only allows the accessory to connect to your home hub.

      This option may prevent firmware updates or other services.

    • Automatic: The router allows the accessory to connect to an automatically updated list of manufacturer-approved internet services and local devices.
    • No Restriction: The router allows the accessory to connect to any internet service or local device.

      This provides the lowest level of security.

See also

Tags: Home, Wi-Fi

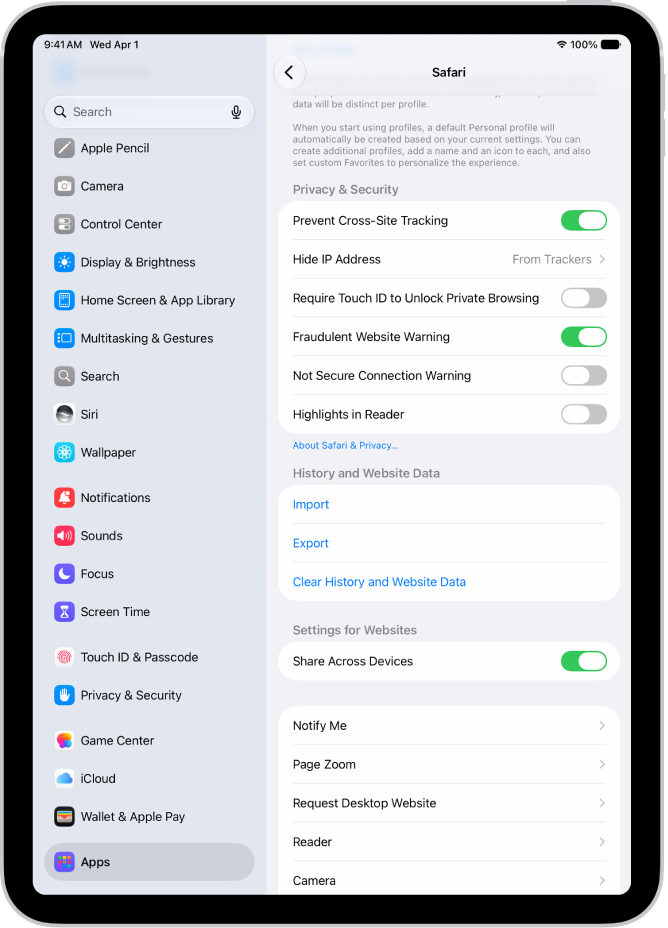
Websites use HTTP or HTTPS to transmit information to and from Safari, and HTTP doesn’t provide a secure connection. That’s why you can choose to receive a warning when you visit websites that use HTTP. You can also browse the web privately in Safari on iPad.

The Not Secure Connection Warning control, located below Privacy & Security on the Safari screen in Settings.

  1. Start the Settings app on your iPad.
  2. Tap Apps, then tap Safari.
  3. Below Privacy & Security, turn on Not Secure Connection Warning.

See also

Tag: Safari

After you set up a Sleep Focus, you can quickly turn it on or off in Control Center. A Sleep Focus helps reduce distractions before and during bedtime. For example, it can filter out notifications and phone calls, and it can signal to others that you’re not available.

You can allow interruptions from people important to you, and customize the Lock Screen and Home Screen. It switches back on or off at your next scheduled bedtime or wake up time, and you can share its settings with your other devices.

Set up a Sleep Focus

  1. Open the Settings app on your iPad.
  2. Tap Focus and tap Sleep.
  3. Customize your Focus.

    For example, you can allow interruptions from people important to you, customize the Lock Screen and Home Screen, and customize how apps and your devices behave when a Sleep Focus is on.

Quickly turn your Sleep Focus on or off

  1. Open Control Center on your iPad.
  2. Do one of the following:
    • Turn the Sleep Focus on: Tap Focus and tap Sleep.
    • Turn the Sleep Focus off: Tap Sleep, then tap Sleep again.

Quick tip: When your Sleep Focus is on, you can also turn it off quickly: Touch and hold Sleep on the Lock Screen, and then tap Sleep.

The next scheduled bedtime or wake up time turns your Sleep Focus on or off again.

To share your Sleep Focus settings with your other devices, make sure you have Share Across Devices turned on. Go to the Settings app, tap Focus, then tap Share Across Devices.

See also

Tag: Focus

Using SharePlay and CarPlay, you and your passengers can all control the music that’s playing in the car.

Passengers can join from a notification on their iPad, or with a QR code on the CarPlay Now Playing screen or another passenger’s iPad. The driver needs to be an Apple Music subscriber, but passengers don’t. Everyone needs iPadOS 17 or later, and has to let contacts discover them when playing music in the car.

Before you begin

  • The driver must have an iPad with iPadOS 17 or later and be an Apple Music subscriber.
  • Passengers must have an iPad with iPadOS 17 or later, but don’t need to have an Apple Music subscription.
  • Everyone must allow their contacts to discover them when playing music in the car—go to Settings > Apps > Music, then turn on Discoverable by Nearby Contacts if it isn’t on already.

Start SharePlay with CarPlay on your iPad

You and your passengers each have a part to play in using SharePlay in the car.

  1. Begin playing music from your iPad using CarPlay.

    A notification appears on the Lock Screen of passengers’ iPad devices. After they tap Connect, you receive a notification in CarPlay.

  2. Tap a passenger’s name. Tap the Checkmark button to allow the passenger to choose and stream music from your iPad.

    After you approve a passenger, they can join SharePlay in the future without going through the same process unless you end their access.

Use a QR code to join SharePlay

Or let passengers join SharePlay over Bluetooth® by scanning a QR code.

  1. On the Now Playing screen in CarPlay, tap the SharePlay button.

    A QR code appears on the CarPlay screen.

  2. Ask a passenger to open the Camera app on their iPad and point the camera at the QR code.

    A button appears below the picture of the QR code on their iPad to request a connection to SharePlay. The passenger taps the button, then taps Connect.

  3. Tap the Checkmark button on the CarPlay screen to allow the passenger to join.

Use a QR code to add other passengers

Passengers who use SharePlay to control music in a car can invite other passengers while the driver stays focused on the road.

  1. Start the Music app on your iPad.
  2. Open the Now Playing screen and tap the SharePlay button at the bottom of the screen.

    A SharePlay window appears, listing all the participants as well as a QR code for joining.

  3. Ask a passenger to open the Camera app on their iPad and point the camera at the QR code, tap the button that appears below the code, and then tap Connect.

    The driver taps the Checkmark button on the CarPlay screen to allow the passenger to join.

Leave or end SharePlay in the car

  • If you’re a passenger: Tap the SharePlay button at the bottom of Now Playing, then tap Leave.
  • If you’re the driver: Tap End on the CarPlay screen.

See also

Tags: carplay, Music

You can duplicate a recording in the Voice Memos app on your iPad, which is useful when you need another copy of it. You can make changes to the copy, save it, and give it a new name.

The duplicate shows up right below the original version in the list of recordings, with “copy” added to its name. You can change that name to a new one, and share a recording, too.

  1. Go to the Voice Memos app on your iPad.
  2. In the list of recordings, tap a recording, tap the Share button above the waveform, and tap Duplicate.

The duplicate appears right below the original version in the list and has “copy” added to its name. To change the name, tap it, then type a new one.

See also

For some large spaces like airports, transit stations, or shopping malls, you can look at detailed, interior maps to help you get around. You can look at an indoor map before you get there, or when you’re already at the airport or mall. You can also find nearby attractions, restaurants, and services in Maps.

Note: Indoor maps aren’t available for all countries or regions.

  1. Go to the Maps app on your iPad.
  2. Do one of the following:

    • Before you get there: Search for the airport or mall. Tap Indoor Map if it appears in the search result. Or drag the map to show it, zoom in, then tap Look Inside.
    • When you’re at the airport or mall: Tap the Tracking Off button, then tap Look Inside.
  3. To find nearby services, tap a category (like Food, Restrooms, or Gates).

    To get more information about a result, tap it.

  4. To get a map of a different floor, tap the button showing the floor level (zoom in if the button doesn’t appear).

See also

Tag: Maps

You can choose which buttons appear in the toolbar in the Preview app for quick access to frequently used items. With Customize Toolbar, you just move items into or out of the toolbar. You can also manage PDFs and images in Preview, and lock PDFs.

  1. Go to the Preview app on your iPad.
  2. Choose View > Customize Toolbar in the menu bar.
  3. Drag items into or out of the toolbar.
  4. Tap the Done button.

See also

Tag: Preview

You can use iCloud Mail Cleanup to help keep your inbox uncluttered and free up storage by deleting old promotions, unsubscribing from mailing lists, and more. When you set up iCloud Mail Cleanup recommendations, they work on any device that has iCloud Mail turned on.

Your inbox isn’t affected until you turn on a recommendation, and you can turn on iCloud Mail Cleanup on iCloud.com, too. Each recommendation can be based on status and age.

Note: iCloud Mail Cleanup may not be available in all languages.

Turn on iCloud Mail Cleanup

  1. Start the Settings app on your iPad.
  2. Tap [your name], then tap iCloud.
  3. Below Saved to iCloud, tap Mail, tap iCloud Mail Cleanup. Turn on Use iCloud Mail Cleanup.

    Note: Your inbox isn’t affected until you turn on a cleanup recommendation.

You can also turn on iCloud Mail Cleanup on iCloud.com.

Turn on a cleanup recommendation

  1. Start the Settings app on your iPad.
  2. Tap [your name], then tap iCloud.
  3. Below Saved to iCloud, tap Mail. Then tap iCloud Mail Cleanup.
  4. Tap Get Recommendation under one of the cleanup recommendations. For example, you can choose Clean up Transactions or Clean Up Promotions.
  5. If necessary, tap the pop-up menu for a rule. Choose another option.

    • Action: What happens to the email
    • Status: Whether the action applies to unread emails, read emails, or all emails
    • Age: How old the emails need to be before the action applies

    Tip: You can edit the rules for a recommendation at any point. Tap an active recommendation, then tap a pop-up menu to choose an option.

  6. Tap Turn On.

Delete a cleanup recommendation

  1. Start the Settings app on your iPad.
  2. Tap [your name], then tap iCloud.
  3. Below Saved to iCloud, tap Mail. Then tap iCloud Mail Cleanup.
  4. Tap an active cleanup recommendation and turn it off.

Use iCloud Mail Cleanup recommendations to unsubscribe

For senders in the Updates and Promotions categories, iCloud Mail Cleanup can recommend unsubscribing in bulk and send future messages to the Trash automatically.

  1. Start the Settings app on your iPad.
  2. Tap [your name], then tap iCloud.
  3. Below Saved to iCloud, tap Mail. Then tap iCloud Mail Cleanup.
  4. Tap Get Recommendations under Unsubscribe Recommendations.
  5. Select each sender you want to unsubscribe from and tap Unsubscribe.

    Note: If you don’t see any recommendations, iCloud Mail Cleanup doesn’t have any recommendations at this time.

Remove a sender from the Unsubscribed list

To start receiving emails again from a sender you unsubscribed from, just remove them from the Unsubscribed list.

  1. Start the Settings app on your iPad.
  2. Tap [your name], then tap iCloud.
  3. Below Saved to iCloud, tap Mail. Then tap iCloud Mail Cleanup.
  4. Tap Unsubscribed and tap Edit.
  5. Tap the Delete button next to each sender you want to remove from the Unsubscribed list.

    To receive emails again from a sender you were previously unsubscribed from, you can sign up for updates and promotions through their website. After you resubscribe, future messages from that sender will go to your inbox.

Turn off iCloud Mail Cleanup

If you turn off iCloud Mail Cleanup, iCloud Mail quits managing old messages. It also erases your list of unsubscribed senders and leaves their messages alone.

  1. Start the Settings app on your iPad.
  2. Tap [your name], then tap iCloud.
  3. Below Saved to iCloud, tap Mail, tap iCloud Mail Cleanup. Then turn off Use iCloud Mail Cleanup.

See also

Tags: iCloud, Mail

You can delete notes you no longer need. You can also recover recently deleted notes within 30 days.

A deleted note moves to the Recently Deleted folder in Notes, on iCloud.com, and on your other devices, and it stays there for 30 days before it’s permanently removed. If you don’t see Recently Deleted, there’s nothing to recover. Notes on iCloud.com and your other devices follow the same rules.

Here’s how to delete and recover notes in Notes on iPad.

Delete a note

  1. Go to the Notes app on your iPad.
  2. In the notes list, swipe left on the note and then tap Delete. Or touch and hold the note and then tap Delete.

When you delete a note, it moves to the Recently Deleted folder in Notes on iCloud.com, on your iPad, and on your other devices signed in to the same Apple Account.

Recover or permanently delete recently deleted notes

Deleted notes stay in the Recently Deleted folder for 30 days. After that, they’re permanently removed from iCloud, your iPad, and other devices signed in with your Apple Account. Until then, you’re free to recover them or delete them permanently any time within those 30 days.

  1. Open the Notes app on your iPad.
  2. In the folder list, tap Recently Deleted. You may need to tap the Toggle Sidebar button to show the folder list.

    If you don’t see Recently Deleted, you don’t have any notes in that folder, and there’s nothing to be recovered.

  3. Do one of the following:

    • Recover a note: Swipe left on the note, then tap Move. Move the note to a new or existing folder.
    • Permanently delete a note: Swipe left on the note, tap Delete, and tap Delete Note.

Note: If you delete a shared note you don’t own, it comes off your list only, not anyone else’s, and it won’t show up in Recently Deleted. Unless the owner stopped sharing, you can reopen it using the original shared link.

Tag: Notes

In the Reminders app, you can save a list as a template to reuse it for routines, packing lists, and more. You can create a link to publish and share a template with others, or download templates that others have shared.

After you make a template from a list, changes to that list don’t affect the template, and changes to a template don’t affect lists you already created from it. You can make a new list from a template, and edit or delete a template, too.

Save a list as a template

  1. Start the Reminders app on your iPad.
  2. Above a list, tap the More button and tap Save as Template.
  3. Enter a name for the template.
  4. Turn on or off Include Completed Reminders and tap the Done button.

Changes you make to a list after turning it into a template don’t affect the template.

Make a new list from a template

  1. Start the Reminders app on your iPad.
  2. Above your lists, tap the More button and tap Templates. Tap the name of a template.
  3. Enter a name for the list and then tap Create.

Edit or delete a template

Any changes you make to a template don’t affect lists previously created from the template.

  1. Start the Reminders app on your iPad.
  2. Above your lists, tap the More button and tap Templates. Tap the Edit button.
  3. Choose one of the following:
    • Edit Template: Add, edit, or delete any items in the template. You can also change the name, color, and icon for the template.
    • Delete Template: Remove the template.

Share a template

Apple servers have access to a template you share, which lets anyone with the link download a copy on a device running iPadOS 16, iOS 16, macOS 13, or later. Images are removed, but you can choose whether the shared template keeps any dates, tags, or locations.

  1. Start the Reminders app on your iPad.
  2. Above your lists, tap the More button, tap Templates and tap the Edit button next to the template you want to share.
  3. Tap Share Template and choose a method for sharing.

To manage a shared template, tap the More button, tap Templates, tap the Edit button, then tap Manage Link.

Changes you make to the template after sharing can go into an update of the shared version, but people who downloaded the previous version have to download the template again to get the updates.

Anyone who has already downloaded a template isn’t affected if you stop sharing it.

See also