Got a tip for us?

Want to show your non-tech-savvy relative how to set up their email without actually having to do it for them? Apple makes it easy to record screen of your iPhone 12 without installing third party Apps.
Screen recording is handy for recording short demos or documenting a glitch with your iPhone 12. The recording can be done in silent or include audio captured by your iPhone’s internal microphone.

Taking a screenshot of your iPhone screen is a quick and easy process, and most people are aware of the two buttons to push to capture a screenshot of their iPhone’s screen and save the image in the Photos app. However, most people do not know how to record a video of their iPhone’s screen.

Fortunately, the process of capturing iPhone’s screen is quick and straight forward. During recording, you can launch various Apps on your iPhone , make selections, and essentially do anything with your phone that you would basically do. The recording is saved as a video on your iPhones camera roll and you can share it on social media, email, or upload just like you would with any other file.

There are two things to remember. First, before you can record the screen of your iPhone 12, you need to enable the feature by adding it to your Control Center. Second: The steps for accessing the record button is determined by the version of iOS you are running, therefore, keep in mind to follow the correct steps outlined below.

To demonstrate the quickest and easiest way to do it, I took a screen recording of my iPhone 12. As it turns out, most people do not know exactly how to do it.

So here’s how to screen record on iPhone 12.

Setting up screen recording on iPhone 12

Although screen recording is a simple and straight forward process, you need to add the screen recording icon to the Control Center on your iPhone.  To enable screen recording, navigate to Settings > Control Center > Customize Controls. Tap the plus icon (+) next to Screen Recording. A Screen Record icon should now be available in the Control Center, and you can find it by swiping down from the top right edge of your iPhone screen.

The steps given in this guide will also work for iPhone 12 mini, iPhone 12 Pro, and iPhone 12 pro max.

Now you’re ready to start recording.

Recording your iPhone 12 screen

Here is how to record screen on iPhone 12

  1. Navigate to the screen where you want to start recording.
  2. Swipe down from the upper right corner of the screen to find the recording icon.
  3. Now, tap on the Record icon.
  4. After a three second countdown, the Record icon will change to red and it will start recording your iPhones screen, even if you navigate away from the Control Center. You’ll know Recording is still in progress because the icon , displayed in the upper left hand corner, will be red.
  5. When you are finished recording, tap the red icon at the top left of the screen and then tap “Stop.”to stop recording. The recording will be saved in the photos app.

Locating and editing your recording

Once you are through with recording, you may want to edit the captured video. Apple’s Photos app makes it pretty simple to edit video. Your new recording will be saved in the Camera App on your iPhone. To view it, launch the Photos app and the recorded video will be the most recent item.
Editing a screen recording is the same as editing any other video in the Photos app.
You can edit the beginning or end part of your recording. You can trim the video and save it as a different clip. It won’t have any effect on the original video, however, you will get an fine tuned version that you can send anywhere you want.
To edit a screen recording, do the following:

  1. Locate the video in the camera roll of your iPhone and tap on it.
  2. Tap “ Edit.”
  3. Tap and drag the arrow at the beginning of the video to the right. It will turn into a yellow frame.
  4. Size the frame to trim the video down to just the section you want to retain. You can hit play at any given point to make sure you are satisfied with the output.
  5. Hit “Done” and then tap “Save as New Clip.”

That’s pretty much it! Happy recording.

So, today we are going to show you how you can get iMessage on PC.
iMessage is certainly the best messaging platform around the world. Unfortunately, the service is only available to Apple users.
Though there are numerous messaging apps such as instagram andFacebook Messenger, for Apple fans, iMessage is undoubtedly the best choice. Unfortunately, there is no iMessage app for windows.
For those who do not have apple devices and would like to use iMessage on PC, it’s quite a difficult task to achieve. Fortunately, in this step-by-step guide, we are going to show you simple tricks on how you can get iMessage for PC.
The most common question I get from windows users is: Is it possible to get iMessage on PC?
The answer is yes, and in this article, I’ll show you how. If you want to get iMessage on PC, there are a few simple steps which you need to follow.

Whether you are using Windows 10, windows 8 or windows 7, here is the step-by-step guide which will help you get iMessage on PC.

So, let’s dive into it!

Method #1: Get iMessage on Windows using Chrome Remote Desktop

In this first method, you need to have Mac in order to download and install Apple Messages for PC. Use of Chrome Remote Desktop extension makes it quick and easy to download and start using iMessage on PC.
This method is the quickest and easiest way to get iMessage on PC.

Chrome Remote Desktop allows users to remotely gain access to another computer through Chrome browser or Chromebook. You can gain full access to your files, documents, emails, apps ETC.
Note: In this method, you need Both Mac and windows computer to get iMessage on PC

How to Use iMessage on Windows PC

  1. Prepare your Mac with iMessage and your windows PC.
  2. , download and install Chrome and Chrome Remote Desktop on both Mac and Windows PC.
  3. Now, run the above apps on your two devices.
  4. Download Chrome Remote Desktop Host Installer on Your Mac
  5. Launch the installer and follow onscreen prompts to complete installation.
  6. Connect your Mac and Windows computer via the security code of Chrome Remote Desktop, and start using iMessage on
    Windows PC.

Get iMessage for windows using Chrome Remote DesktopYou are now a step away from becoming a master at using iMessage on windows PC!

Method #2: Get imessage on pc using ios emulators

Another way to get iMessage on PC is through the use of Emulators.

IOS emulators are third party software which creates a virtual iOS ecosystem on PC allowing users to install and enjoy iOS Apps on their Windows computer.

This method applies to folks who don’t have a Mac and would like to use iMessage on Windows computer.

Here is the idea. You simply need to download and install iPadian

This will allow you to easily download and use iMessage on Windows.

The following are some of iOS emulators available:

  • Mobione Studio
  • APP.IO
  • SmartFace
  • iPhone simulator
  • iPadian

Get iMessage for PC using iPadian emulatoriPadian 2 is an iPad simulator which lets users transform Windows computer and lets you send iMessage from PC.

. The emulator includes Standalone Adobe air application. It is a very useful tool for folks who want to enjoy iOS apps on their Windows computer.

Note: some of these emulators may introduce malware to your computer. Therefore , be extra cautious while using them on your device.

How to Install Apple’s Messages App on Windows PC Using iPadian 2

  1. On your PC, download the iPadian emulator.
  2. Next, run the emulator.
  3. Next on, Read and accept terms and conditions.
  4. After the installation process is complete, open the iPadian software on your computer.
  5. Now, search for “iMessage” in the search bar and download the iMessages app on your computer.
  6. Finally, open the iMessage app and start enjoying iMessage on your PC.

That’s pretty much it on how to get iMessage on PC.

You are now a master at using iMessage on Windows computer!
Now take a moment to check our article about 30 Plus Windows Keyboard Shortcuts To Boost Your ProductivityFinal thoughts:
If you are looking for how to use iMessage on PC, there you go! Now you can enjoy messaging on Windows PC. If you know any other method to get iMessage on a PC, tell us in the comments section below. we also have plenty of other articles that I suggest you check right now.

Wondering how to set up iMessage on your Mac? Here’s how!
The Messages app in macOS allows users to get in touch with friends, family, and colleagues across various Apple devices including iPhone, iPad, or, iPod touch. Fortunately. setting up iMessage on Mac is a quick and easy process.
With Messages for Mac, you can send infinite messages to any Mac, iPhone, iPad, or iPod touch that supports iMessage, Apple’s secure-messaging service.
iPhone users can send and receive SMS texts as well. If you have Windows PC
this guide explains how you can set up iMessage on

Windows PC.
In this guide, I’ll show you how to set up iMessage on Mac, as well as how to set up Messages iniCloud,
which keeps your messages in sync across all your Apple devices.
In case you’re new to the world of Mac or have just never set up Messages before, you may be wondering how to go about it. No worries, follow the steps below, and you’ll be chatting with your friends in no time.

Set up iMessage on Mac

How to Set up iMessage on Mac

  1. Open Messages App on your Mac. You can find it on the desktop, dock, Applications folder or by searching for it with Command+Space.
  2. Log in with your Apple ID and password. If you don’t have an Apple ID, you can click “Create new Apple ID” at the bottom to create one.
  3. Login iMessage on Mac

  4. Iftwo-step or two-factor authentication is enabled for your Apple ID, enter your verification
    Code sent to the other device.
  5. In the Menu bar, click on Messages and choose Preferences. Alternatively, you can press Command+Comma.
  6. Click the iMessage tab.
  7. Check the box next to Enable Messages in ‌iCloud‌ (this will sync your messages across all your apple devices)
  8. Next, select the phone number and email addresses that you prefer people to reach you at.
  9. Next on, select the phone number or email address you’d like people to see when you start a new conversation.
  10. Finally, click the red traffic light located at the top-left hand corner of the screen to close Messages preferences.

In case your phone number does not appear in the Messages preferences, you need to enable iMessage on your iOS device. To add a phone number to iMessage on mac:
On your iPhone, navigate to Settings > Messages and turn on iMessage. If it isn’t, you’ll see “Use your Apple ID for iMessage,” which you should click and sign in with the
account you’re using on your Mac.
After everything is set up, your phone number should appear in the Messages preferences on your Mac and you’ll be able to
Enjoy using iMessage.

Finally, if you enabled Messages in iCloud, you’ll also want to enable it on your iPhone or iPad‌ so that your messages can sync across all your Apple devices. Here’s how.

How to Set up Messages in iCloud in iOS

  1. Open Settings app on your iPhone or iPad‌.
  2. Tap your name.
  3. Tap iCloud‌.
  4. Toggle the switch next to Messages to ON position if it is not already

Thats pretty much it on how to set up messages on Mac.
Questions?

Let us know in the comments below!

You might not have sat to think about it but Music has become an important asset to those of us who enjoy drowning out the sounds of the environment with sensational melodies, lyrics, and beats.

Whenever you’re on the move and most likely away from a Wi-Fi, you may not want to stream music and podcasts with your mobile data and that is why I have created this list of the best music download apps for iPhone and iPad.

Music keeps me rocking and rolling! From keeping me happy during working hours to revitalizing my spirit during the long traffic to revving up the party time, it’s a fundamental part of my life. To ensure my romance with awesome songs never has any interruption, I have created a gigantic playlist of my favorite songs. I’m not just a melomaniac, I’m also producing my own music – with my acoustic guitar, and even an arranger keyboard, sometimes. Thankfully, downloading free songs on iPhone and iPad is dead simple!

There is nothing better than free music, and you’re no doubt on the lookout for ways to listen to music for free on your iPhone.

Apple used to give away a free song every week on iTunes, however, That’s now a thing of the past. But that’s perfectly fine; there are a couple of other ways to get music on your iPhone for free. A number of free music apps makes it easy for users to download and listen to music on their iPhone, iPad or iPod Touch without having to connect to Internet.

It’s very easy to download free music on your iPhone or iPad. If you are an audio junkie like me, I’ll show you how to download free music on iPhone and iPad.

Here are our favorite music download apps for iPhone and iPad that won’t cost you a penny.

Best iPhone and iPad Apps to Download Free Music in 2025

Here are our top picks for free music apps for iPhone:

1. Spotify Music

boasting more than 80 million subscribers and access to over 40 million tracks, Spotify is undoubtedly the most popular music platform in the world. I find it to be an incredible platform especially when it comes to managing playlists, creating different channels as well as daily mix. Spotify free offers clean sound quality and in spite of there being ads they are not destructive and do not linger for a long time.

There is also personal recommendations and collection of premade playlists which perfectly suits your exclusive taste. And if you want to improve your listening experience, you can buy Spotify Premium subscription for $10 a month to ditch those ads. You will also be able to create custom playlist and download music for offline listening.
Price: Free
Check out the Spotify App for iPhone.

2. SoundCloud

Boasting over 175 million monthly listeners, “SoundCloud” needs no bells and whistles, does it? the app has got everything you would ever need as far as music is concern. SoundCloud has got a huge library of songs to listen to including hip-hop, RnB, rock, classical, Reggae, jazz, podcasts and great audiobooks. SoundCloud offers a great way to discover new artist. Once you spot an artist you like on SoundCloud, you can … get lost in a rabbit hole of music awesomeness.
SoundCloud also recommends tracks for you based on your likes.

To enjoy every features this App has to offer, You can subscribe to the SoundCloud Go for $5.99/month or SoundCloud Go+$12.99/month. This will allow you to download music for offline listening.
Price: Free
Check out SoundCloud for iOS

3. TIDAL

Though Spotify and Apple Music still largely dominate the music streaming market, Tidal offers sound quality that you simply can’t find on other music platform. Its high fidelity sound quality, high definition music videos, tailor-made suggestions, as well as the curated editorial by artists and experts makes it worth a serious look in itself.
The app provides you with unlimited access to over 60 million tracks that you can listen on your iPhone, iPad, iPod Touch and Mac.
Tidal also offers over 130,000 high-fidelity music videos. Music articles, features, and interviews are also incorporated within the platform to enhance your experience. You can also download songs, albums and playlists, to listen to them offline!
Price: Free
Download Tidal for iOS

4. Google Play Music

Boasting over 40 million tracks, “Google Play Music” is one of the most adored music streaming platform for consuming tunes.

Just like spotify and SoundCloud, the app also recommends you tracks based on your liking. It offers storage and streaming for up to 50,000 songs from your personal collection for free. You can purchase premium subscription for $10 a month to listen to music free from ads. The premium version also include the option to download songs for offline listening as well as YouTube Red membership without incurring any extra cost. Overall, the app has a clean design, lined with hand-picked playlists and custom radio stations that further enhances your listening experience.
Price: Free
Check out Google Play Music for iOS

5. Deezer

I have always found “Deezer” to be quite impressive. The platform features awesome playlists, smooth interface, as well as the ability to search, stream and listen to top radio hits and new releases. Moreover, you can create unlimited number of playlists and quickly access them from anywhere.
You can upgrade to the premium version to enhance your listening experience. With the pro version, you can skip unlimited number of tracks. Moreover, you can Download your favorite songs, albums and playlists to listen to them even without Wi-Fi or 4G.
Price: Free
Check out Deezer for iOS

6. Napster – Top Music & Radio

Boasting a gigantic library of more than 60 million songs, the app allows you to stream and download your favorite music for offline listening. Moreover, you can create playlists of your favorite songs and share them with your friends. Napster also provides users with awesome suggestions Based on their liking. So, you can quickly access the songs that rocks you the most!

With a monthly subscription of $9.99, the app will allow you to enjoy all the premium features without any limitation.
Price: Free
Download Napster for iOS

7. Evermusic – offline music

For those of you who have your treasured music collection saved in the cloud services such as Google Drive, Dropbox, OneDrive, Box, MEGA, Yandex.Disk and WebDAV and want a better way to manage it and use it, Evermusic is a fantastic music player and a must-have app.

The app syncs with your cloud selections and you can stream your songs from there, or download your favorite tracks so you can listen to them , anytime and anywhere.

Evermusic supports multiple audio formats including MP3, AAC, M4A, WAV, AIFF and M4R.

You can also use it as an audiobook player. The app allows you to set multiple audio bookmarks as well as setting timer which is useful after you’ve fallen asleep.

You can save media position and even control playback speed. Moreover, you can organize Your music by artist, album and genre to allow you identify your music quickly..
Price: Free
Download Evermusic for iOS

8. MyMP3

What sets “MyMP3” apart from other music apps is it’s ability to allow users to convert any videos into MP3 without difficulty. You can also edit the metadata of any song. For example, you can easily edit the song and artist titles. Organize your songs properly and Sync them with the cloud to keep them safe and secure. Yap, keep in mind to share them with your friends to win a lot of hearts and likes!
Price: Free
Download MyMP3 for iOS

9. Free Song Notifier for iTunes

Every now and then, iTunes offers free music from some of the best artists in the world to its users. If you don’t want to miss out on this great deal, download Free Song Notifier, that is tailored to help you grab these free music Files straight on your iPhone and iPad free of charge. the app notifies you As soon as a free song is available to download in iTunes, therefore. You can download free iTunes song right from this app. The app provides you with a complete list of 15 songs that are trending in your country. Moreover, you can preview them for 30-second before hitting download button.
Besides Access to 15 trending songs in your country, the app has impressive interface that is very easy to navigate and use.
Another great benefit of this app ubsent in other music apps, is that users are kept abreast of the top 100 hit tracks on YouTube along with links that you can click on to view and download them.
Price: Free
Download Free Song Notifier for iTunes iOS

10. FMA

FMA is directed by the radio station WFMU. The app lets you listen and download all the music in the library free of charge.
The music is organized into genres including Blues, Classical, Country, Electronic, Folk, RnB, Hip-Hop, Instrumental, International, Jazz, Old-Time/Historic, Pop, Rock, Soul, and more. Moreover, the app allows users to listen to their favorite tracks and share them on social media platform such as Twitter, Facebook, as well as email.
Price: Free
Download FMA for iOS

Other Ways to Download Free Music on Your iPhone/iPod Touch

If we’re talking about free music on the iPhone, the options could be limited. However, the internet has a superfluity of sources where you can download music for free. Finally, don’t neglect your own collection of CDs and MP3s. You can easily copy any songs that are stored on your computer to your iPhone. You will need to save them in your Dropbox folder, launch the Dropbox app on your iPhone and enjoy the music playback.

That’s pretty much it on how to download free music on iPhone!

In case you are purchasing a secondhand iPhone or iPad or buying a new iPhone from third-party apple dealers, you should keep in mind to check if iPhone is new or refurbished. Morover, You should check this information when you are purchasing an iPad.
– [ ] Thankfully, Apple has made it really simple to check if iPhone is new or refurbished through a device model identifier trick. This information is very crucial especially when you are buying an iPhone or iPad from third party iPhone and iPad dealers or through a non-Apple website. Besides checking if iPhone is new or refurbished, you can check if an iPhone or iPad is a personalized device or if iPhone or iPad is a replacement device as well.
How to check if iPhone is new or refurbished

How To Check iPhone is new or Refurbished

For you to check if iPhone is refurbished or new, you should determine the device’s model prefix.
Follow these simple steps to find the model number for your iPhone or iPad:

  1. Launch settings app on your iPhoneor iPad.
  2. Tap ‘General’
  3. Tap on ‘About’
  4. Locate ‘Model’
  5. Once you find the ‘Model’ option, read the model number, which will look like “MN572LL/A”. The first letter shows you if your iPad or iPhone is refurbished, brand new, replaced or a personalized device.

Here is the meaning of the first alphabet of the model number of an iPhone:

  • M: Brand New device
  • F: Refurbished device
  • N: Replacement device
  • P: Personalized device

Signing off

That’s how you can find out if an iPhone is refurbished, brand new, replacement unit, or personalized. This information is very important especially when you are purchasing a new or used iPhone from a third-party seller and are uncertain if the iPhone or iPad you are buying is new or refurbished.

If you think there are other prefixes we didn’t include on this list, let us know in the comments section below. Also, if you want to share your experience with us, drop us a comment.

In this step-by-step guide, we’ll explain what is Documents and Data on iPhone and iPad, and show you how to delete documents and data on iPhone or iPad running iOS 13 and iPadOS 13 to free up space on your device.

iPhone documents and Data can become an issue especially when you run out of storage space. If you want to delete “Documents and Data” on iPhone or iPad, there are a few simple steps which you need to follow.
Here is the step-by-step guide which will show you how to delete documents and data on iPhone or iPad running iOS 13 and iPadOS 13.
Before we dive into clearing iPhone documents and data, let’s first understand what is Documents and Data on iPhone and iPad.

What is documents and data on iPhone?

iPhone documents and data refers to browser history, cookies, logs, caches of photos and videos, database files and more piled up by your apps. And if you don’t get rid of them on a regular basis, they can turn out to be an issue for your device. Moreover, the total file size of Documents & Data can even surpass the actual size of the associated app!
Facebook documents and data on iPhone
Why do apps need to store cache? They store cache to improve users experience. For example, Anytime you search something on Safari, the browser Stores a record of it to give you prompt access next time you search for the same query.

See also:
How to delete frequently visited sites on safariSimilarly, YouTube stores a record of your watch history to recommend the most appropriate type of videos you enjoy watching. Enough of that; lets jump into how to delete documents and data on iphone in ios 13 or iPadOS 13.

How to Delete Documents and Data on iPhone or iPad

Here are the steps which can help you to delete documents and data on iPhone or iPad. iOS allows users to check out how much storage each app’s data has taken up on their device. Once you have confirmed how much space has been taken up by specific apps, you have numerous options to get rid of the associated data.

You can offload unused apps without necessarily deleting their data. And when you reinstall them, their data is restored automatically. therefore, you can use this method to free up a lot of space on your device without having to clear the important data on your iPhone. What if you intend to perform total cleanup? In this regard, you can erase the app alongside the associated documents and data.

Steps to delete documents and data on iPhone and iPad

Follow these steps to delete documents and data on your iPhone and iPad.

  1. Launch Settings app on your iPhone or iPad→ Tap on General.
  2. Tap on iPhone/iPad Storage → Now, tap on the app you intend to delete or offload.
  3. Next, you will be presented with two options: Offload App and Delete App. If you want to erase the app but preserve its data, select Offload option. As we have already pointed out, you will be able to reinstate the associated data during the app reinstallation. But if you want to get rid of the app alongside the associated data, tap on the Delete button and confirm.

Clear Documents and Data of Specific Apps from iCloud on iPhone and iPad

What if you need to remove stored data from specific apps from iCloud? It is possible to stop icloud drive documents and data from taking your space by removing redundant files. Note; it will erase the entire data from the cloud and connected devices. And, the process can’t be undone.

  1. Launch Settings app on your iPhone or iPad → Tap on your profile.
  2. Tap on iCloud → then, choose Manage Storage.
  3. Now, tap on the app with the data you intend to get rid of on the cloud and then tap Delete Data → hit Delete to confirm.

That’s pretty much it on how you can get rid of cache of individual apps from all of your devices synced with the same iCloud account.

It is important to just allow a selection of apps to save their data in iCloud. This will be useful in managing your storage in a better way.

Clear Out Music, Movies & TV Shows, Thumbnail Cache

Every purchase made on iTunes (on the iPhone/iPad or synced from the computer) is part of the media. This is normally placed under the Audio/Video section of your storage, however, some of it goes to “Documents and Data.” This could include thumbnail cache or associated files.

You can get rid of all music on your iPhone and then re-sync it through the computer to clear cache. This will help you To clear out all cache on your iPhone, and since these are not created during a re-sync, you are sure to get some free space on your device.

Mail: clearing out old email and attachments

In case you are a stock Mail app user, there is a bunch of cache that is associated with it. Every synced email that you access through the app is saved on your iPhone for quick access. Data accumulate over time. Add to this all the attachments that you open on the iPhone. Here is the easiest way to clear out all mail cache and data:

  1. Launch Settings app on your iPhone or iPad → Tap on Accounts & Passwords.
  2. Now, tap on Email account.
  3. Next, tap on Delete account and hit confirm.
  4. Finally, Tap on Add New to re-add new account.

Clean Up Safari History and Website Data

It’s important to clear out Safari history and website data every now then to make sure the browser continues to work efficiently and prevent it from amassing a lot of cache. Check out
How to clear app cache on iPhone

Clean Up Photos

There could be a great deal of redundant photos in your photos app. expunging them can help you gain some useful space.

  1. Launch Photos app on your iPhone or iPad → tap on Select at the top right corner.
  2. Select the photos you wish to erase and tap on the delete button located at the bottom-right corner of the screen. Hit Delete to confirm.

So, that was about clearing the unnecessary images, what about getting rid of redundant messages? Read on…

Don’t allow Messages App consume too much of your precious storage.
If you are an avid iMessage user, there is a high chance that your message app may have used up lots of your space. Thankfully, iOS makes it easy to view how much storage photos, videos, GIFs have taken up on your iPhone. So, you can opt to erase or keep data based on your preference.

Here is how to do it:

  1. Launch Settings app on your iPhone or iPad → Hit General.
  2. Now, tap on iPhone/iPad Storage → Hit Messages.
  3. Under Documents & Data, choose a particular section and then hit Edit.
  4. Tap on Radio Button → Tap on Trash Icon to get rid of stuff you no longer need.

Voicemail: Delete all voicemail

It is important to keep in mind that all of your Voicemail are a part of the “Documents and Data”. Therefore, It is recommended that you delete unwanted voicemails from time to time To avoid cluttering your device.

  • Head over to phone app → Voicemail → choose the voicemail → Now, you ought to tap on it or swipe right to left across it to access the Delete button → hit Delete button.
  • To get rid of several voicemails, launch the Phone app → Voicemails → tap on Edit → select the voicemails → hit Delete.

Clean Up Apps from Time to Time

The simplest trick to prevent your iPhone from running out of space is to clear out the cache and other redundant data on your apps on a regular basis.
A number of apps such as Safari, Dropbox, FaceBook, and Twitter makes it easy for users to get rid of such data. Therefore, preventing them from taking up much of your storage is a simple and straight forward process.

See also:
How to Clear App Cache on iPhone? The Easiest Way!

Wrapping up:

So, that’s how to clear documents and data on iphone and iPad running iOS 13 and iPadOS13.
Questions?
Let us know in the comments below. we also have plenty of other articles that I suggest you check right now.

Its easy to upgrade iCloud storage plan from an iPhone, iPad, Mac or windows PC. Follow this quick step-by-step guide to learn how to change iCloud storage plan from your devices.
Upgrade your iCloud storage plan
If your iCloud storage has run out of space, No problem, Apple has made it pretty easy to change your iCloud storage plan from iPhone, iPad, Mac, or even Windows to ensure you continue to sync all of your important data across your iOS devices.
Apple offers users with only 5GB of freeiCloud Storage. In this regard, it takes a very short time for this space to get filled up and get a pop-up indicating your
“iCloud Storage is Full” when trying to sync your data. Therefore, in case your precious cloud space has already been taken up by your important files and you are
Thinking of changing your iCloud storage from iOS device or desktop, this guide is for you!
Applehas three iCloud storage plans: 50GB ($0.99/month), 200GB ($2.99/month) and 2TB ($9.99).
One advantage of having a huge iCloud storage plan, is that you can share your iCloud storage
with other members of your Family. If you want to change iCloud storage plan on your iPhone, iPad, Mac or Windows PC, there are few simple steps you need to follow.
here is the step-by-step guide which can help you change iCloud storage plan on your iPhone, iPad, Mac or Windows PC.

How to change iCloud storage plan

follow these steps to change iCloud storage plan on your iPhone, iPad, Mac or Windows PC.

Upgrade iCloud Storage from iPhone and iPad

Follow these steps to upgrade iCloud storage plan on your iPhone or iPad.

  1. Launch Settings app on your iPhone or iPad → Tap on your name.
  2. Tap on iCloud → Tap on Manage Storage.
  3. Next, tap on Upgrade or Change Storage Plan.
  4. Now, choose the storage amount you wish to purchase . Then, hit Buy located at the upper-right corner → Log in using your Apple ID and Password.
  5. Next on, follow the on screen prompts to upgrade the storage plan.

Cancel or Downgrade iCloud Storage from iPhone and iPad

Keep in mind: Downgrading iCloud to 5GB plan is similar to cancel the iCloud subscription. This is because, 5GB plan is available for free to all iOS users.
follow these steps to downgrade iCloud storage plan on your iPhone or iPad.

  1. Launch Settings app on your iPhone or iPad → Tap on Apple ID banner represented by your name.
  2. Now, tap iCloud → hit Manage Storage.
  3. Next, tap Change Storage Plan.
  4. Tap Downgrade Options then key in your Apple ID Password then hit Manage.
  5. Next on, select a plan of your choice and then hit Done → Tap on Downgrade in the Popup

keep in mind that you can only downgrade the plan if the
present plan expires because you will lose the additional space for what you have paid before.

Upgrade iCloud Storage Plan on Mac

Mac book has huge space in its hard disk. However, in some cases, you have some essential files or projects which you don’t want
to lose should you format your device. In this regard, you will need more space in your iCloud storage, since 5GB iCloud storage for a Mac computer , can never be enough. Follow these steps to upgrade iCloud storage plan on your Mac.

  1. Launch the Apple Menu and click on System Preferences.
  2. Next, click on iCloud.
  3. Next on, click on Manage option.
  4. You will be presented with an option to purchase additional Storage.
  5. Select the plan of your choice.
  6. Key in your Apple ID password. Your Mac book will now upgrade its cloud storage space.

Cancel or Downgrade iCloud Storage Plan on Mac

The process of downgrading and upgrading the storage plan for Mac is the same. Follow these steps to downgrade or cancel iCloud storage plan on your Mac.

  1. Launch the Apple Menu and hit System preferences to launch iCloud.
  2. Next, click on Manage and then Change Storage Plan.
  3. Click on Downgrade Options.
  4. Key in your Apple ID password.
  5. Choose a plan of your preference → Click on Done and your plan will be changed.

Upgrade iCloud Storage Plan on Windows PC

Just like Mac, there are numerous reasons why you may need additional iCloud space on PC. Here is how you can Upgrade iCloud Storage Plan on Windows PC. Before you dive into upgrading the iCloud storage on PC, you will first need to download
iCloud for Windows on your PC.

  1. Launch iCloud on your Windows PC and log in into your account using your Apple ID and password.
  2. Now, click on Storage.
  3. Next, click Buy More Storage.
  4. Next on, Choose the option Change Storage Plan and hit next.
  5. You will get a pop-up asking you to log in with your Apple ID and Password, Sign in and hit the Buy button.

The above steps will enable you to access more storage on your Windows PC as per your selected plan. We have just looked at how to upgrade the
cloud storage plan on various devices. Now let’s focus on how to downgrade the storage plans.

You can downgrade your storage plan at any given time. Keep in mind that when you decrease the plan,
the change will only be effected after the end of the current monthly or annual subscription.

One more thing worth noting is that in case you lowered your storage plan and the size of your data go beyond your plan, new data will not be synced across your devices. Moreover, backing up your devices to iCloud will not be possible.

Downgrade iCloud Storage Plan on Windows PC

Follow these steps to downgrade iCloud storage plan on windows PC.

  1. Launch the iCloud for Windows the same way you did with upgrading the plan.
  2. Click Storage → Change Storage Plan → Downgrade Options.
  3. Key in your Apple ID password then hit Manage option.
  4. Choose the iCloud plan you wish to downgrade then hit Done.

That’s pretty much it on how you can downgrade the iCloud storage plan on iPhone, iPad, Mac or Windows PC.

Signing off

So, which storage plan did you prefer? And, how do you manage your iCloud storage so that it has only your most essential files and remain organized? Let us know in the comment section below. we also have plenty of other articles that I suggest you check right now.

Tag: iCloud

Want to temporarily disable face ID on iphone 11, iPhone 11 Pro or iPhone 11 Pro Max? You are in the right place. Both Face ID and Touch ID allow users to conveniently secure their iPhone or iPad and keep snoopers from accessing their personal data. Despite the fact that
iPhone’s biometric authentication features are top-notch, they are still subject to forced unlocks. For example, attackers can physically force
you to unlock youriPhone using Touch ID or Face ID and forcefully gain access to your personal data.

Thankfully, Apple has made it easy to keep user’s data secure through use of a simple hack that we explain in this article. ReadHow to turn off 3D Touch in iOS 13
It is easy for iPhone and iPad users to swiftly disable Face ID or Touch ID security feature and deter anyone from forcefully unlocking their devices.
Disable face ID
The steps given in this guide will disable the touch ID or Face ID feature until user enter the correct passcode.

The face ID or Touch ID feature will be disabled until the user unlock their device using the correct passcode. The correct Face ID
or Touch ID scans will not be able to unlock your device in this state.
Disable touch ID on iPhone

Temporarily disable Face ID or Touch ID to prevent forced unlocks

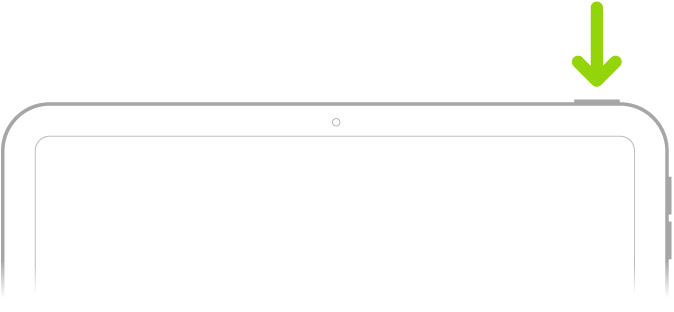
It is easy to temporarily disable Face ID on iPhone X or later. This will also apply to the new iPhone 11, iPhone 11 Pro and iPhone 11 Pro Max users. You just need to press and
hold the power and side buttons at the same time until the slide to power off screen appears. This can be done while your device is both locked or unlocked. Immediately the power off screen shows up, Face ID will automatically be disabled until user unlock their device using the correct passcode.

To disable touch ID on iPhone 7 or earlier: Press and hold the power off button until slide to power off screen shows up on your iPhone. Immediately this happens, Touch ID will be
disabled until user unlock their device using the correct passcode.

That’s pretty much it, That’s how you can disable Face ID or Touch ID and prevent forced unlocks. This little known hack can help you with securing
your data in undesirable situations. Should you have any question as far as this tip is concern, let us know in the comments section below.

Apple Watchis undoubtedly the most popular and the number one choice smart watch for most people around the world. However, it’s basically a part of the tightly-knit
Apple ecosystem.
Apple Watch

Can you use Apple Watch without an iPhone

The most common question I get from people is: “is it possible to use an Apple Watch without an iPhone?”

We need to first understand what we mean by using an Apple watch “without” an iPhone. This could mean using an Apple Watch with a device that is not
iPhone.
The answer to this question is no.

Second interpretation is if it is possible to use an Apple watch away from your iPhone. The short answer is yes, in case you leave your iPhone behind and go out, Apple Watch will remain functional.
From a hardware standpoint, Apple Watch is bundled with standalone hardware and it can work independent of iOS devices.
Can you use Apple Watch without an iPhone?
This leads us to the next interpretation. This is perhaps why you raised a question. Can you use an Apple Watch as an independent device?
without an iPhone or any device connected to it? For now, the short answer is no. Having said that, This interpretation has more into it
than just a plain answer can offer.

For you to set up your Apple Watch, you require an iPhone

The Apple Watch is designed to work specifically as a complement device for an iPhone and not iOS. As such, it is not possible to use its app on an iPad, Apple
TV, or iPod touch. You require an iPhone to set up an Apple Watch
, therefore, the set up process cannot take place without an iPhone.

The most autonomous version of Apple Watch is The one with cellular capability.

All Apple Watch models have the ability to communicate wirelessly. With the help of Bluetooth, Apple watch is able to obtain the information it requires straight from your iPhone. This happens in a more
Power-efficient manner and yields the best battery life for your watch. In case your phone is not in range, the Apple Watch is capable of falling back to Wi-Fi, which is to say you need to
be within the range of a known Wi-Fi network.

Cellular models of the Apple Watch are capable of functioning in this mode if you have data plan from your carrier. Which is to say, the
Cellular model is the most autonomous version of the watch despite the fact that it is not absolutely independent.

what you can do with no iPhone but with internet

Here are some things you can do with your Apple Watch if it’s connected to the internet but isn’t connected to your iPhone:

  • Make Voice-over-IP calls
  • Operate any app that require you to be connected to the internet
  • Use Siri
  • Use iMessage
  • Use audio Apps that are internet-based

What you can do with no iPhone and no internet

Here are some of the things you can do with your Apple Watch without the internet connection:

  • Use Apple Pay
  • Access photos synced from your iPhone
  • Access stopwatch, alarms, Health apps, and more
  • Use audio content downloaded on your Apple Watch

Without any external connection, the Apple Watch continues to perform fitness tracking activities, playing your downloaded music and podcast however, that’s pretty much it.

A more autonomous future?

The Apple Watch comes bundled with a powerful hardware. It has an amazing design and general package that makes it the number one choice for most people. Most of whom might not be iPhone enthusiasts. Currently, Apple has designed an Apple Watch to work as a companion accessory for an iPhone but not as an autonomous device.

Keep in mind, when the iPad was first released, you were required to connect it to either a Mac or PC
To use it. Today, an iPad is being used as a stand-alone
device.
It’s very possible Apple will equip the Apple Watch with the same capabilities in the future.
Questions?
Let us know in the comments section below.

Apple’s AirPods can help you hear better. An accessibility feature called “Live Listen” lets you use AirPods as hearing aids.
This is how you can use AirPods as hearing aidsApple AirPods are among the most stylish iPhone accessories you can buy right now. Besides listening to music and podcasts, you can use them as hearing aids by enabling “Live Listen” feature which amplifies sounds around your immediate environment.
The AirPods Live Listen feature uses iPhones Mic which is used to capture and transfer the audio straight to your AirPods. As such, should you be hard of hearing, you can simply lay your iPhone on a table — or even hold it close to someone’s mouth — and the AirPods will amplify what’s being spoken rather than asking someone to raise their voice.
The feature works perfectly and you can even use it to spy on other peoples conversations. This is because your iPhone can transfer audio to your AirPods even when you are a few yards away from your iPhone as long as the AirPods remain connected to your iPhone via the Bluetooth. If you want to activate and use the AirPods Live Listen feature, there are a few simple steps you need to follow.
Here is the step by step guide which can help you set up and use live listen feature on your iOS device.

Steps to Use AirPods as Hearing Aids Using Live Listen

Follow these steps to turn on and use The Live Listen feature in your iPhone or iPad:

  1. Start Settings app on your iPhone.
  2. Tap on Control Center.
  3. Tap on Customize Controls.
  4. Tap the green + button next to Hearing to add it to control center.

Now, you can enable Live Listen feature on control center.

How to use Live Listen on your iPhoneor iPad with AirPods

Now that you have the feature enabled on your iPhone or iPad, you can start using Live Listen with yourAirPods:

  1. Pop your AirPods in your ears.
  2. on an iPhone X or newer, swipe down from the top-right of your home screen to launch control center.
  3. on an iPhone 8 or earlier,swipe up from the bottom of your home screen to launch control center.
  4. Next, tap on the ear icon.
  5. Finally, tap the “Live Listen” option to turn it on.

Now, you can lay your iPhone on a table and you’ll be able to hear their conversation from your AirPods. To test the feature, put your
iPhone on the table while people are having a conversation at the table and walk out of the room.
That’s pretty much it. You can turn on live listen feature on the Control Center any time you want to use it. When you are done using the feature, keep in mind to turn it off to avoid distorting your music or podcast.

Want to know what else AirPods can do? Check out my
AirPods tips and tricks guide
and
AirPods Pro tips and tricks guide
questions?
Let us know in the comment section below. We also have plenty of other articles that I suggest you check right now.